Welcome to the Growery Message Board! You are experiencing a small sample of what the site has to offer. Please login or register to post messages and view our exclusive members-only content. You'll gain access to additional forums, file attachments, board customizations, encrypted private messages, and much more!
|
 Some of these posts are very old and might contain outdated information. You may wish to search for newer posts instead. Some of these posts are very old and might contain outdated information. You may wish to search for newer posts instead.
|
 Triptonic Triptonic


Registered: 06/13/08
Posts: 15,581
Loc: 
|
 Re: All CFL Semi-Auto Closet Project (FirstGrow)('Flower' Seed) Re: All CFL Semi-Auto Closet Project (FirstGrow)('Flower' Seed)  [Re: Inverted] 1 [Re: Inverted] 1
#376187 - 03/01/10 02:00 PM (15 years, 1 month ago) |
|
|
He should lift the container and feel how heavy it is, then lift it when its dry. Then he will know when to water.
|
Triptonic
Registered: 06/13/08
Posts: 15,581
Loc:
|
Re: All CFL Semi-Auto Closet Project (FirstGrow)('Flower' Seed) **Currently Flowering: 263 Watts** [Re: TrueHerbCrystal] 1
#410463 - 05/02/10 05:11 PM (14 years, 11 months ago) |
|
|
Jesus dude that sucks. Get yourself a lawyer. Why did they have right to search your car? Because it smelled like something?
Not to be a dick or anything but you did most of the things wrong in that situation. I know you were nervous though so its understandable.
|
Triptonic
Registered: 06/13/08
Posts: 15,581
Loc:
|
Re: All CFL Semi-Auto Closet Project (FirstGrow)('Flower' Seed) ** SEIZED & DESTORYED BY COPS ** [Re: DungenessDank] 1
#410484 - 05/02/10 05:31 PM (14 years, 11 months ago) |
|
|
Bumper stickers on the back of your car is not a good enough reason to search. Even if the sticker says "I smoke pot". If they had the right to search your car they would have just done it and not told you they were going to. Did your car smell like weed?
Just for future reference, never let them search your car. If you say "no" that doesnt give them the reasonable suspicion to let them search it.
Also, always step out of your car and lock the doors. If they ask you why you locked the doors just tell them its a habit.
Never leave your windows down either, especially if it smells like weed in your car.
And never leave things in plain sight.
If you follow all those rules you will most likely get away, and if you dont you will probably be able to get the case dropped.
Lying to the cops when your ass is in a bad situation is better than going to jail and having to pay up the ass in fines.
I dont know what state you live in, but the manufacturing of mushrooms in my state will land you quite a bit of time in jail since they are considered more harmful than weed.
Also depending on the state you are from the manufacturing of weed lands a pretty hefty sentance.
Dont worry yourself to death though, since there is nothing you can do about it now. The best thing you can do is get a good lawyer and hope that since it is your first offence they will let you off on probation.
You might have some felonys though dude, sorry to say it.
Court is fuckin scary as shit as well......but just be polite and have a good lawyer standing by you.
|
 Dephect Dephect


Registered: 06/25/08
Posts: 740
Last seen: 3 years, 10 months
|
Re: All CFL Semi-Auto Closet Project (FirstGrow)('Flower' Seed) ** SEIZED & DESTORYED BY COPS ** [Re: TrueHerbCrystal] 1
#412941 - 05/06/10 10:11 AM (14 years, 11 months ago) |
|
|
He means your Miranda rights and its what every cop says to you when you get arrested. From what you said he said. I don't think how fast he said it matters.
I always thought Oregon was pro MMJ too. I know two growers from up there and another one who has dissipated from society. Still hope everything goes well. Cops can be fucking ass holes. I am glad to say I have never had a drug related charge ever! You just have to think every single situation out.
Oh yeah and Amsterdam bro? Not to sink your boat but a 1 bedroom apartment over there costs 300k+. Also its really really really hard to immigrate there. Also its not the drug utopia you might think it to be.
"The Dutch have divided drugs into two groups, depending on their influence on human health – soft drugs and hard drugs. Hard drugs as cocaine, LSD, morphine, heroin are forbidden in the Netherlands as in any other country.
Soft drugs as cannabis in all its forms (marijuana, hashish, hash oil) and hallucinogenic mushrooms (so called magic mushrooms or paddos – from Dutch: paddestoel - mushroom) are legal under condition of so called “personal use”. As a result smoking of cannabis even in public, is not prosecuted as well as selling it although technically illegal under still valid Opium Act (dating from 1919, cannabis added as drug in 1950), is widely tolerated provided that it happens in a limited, controlled way (in a coffee shop, small portions, 5 grams maximum transaction, not many portions on stock, sale only to adults, no minors on the premises, no advertisement of drugs, the local municipality did not give the order to close the coffee shop).
(Sounds like dispensaries here for the most part, except I can buy QPs.)
Situation changed recently in regard to the hallucinogenic mushrooms (also known as magic mushrooms or paddos), the sale of which has been forbidden starting November 1, 2008. Almost 200 different mushrooms were forbidden and are presently regarded by the Dutch drug law (so called Opiumwet – Opium Act) as dangerous as cocaine or heroine. Never really considered as drugs before, the paddos were previously sold by the so called smart shops along with popular natural medicines as Ginkgo Biloba, Guarana, Cola, some herbs, food additives and vitamins. The decision to stop their sale has been taken after almost a hundred cases were recorded each year, when the medical help has been required linked to the consumption of paddos in Amsterdam only, involving mainly foreign tourists. Tragically, three of these cases ended as serious accidents, one of them in the tragic death of the 17-year old French girl. Hundreds of people demonstrated in Amsterdam against the ban, before it had been introduced. The municipality of Amsterdam, fearing the under counter sales, was against the ban proposing instead three days of waiting period before every purchase. This proposal has not been accepted. Today the hallucinogenic mushrooms are forbidden in the Netherlands, along with the hard drugs."
As you can see its not the acclaimed drug utopia you think it to be and would suggest researching the laws there, before assuming them.
Hope this didn't bring you down, just wanted to show you the truth.
|
Triptonic
Registered: 06/13/08
Posts: 15,581
Loc:
|
Re: All CFL Semi-Auto Closet Project (FirstGrow)('Flower' Seed) ** SEIZED & DESTORYED BY COPS ** [Re: TrueHerbCrystal] 1
#415727 - 05/11/10 02:28 AM (14 years, 10 months ago) |
|
|
Yeah I totally understand being nervous about everything and just not doing anything. I might have done the same thing. But dont you think that they wouldnt have asked if they could just go ahead and do it?
|
Inverted
CNC Machinist/Greenthumb


Registered: 06/01/08
Posts: 9,953
Loc: North Star
|
Re: All CFL Semi-Auto Closet Project (FirstGrow)('Flower' Seed) **Currently Flowering: 263 Watts** [Re: TrueHerbCrystal] 1
#418650 - 05/15/10 10:11 PM (14 years, 10 months ago) |
|
|
Nah I got pulled over, two separate times. One time I was driving and the other I was a passenger. I admitted to what was mine and they just kept my favorite pipe and took the bud.
I've even had a cop write me a fake ticket that I tried to go pay for mj posession and they were like there is no record of that citation number.
I was like FUCK ME the damn cop just took my shit.
--------------------
Don't criticize what you can't understand
|
lostinbq
!!!STARNGE!!!!

Registered: 04/25/10
Posts: 581
Last seen: 4 years, 7 months
|
Re: All CFL Semi-Auto Closet Project (FirstGrow)('Flower' Seed) **Currently Flowering: 263 Watts** [Re: TrueHerbCrystal] 1
#422563 - 05/23/10 01:33 PM (14 years, 10 months ago) |
|
|
u had just 1 plant right.... over 5 plants here is a felony so id imagine its the same in ur state.. i was busted with a quarter 2 times on school grounds when zero tolerance first started and i waited like 8 weeks before i got in to see the judge.. so i would also guess of the place ur in i was in baltimore city at the time so i guess thay had a lot on there plate.. still good hopes to ya
--------------------
Everyone are you ready for doom,
Because I've blackened the sun,
And I've bloodied the moon.
I bring gloom when I step in the room,
With the fumes of a tomb.
flowers bloom when Im taken away

|
FRACTALife
Rust Fuckin' Cohle


Registered: 03/19/10
Posts: 6,838
Loc: Carcosa
Last seen: 8 years, 1 month
|
|
So happy for you THC!
Glad to have you back on here, I was worried about you.

--------------------

|
Dephect
Registered: 06/25/08
Posts: 740
Last seen: 3 years, 10 months
|
Re: Here's what happened... [Re: DieselB] 1
#535884 - 03/11/11 11:41 AM (14 years, 1 month ago) |
|
|
Im glad you got out pretty free. Sometimes the piggies don't know how to treat their drugs and evidence either. Keep in mind. Psilopsybin and LSD are very unstable in the wrong conditions. Oxidization, UV exposure, and heat make them degrade. Or they could have just been being nice. Either way your lucky.
|
TrueHerbCrystal
Uncertified Oregrowian

Registered: 02/07/09
Posts: 1,352
Loc: Emerald City
Last seen: 6 years, 6 months
|
 All CFL Semi-Auto Closet Project (FirstGrow)('Flower' Seed) **SEIZED & DESTROYED BY COPS** All CFL Semi-Auto Closet Project (FirstGrow)('Flower' Seed) **SEIZED & DESTROYED BY COPS**
#350457 - 01/19/10 09:27 PM (15 years, 2 months ago) |
|
|
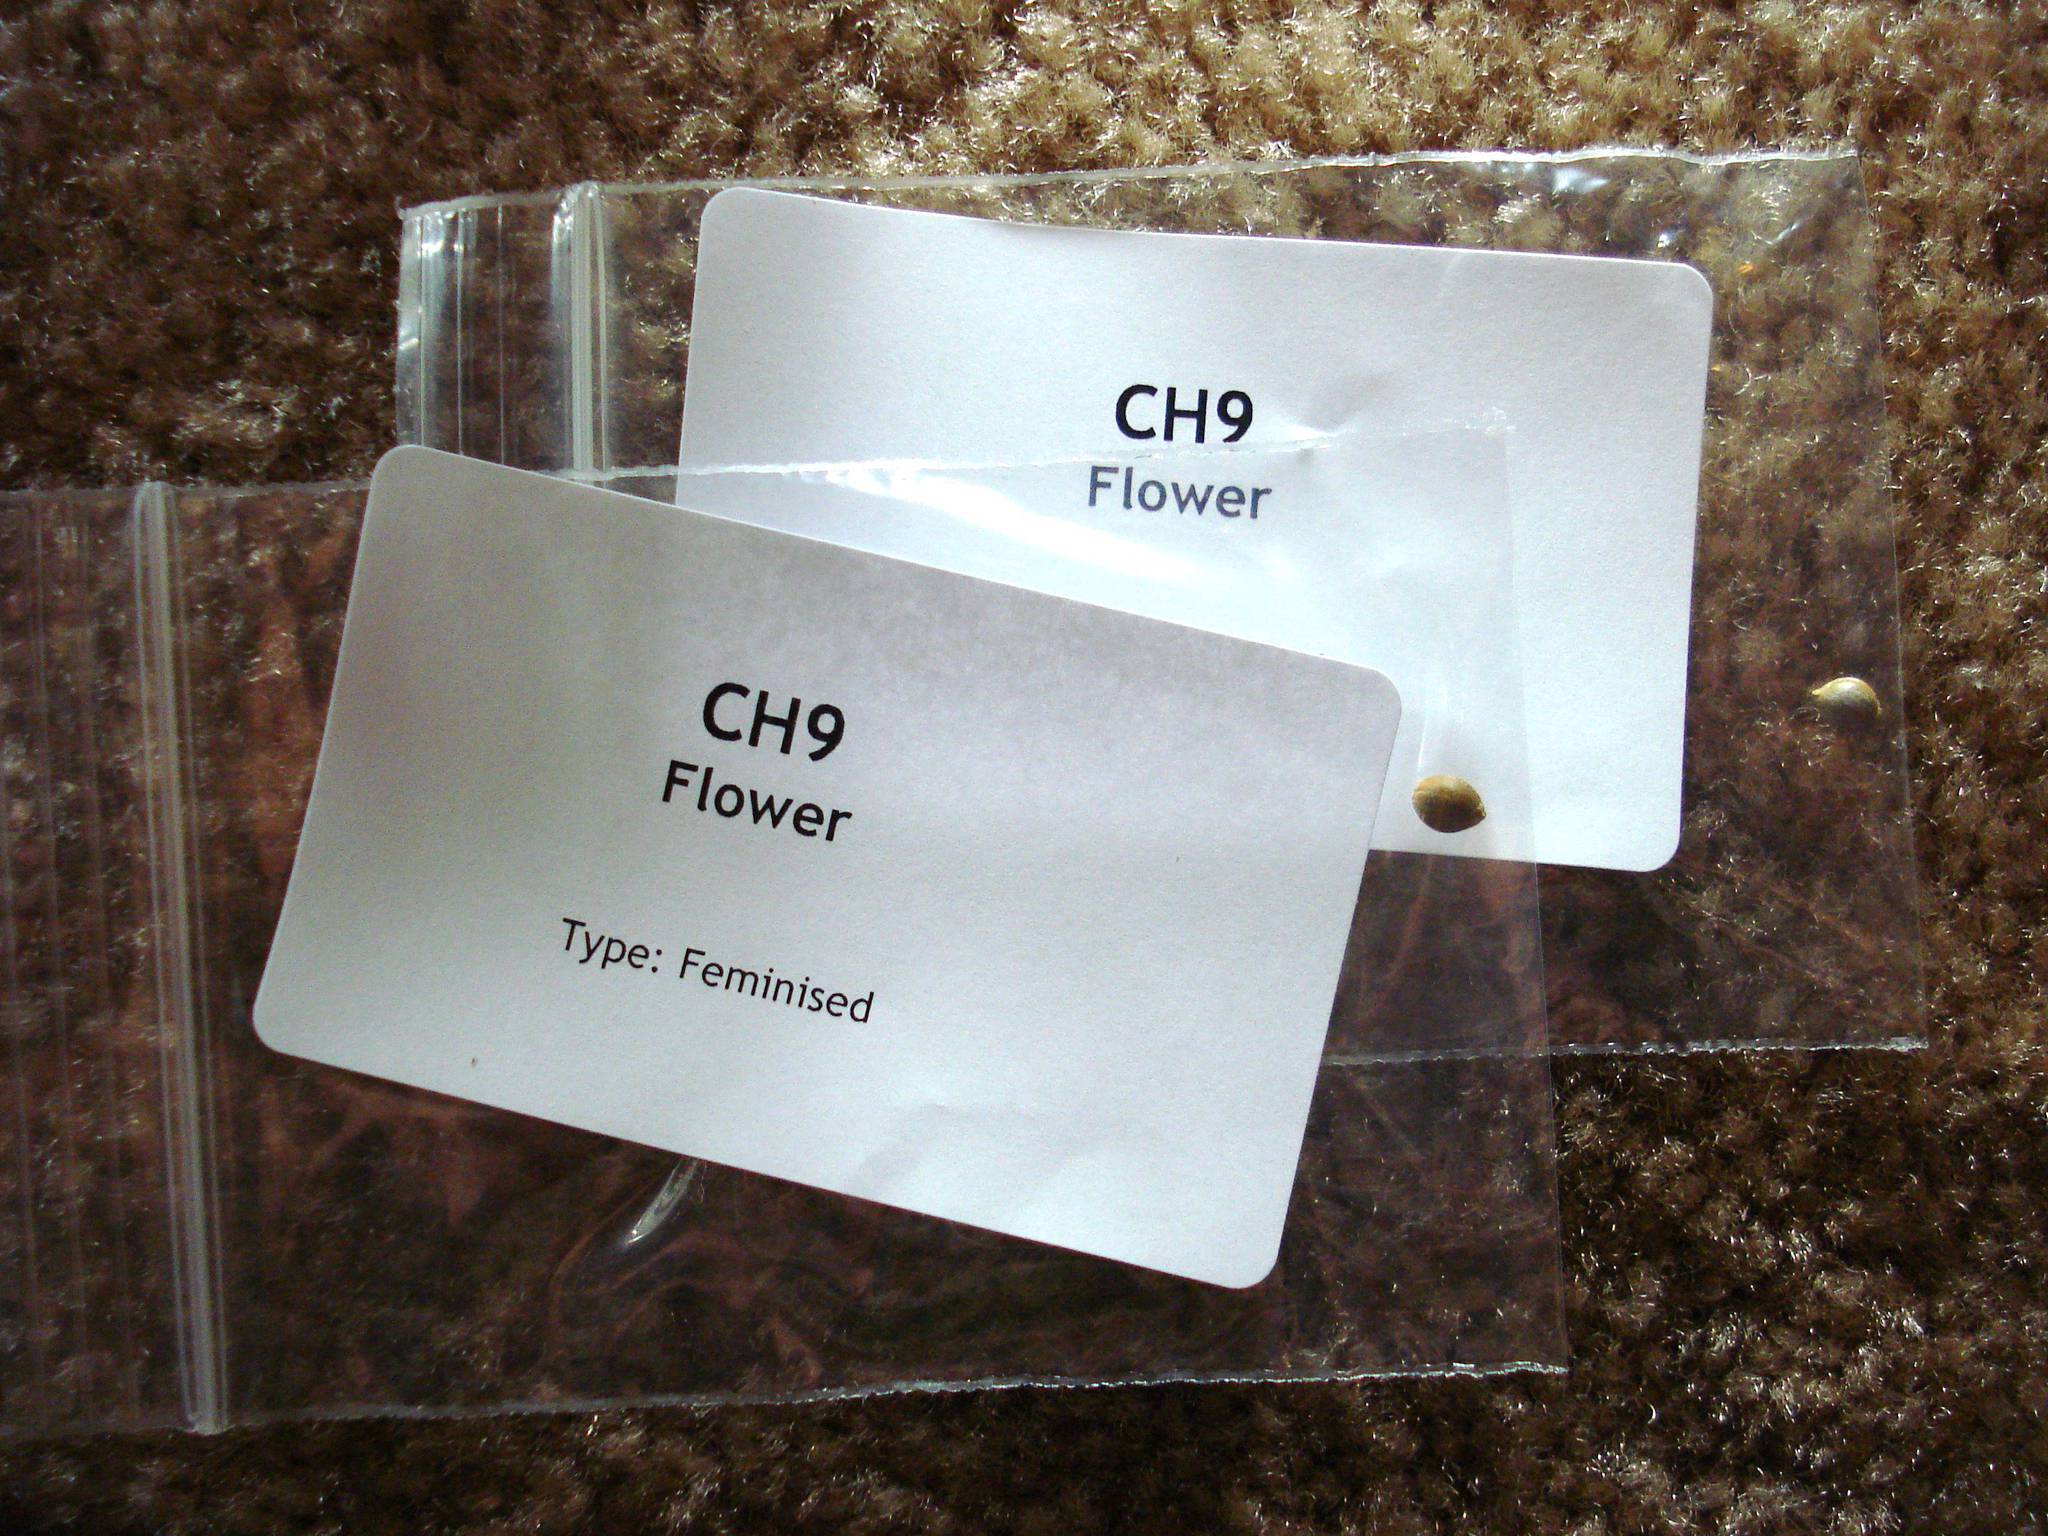
ALL CFL Semi-Auto Closet Project (FirstGrow) ("Flower" strain seed)
**ENDED ABRUPTLY: SEIZED & DESTROYED BY COPS **
Critical Update
Date: May 2, 2010
Early this morning, my living plant, only 2 weeks from finishing flowering was seized and destroyed by a group of cops. It was not at random, but a series of events that lead to this horrible outcome for this grow journal. Basically, bad decisions, incriminating stickers and being in the wrong place, at the wrong time.
Here's the whole story on how and why it was Seized by the Cops. Please read so you don't make the same mistakes on your grow, or in your life.
-------------------------------------------------------------
Original Journal
Well, since everyone else makes a collection of their entire grow on the first page, I'm doing the same. Besides, like my bedsheets, my OP is really messy!
Lets start from the beginning:
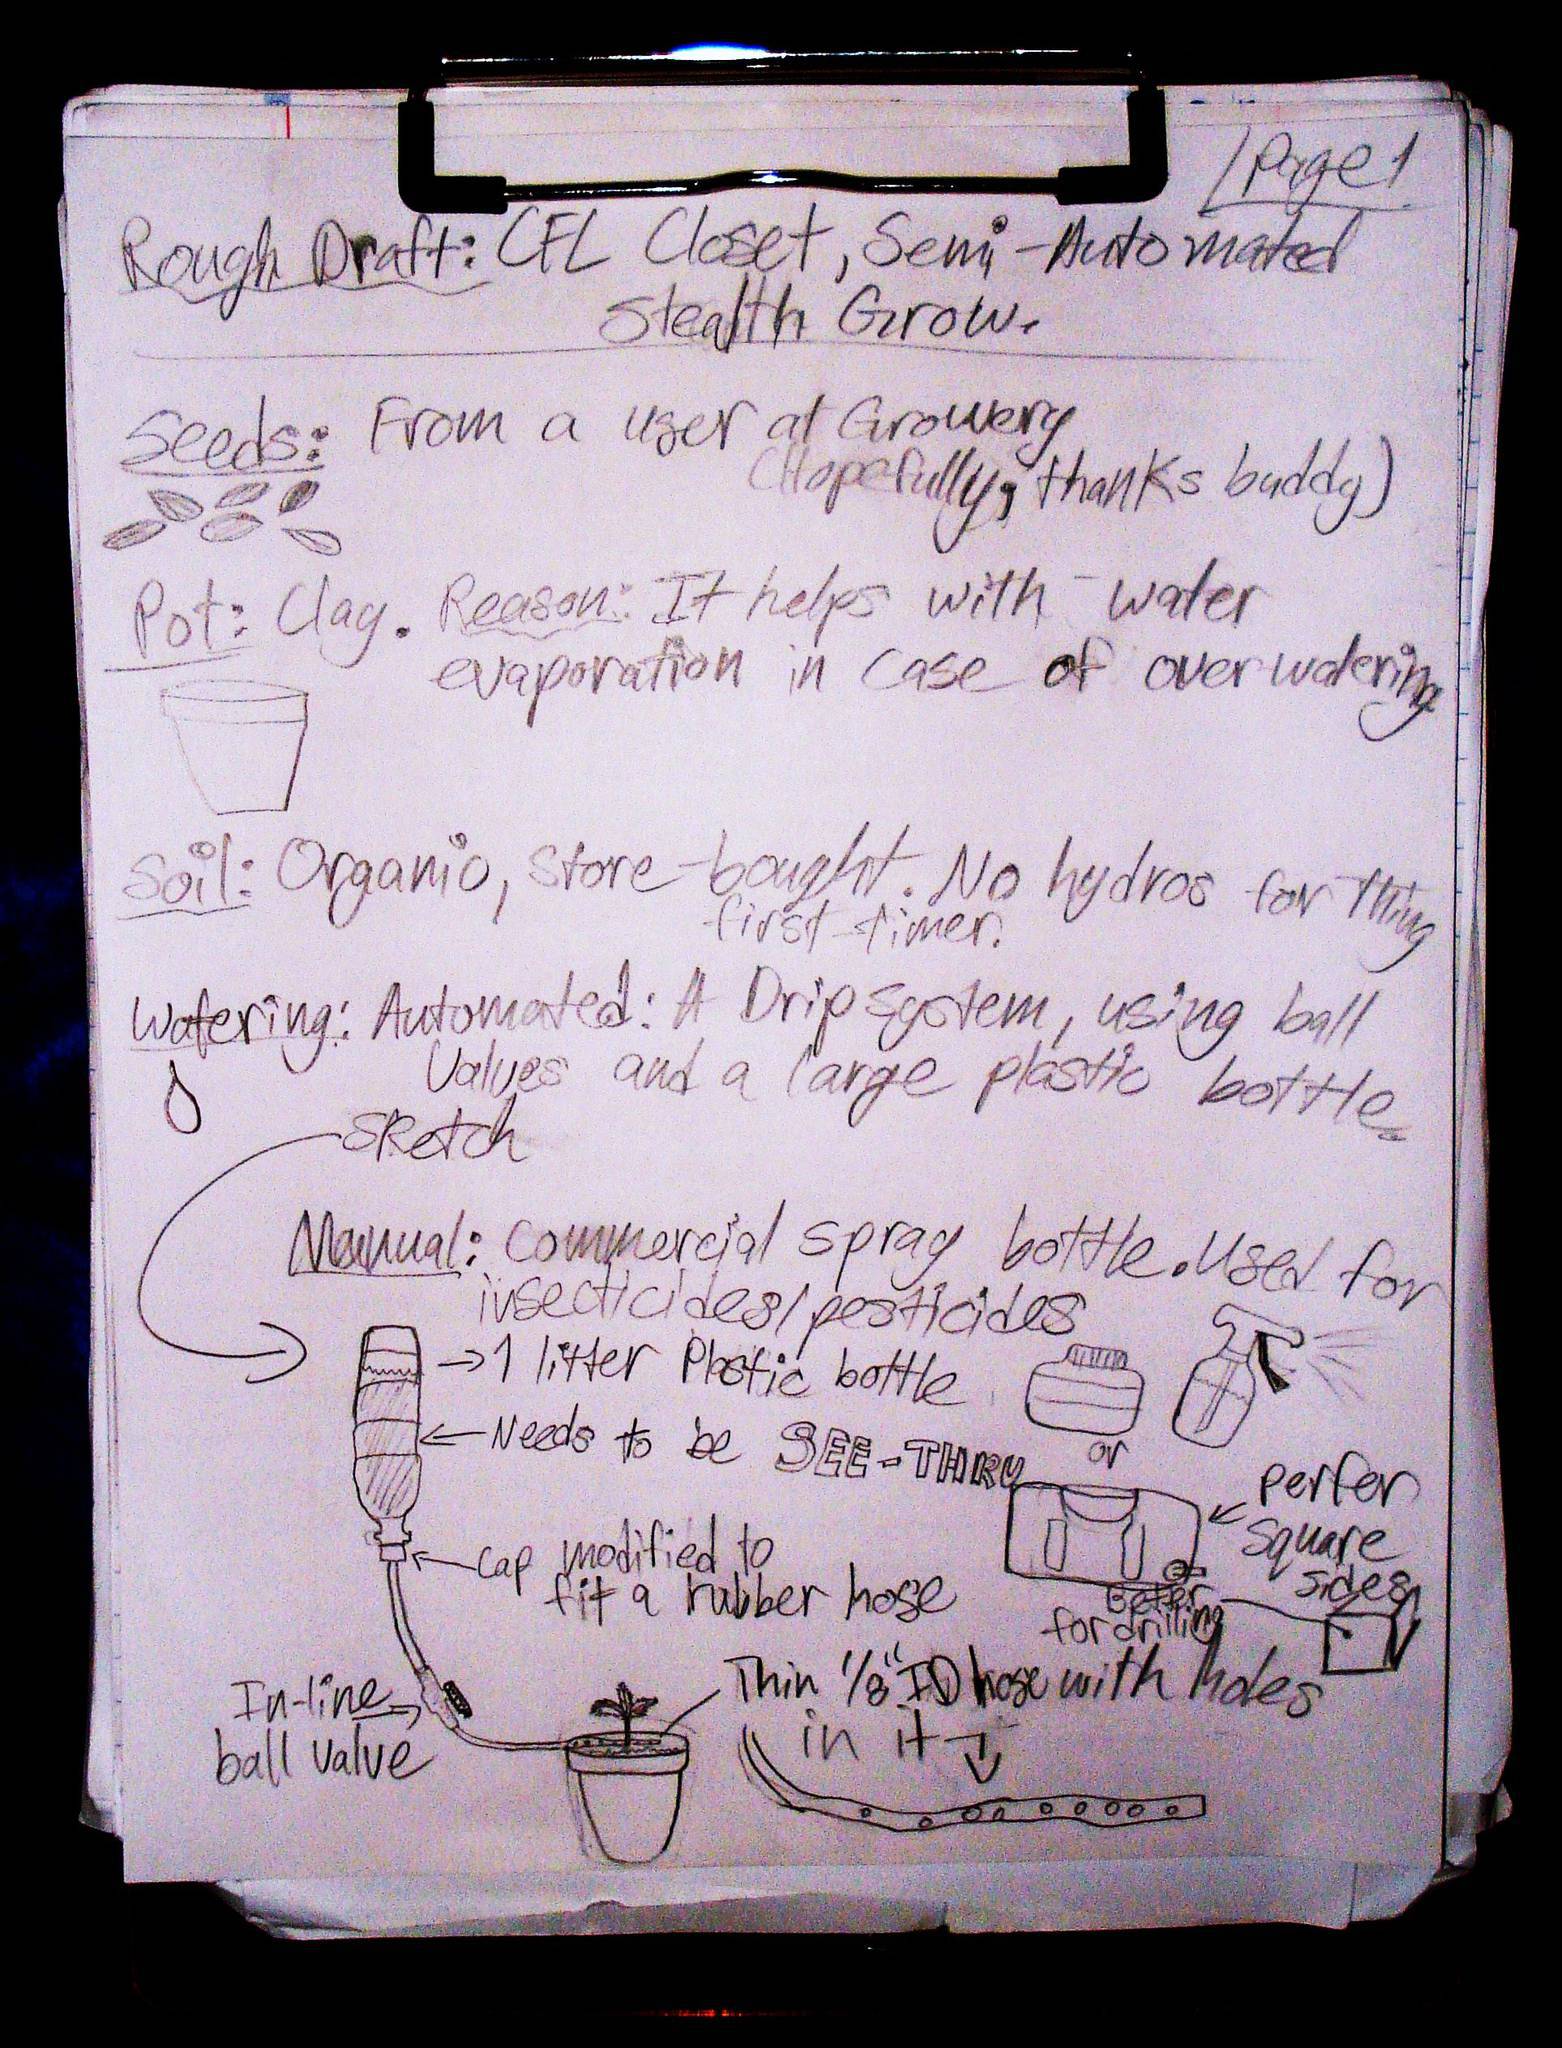
The Seeds:
Here are the feminized " Flower " seeds by CH8 breeding company and the strains stats (provided by the website I bought them from).
 
~ My Babies Lifestory ~
First Lighting Set-Up

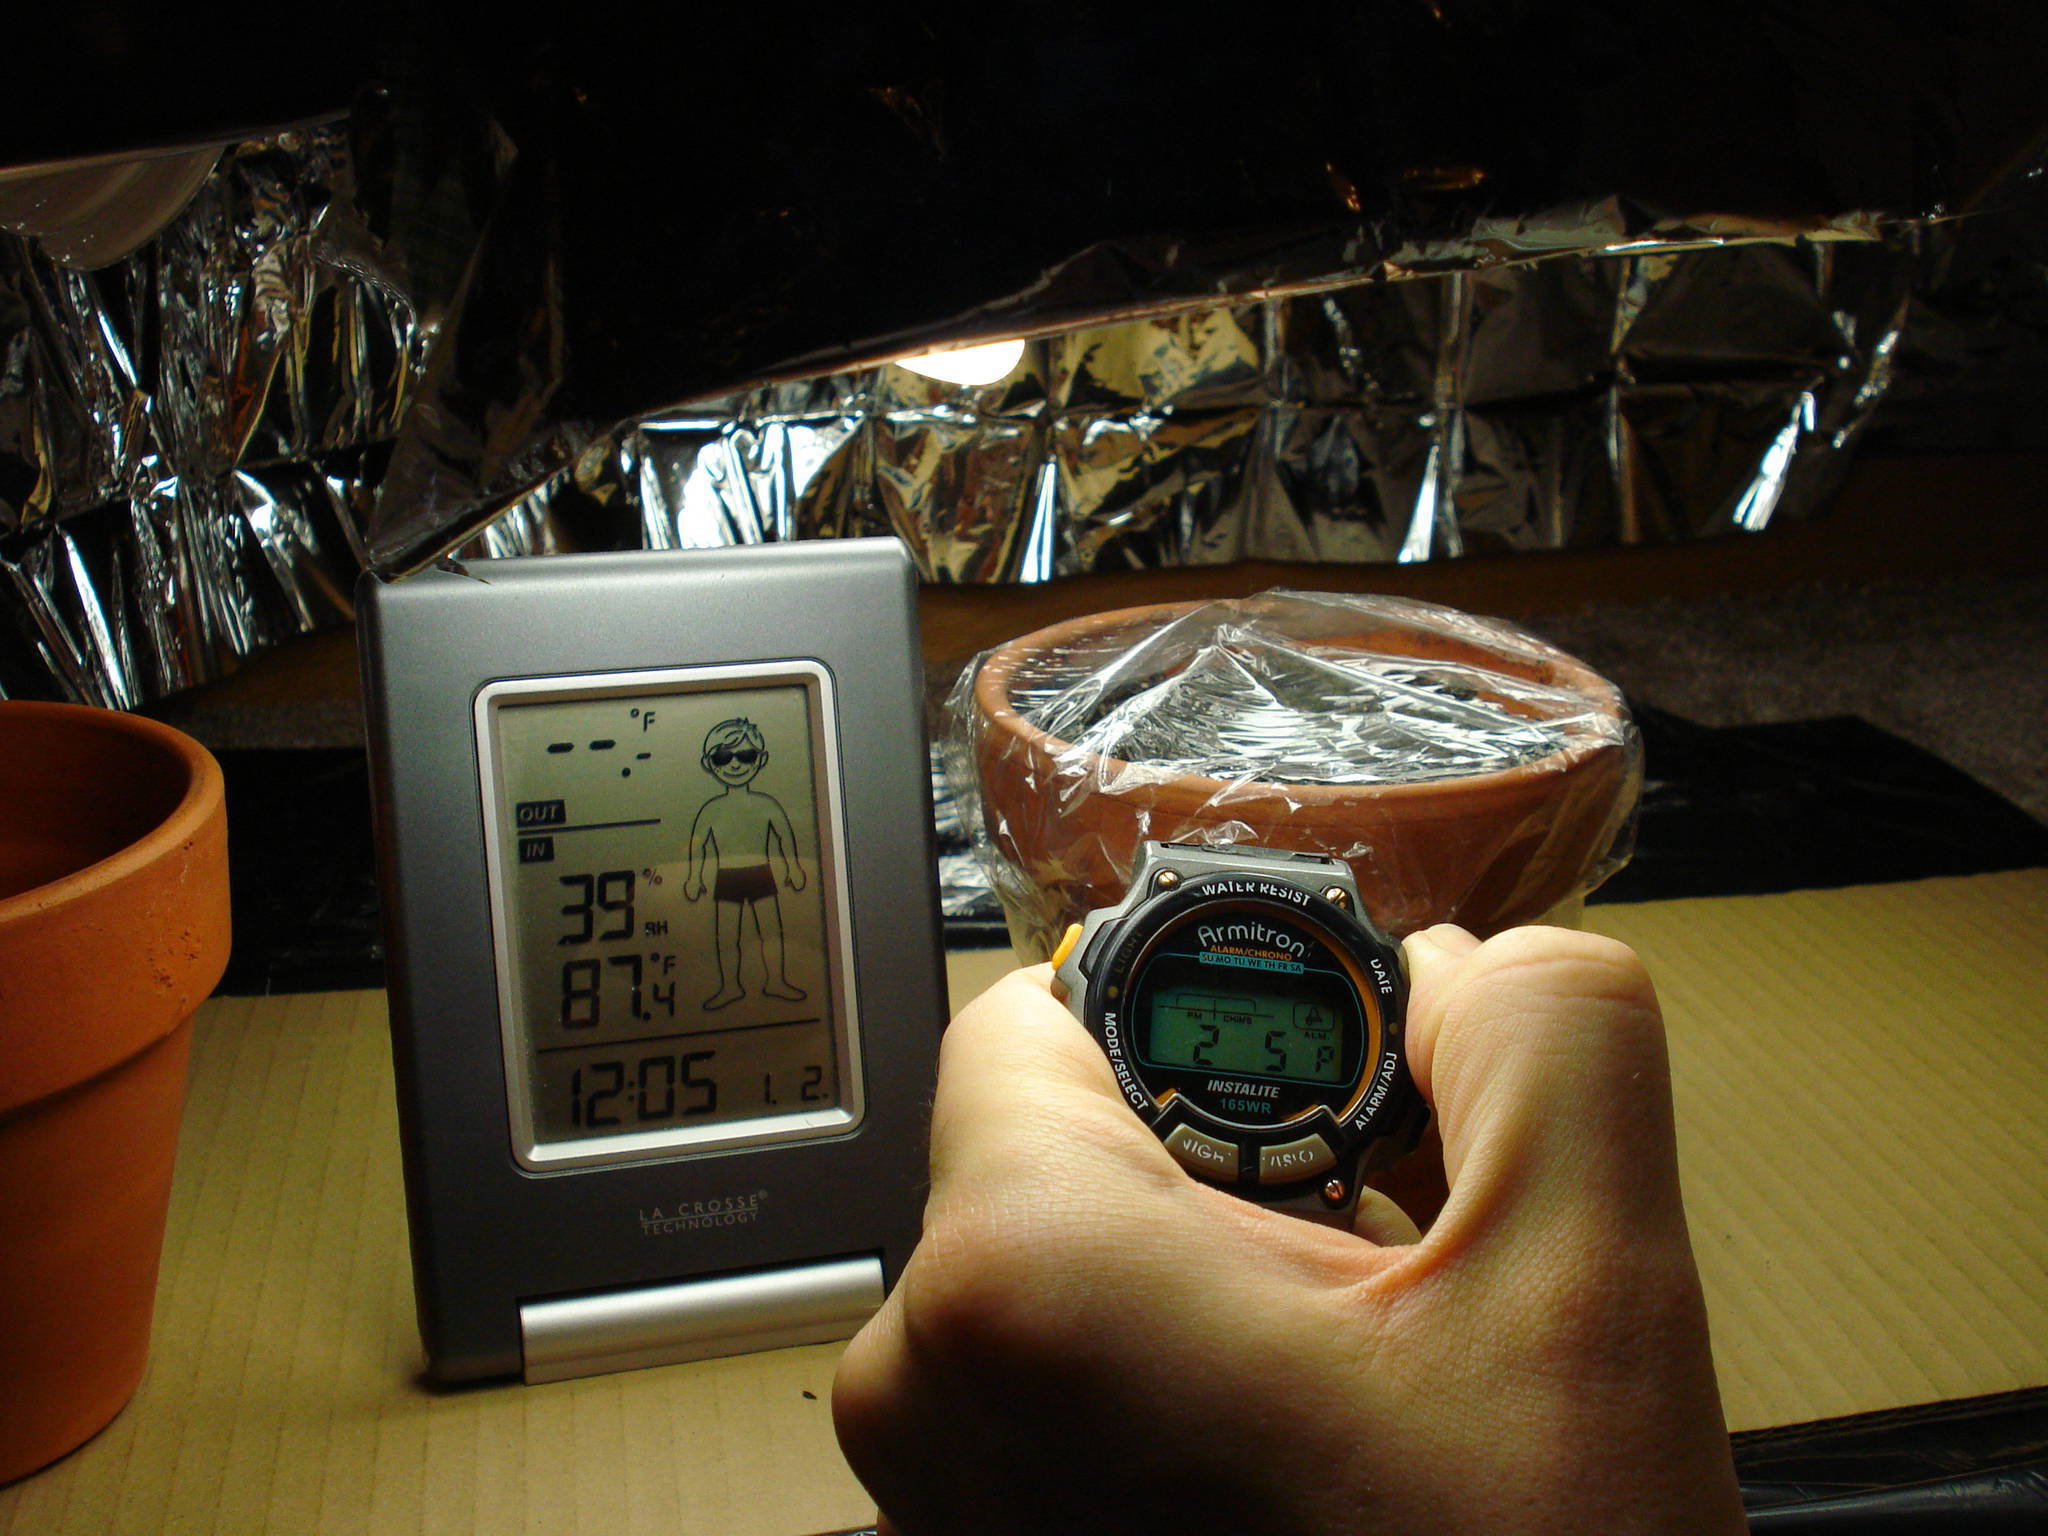
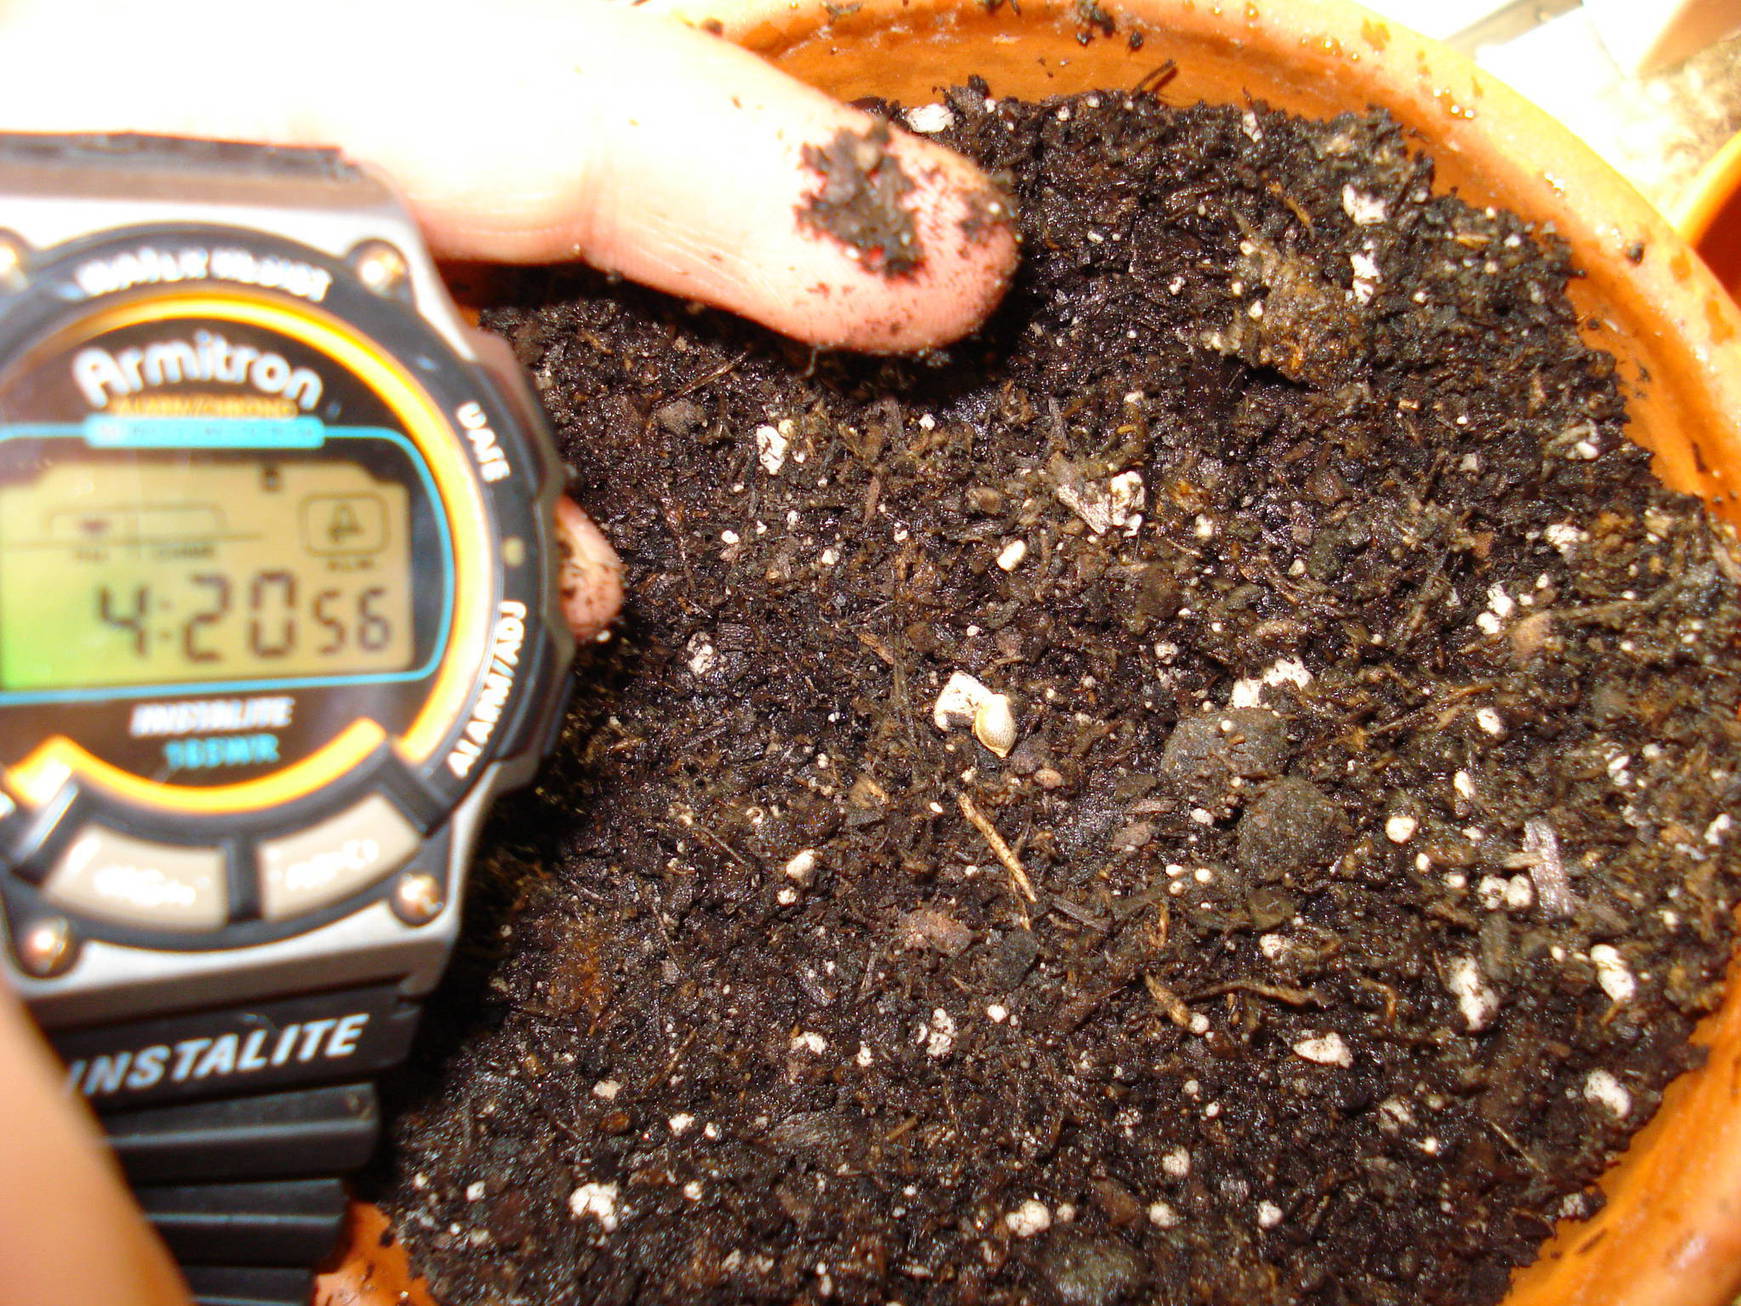
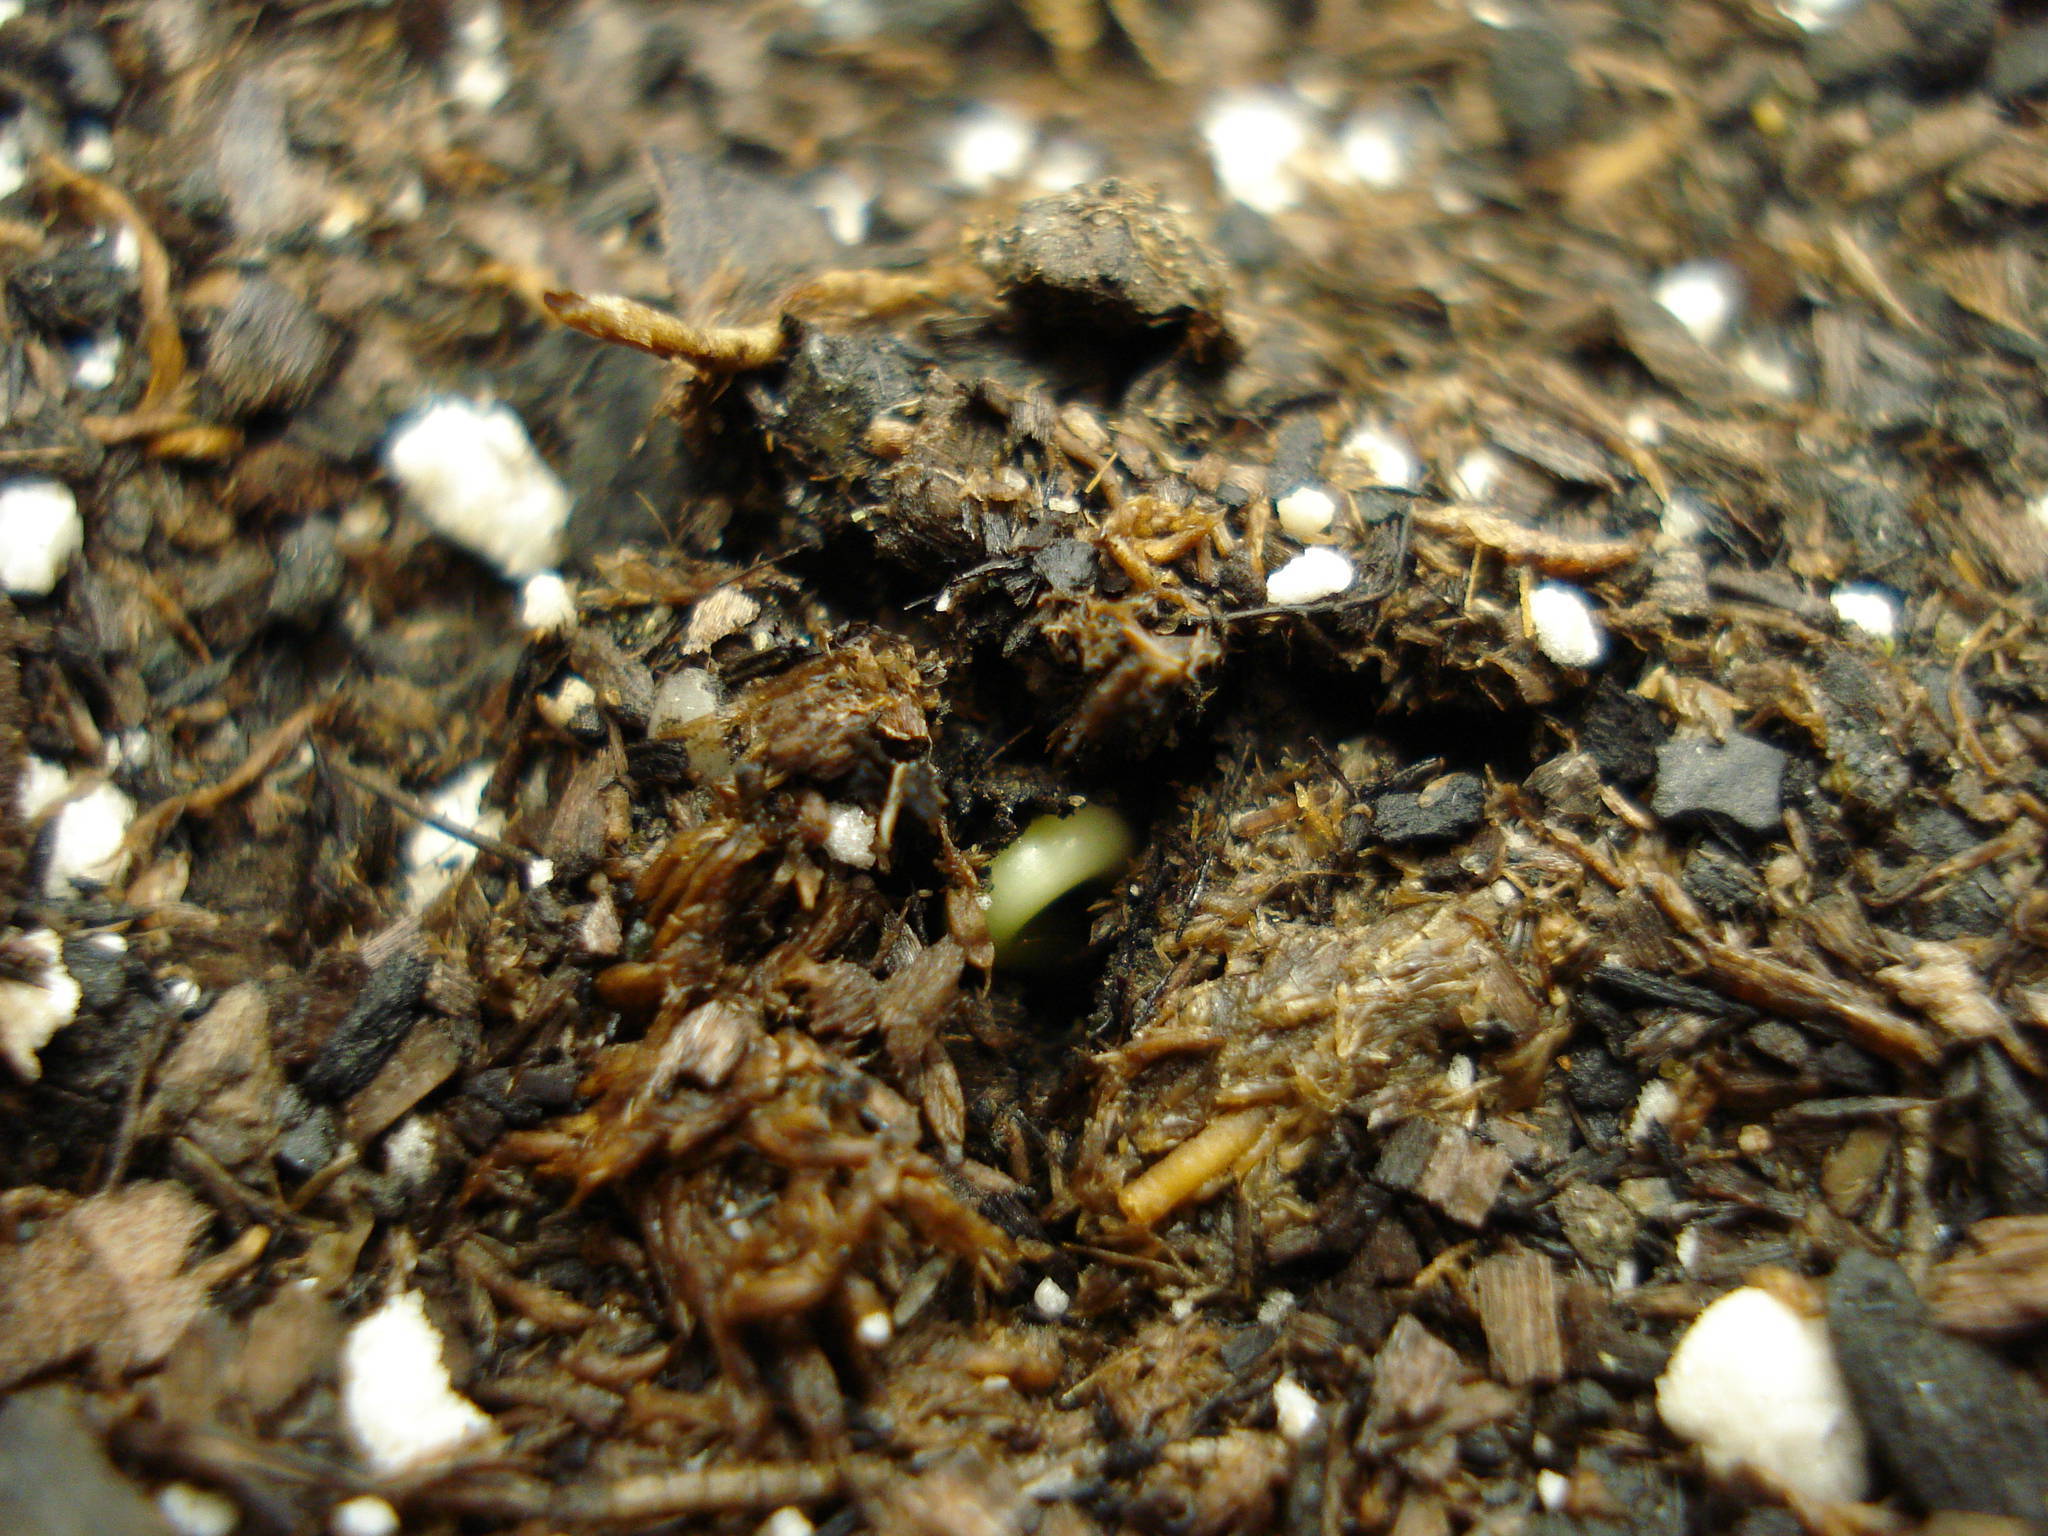
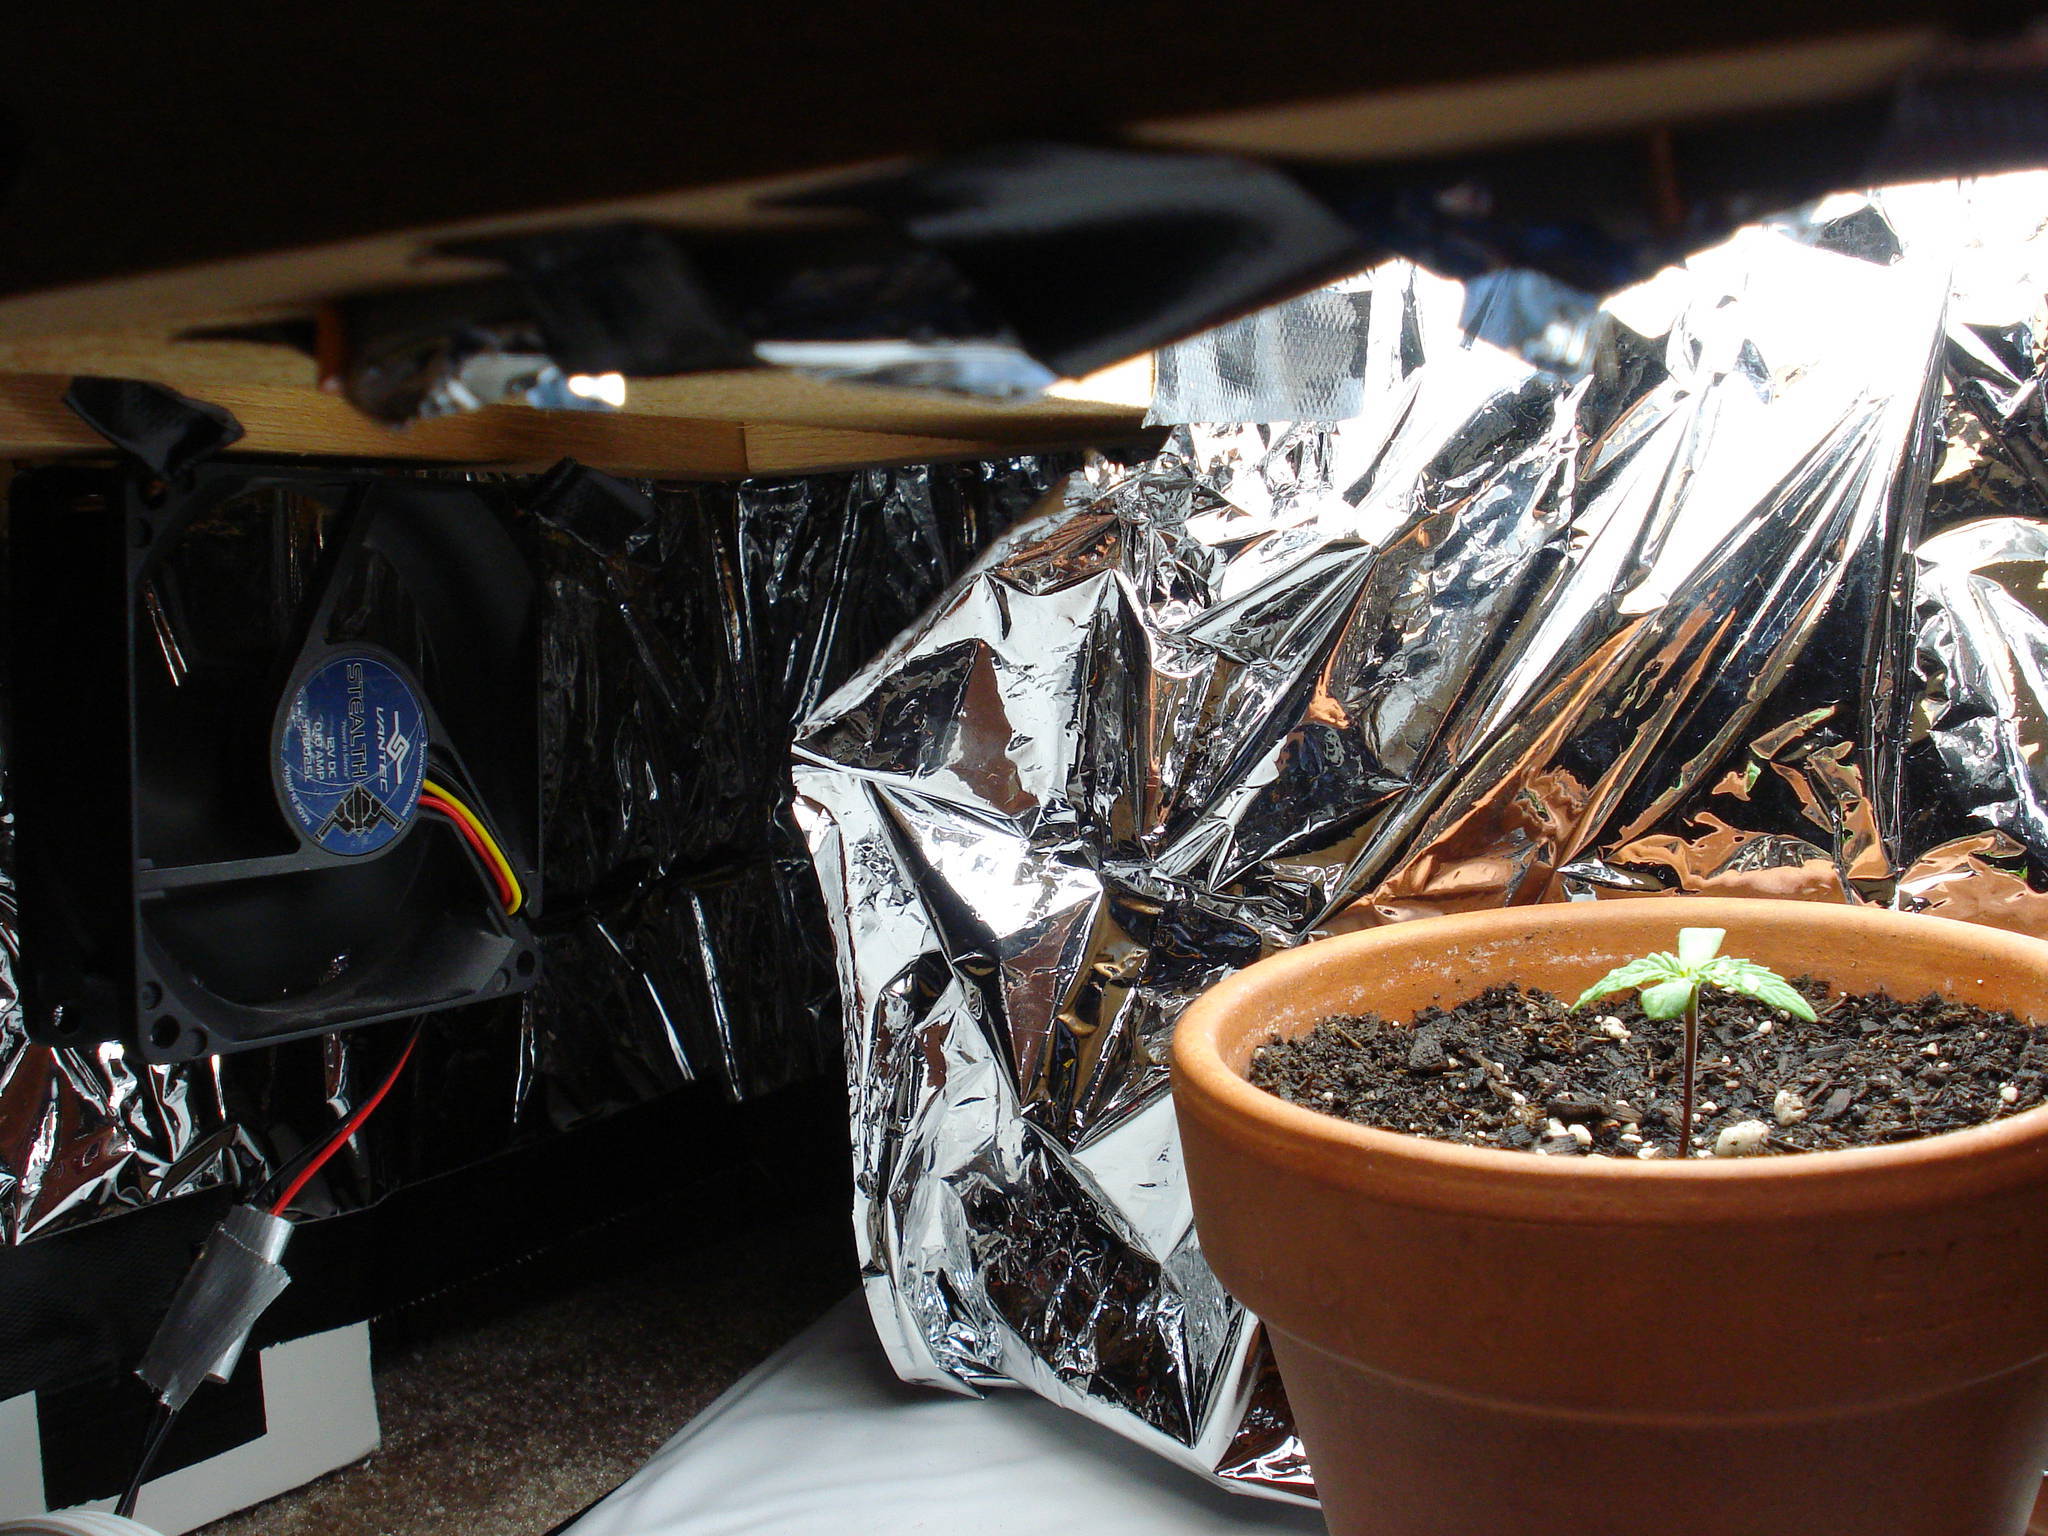
Day 0: Feb. 5, 2010 (seed dropped-into-soil date)
  
Notes: Last photo: It was important to me that the seed be planted at exactly 4:20pm, in honor of my goal of harvesting on April 20, 2010.
It was a bad choice to use clay pots from the start. They have bad drainage, and they evaporate water too fast thru their clay material.
Next time, I will use plastic with bottoms that have plenty holes in them.
Day 3 (I think): Feb. 8, 2010

Day 4: Feb. 9, 2010
 
Day 5: Feb. 10, 2010

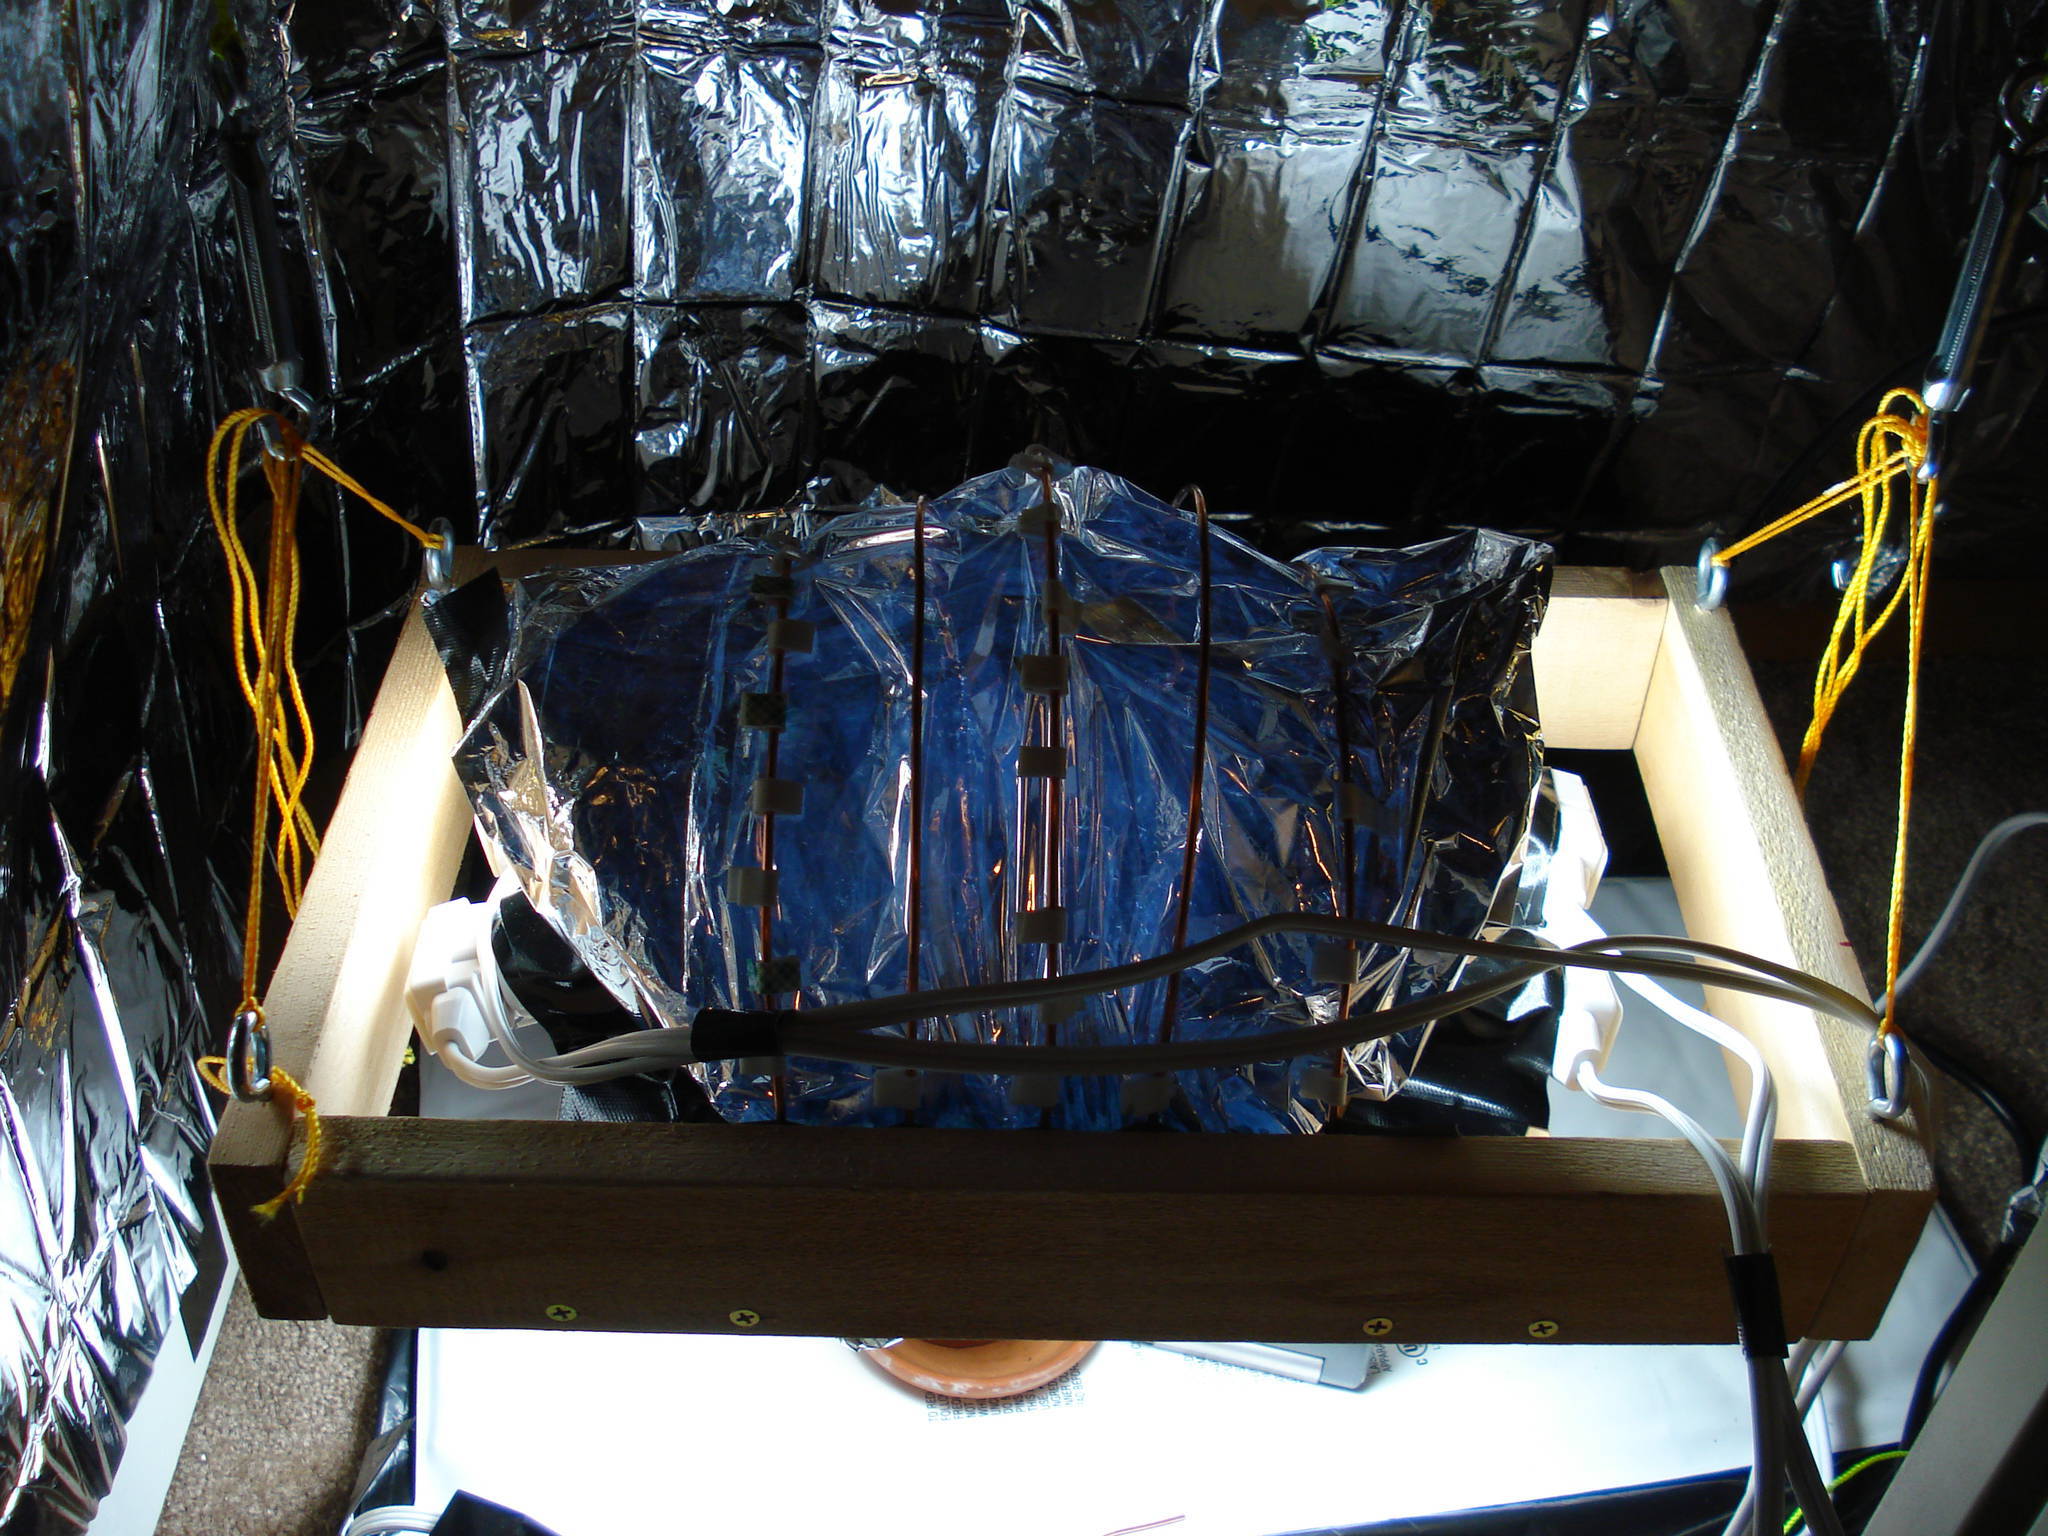
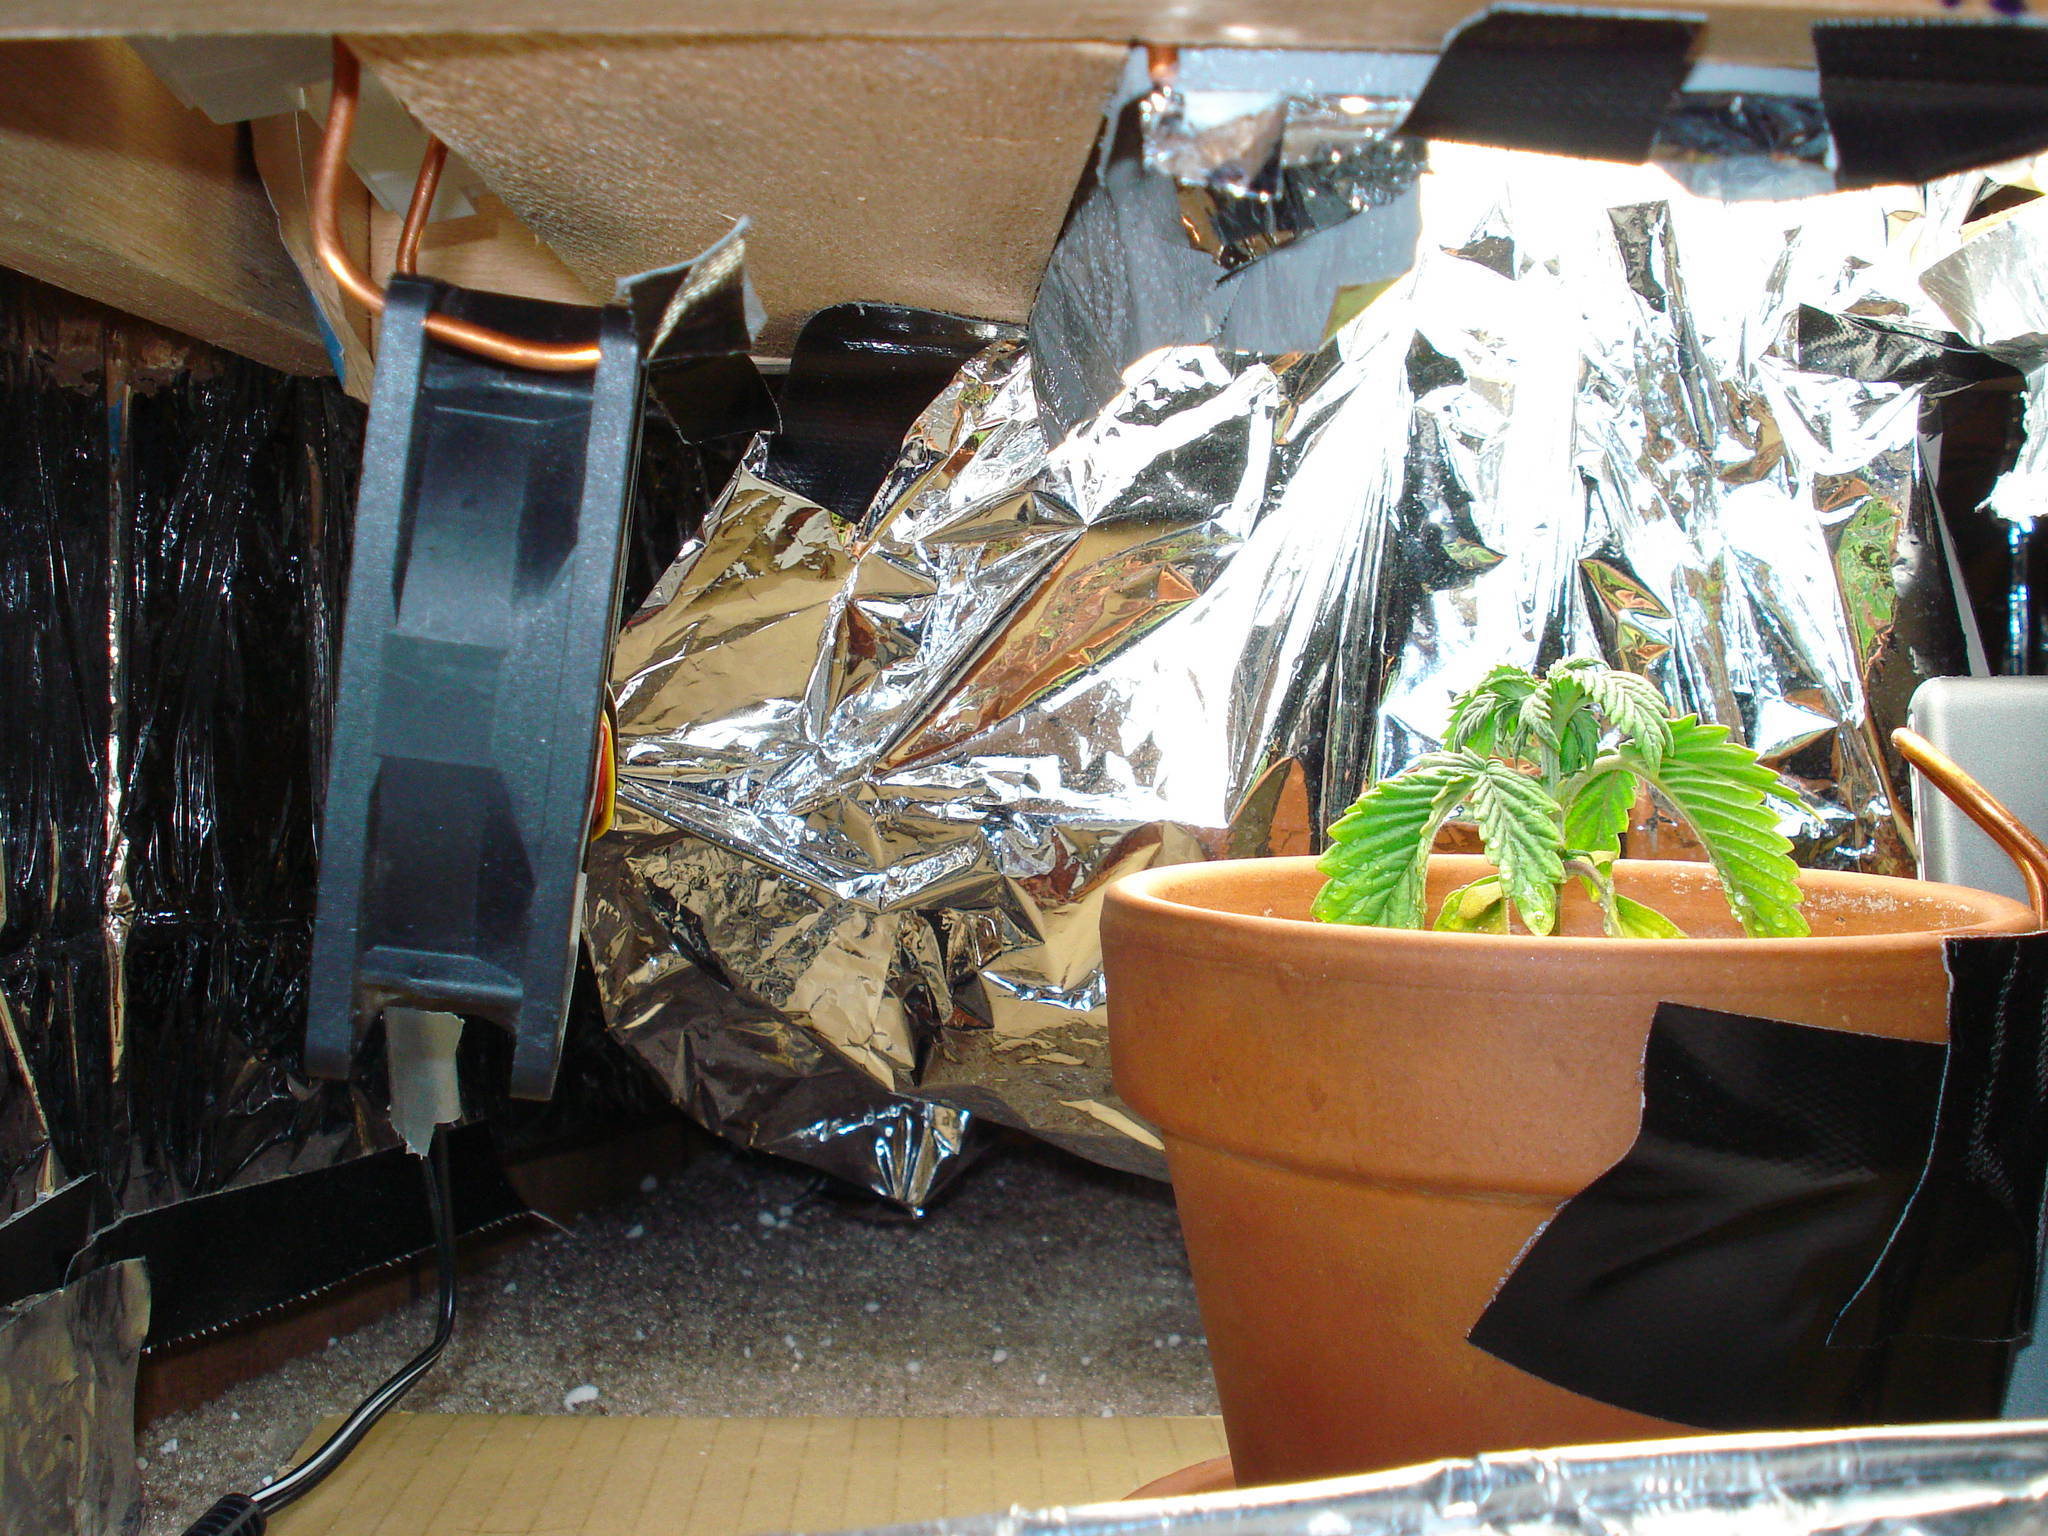
New, and Current Lighting System: Created Day 10 (Feb. 14)

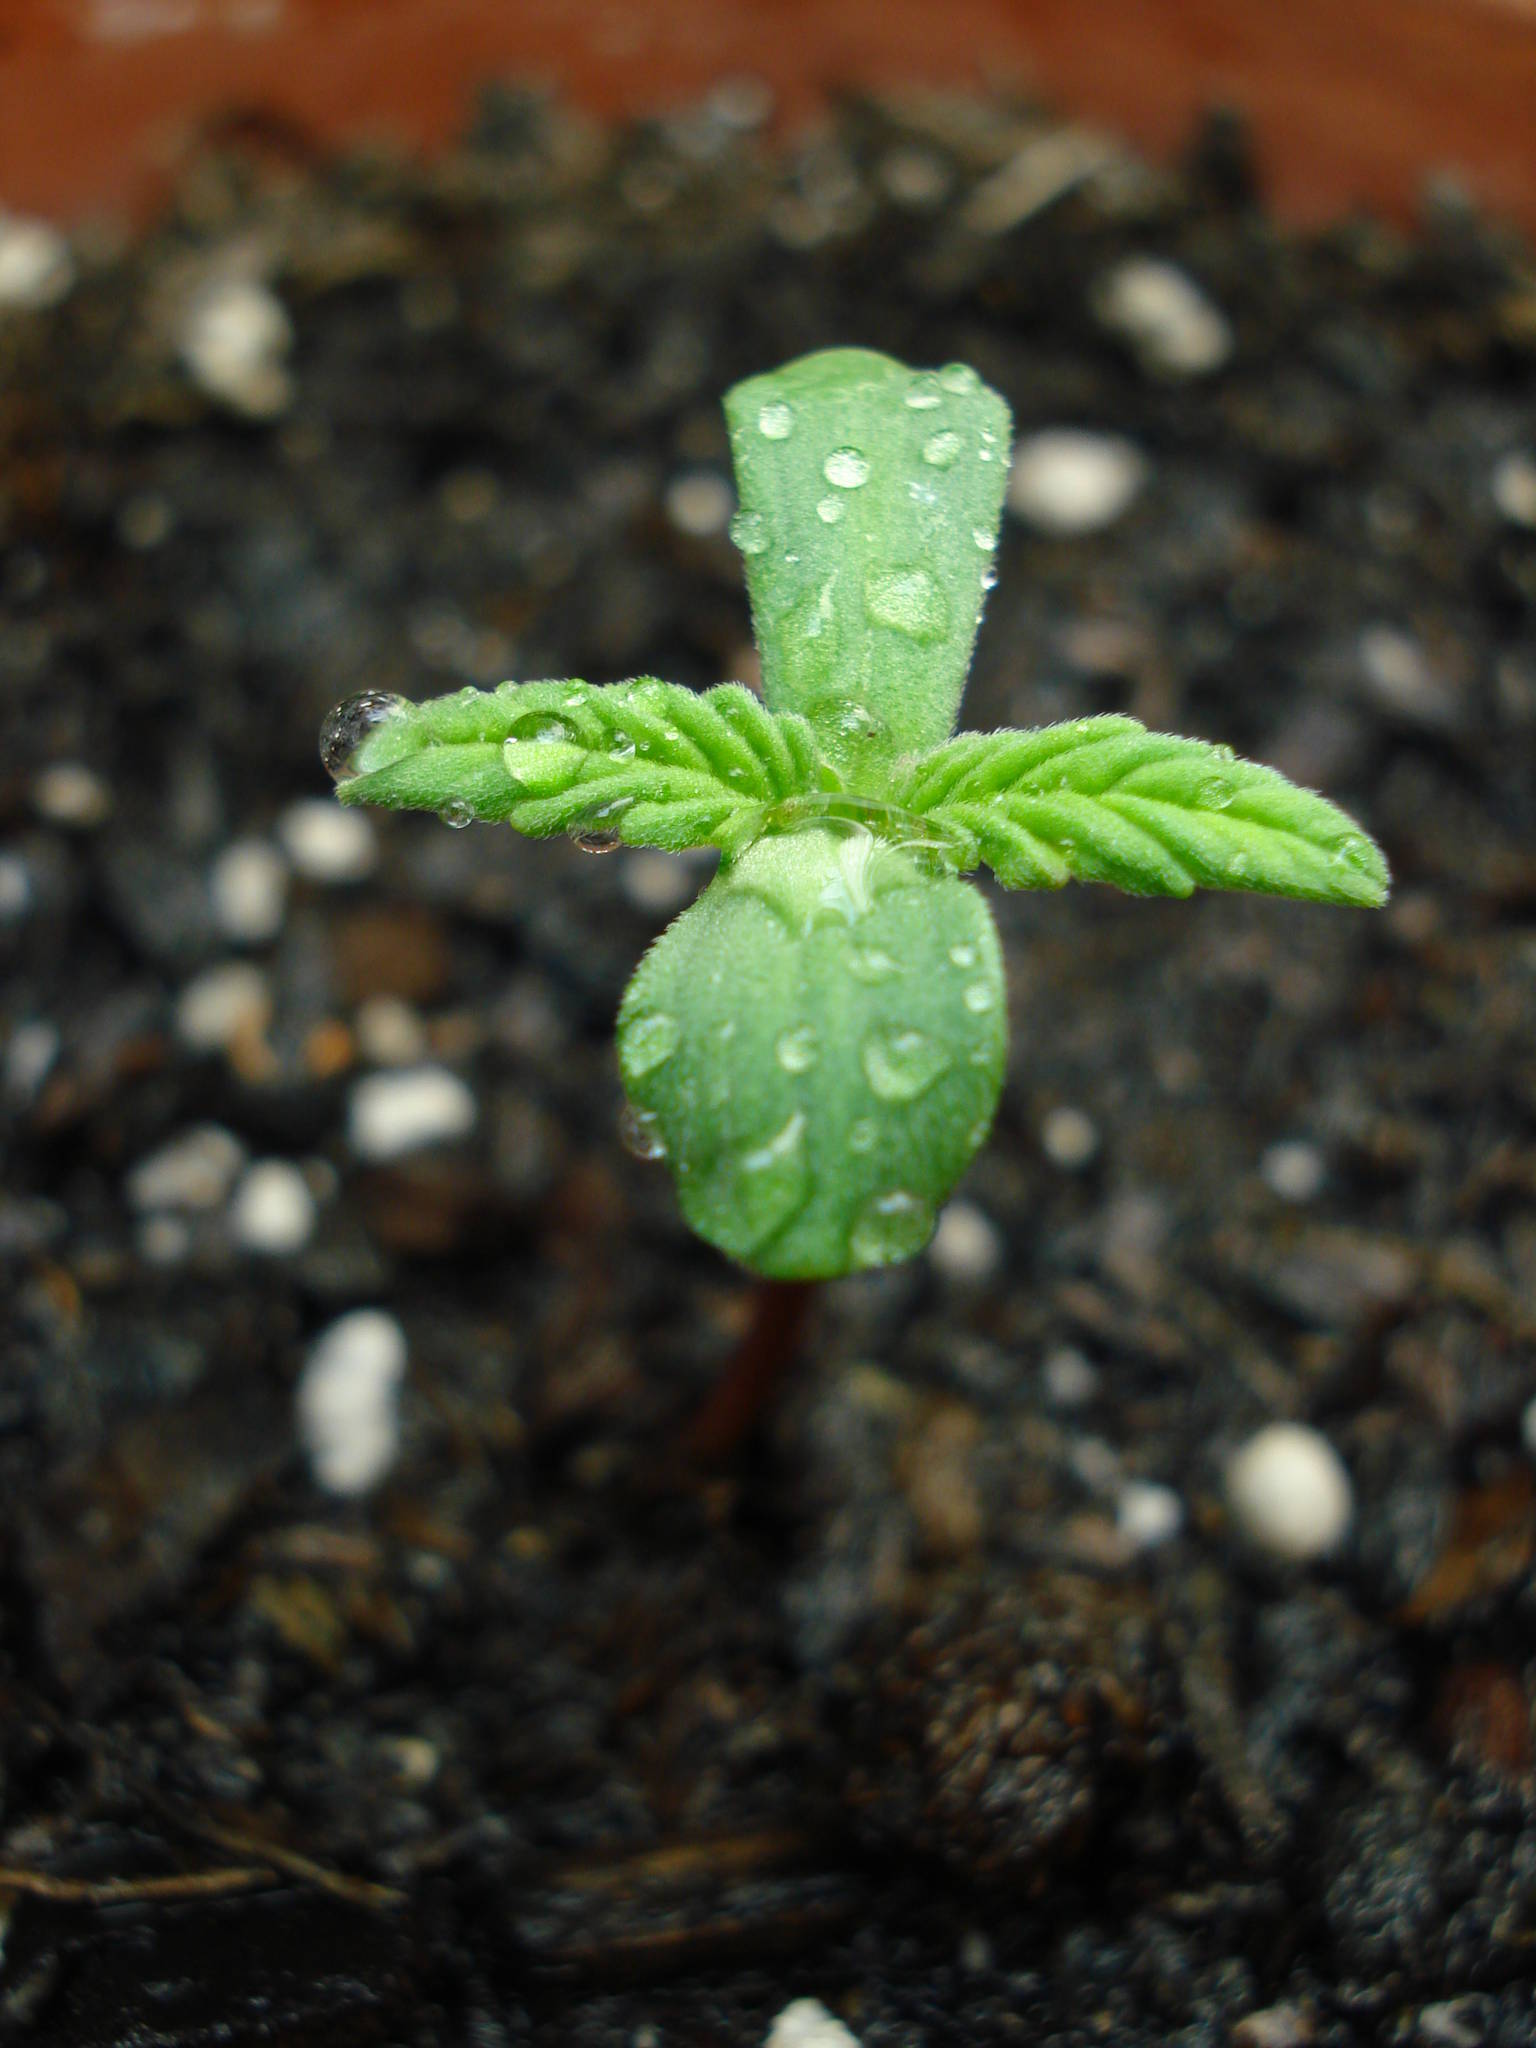
Day 10: Feb. 15, 2010
   
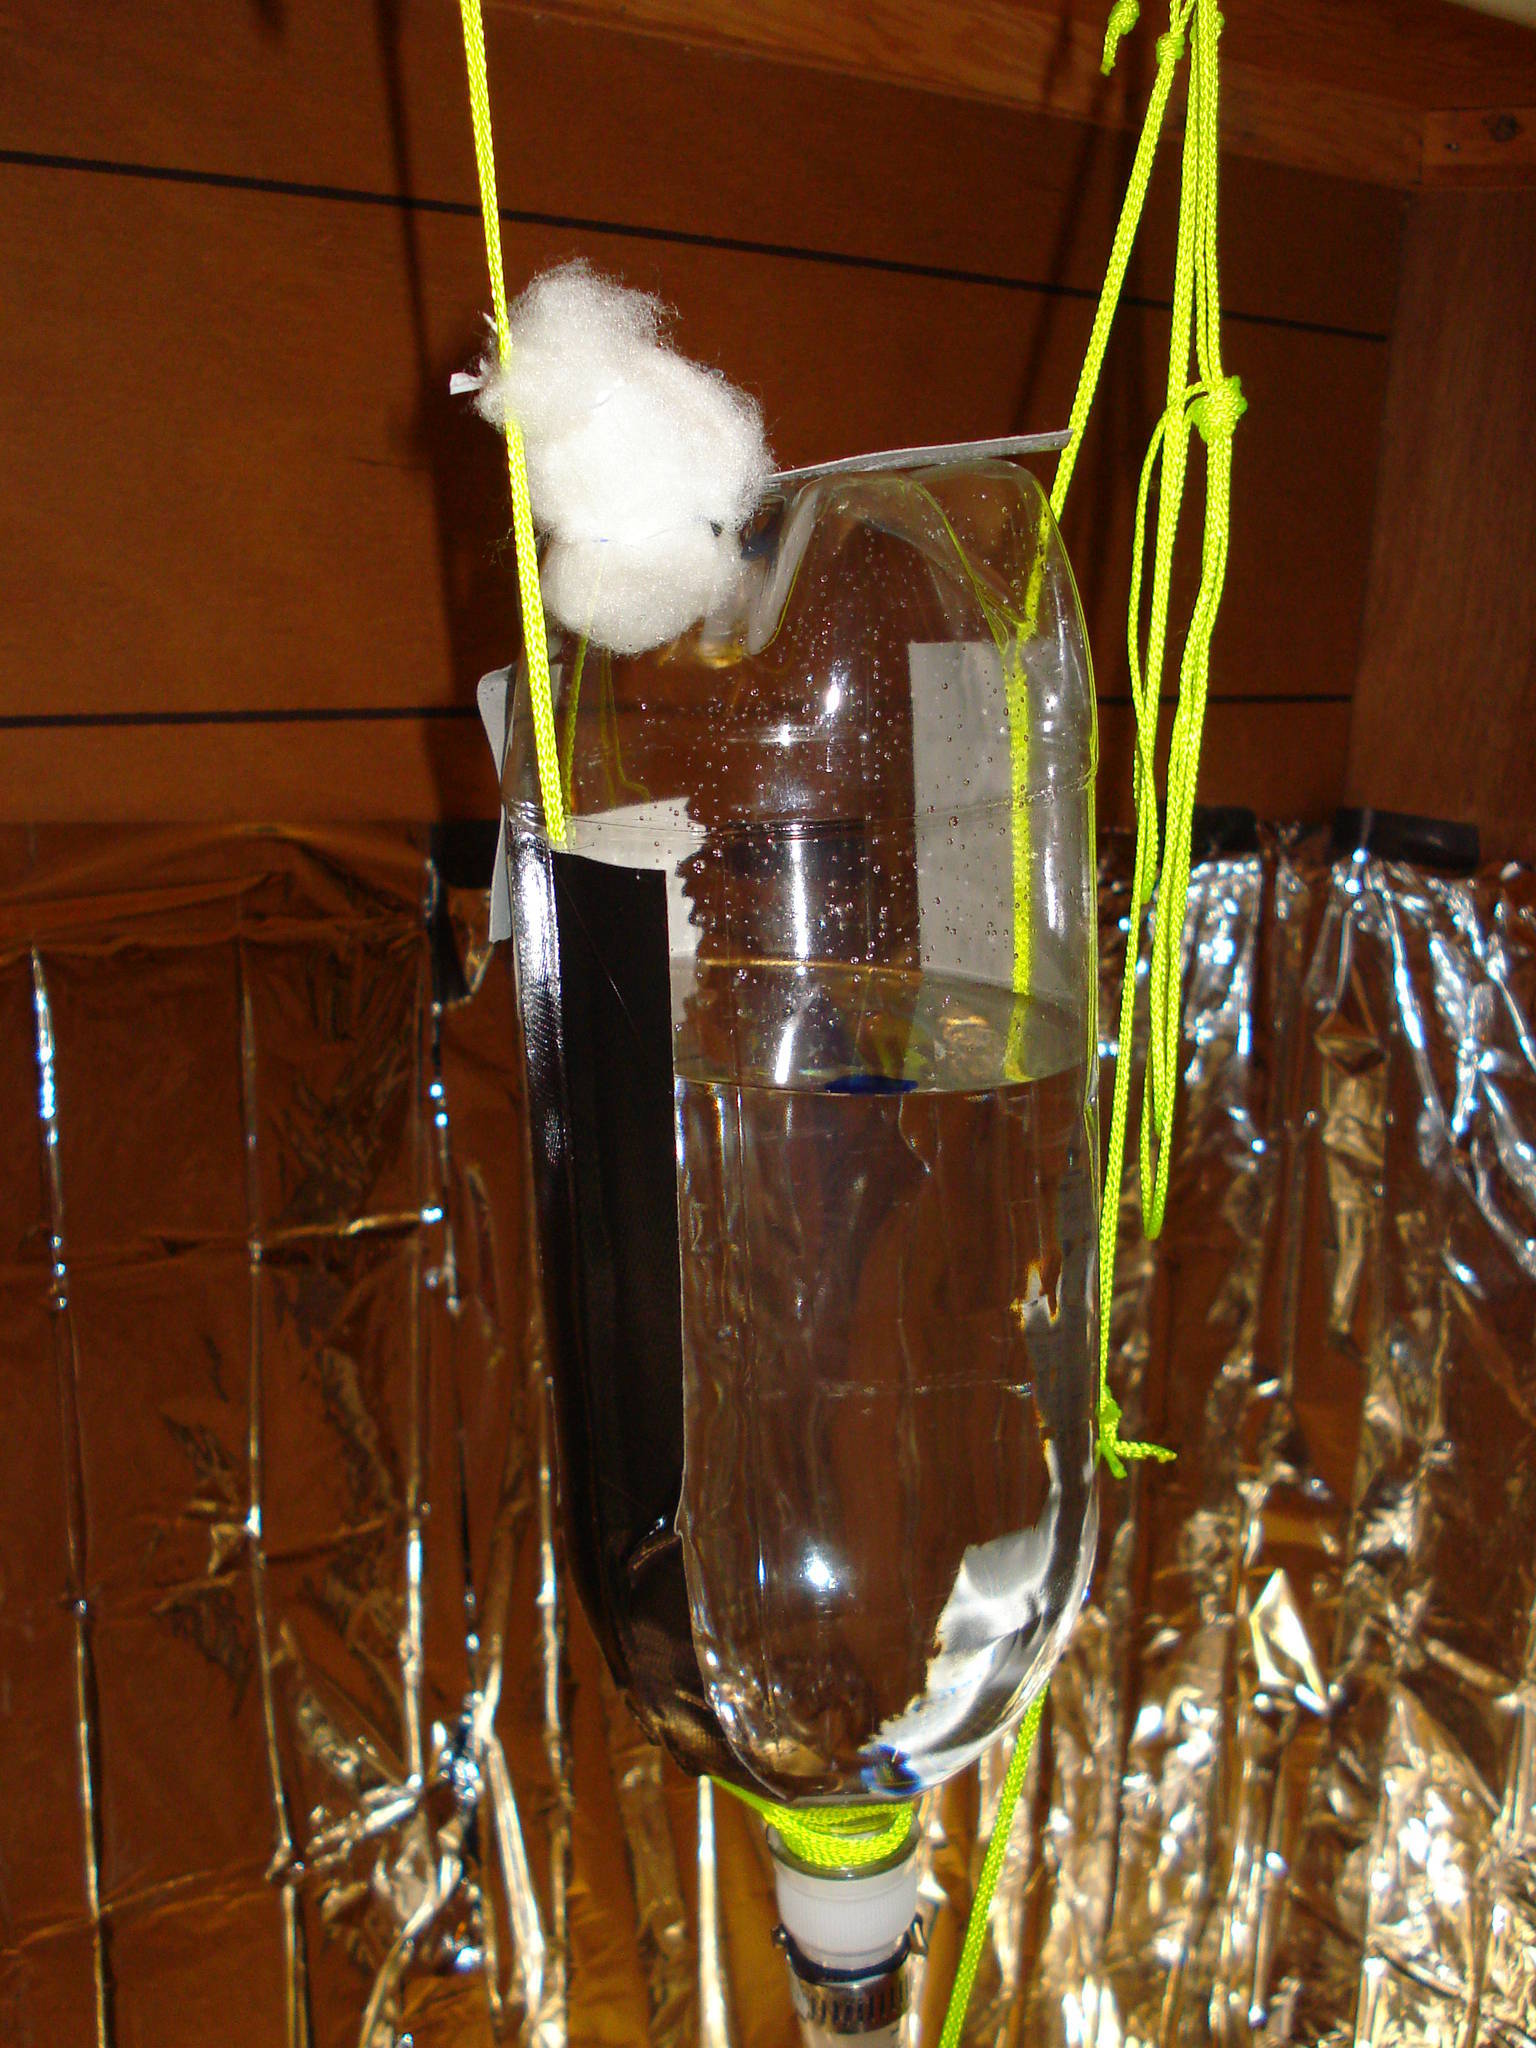
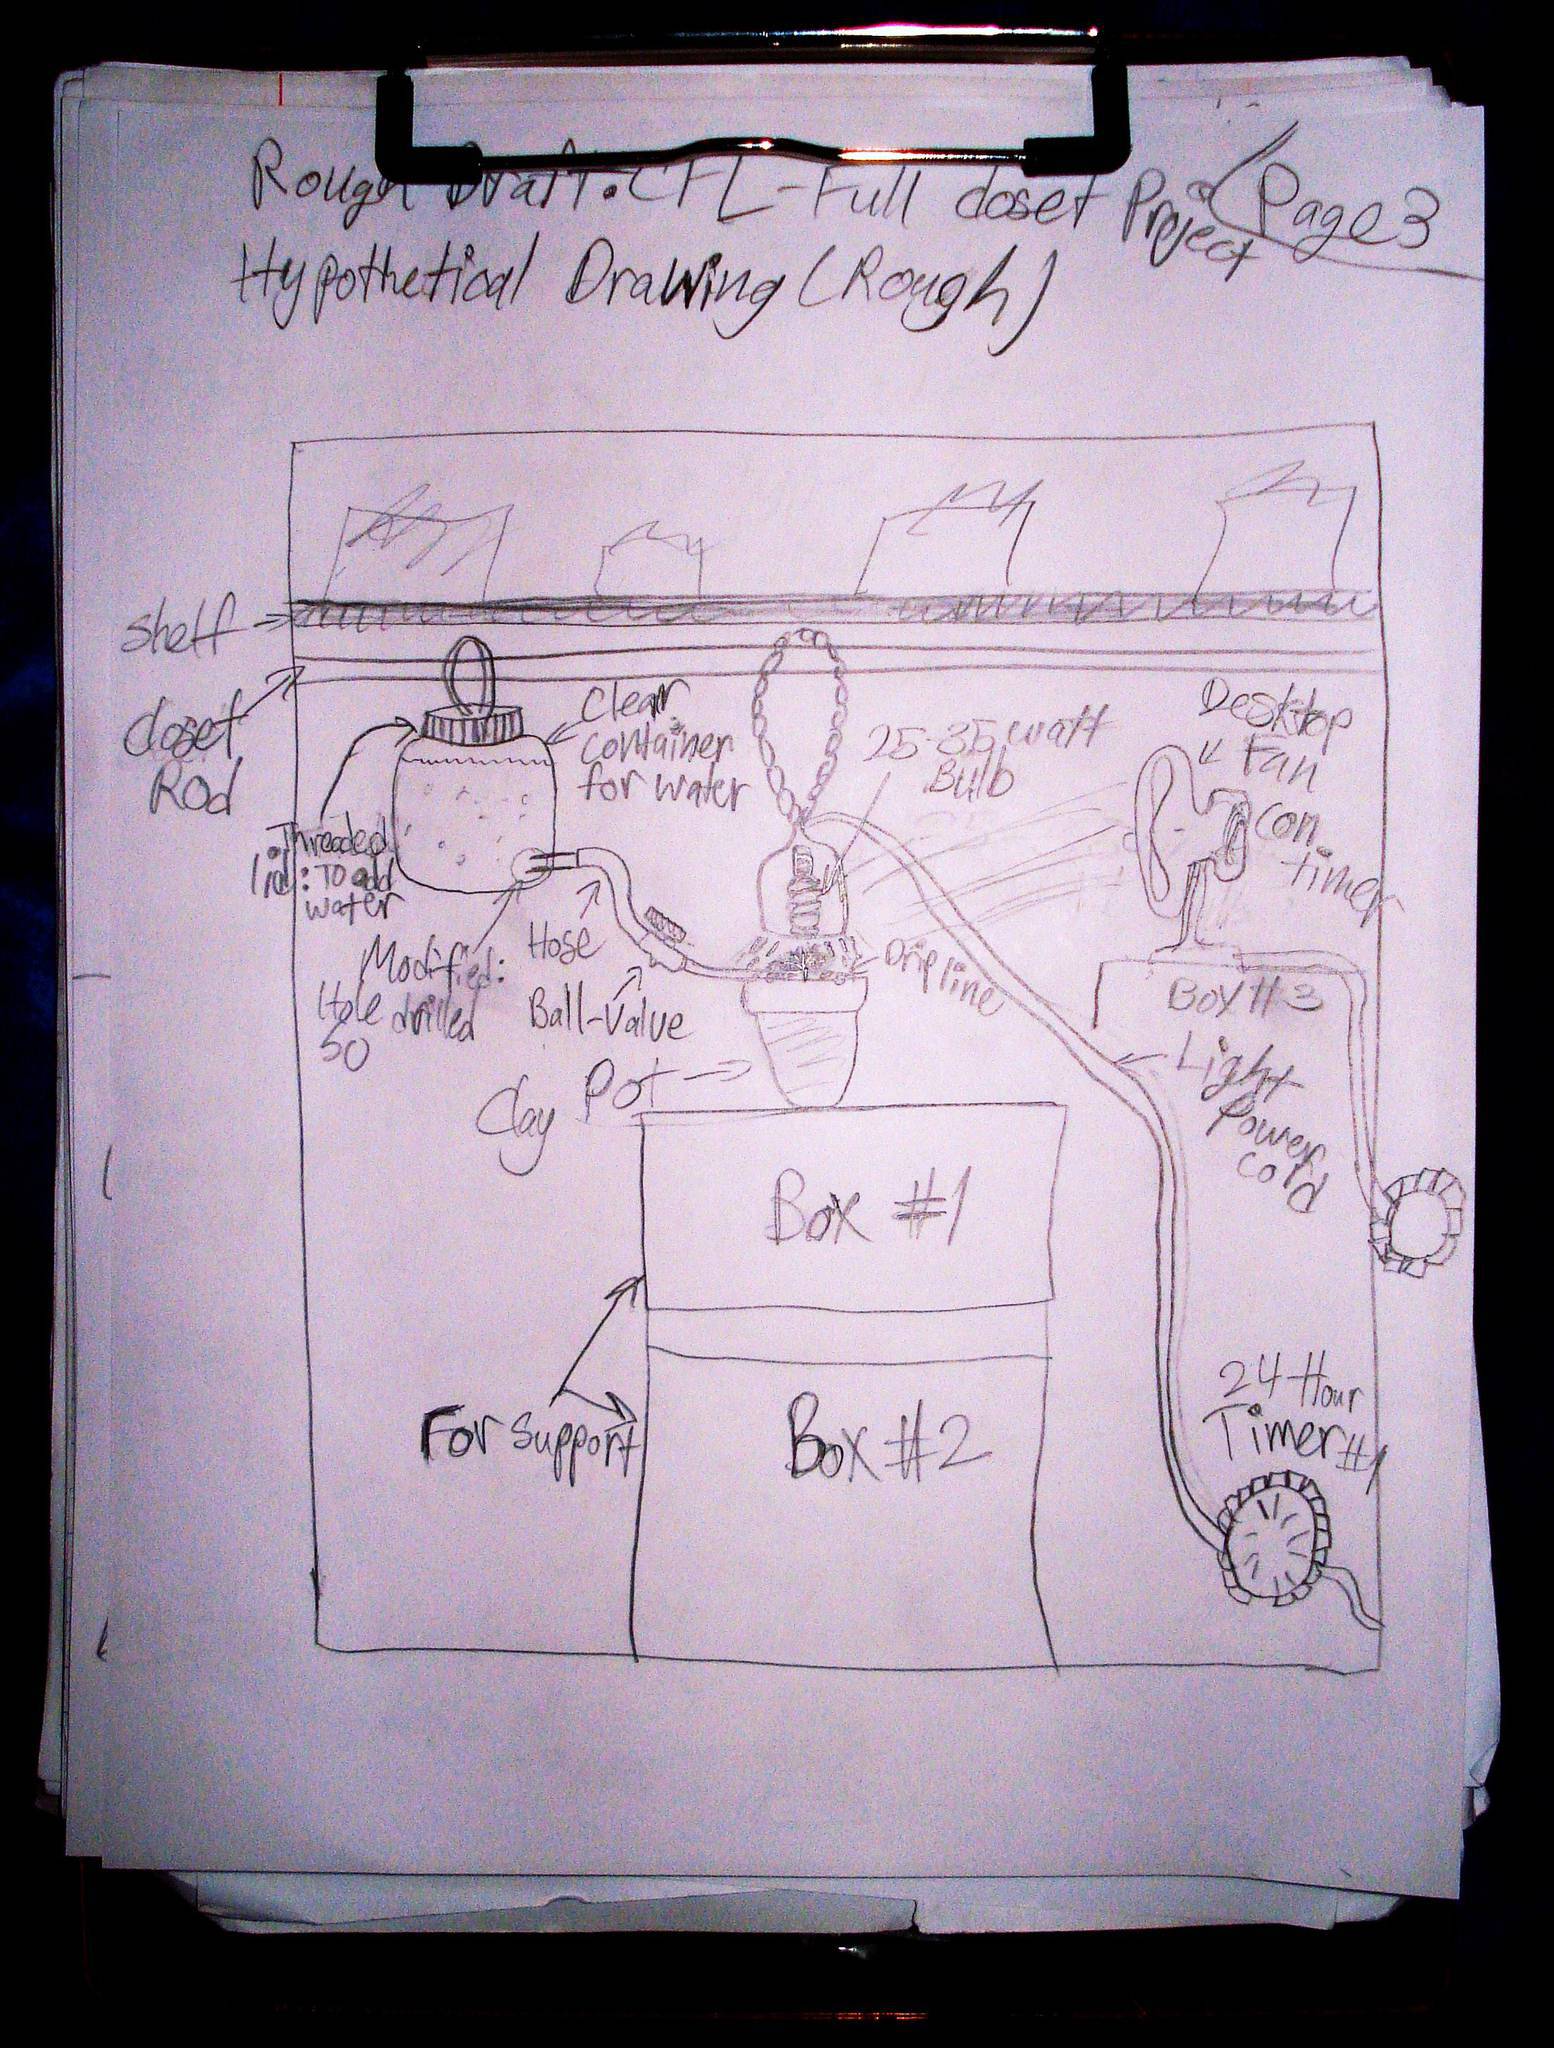
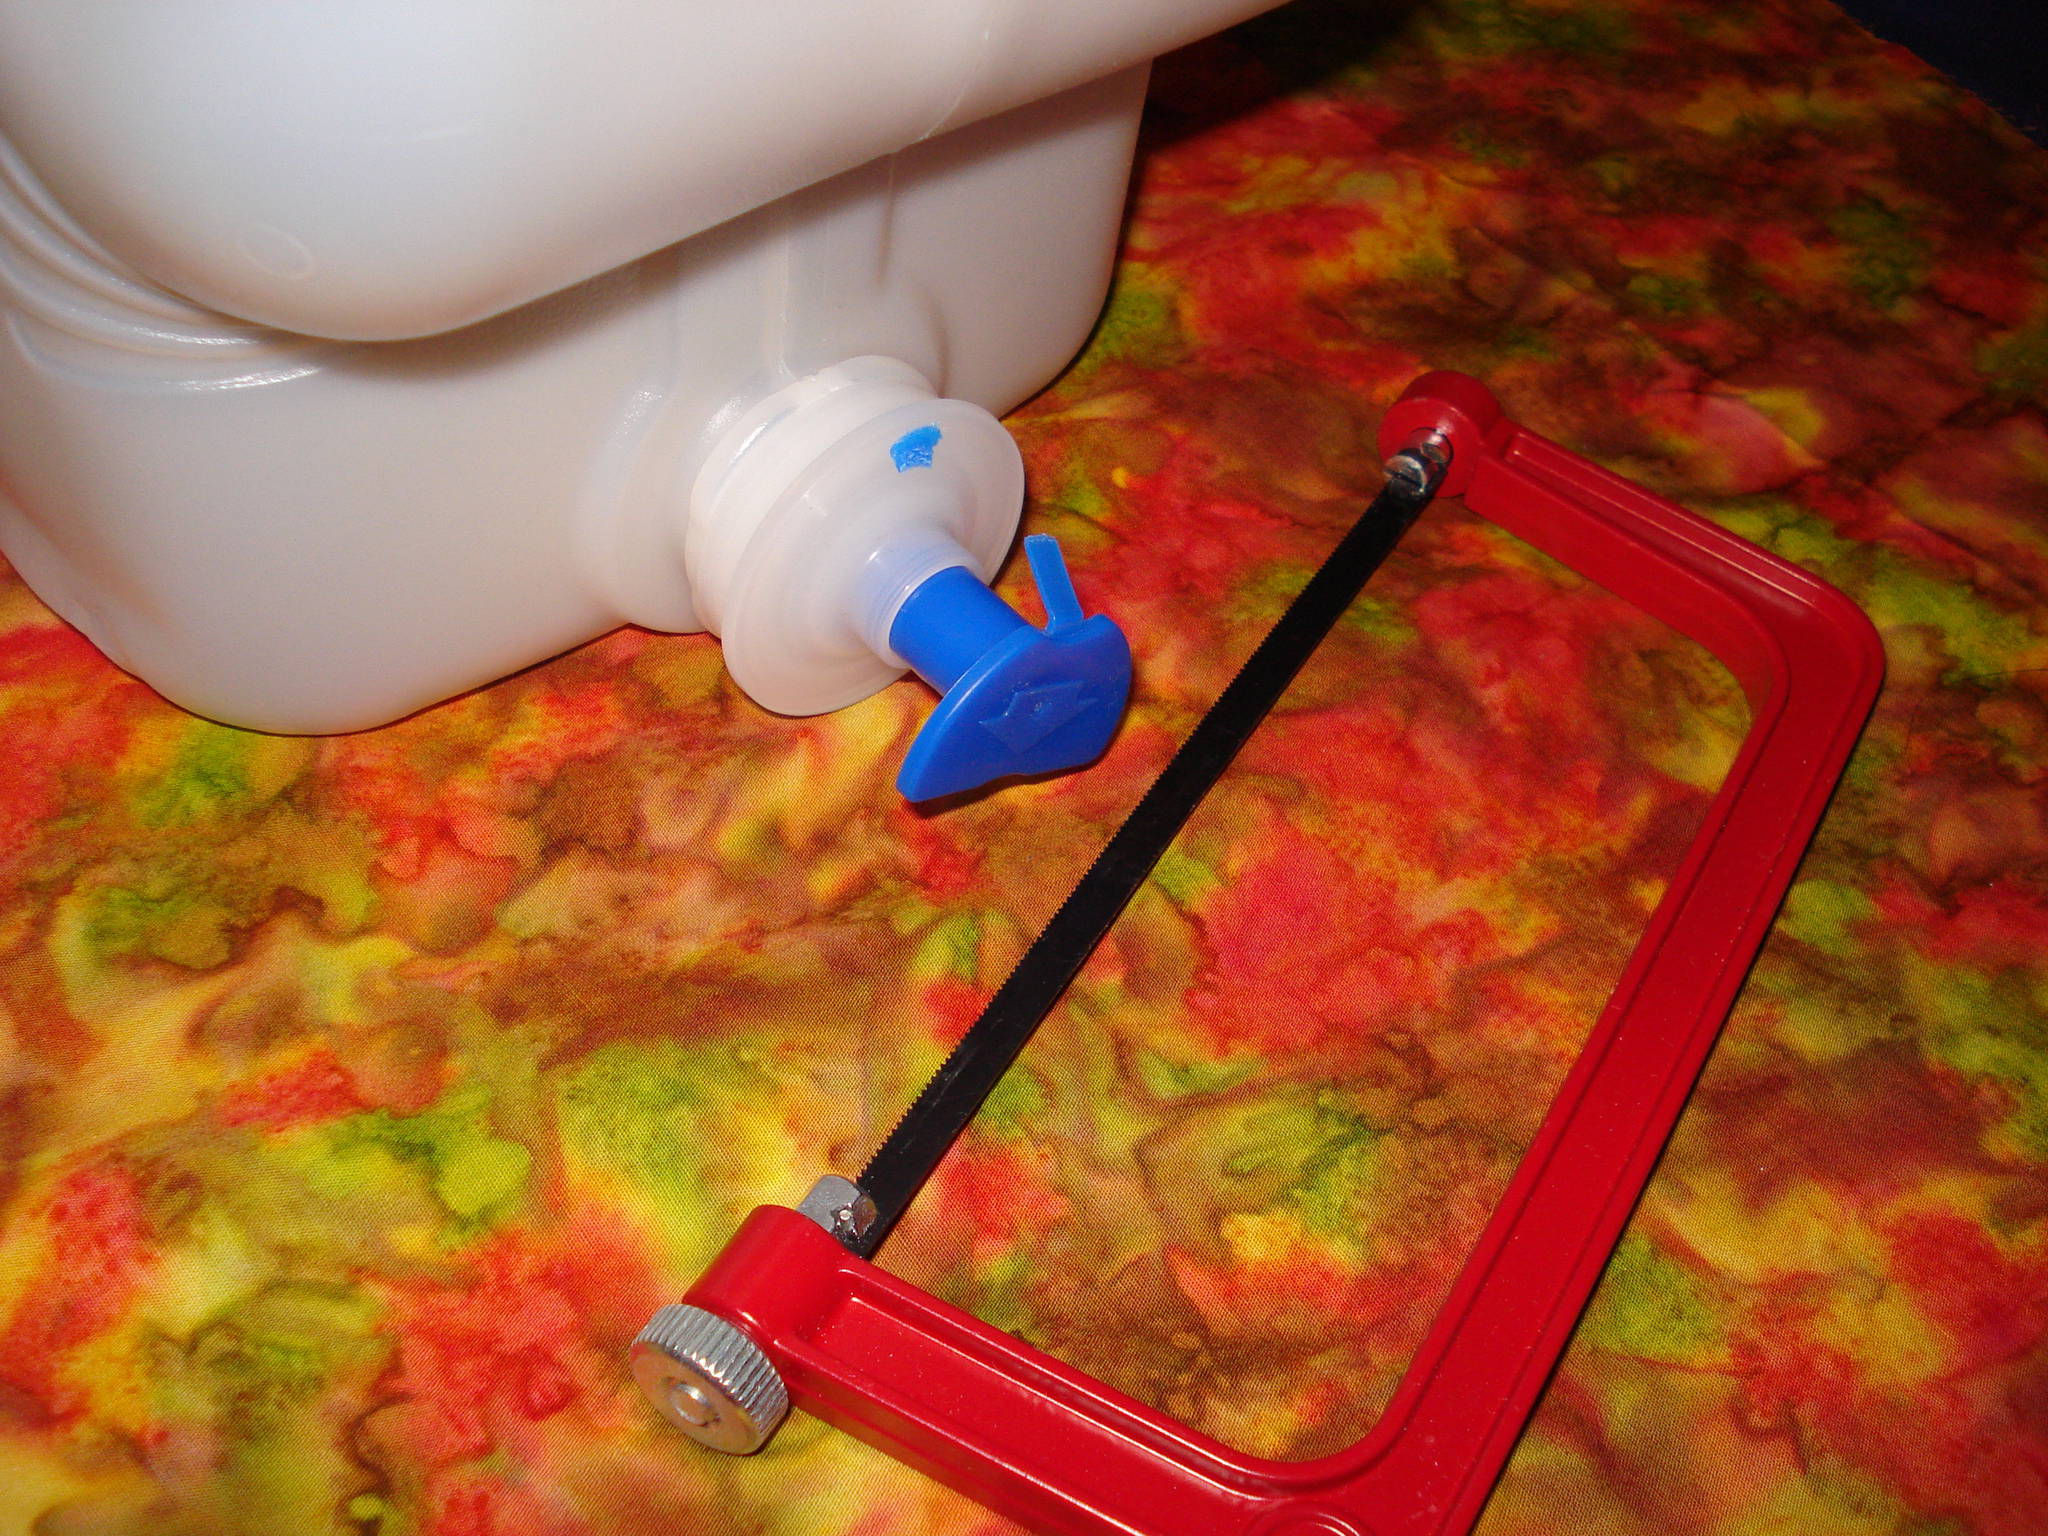
Notes: Implemented gravity drip system, which is basically a large bottle fiilled with water (see last photo, on Right), held high, near the closet rail (to create pressure via the pull of gravity), that is hooked up to a 1/4 turn ball valve to control dripping. This was a bad idea. The valve was hard to adjust, and was not very precise. And, I later found out that these plants like well-drained, dry soil, not constantly watered soil. The periods of dryness help the roots grow, and the plant from becoming droopy. A quick lesson learned...
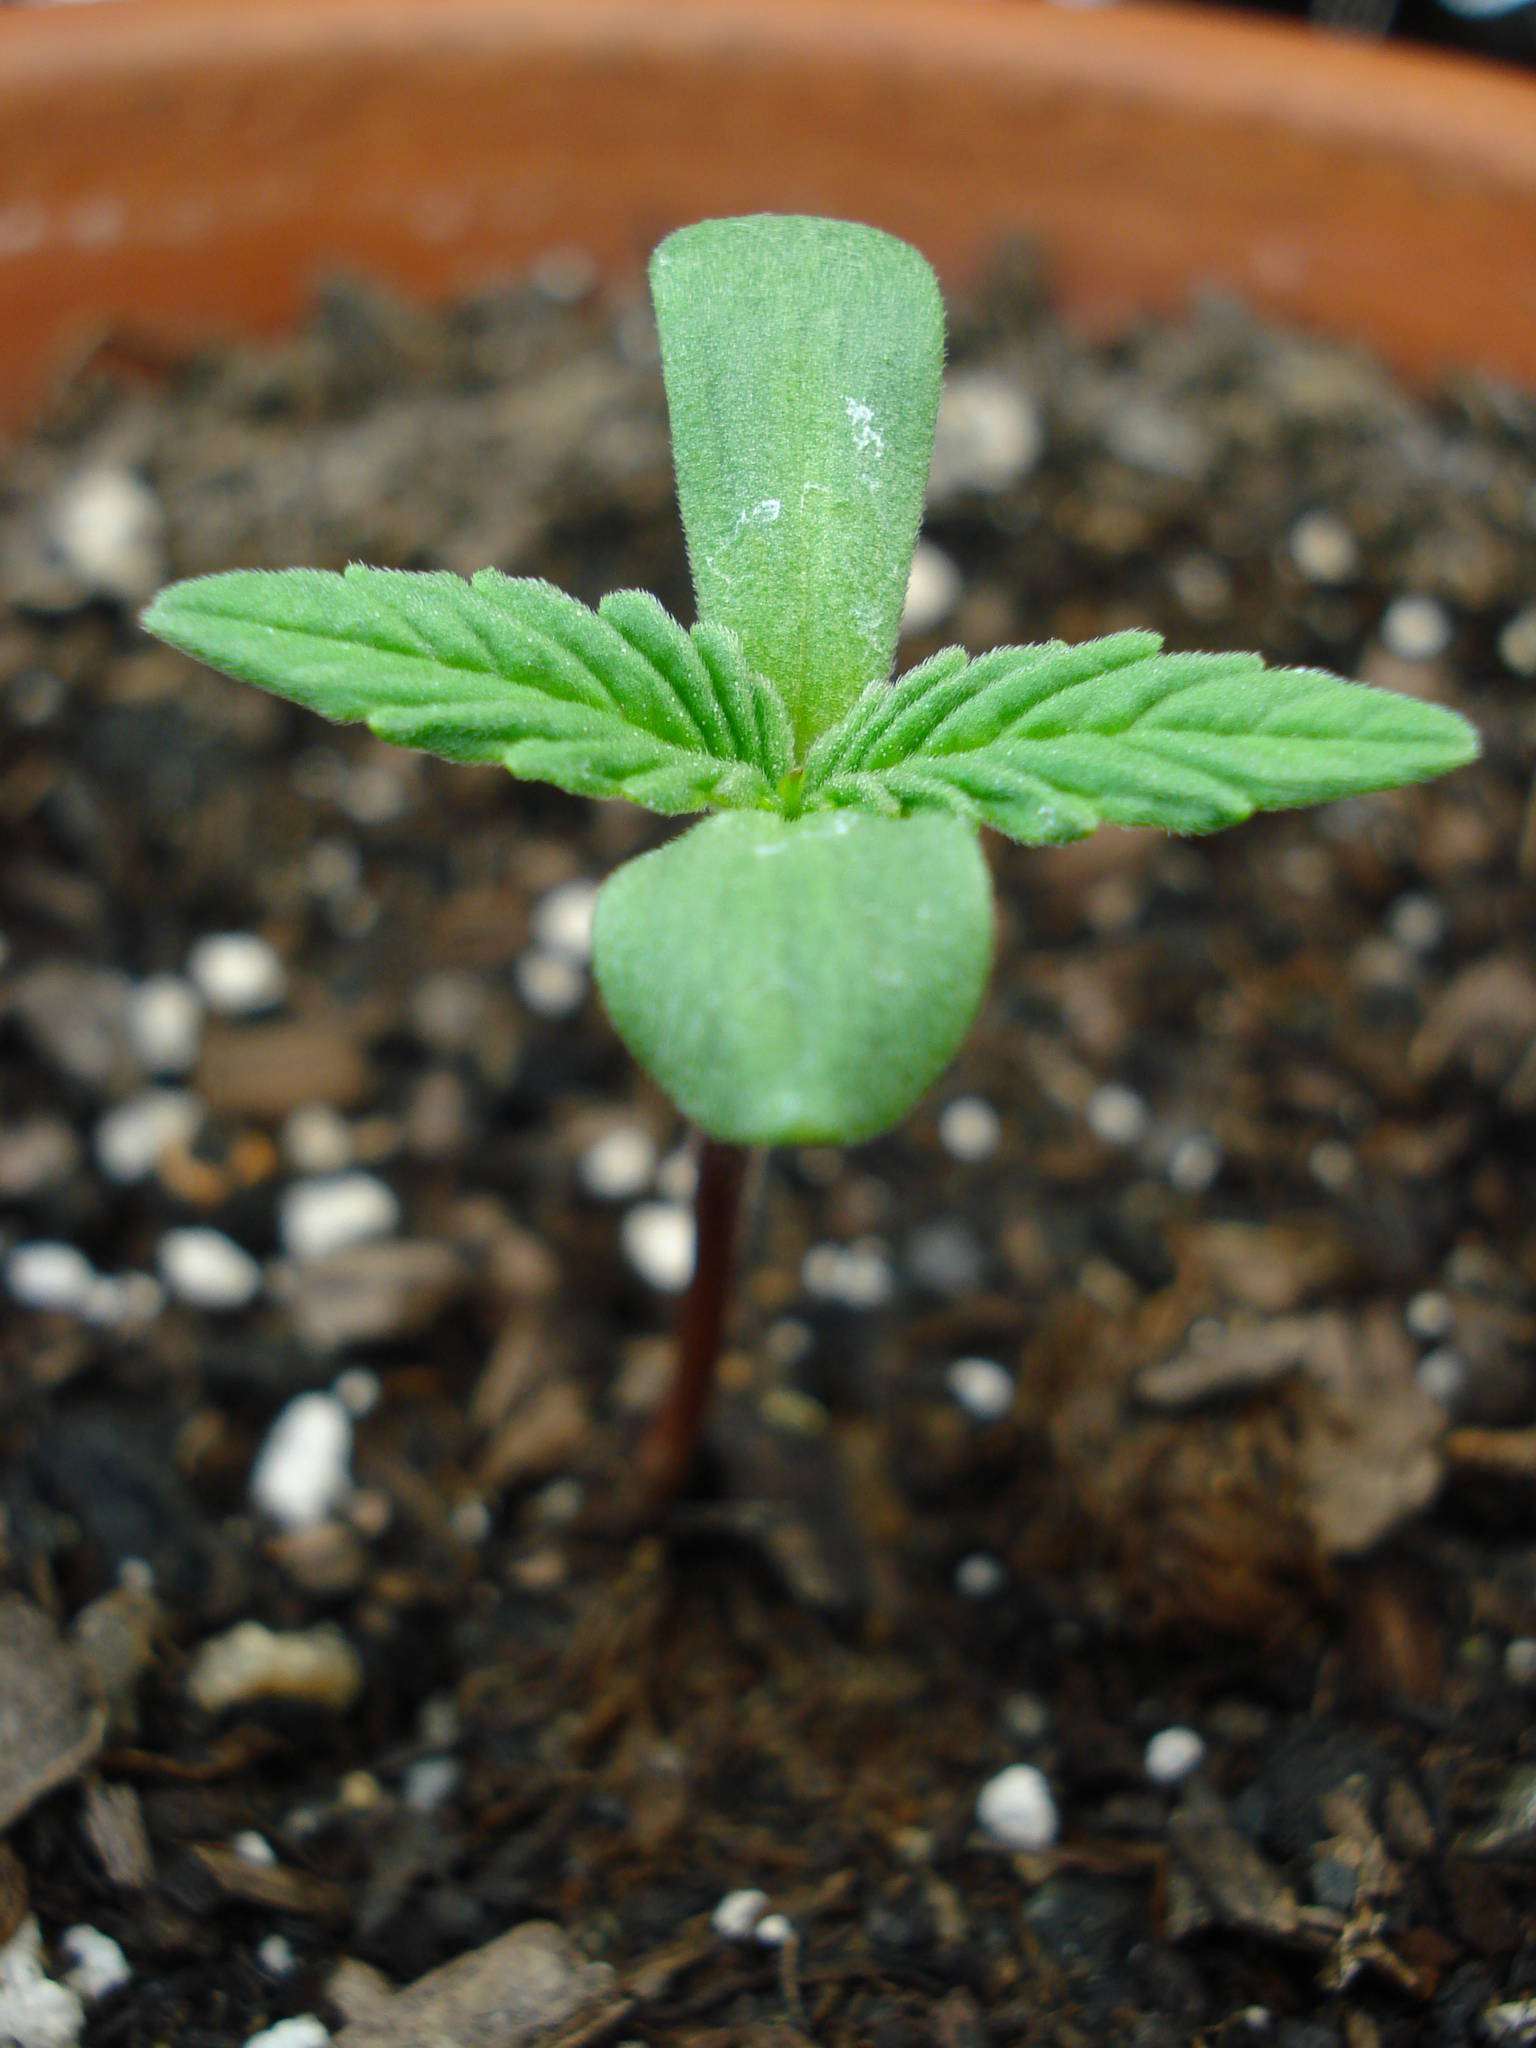
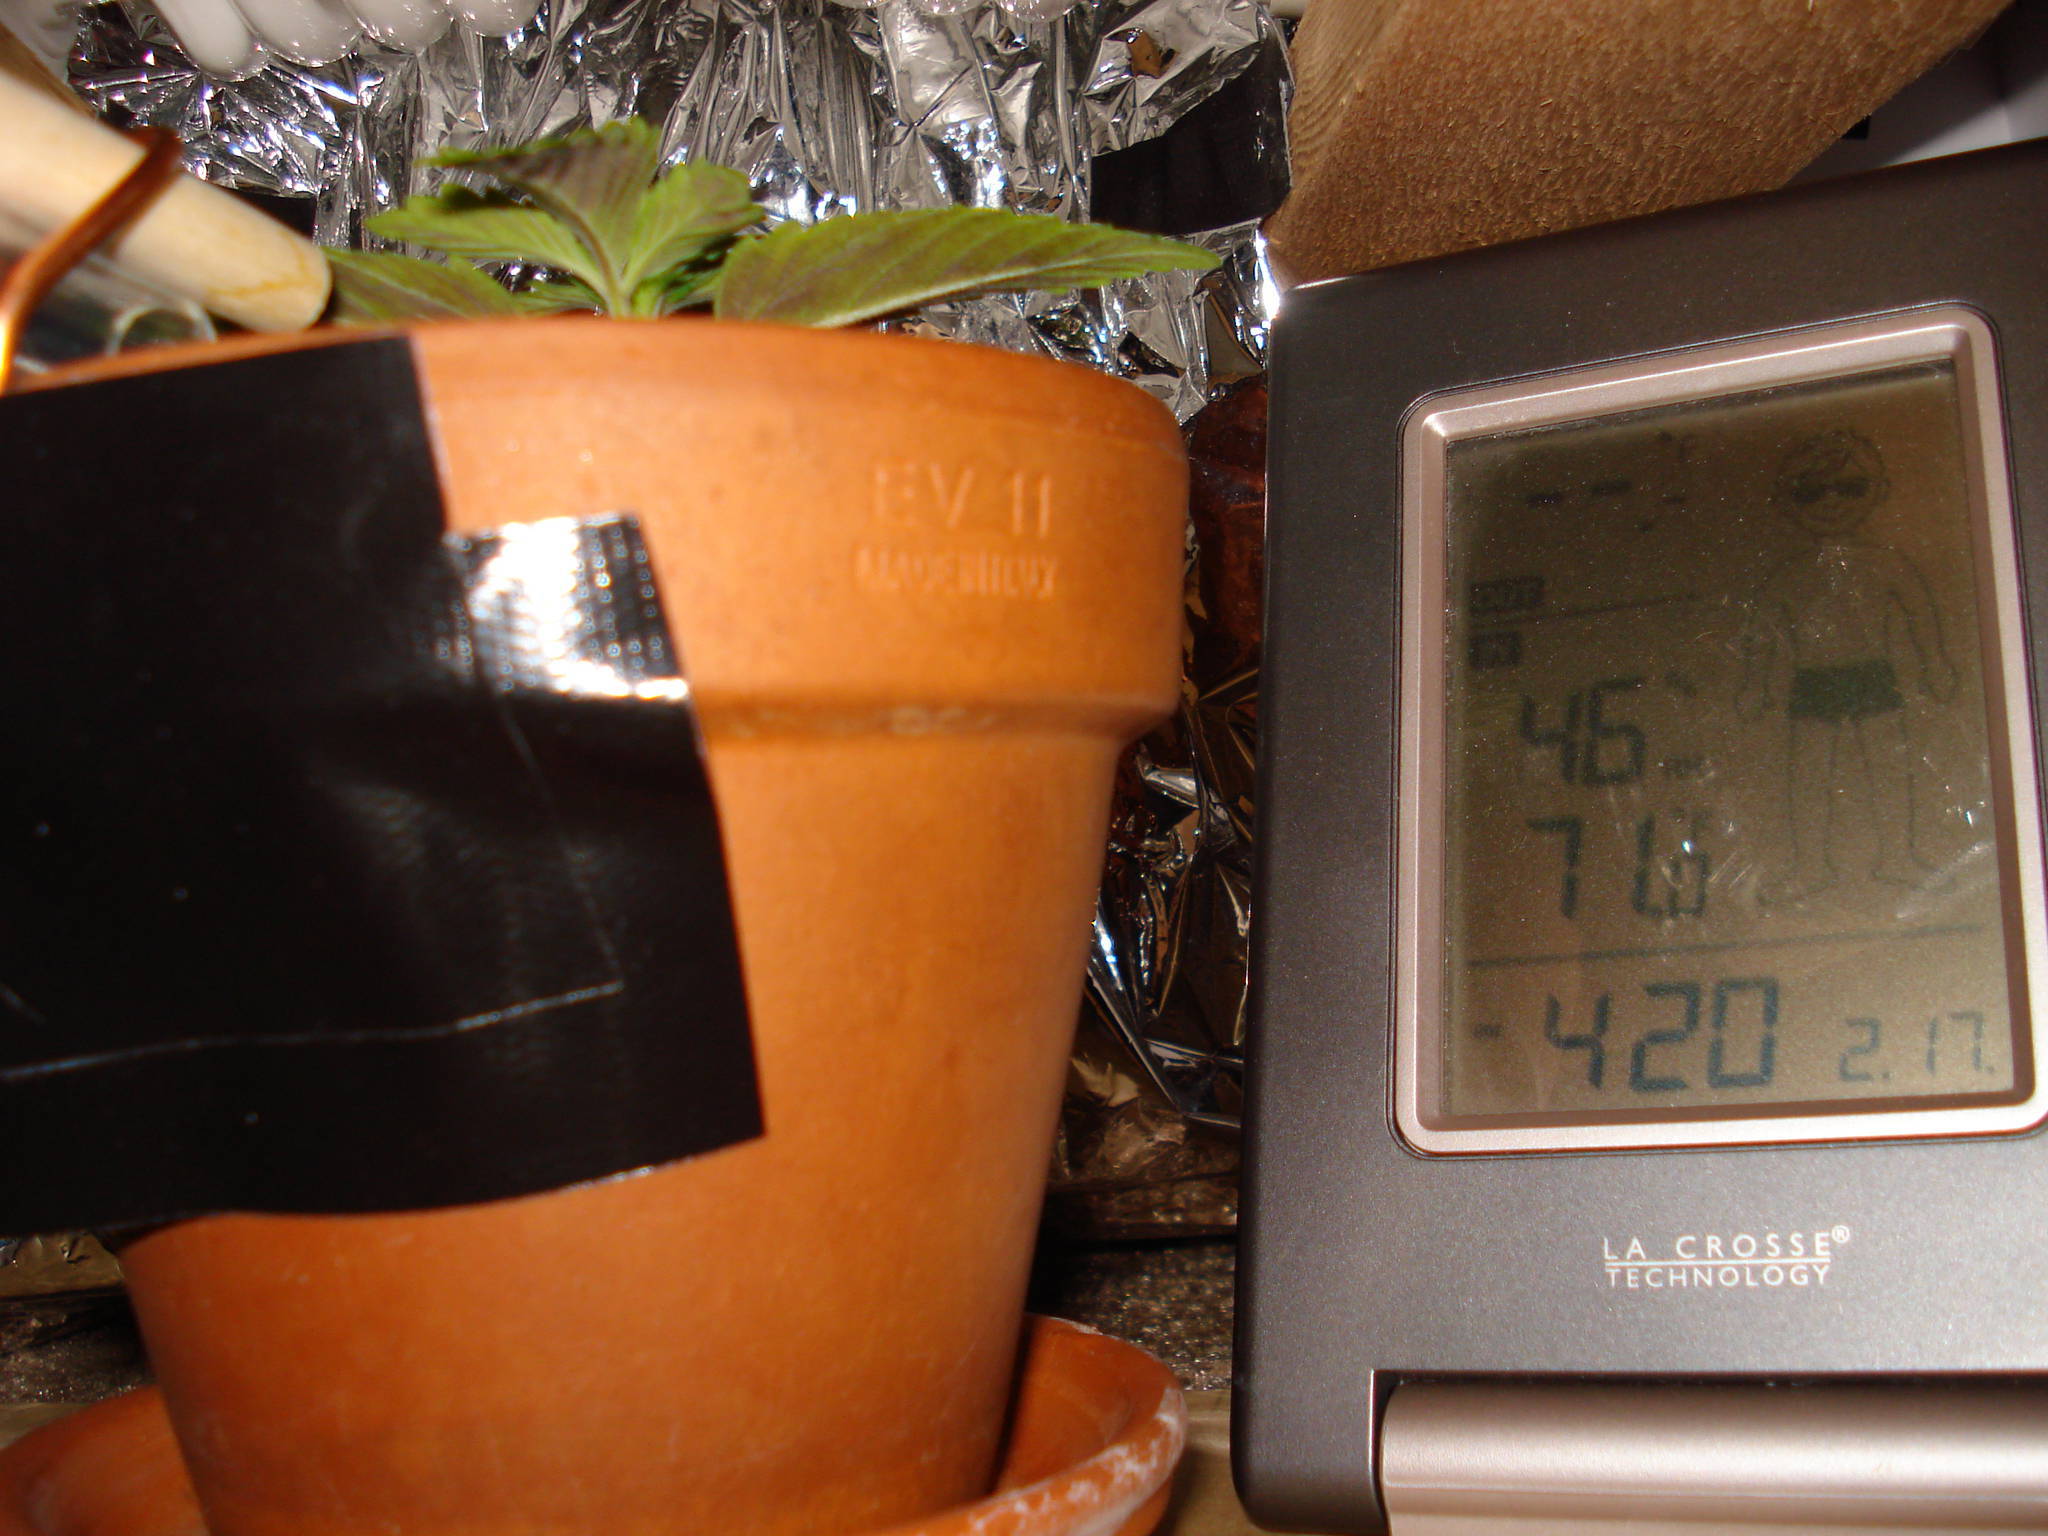
Day 12: Feb. 17, 2010
  
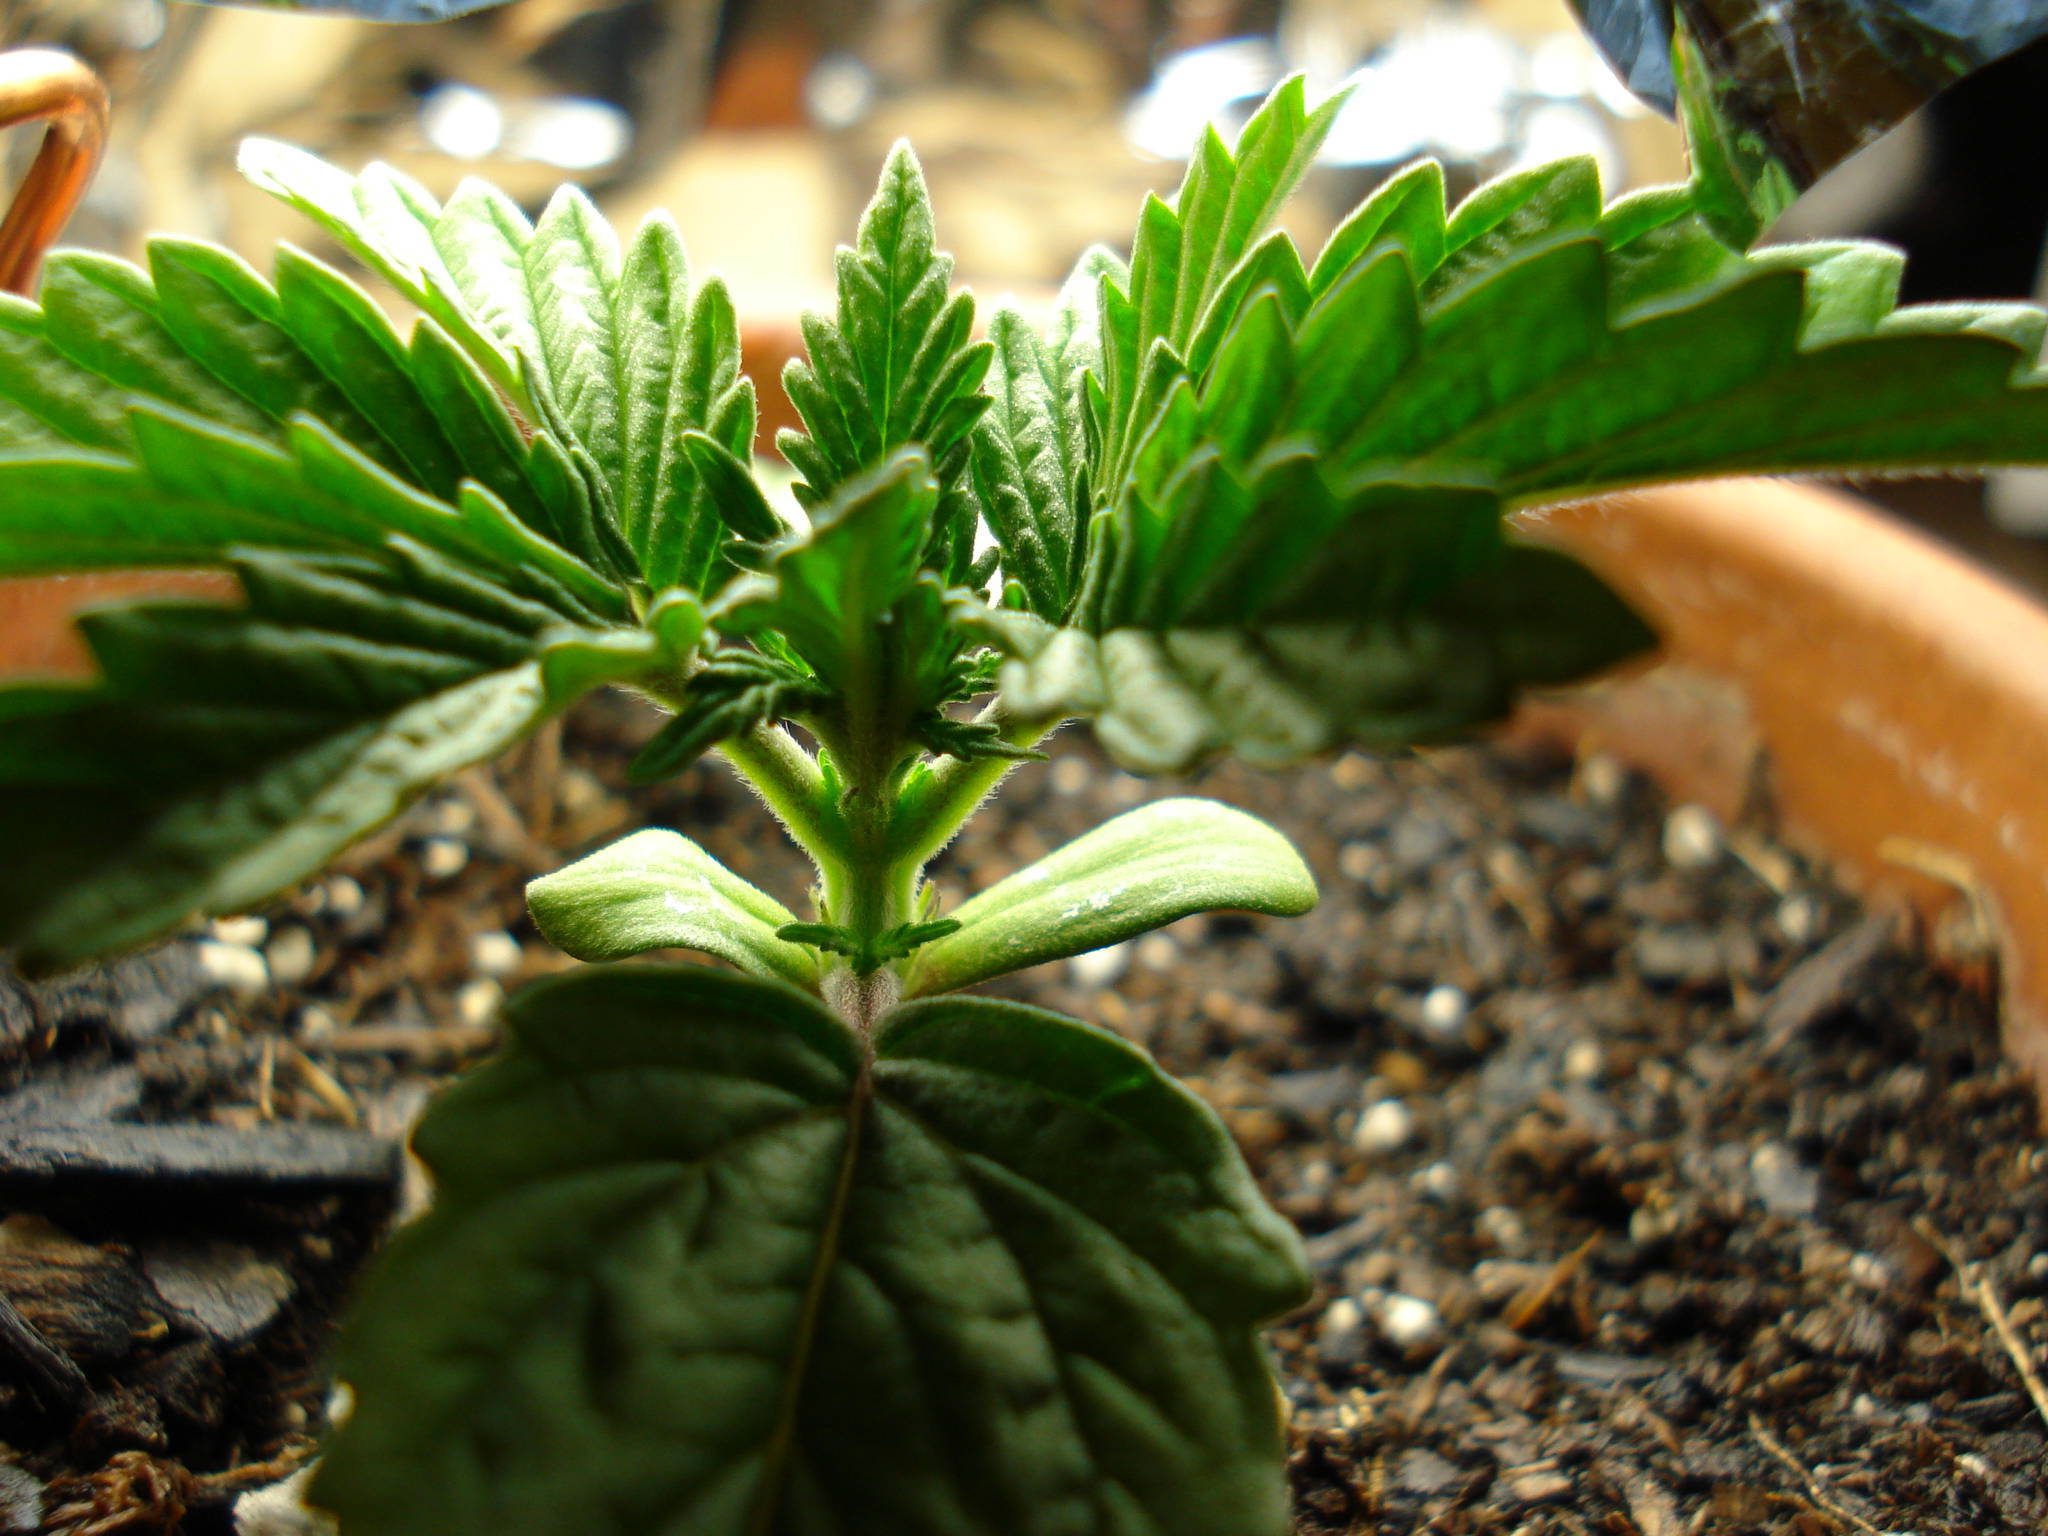
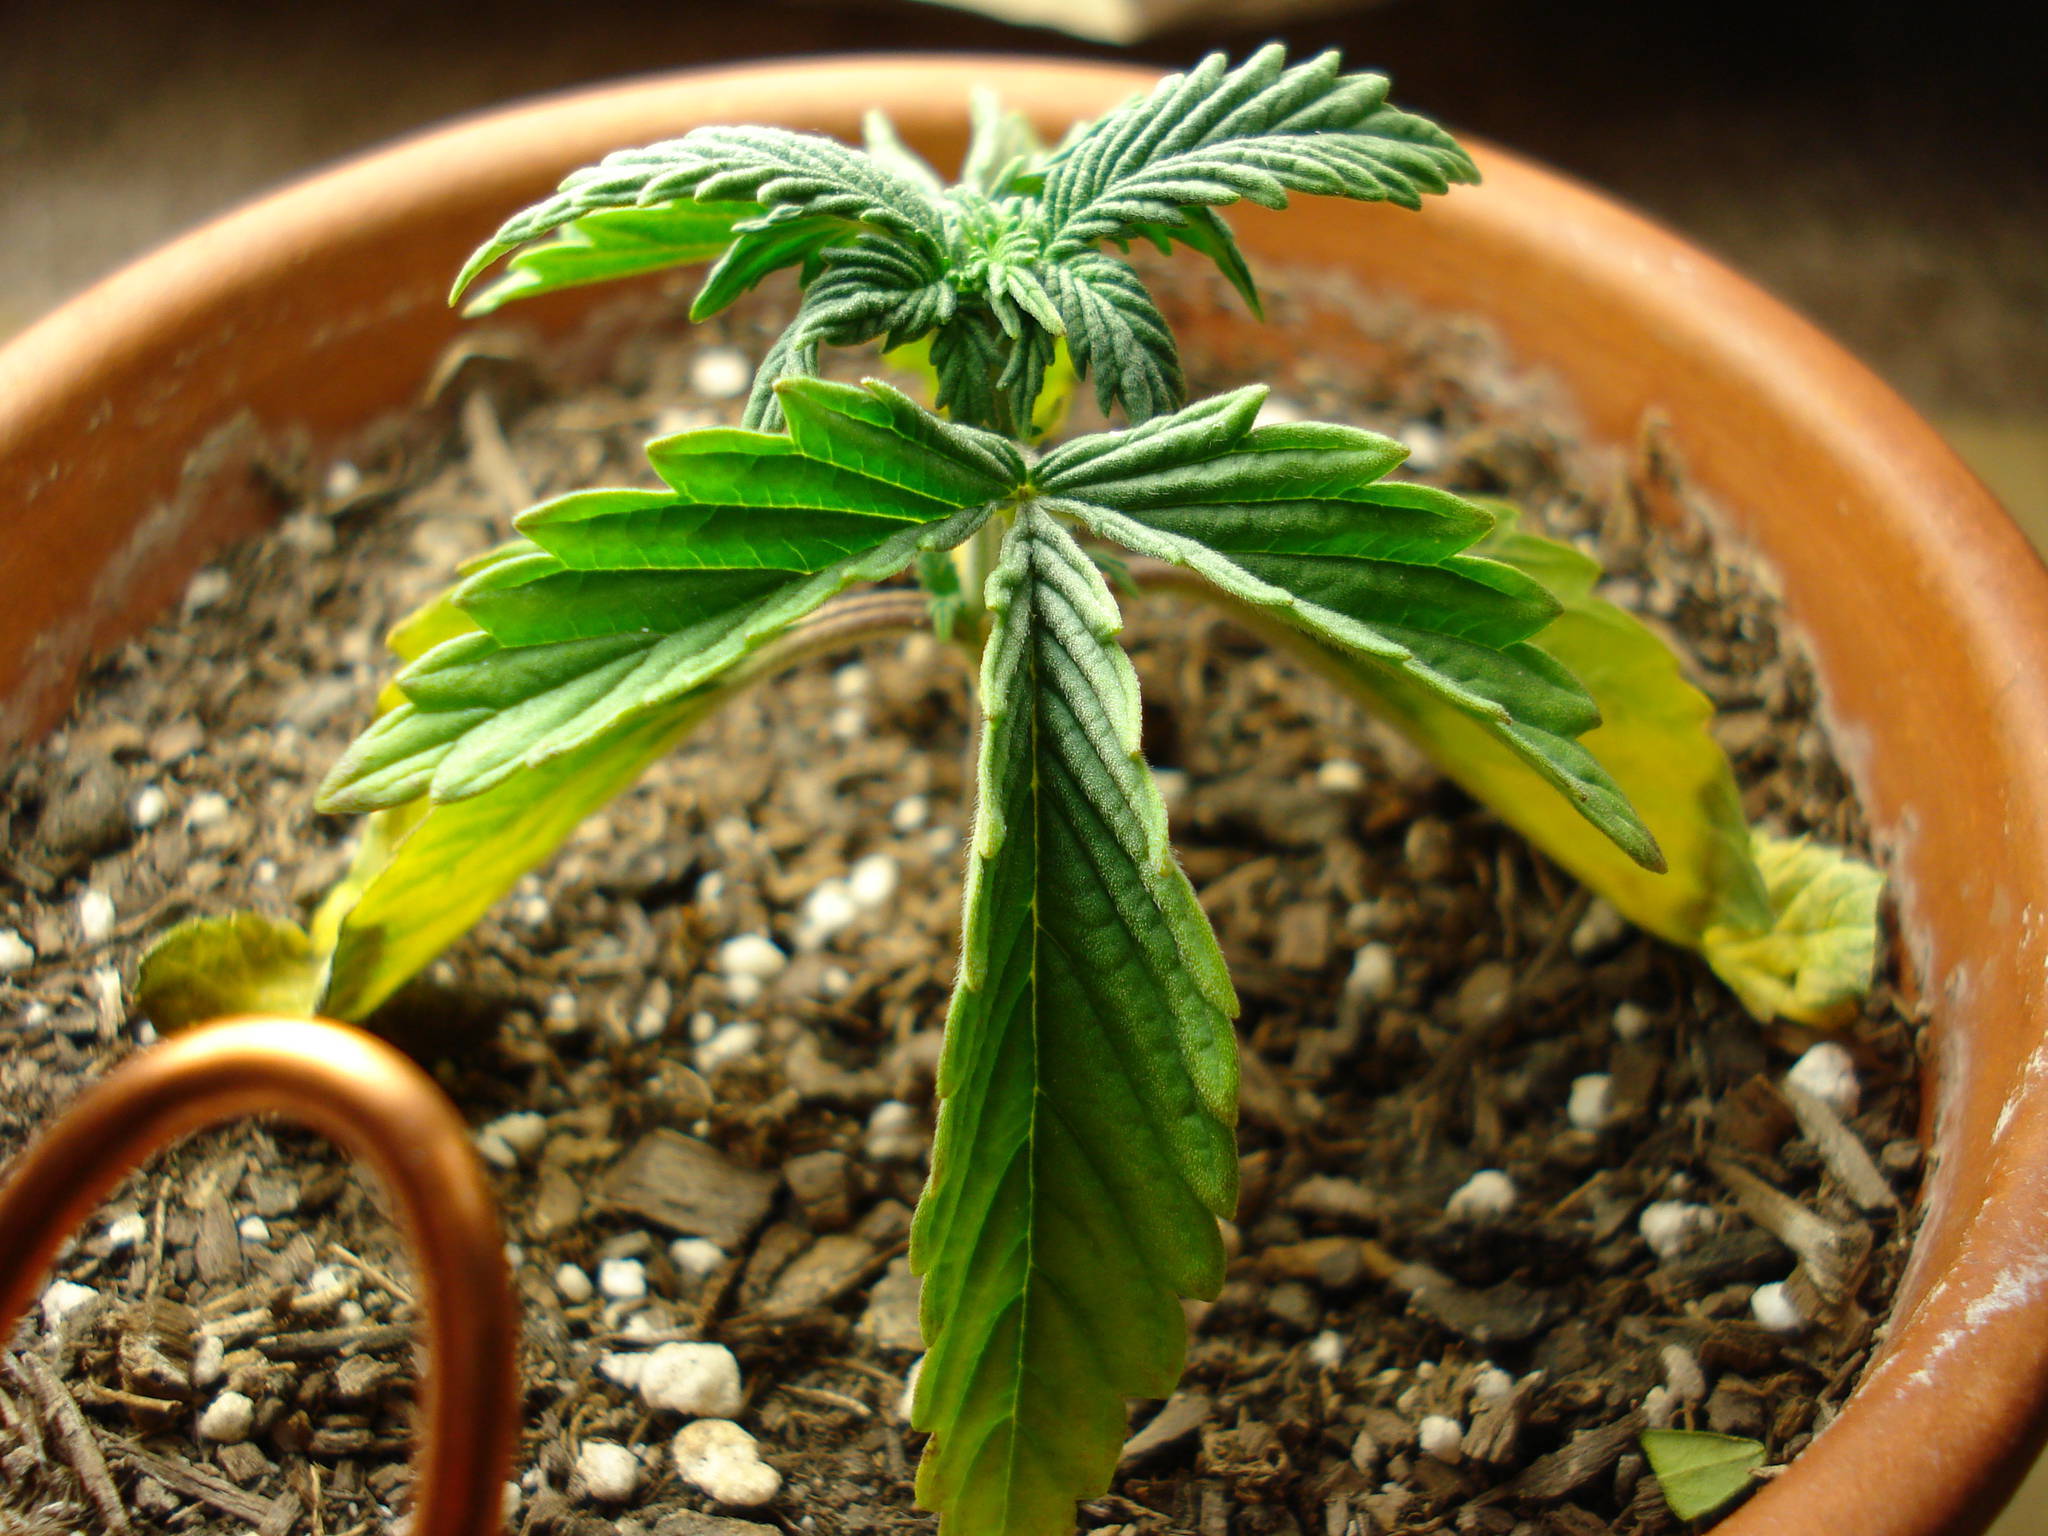
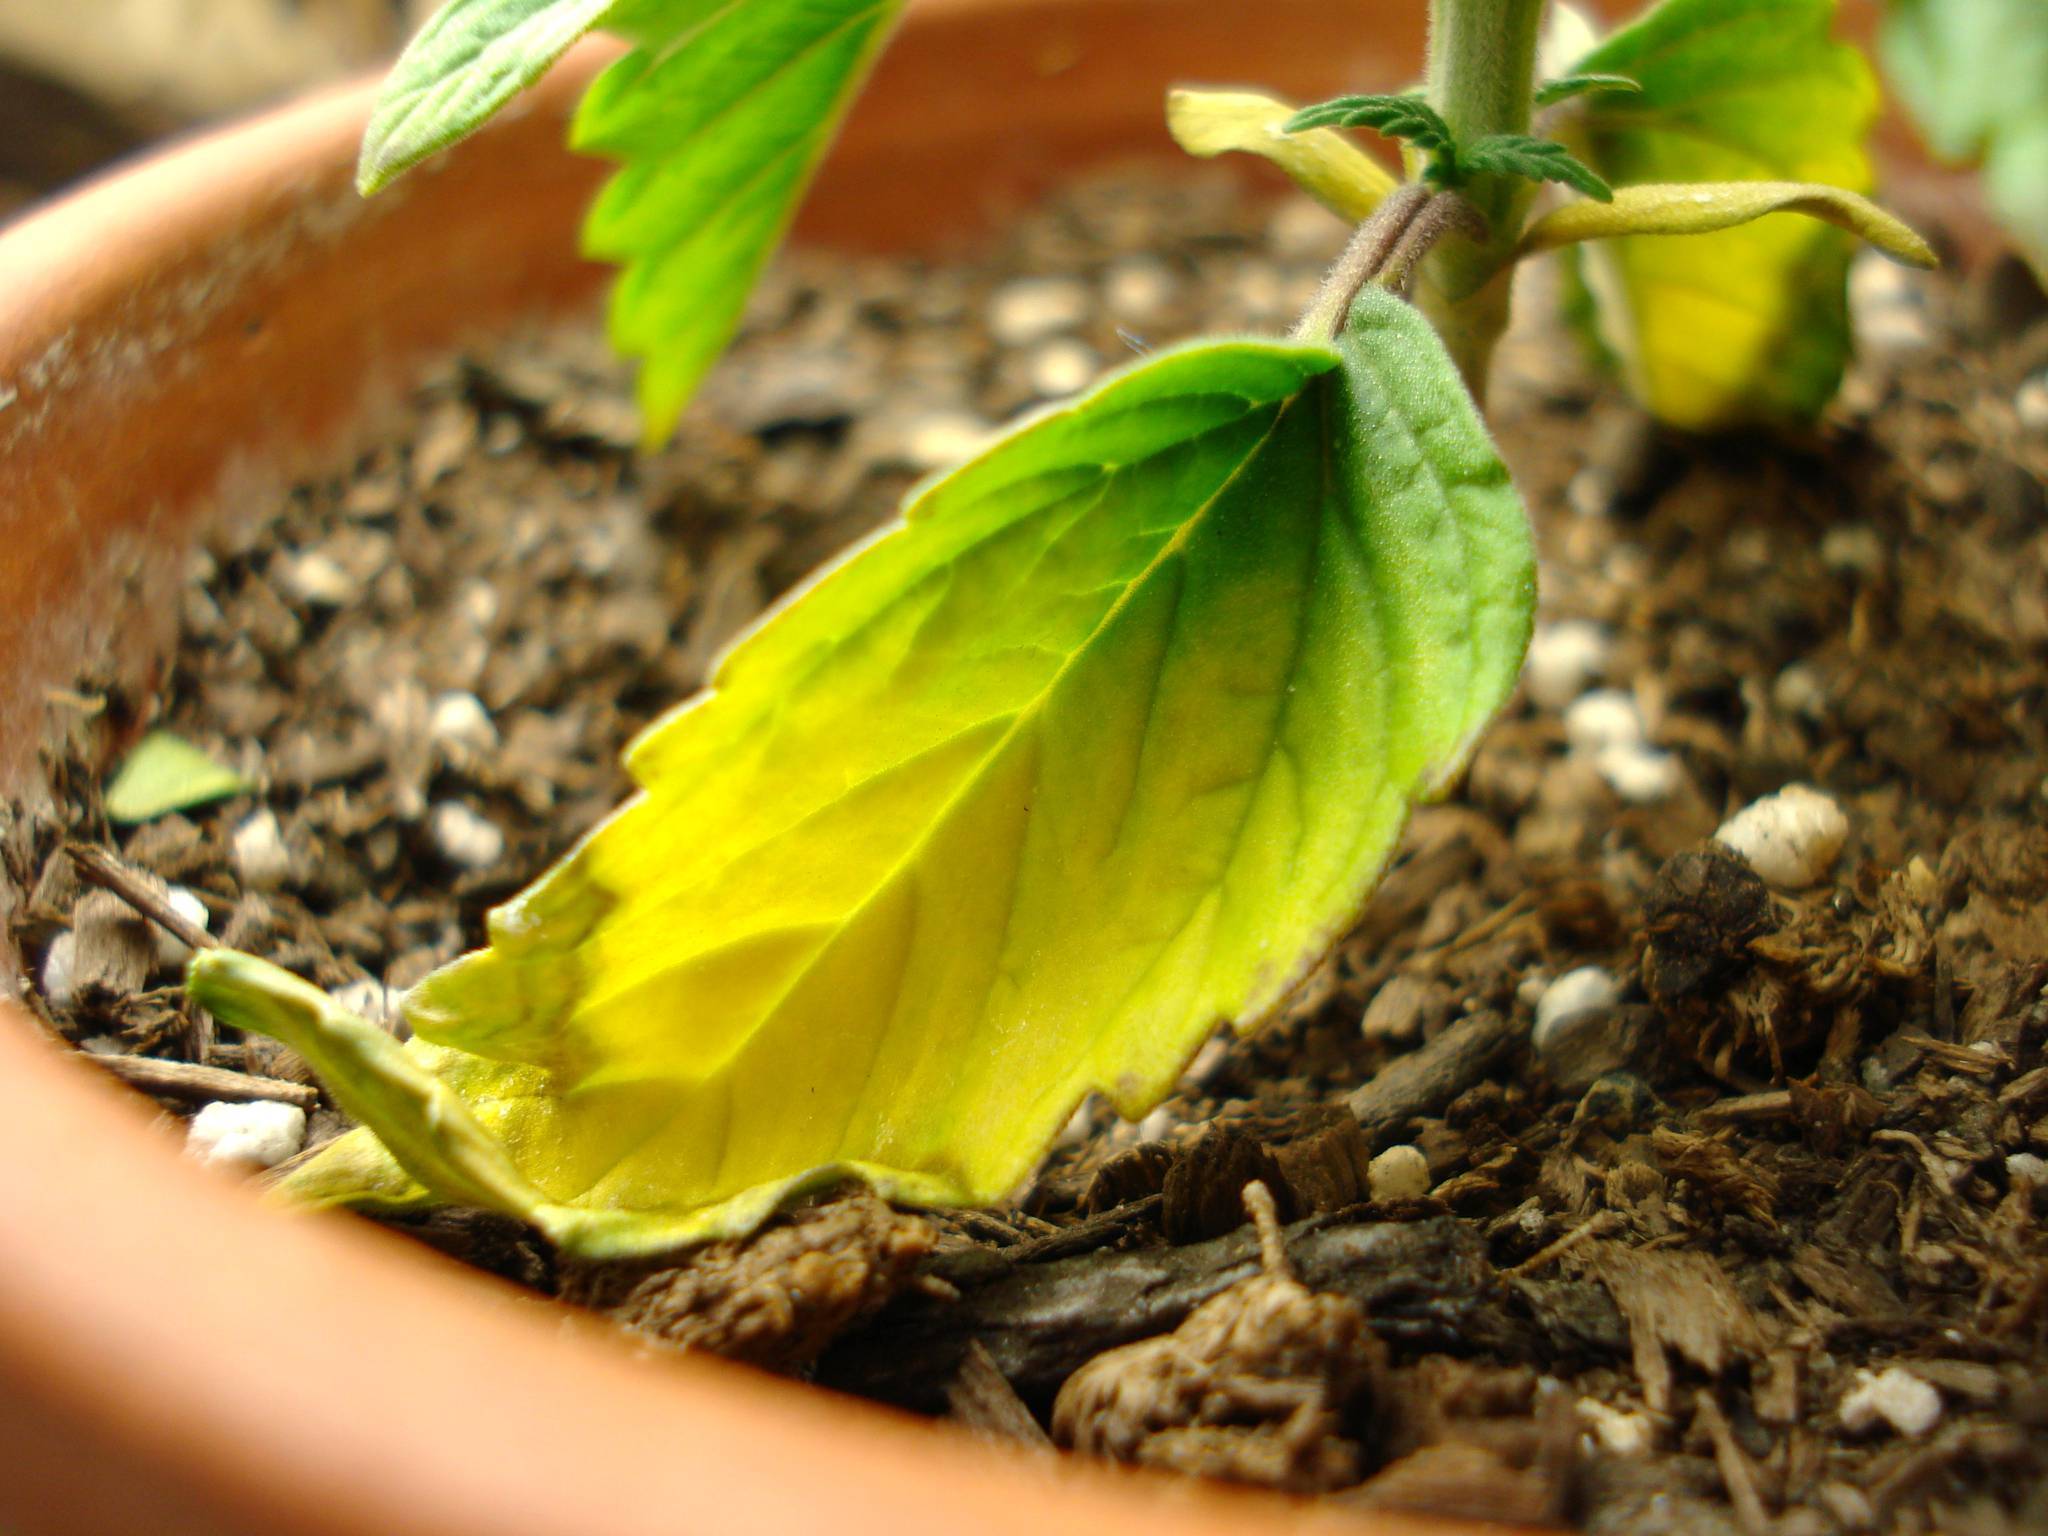
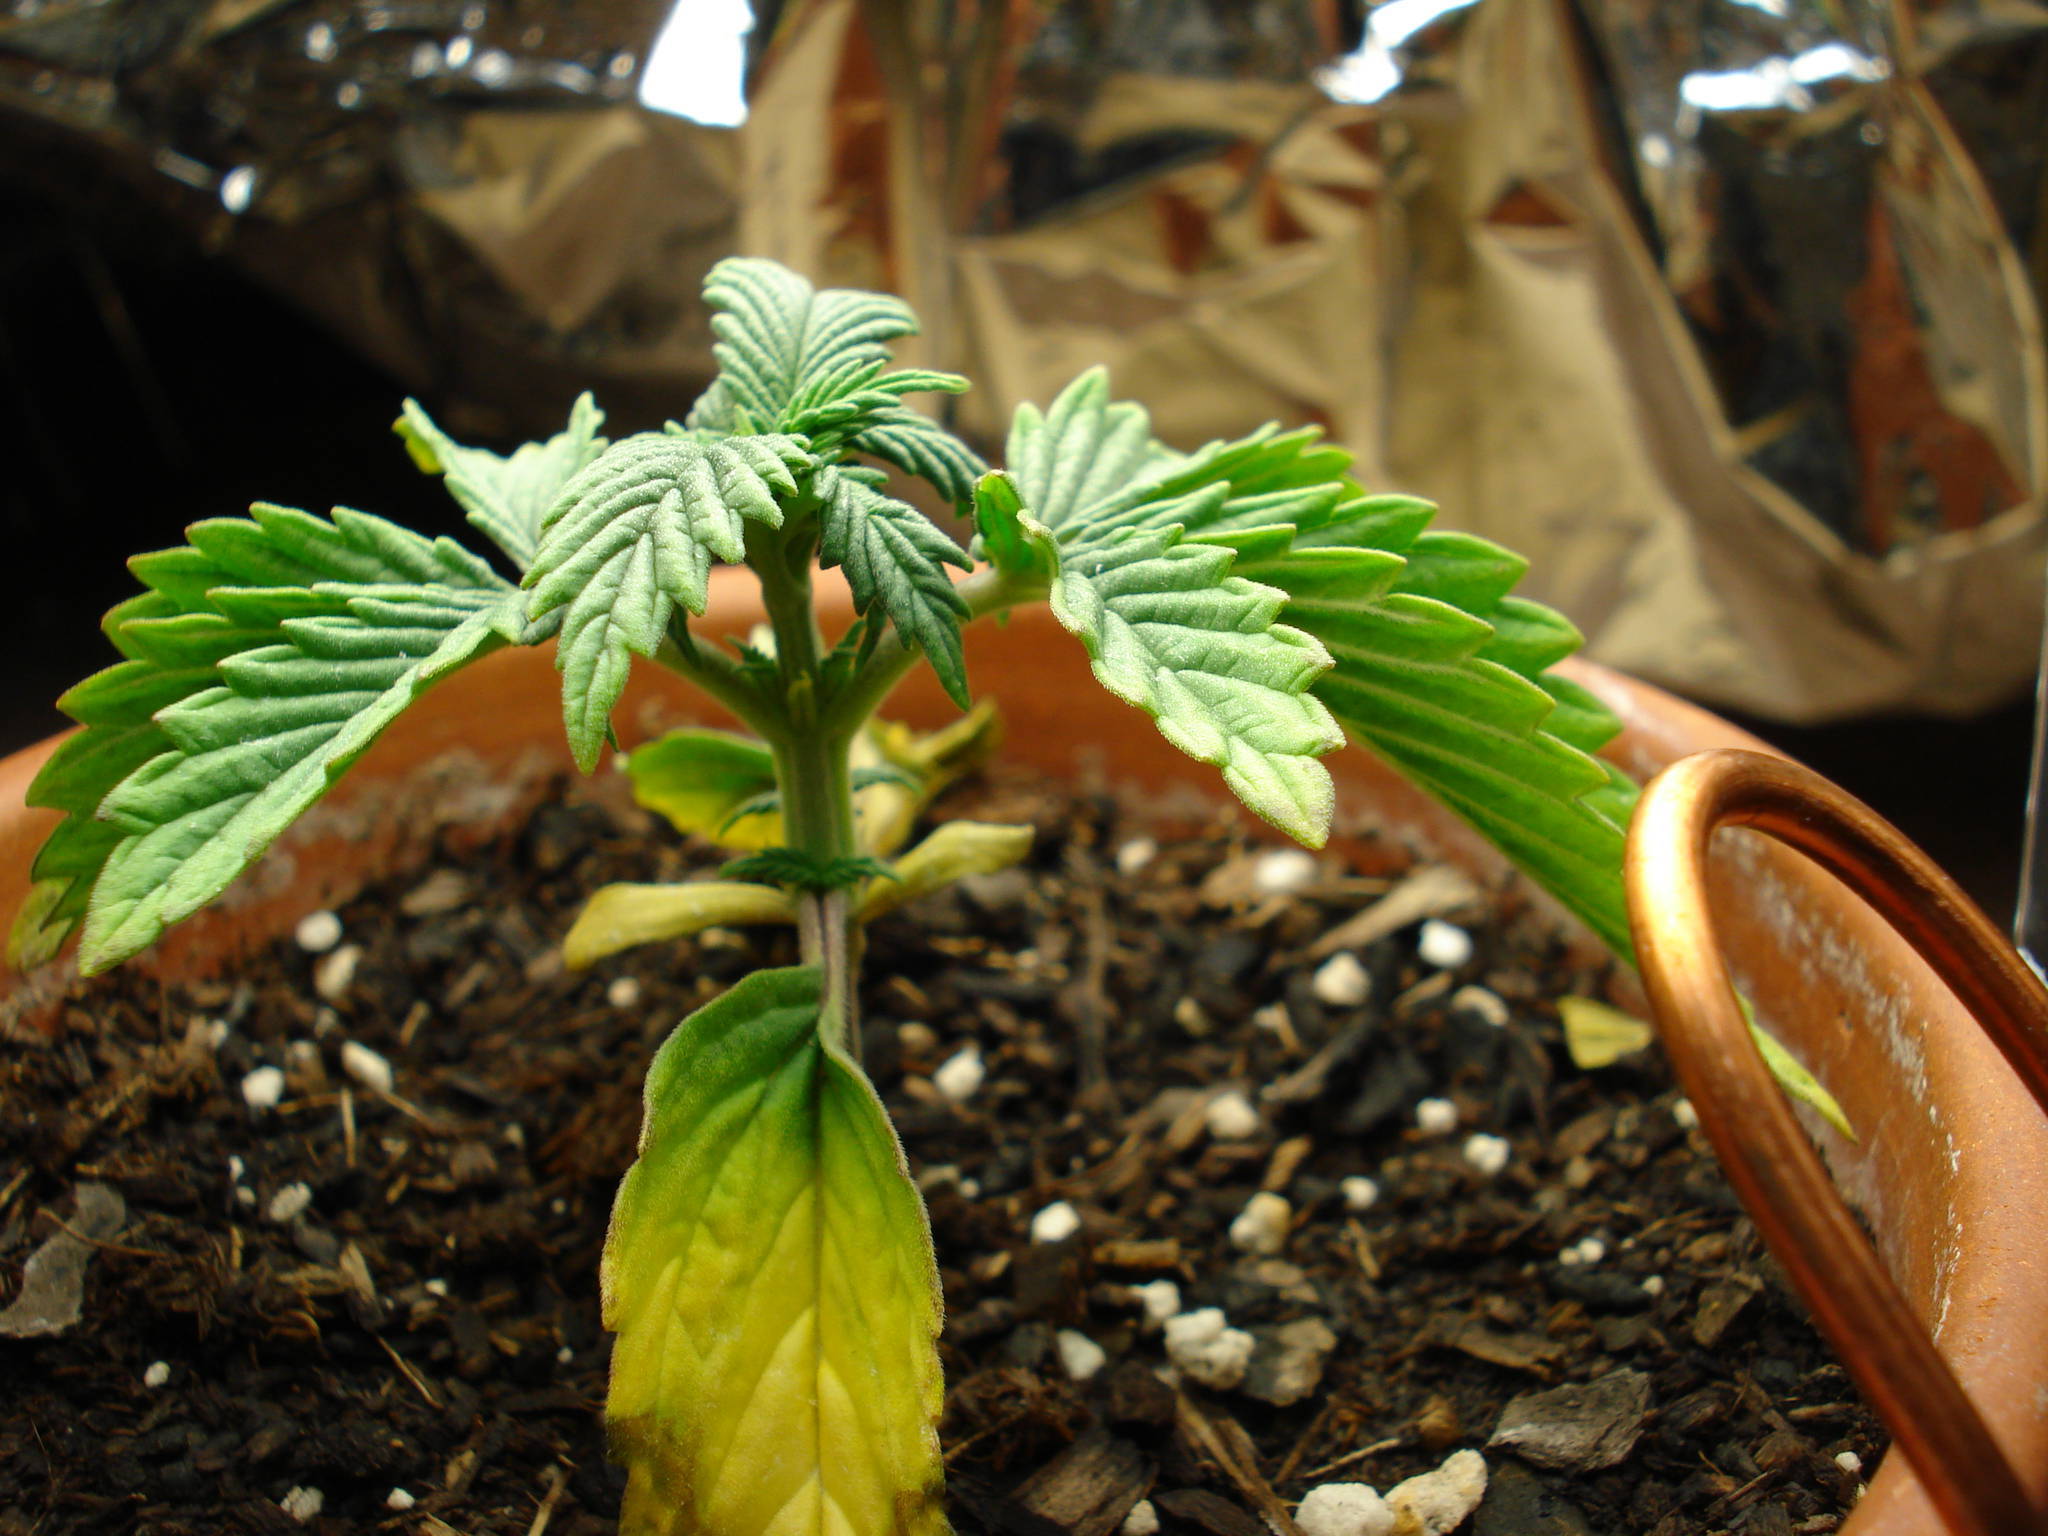
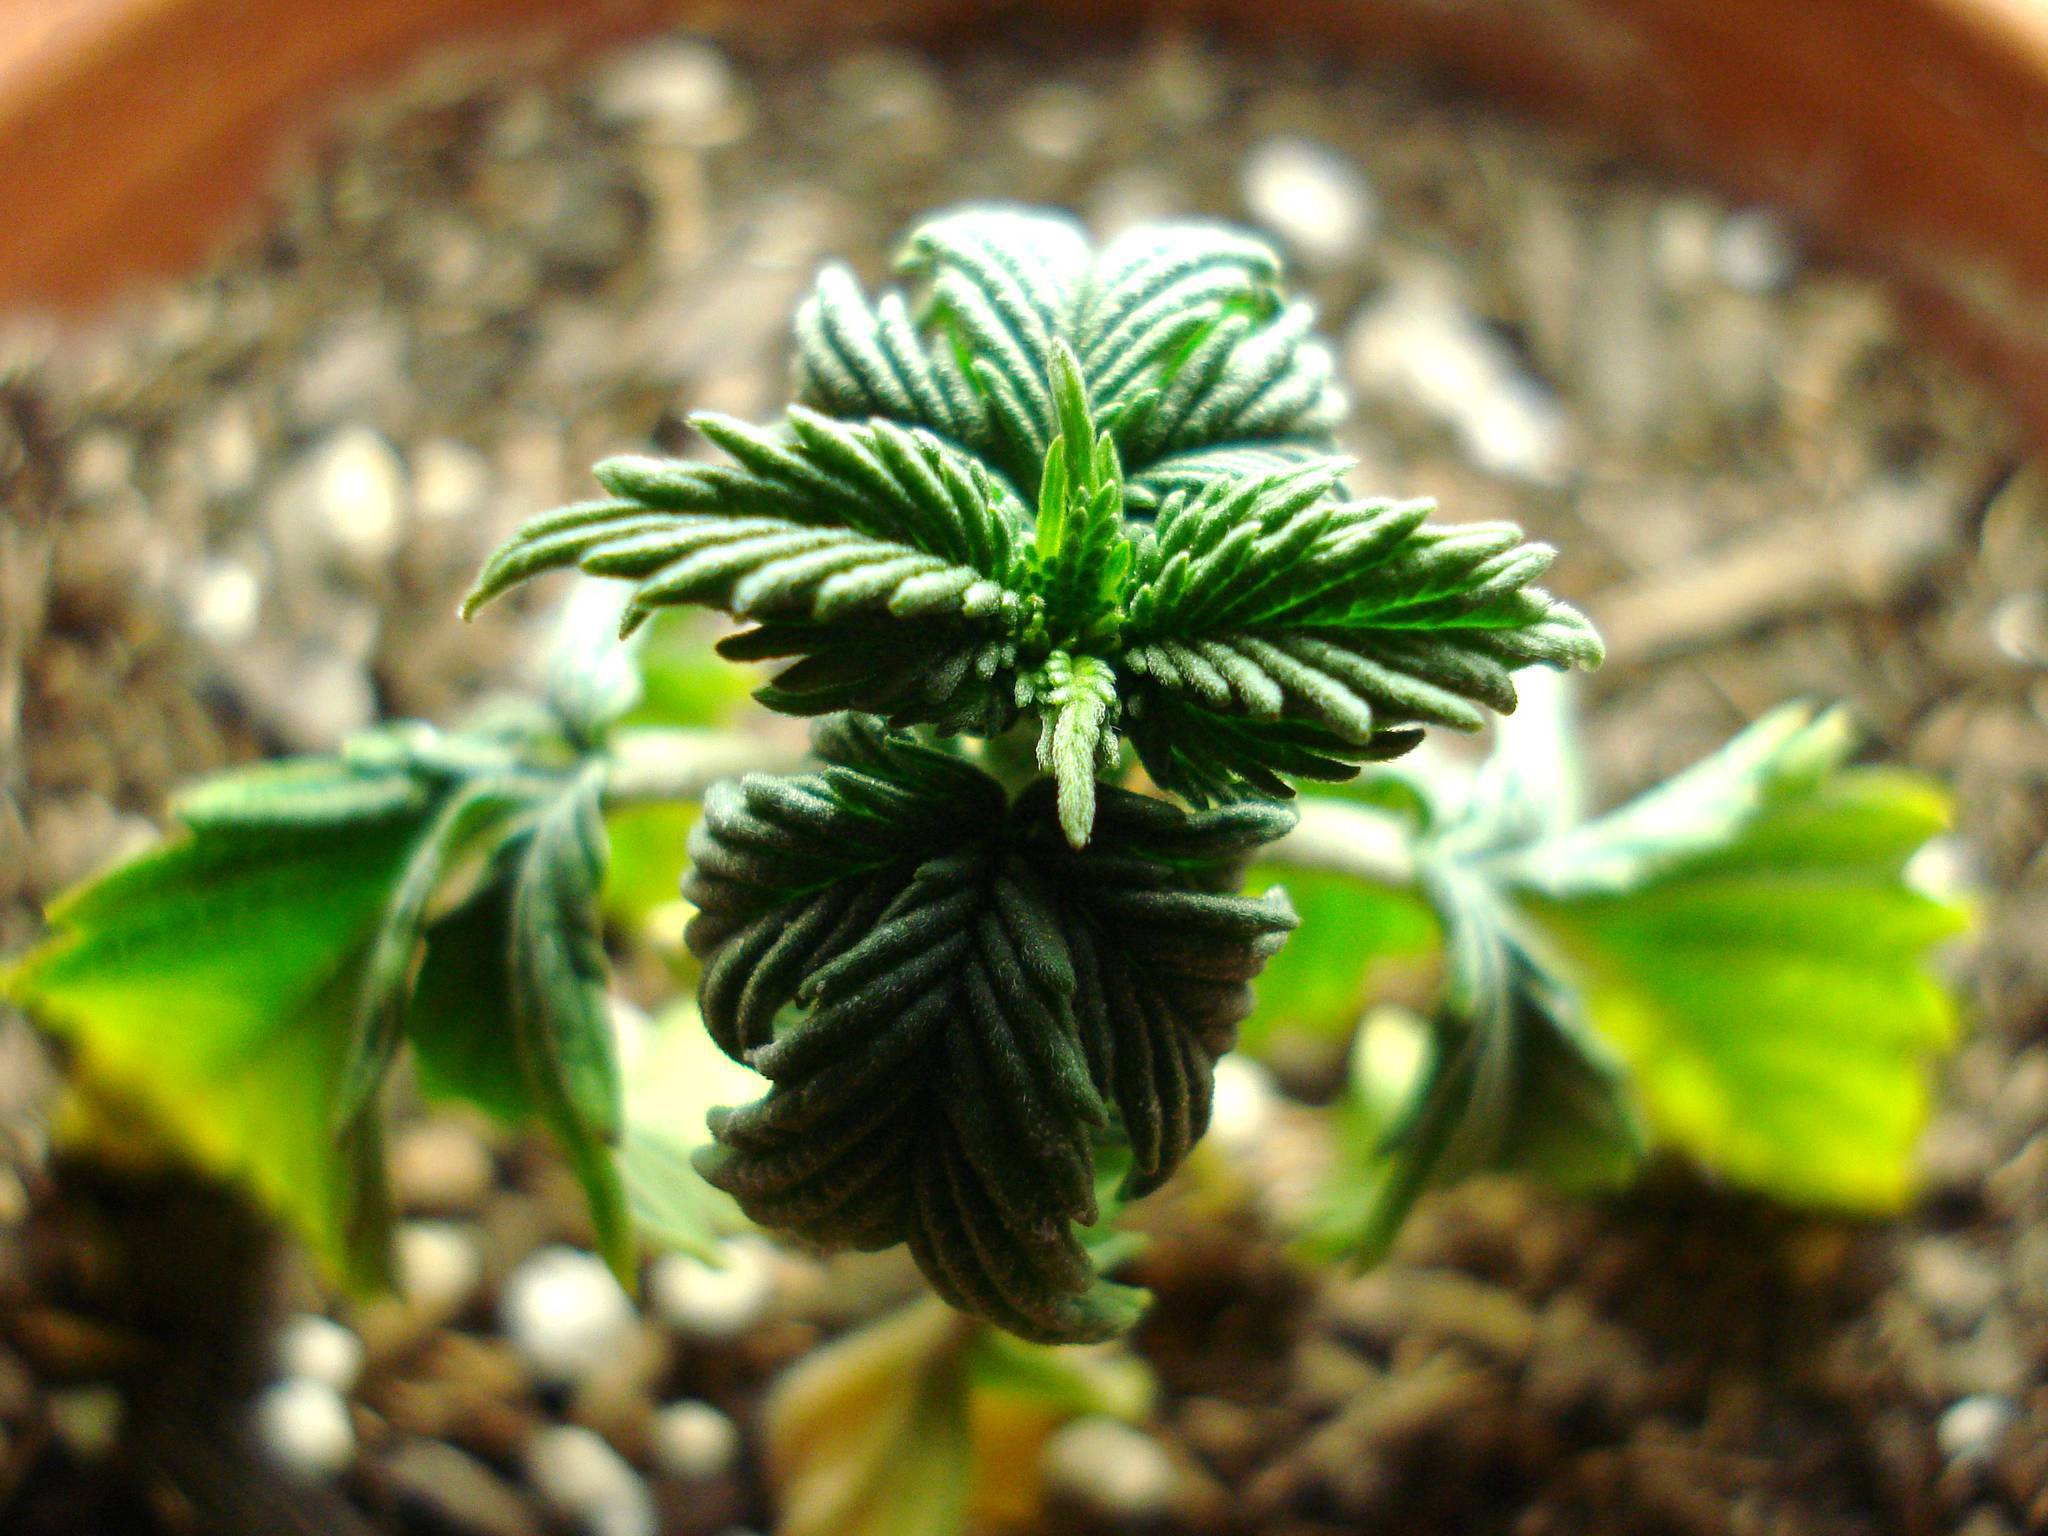
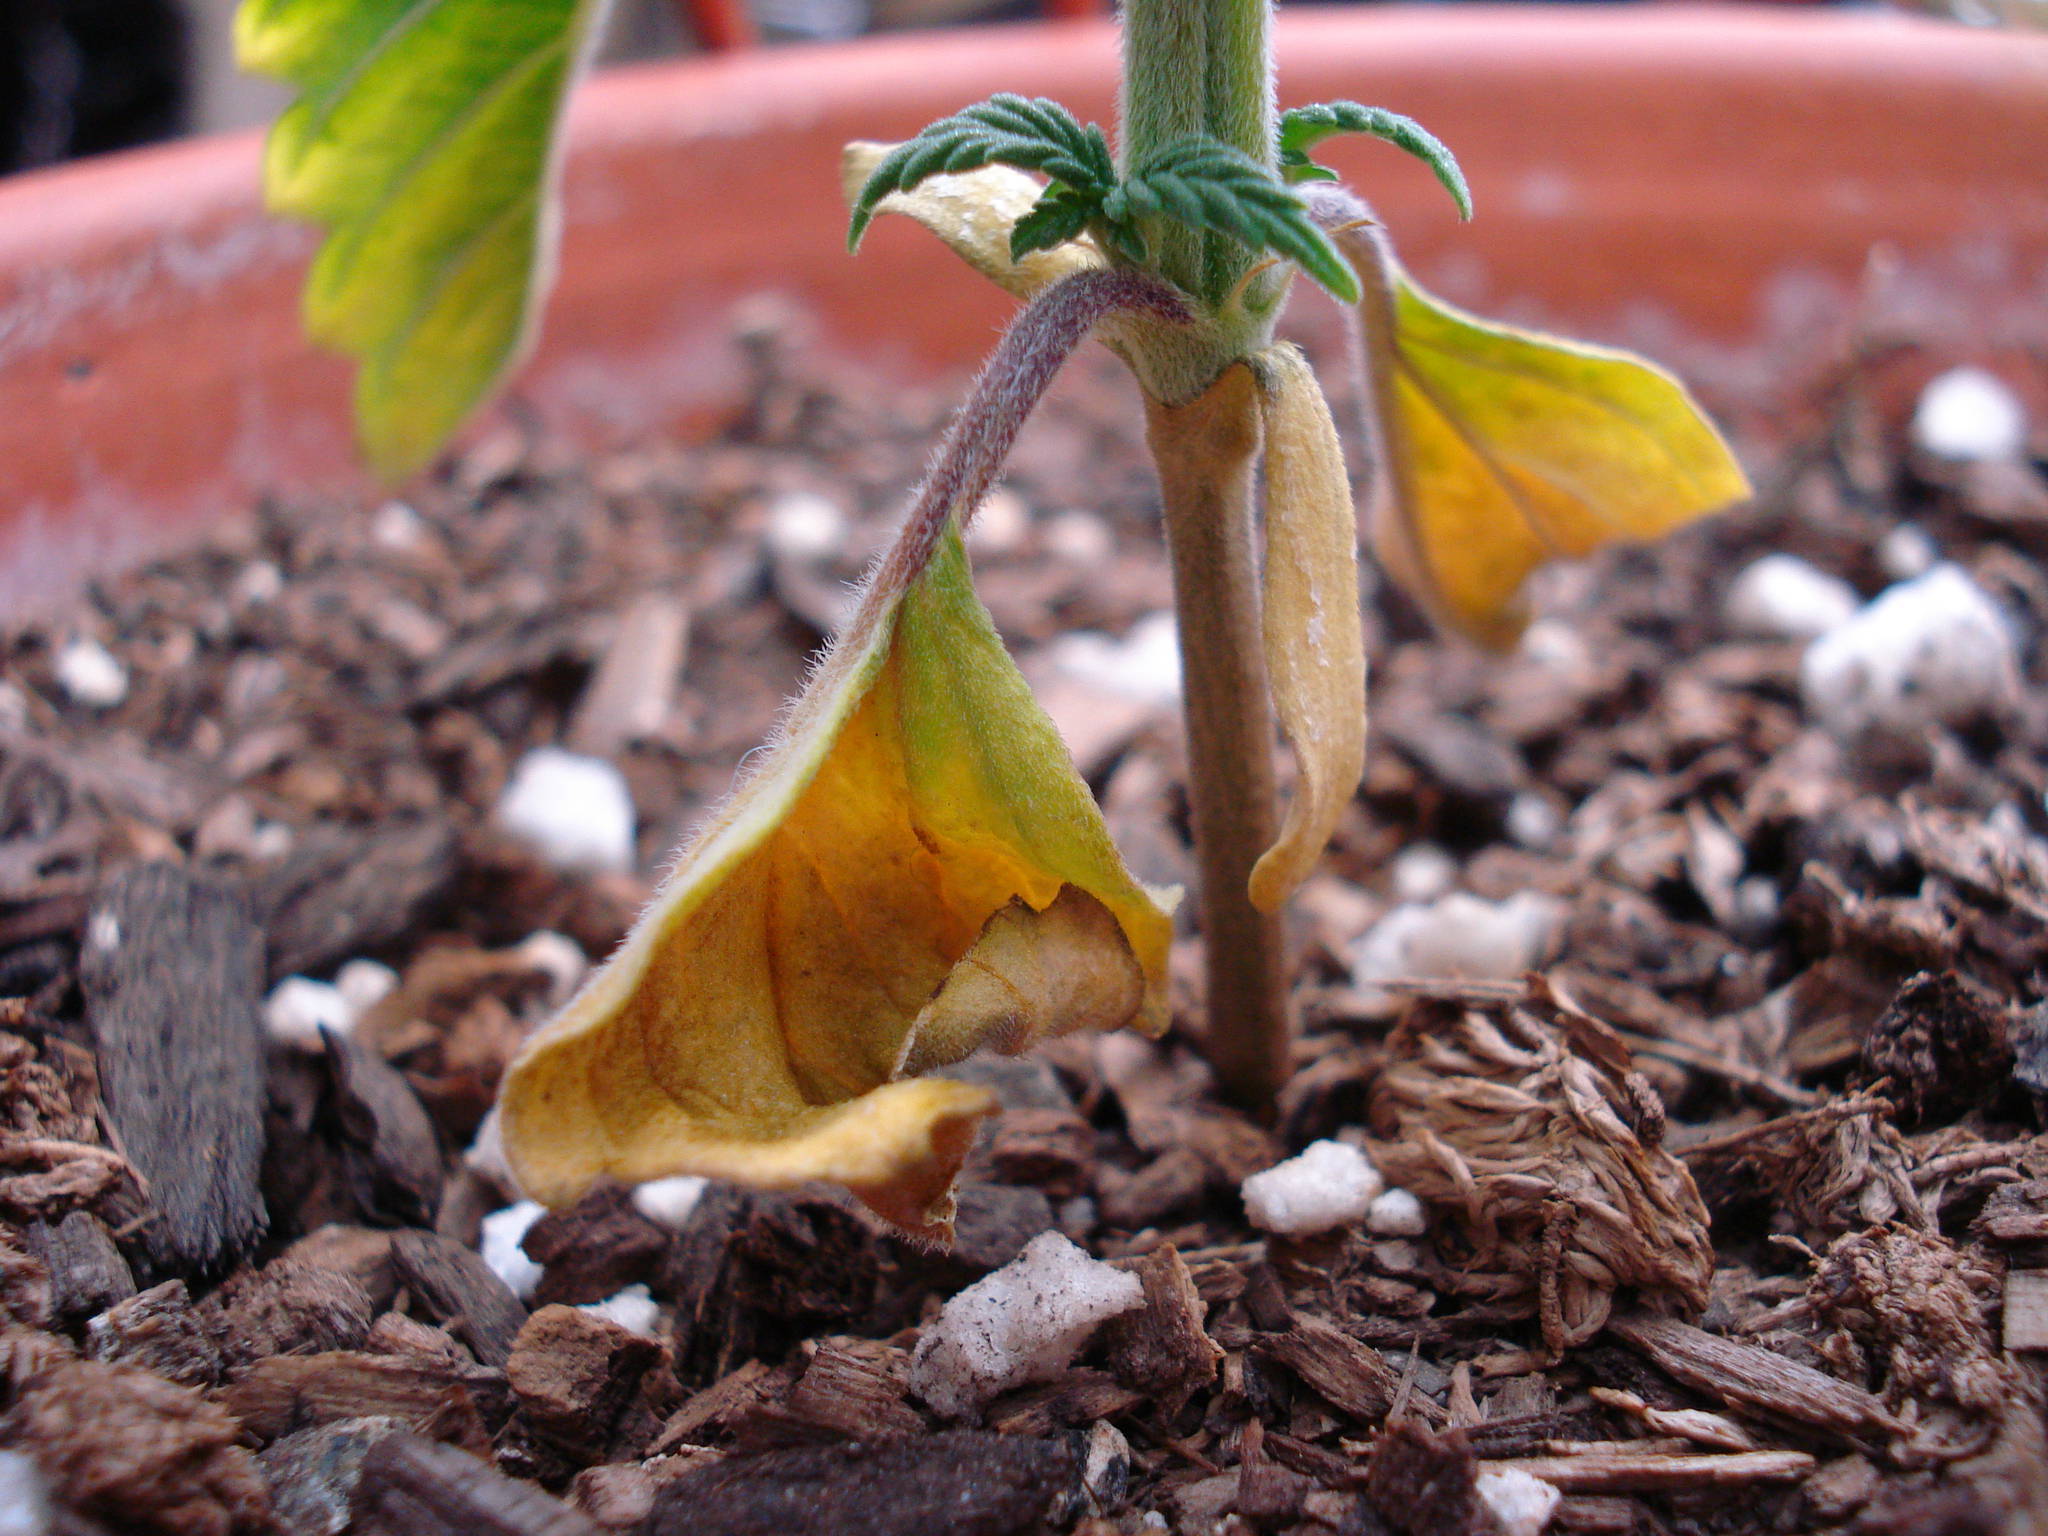
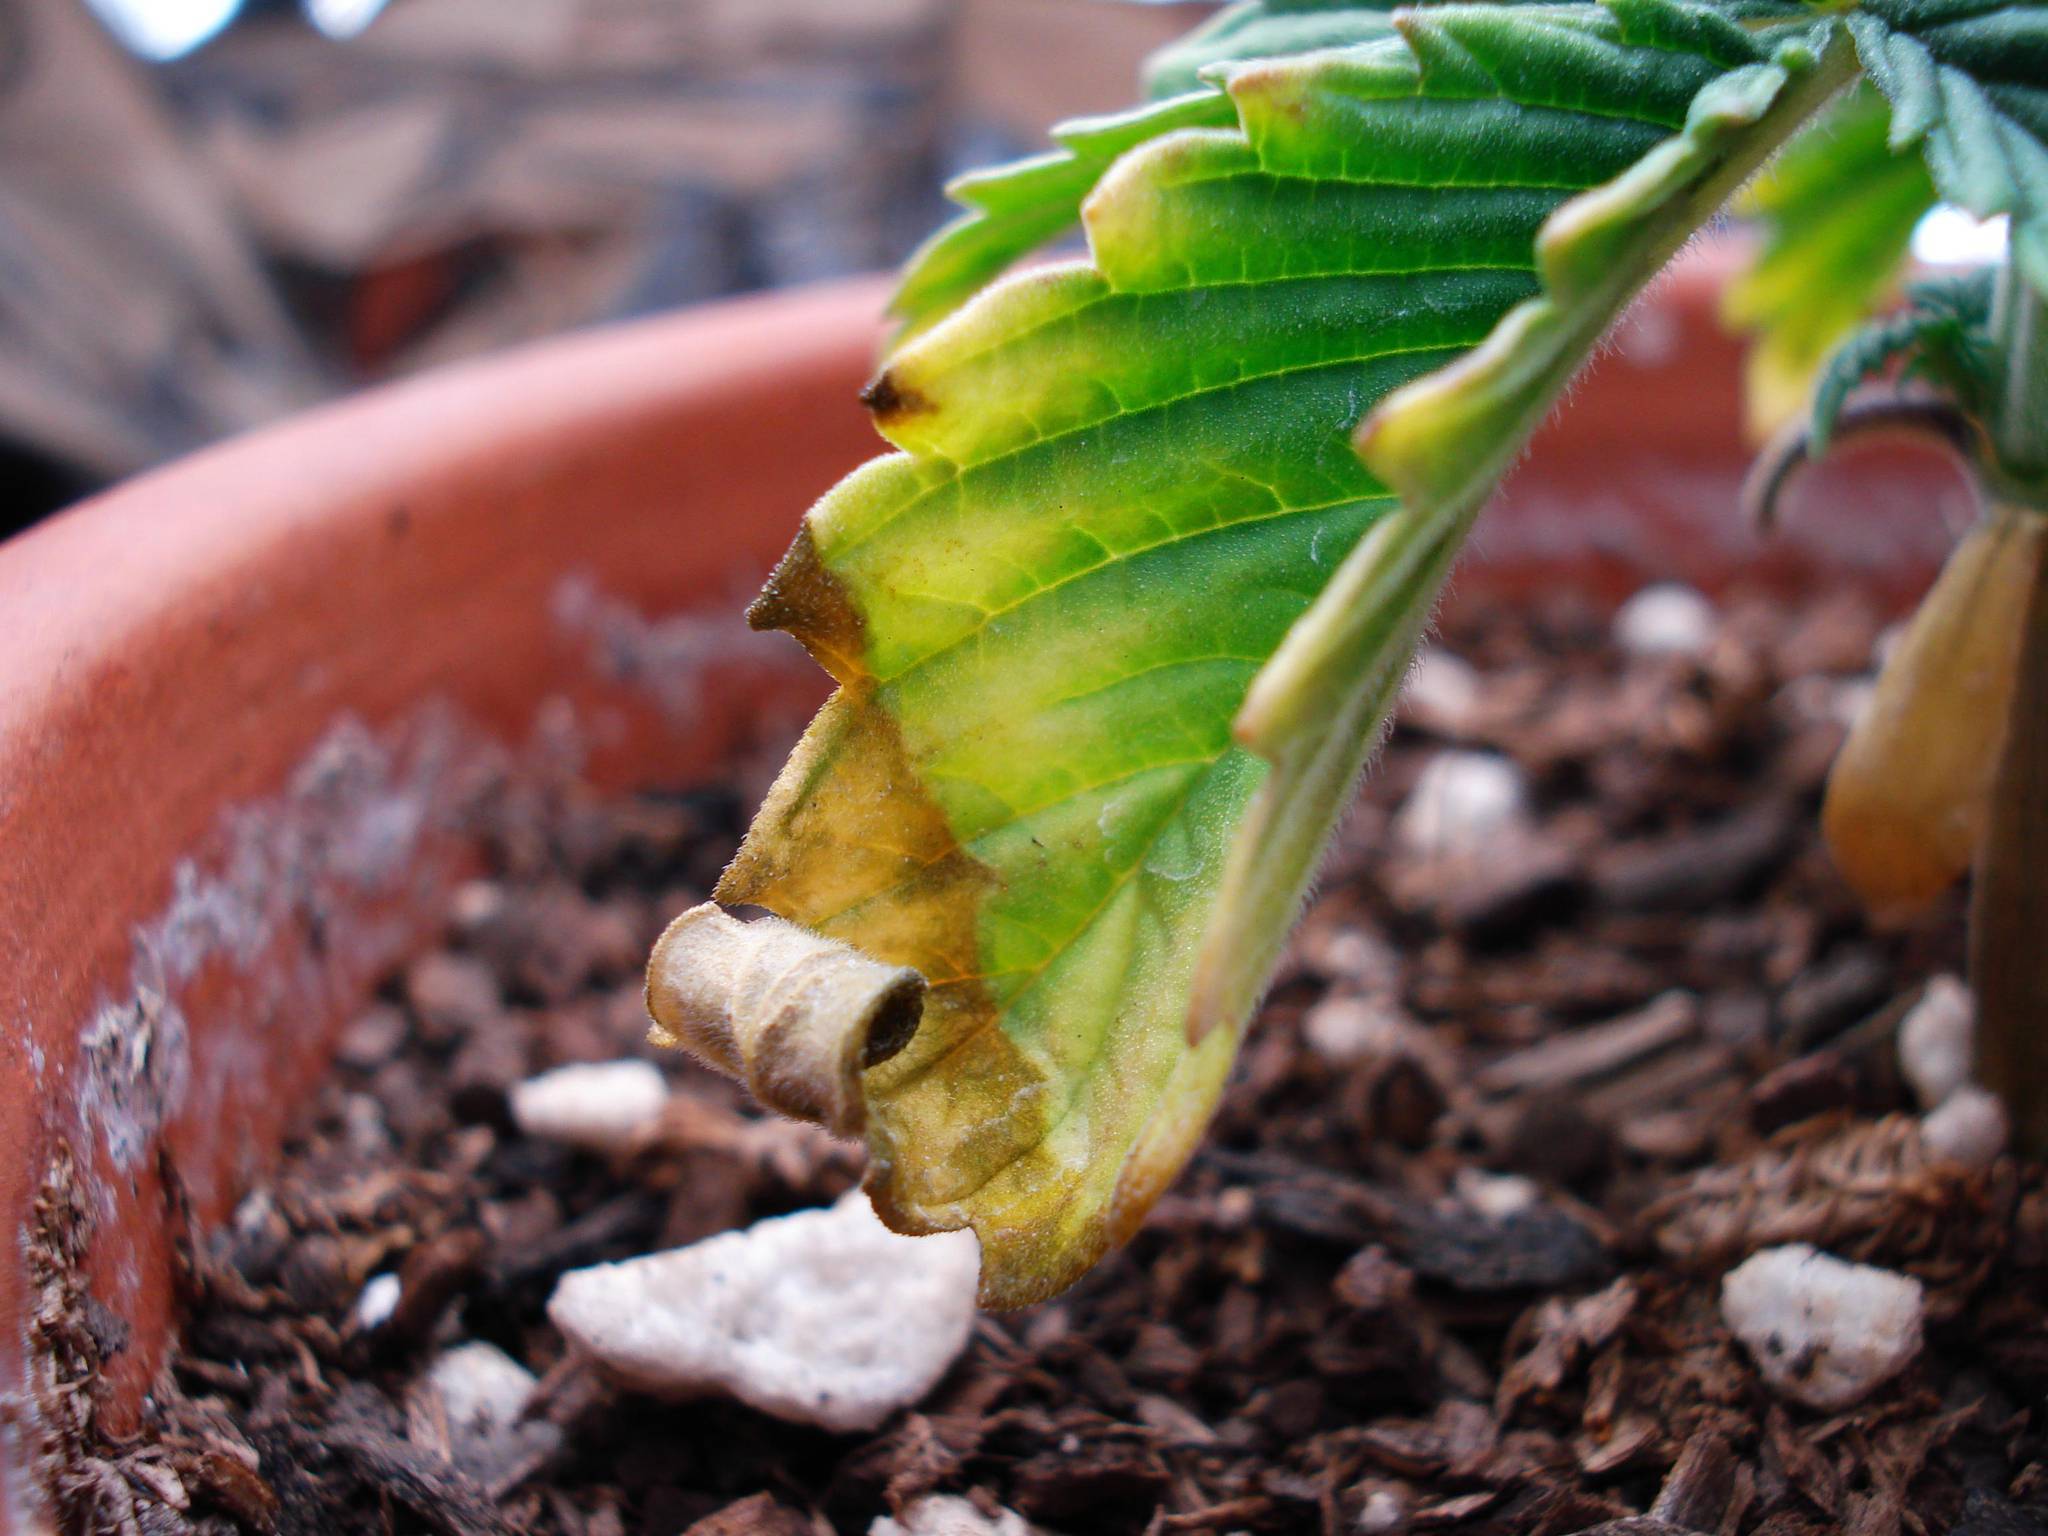
Notes: Still using drip system (have not yet learned its not helpful to my plant). Also, notice the purple color under the leaves on the last photo. Up to this point, I have not being using a fertilizer, just bottled water. I later find out, thru research, that the purple is an early sign of nutrient deficiency (aka she needs food). I wish I learned that sooner. Oh well.
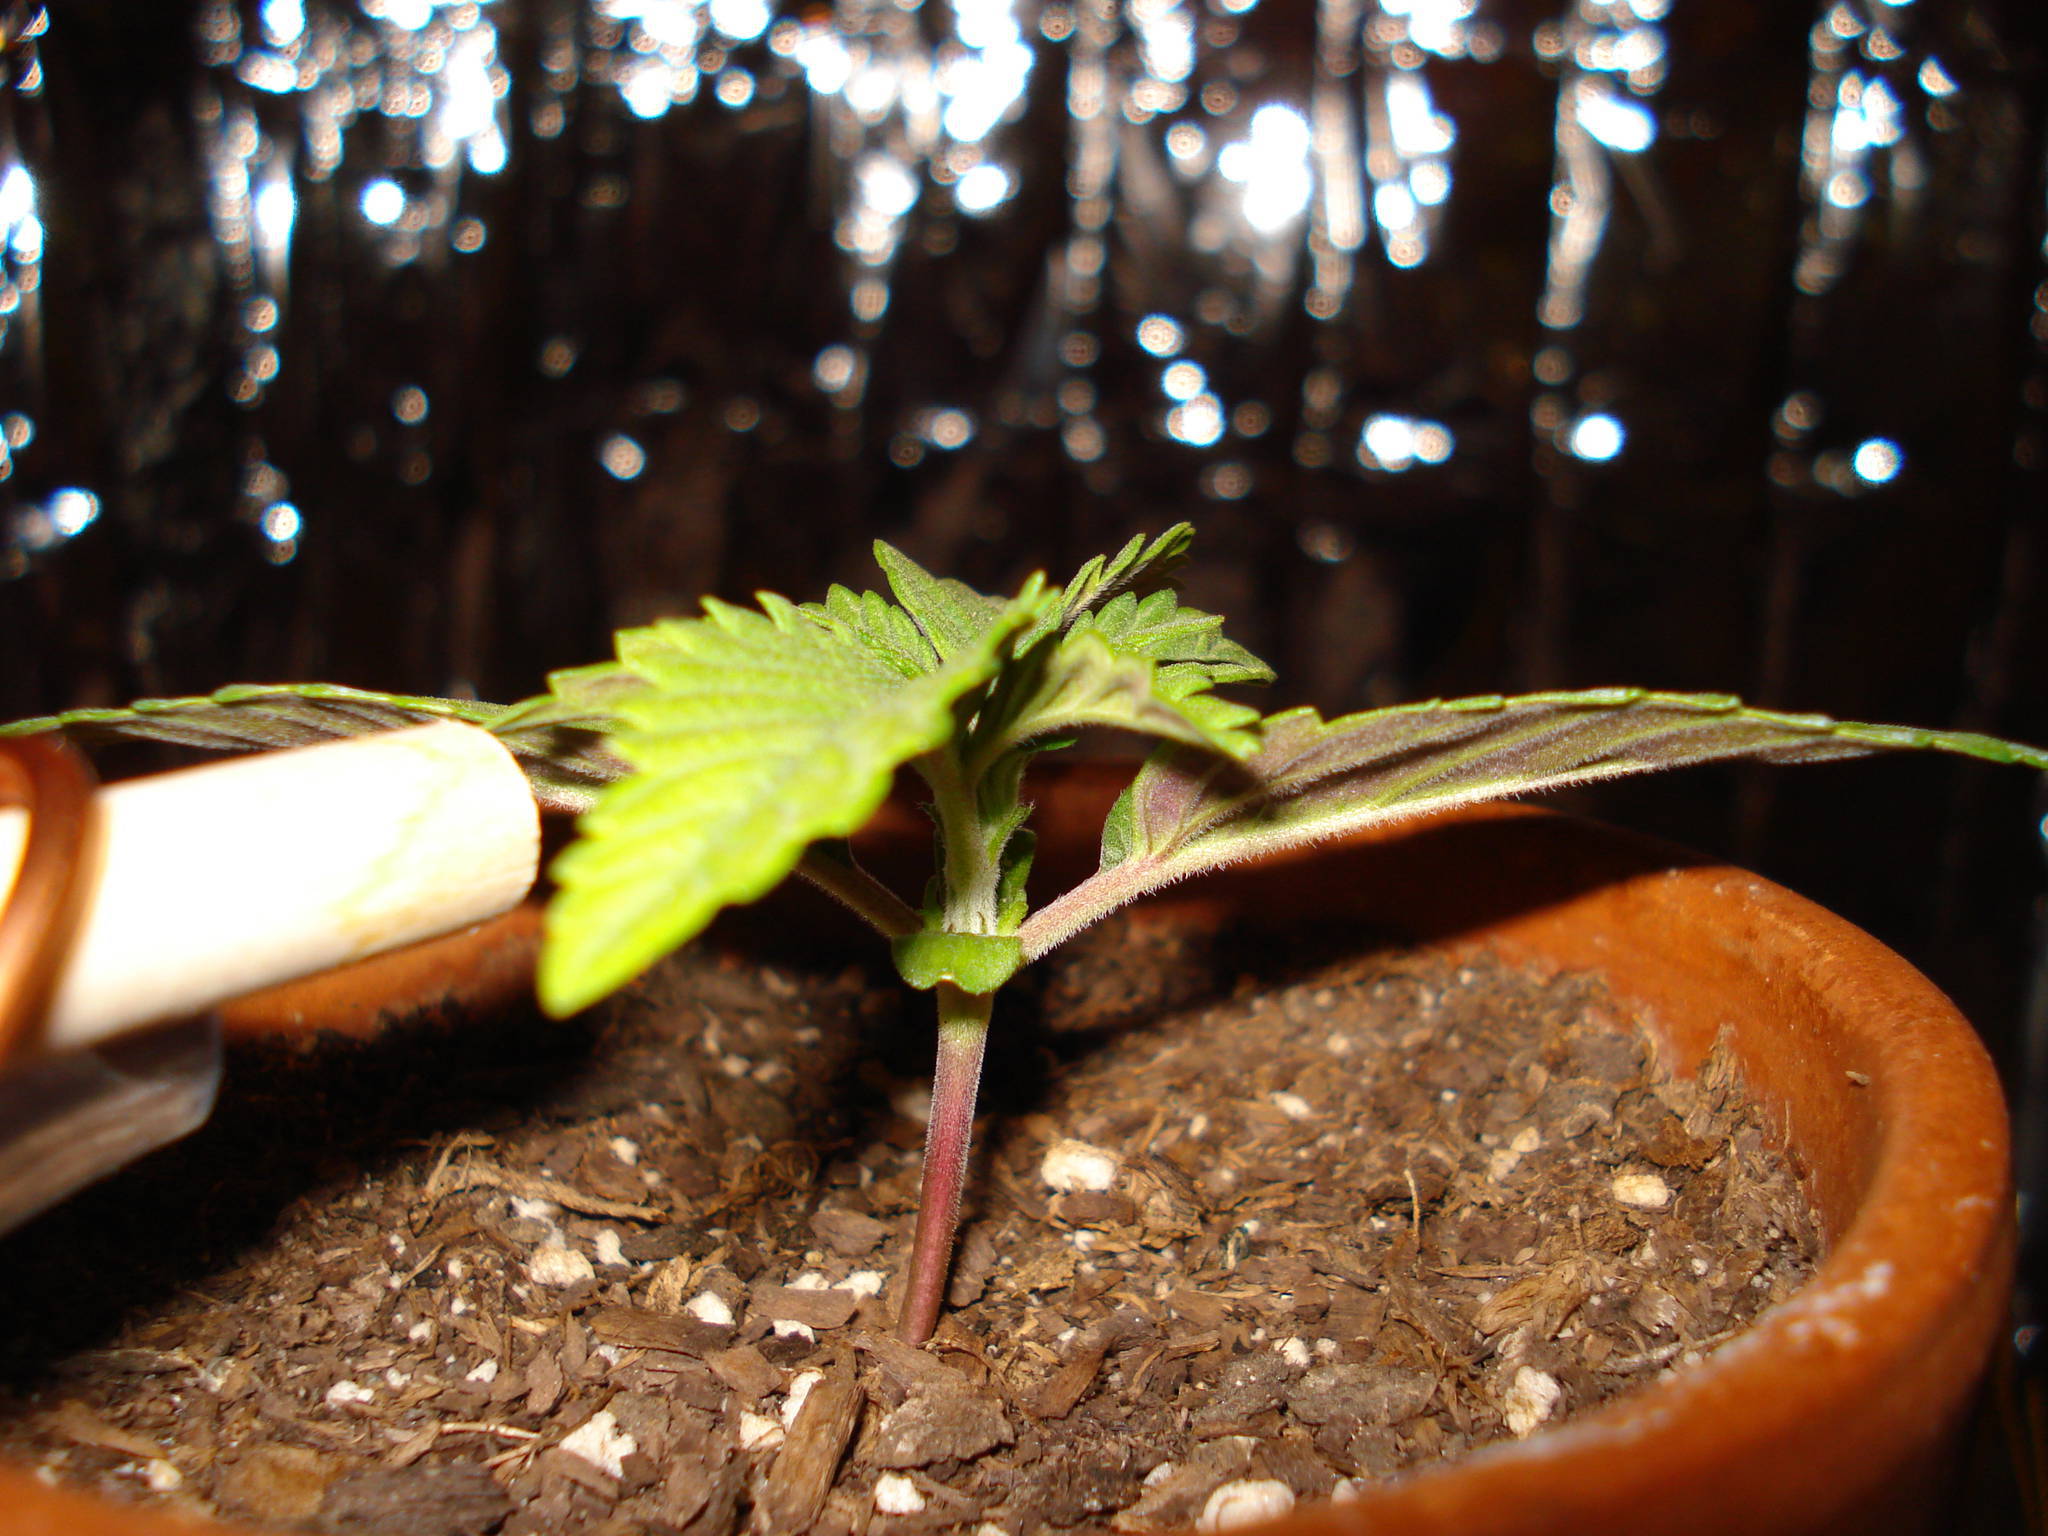
Day 14: Feb. 19, 2010
   
Notes: Notice yellowing on the cotyledon (baby) leaves on 3rd photo. Sign of nutrient deficiency...should of saw the signs. I also added a pan of perlite (last photo) to aid with humidity. Seemed to help, but not by much (a few % only).
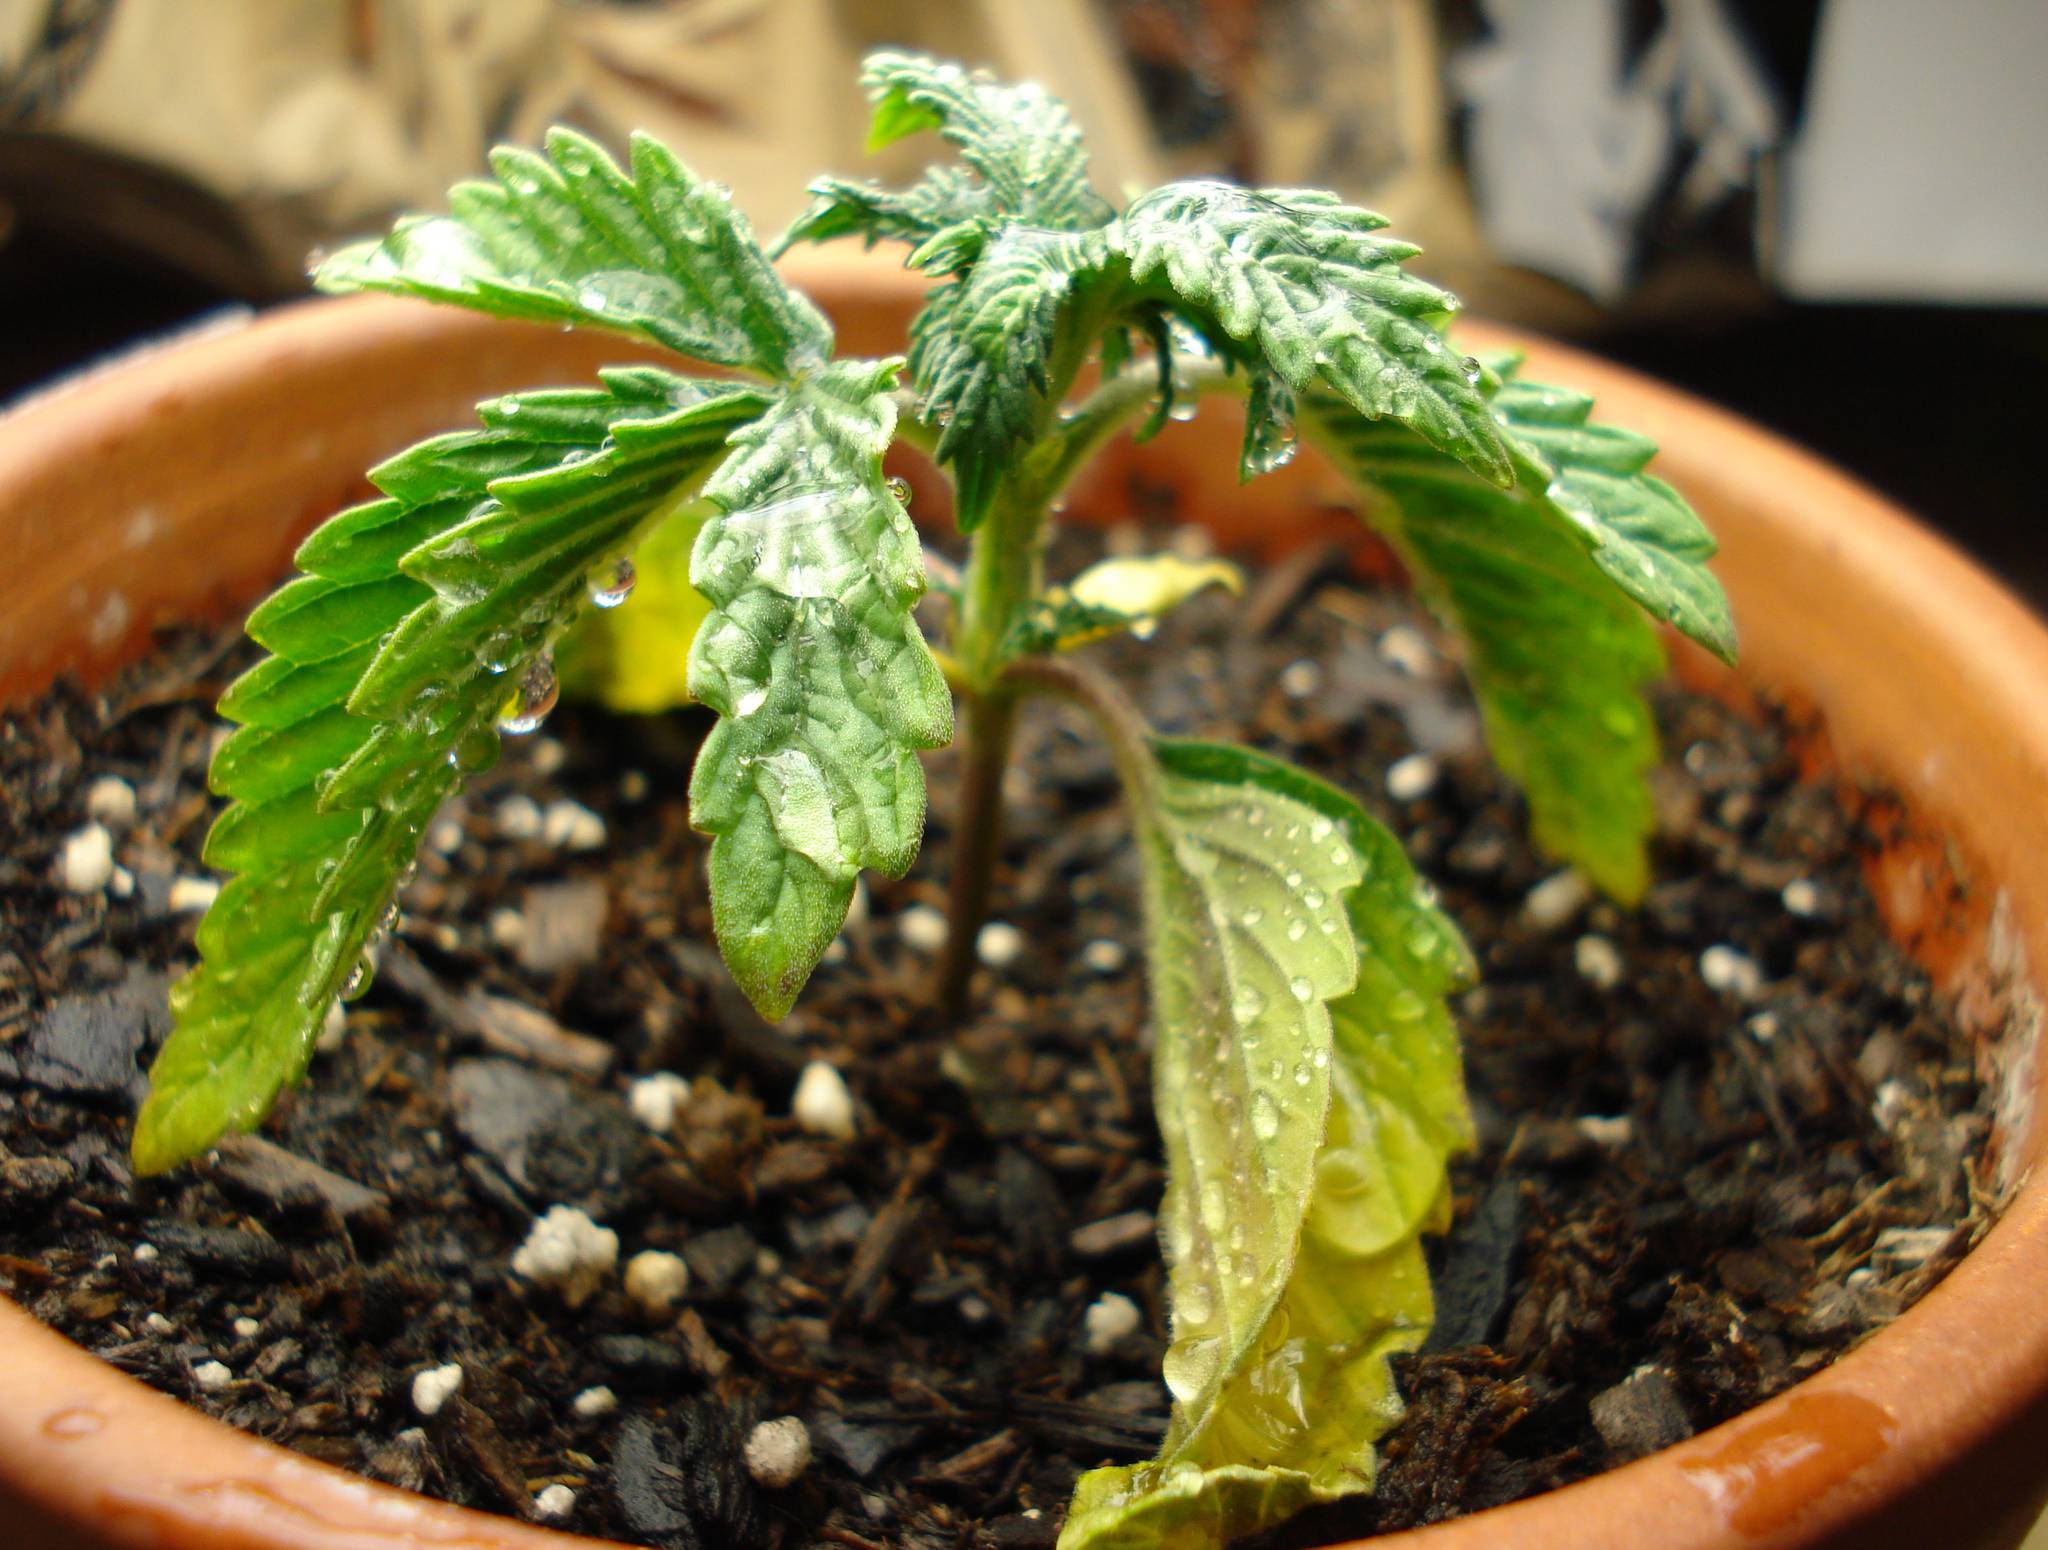
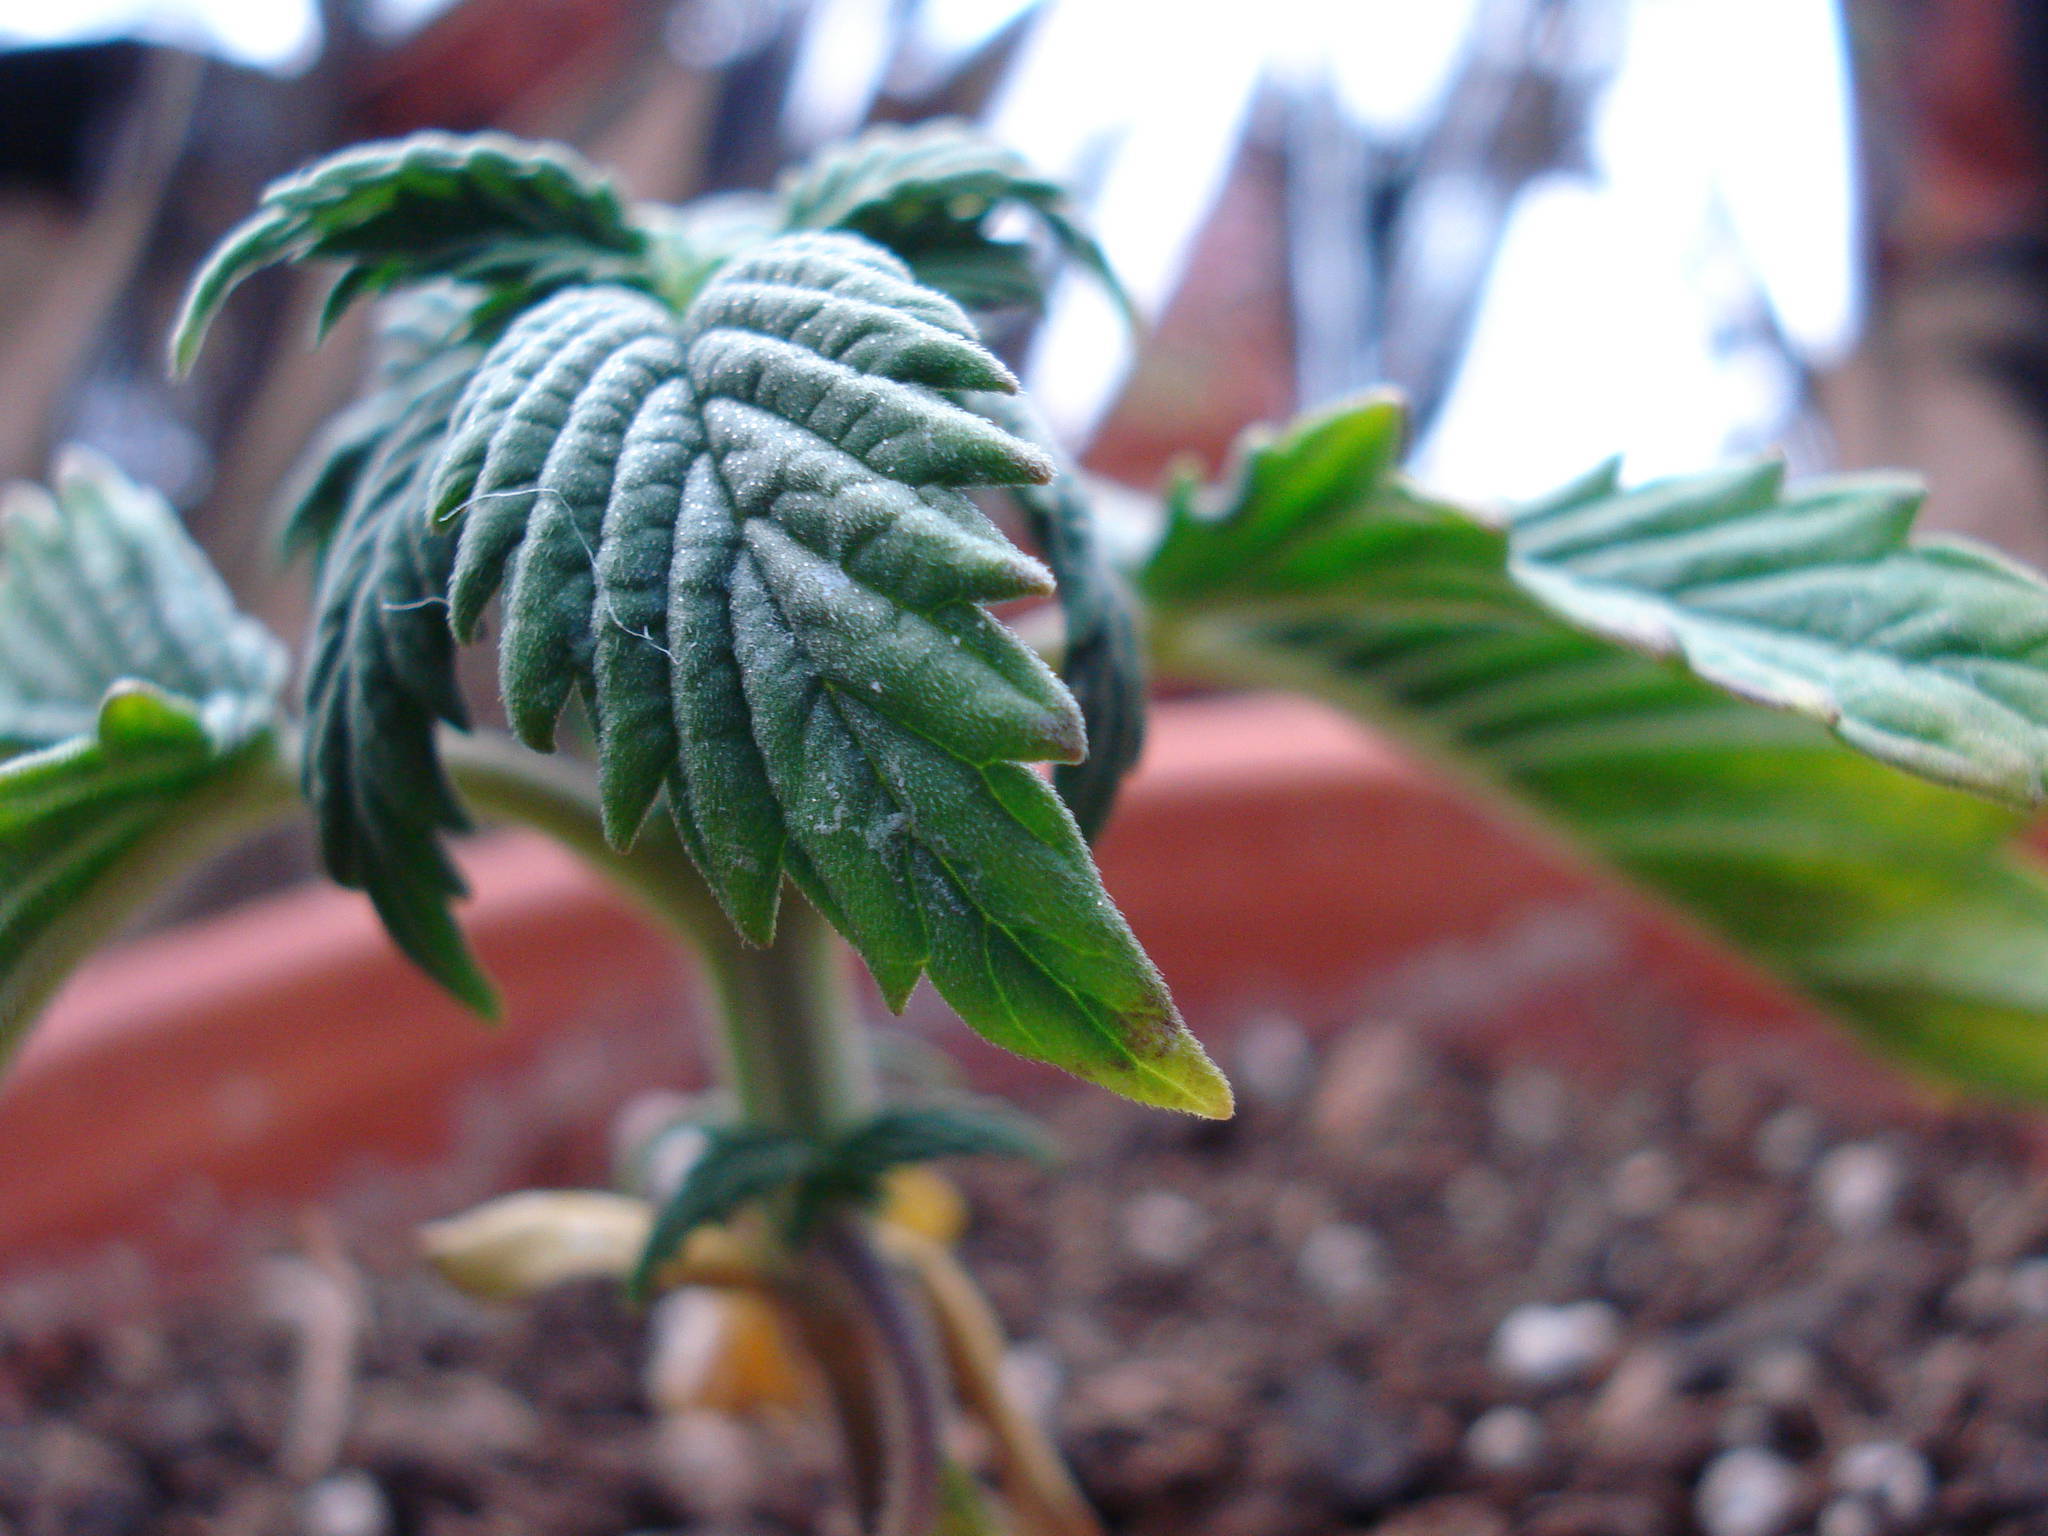
Day 17: Feb. 22, 2010
     
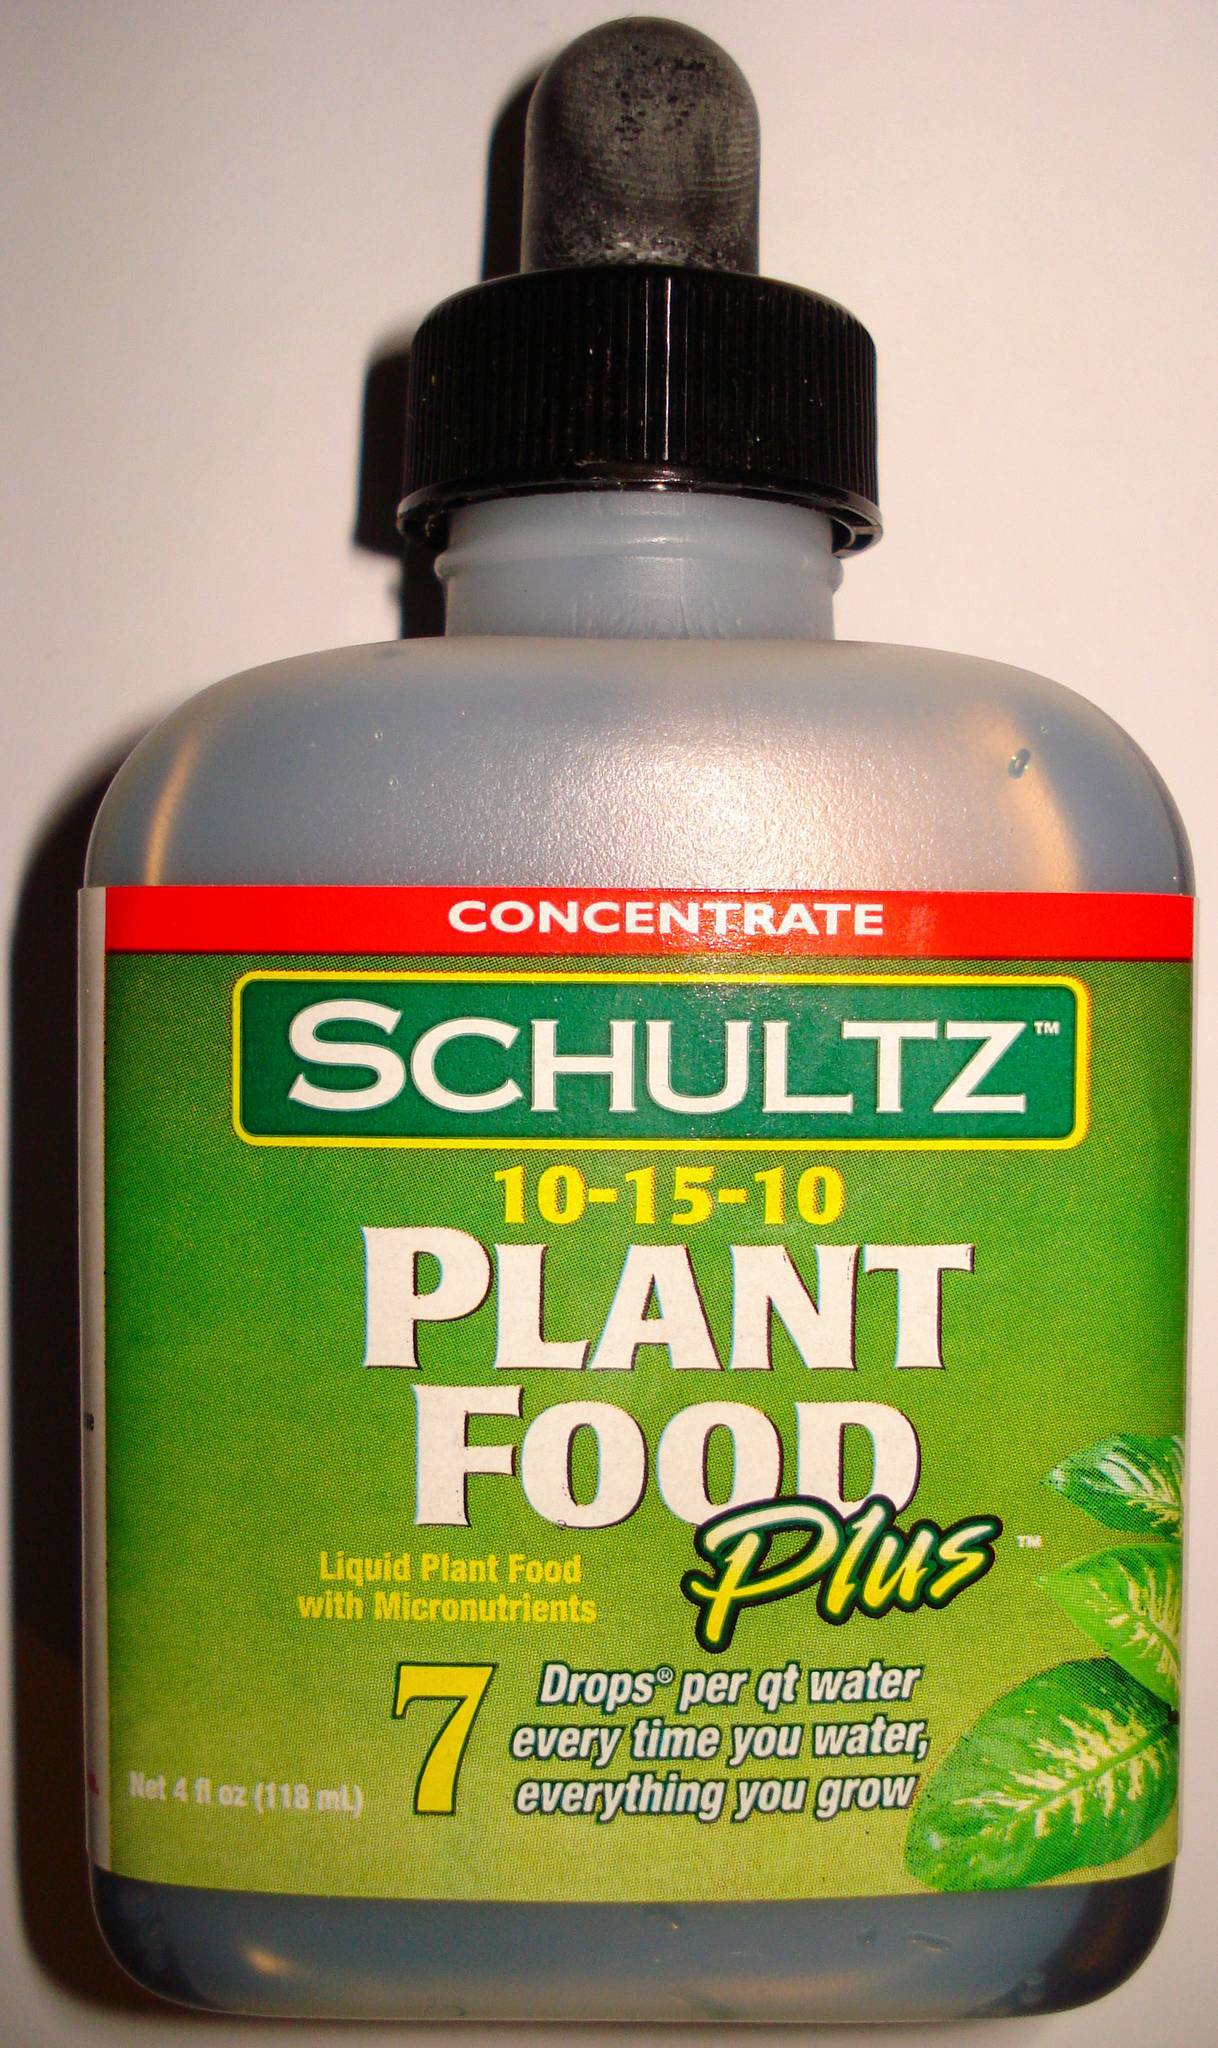
Notes: First sign of major yellowing on bottom leaves. Again, its the fact I haven't been using food. But today, I buy Shultz(r) liquid plant food (2nd last photo), and with Inverted's advice of using 2 full droppers per gallon (last photo). I also made the mistake of spraying the leaves with the mixture (forth photo from left). That was a Bad idea.
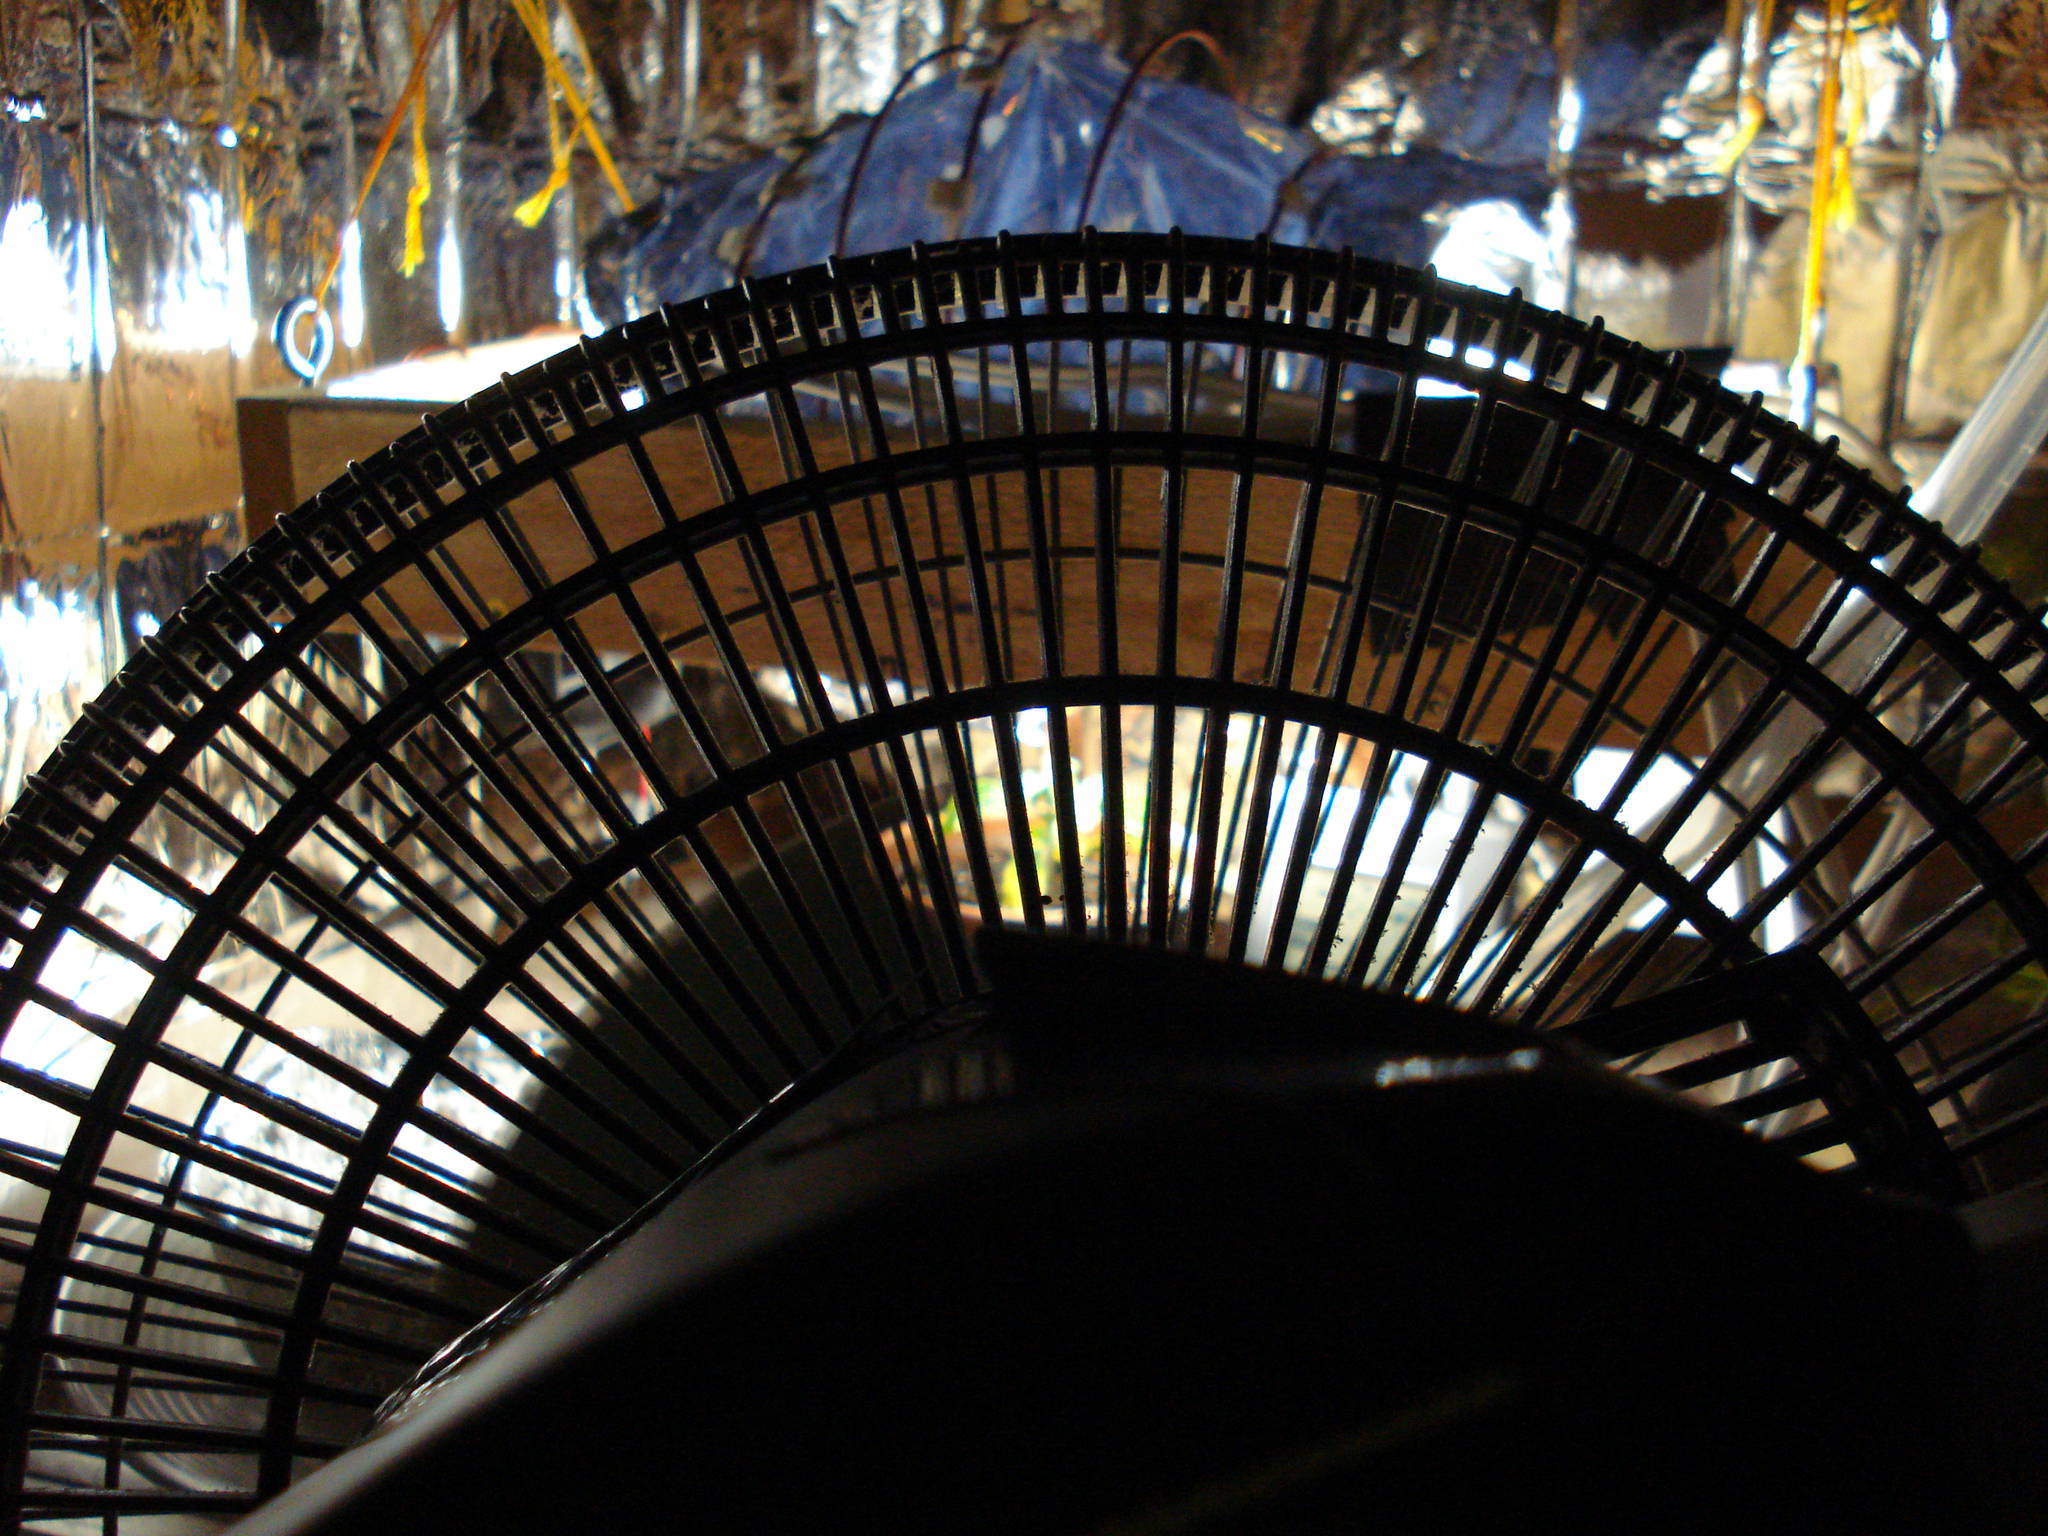
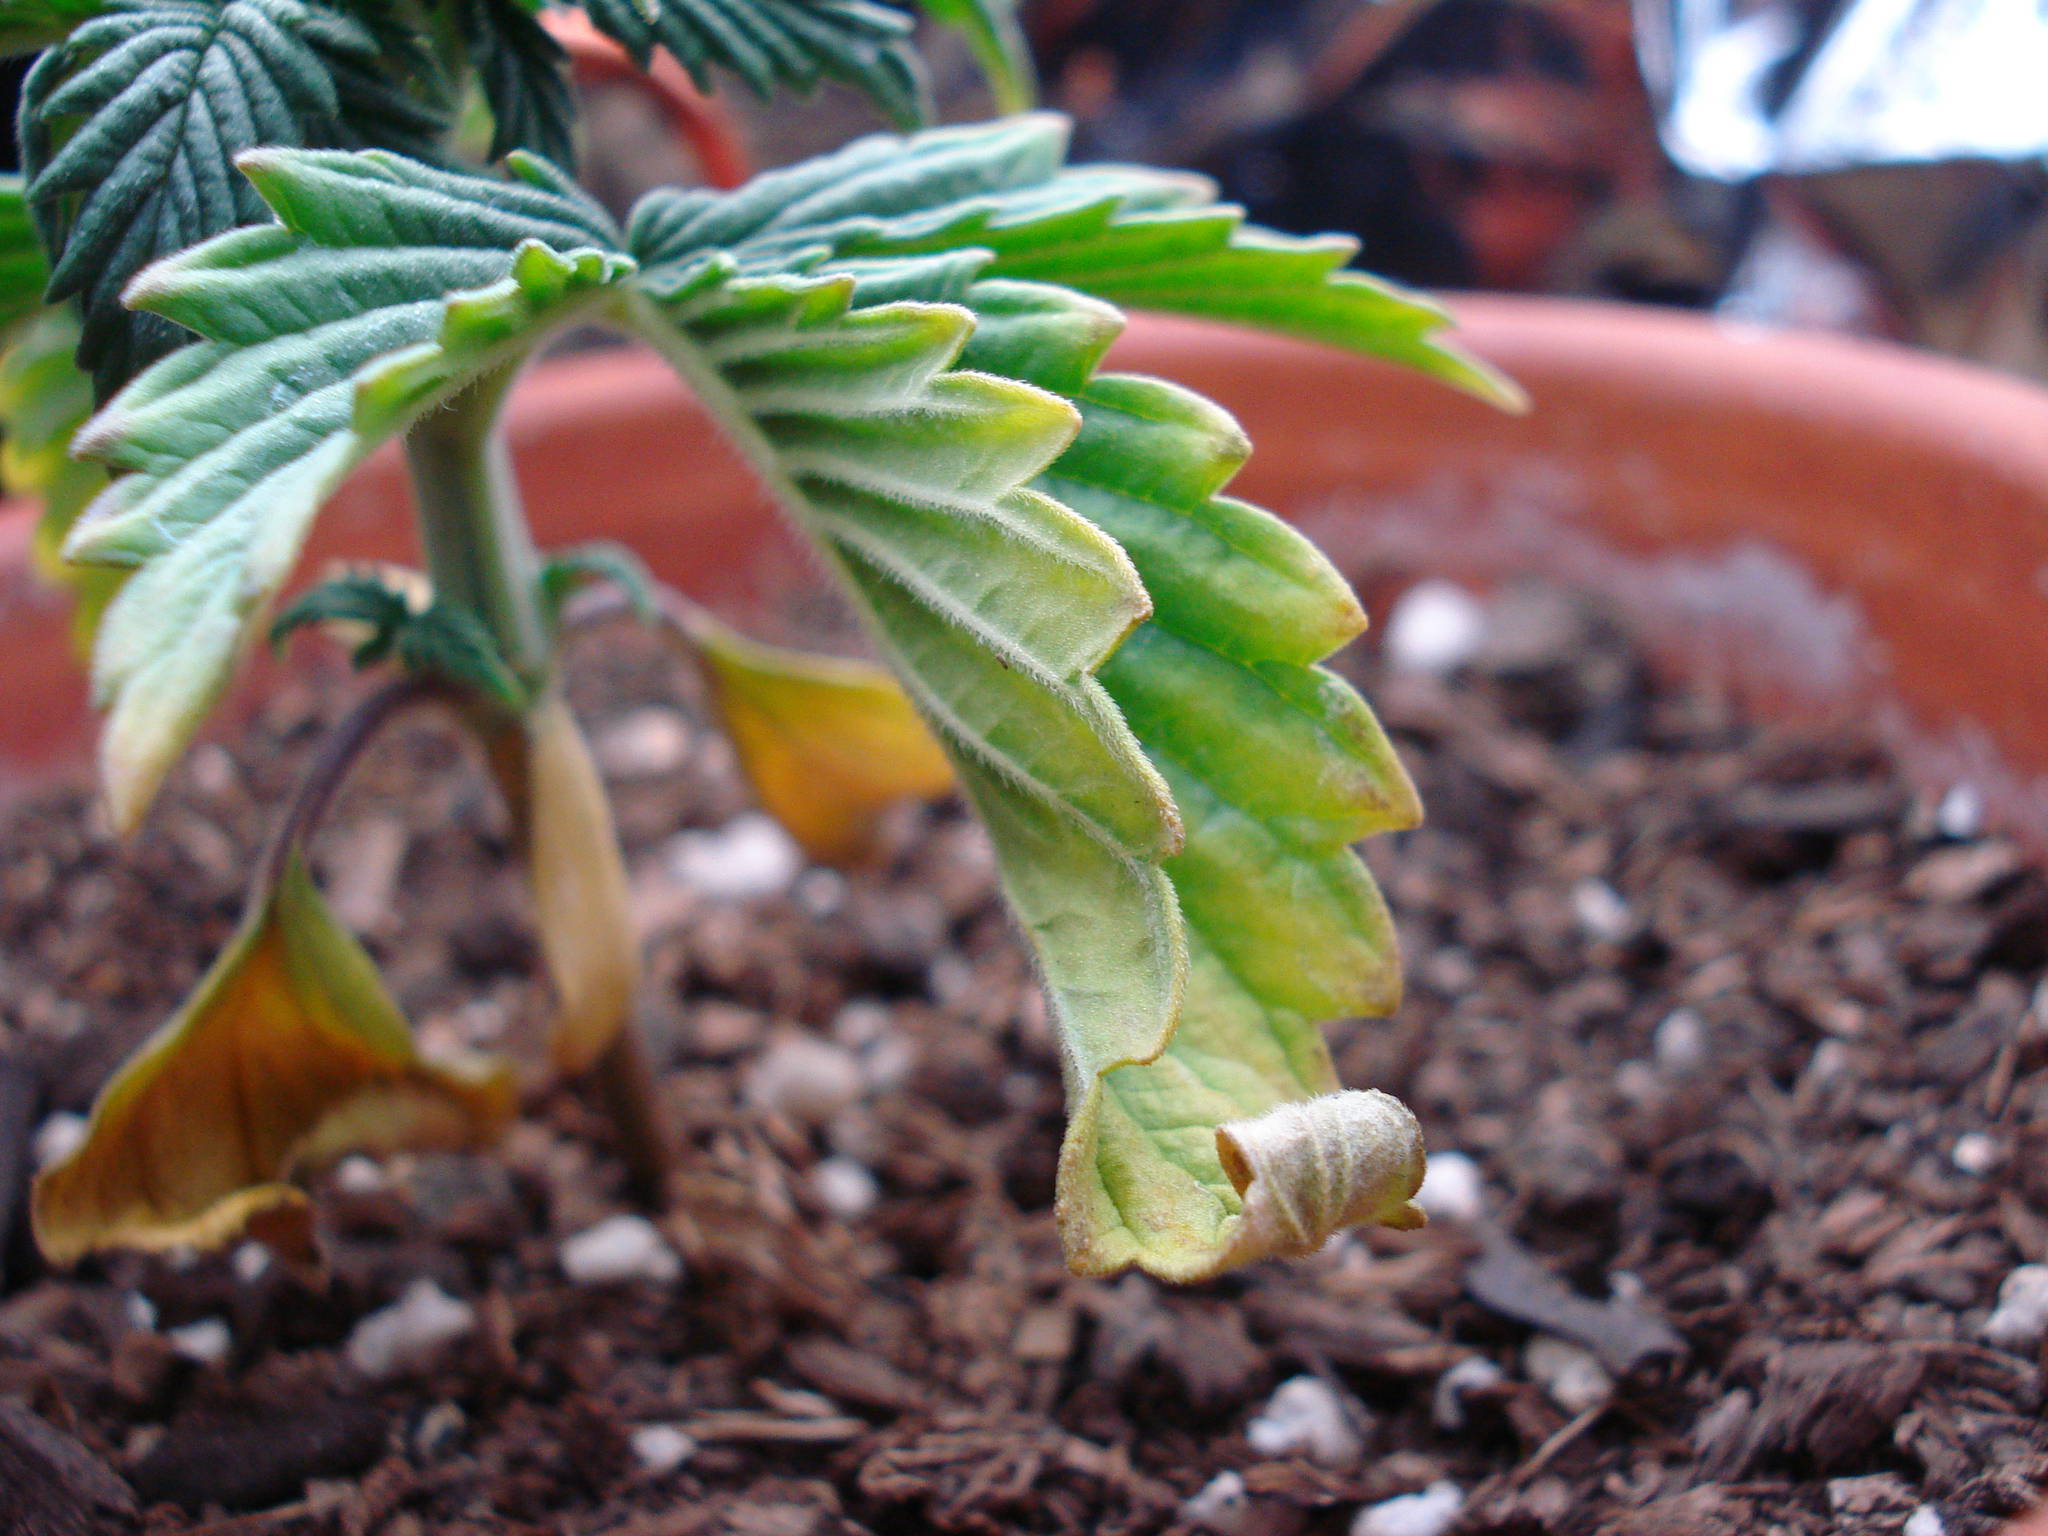
Day 18: Feb. 23, 2010
  
Notes: Yellowing still getting worst. 2 mistakes pictured here. First, photo 3: I had my fan blowing directly on my plant the entire light cycle. It should have been on rotate-mode. That was a bad choice by me. Second Mistake, photo 4: My taped-up sheathing failed, thank God it was during the day. I learned that thumb tacks are the way to go when putting up sheet stealth.
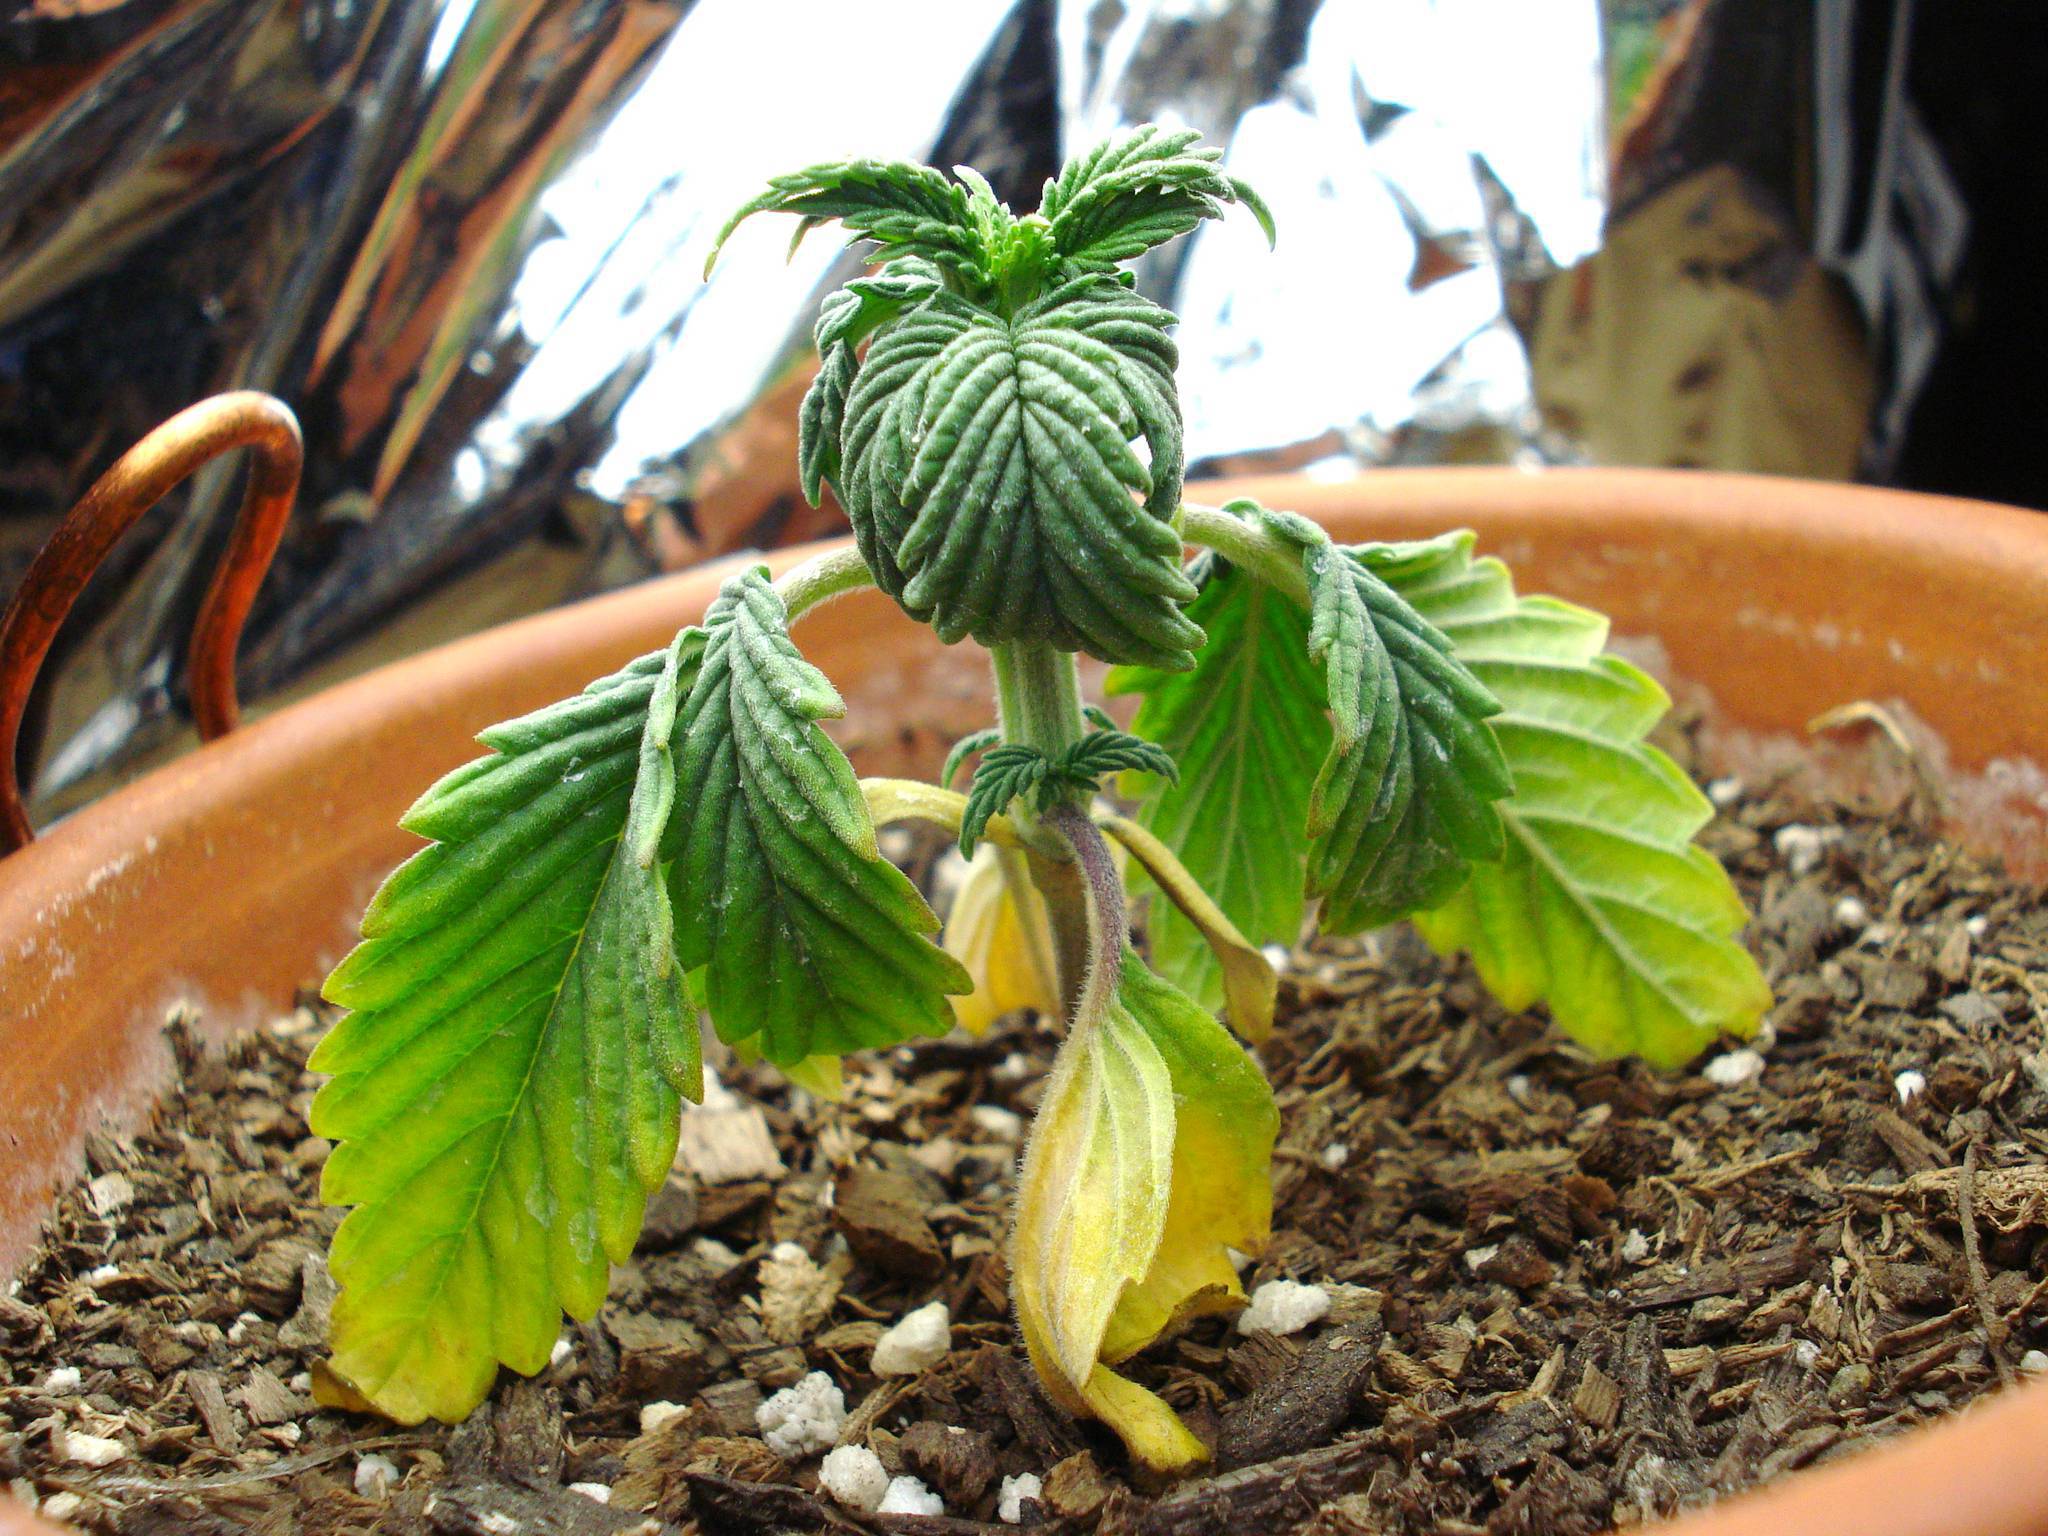
Day 20: Feb. 25, 2010 (? not sure)
   
Notes: Drooping is getting pretty bad here. The yellowing won't stop on lower leaves. The yellow eats it like a disease, its weird. Added a small 80mm fan to the woodern 'light wagon" to aid in cooling and strengthening the stem with a little wind (a good idea). Also, the last photo is my *fixed* stealth covering using a large cloth sheet. I used push-pins instead of duct-tape, like I used before. Works WAY better! Don't use tape on cloth, it doesn't work. Push-pins or small nails only.
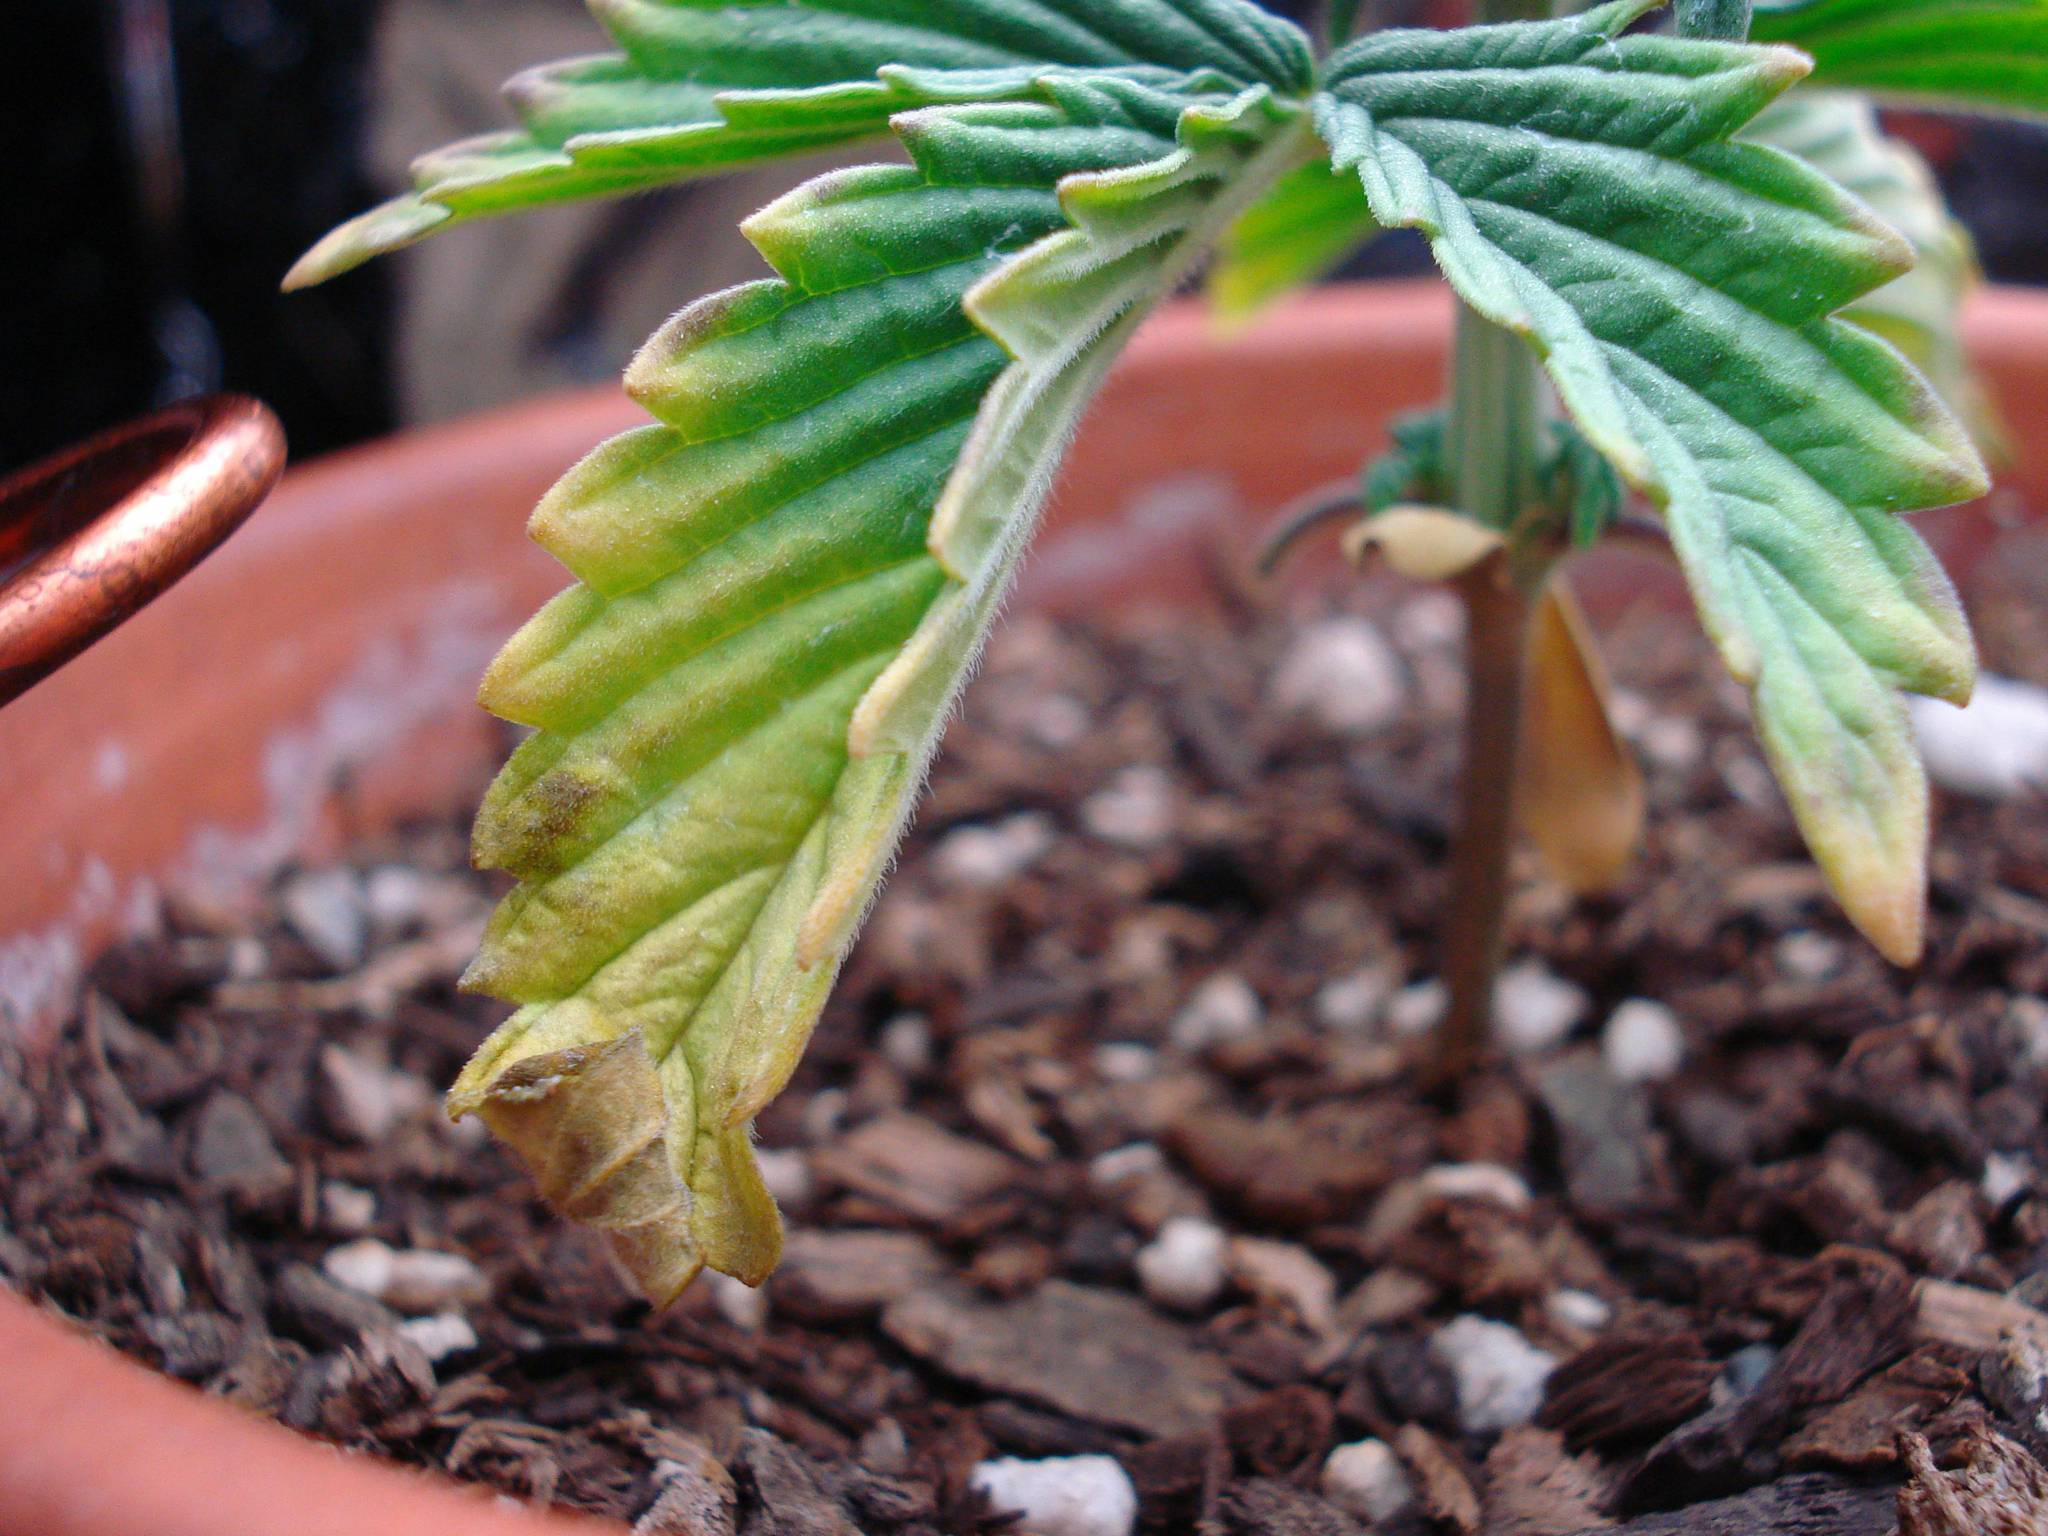
Day 22: Feb. 27, 2010
   
Notes: Noticeable yellowing on tips on upper canopy (Photo 2). Curling is getting really bad on the bottom leaves. The bottom leaves are dying a little more everyday. I've been cutting them, and smoking them. The smell (before I smoke them) has a unique sun-ripened guava smell. Now I know why its called "Flower!". Smells sweet and pleasant.
Day 23: Feb. 28, 2010
   
Notes: Still problems with curling and yellowing, but not bad. I posted this one day diff. one because its the end of the month, and I didn't do the 29.
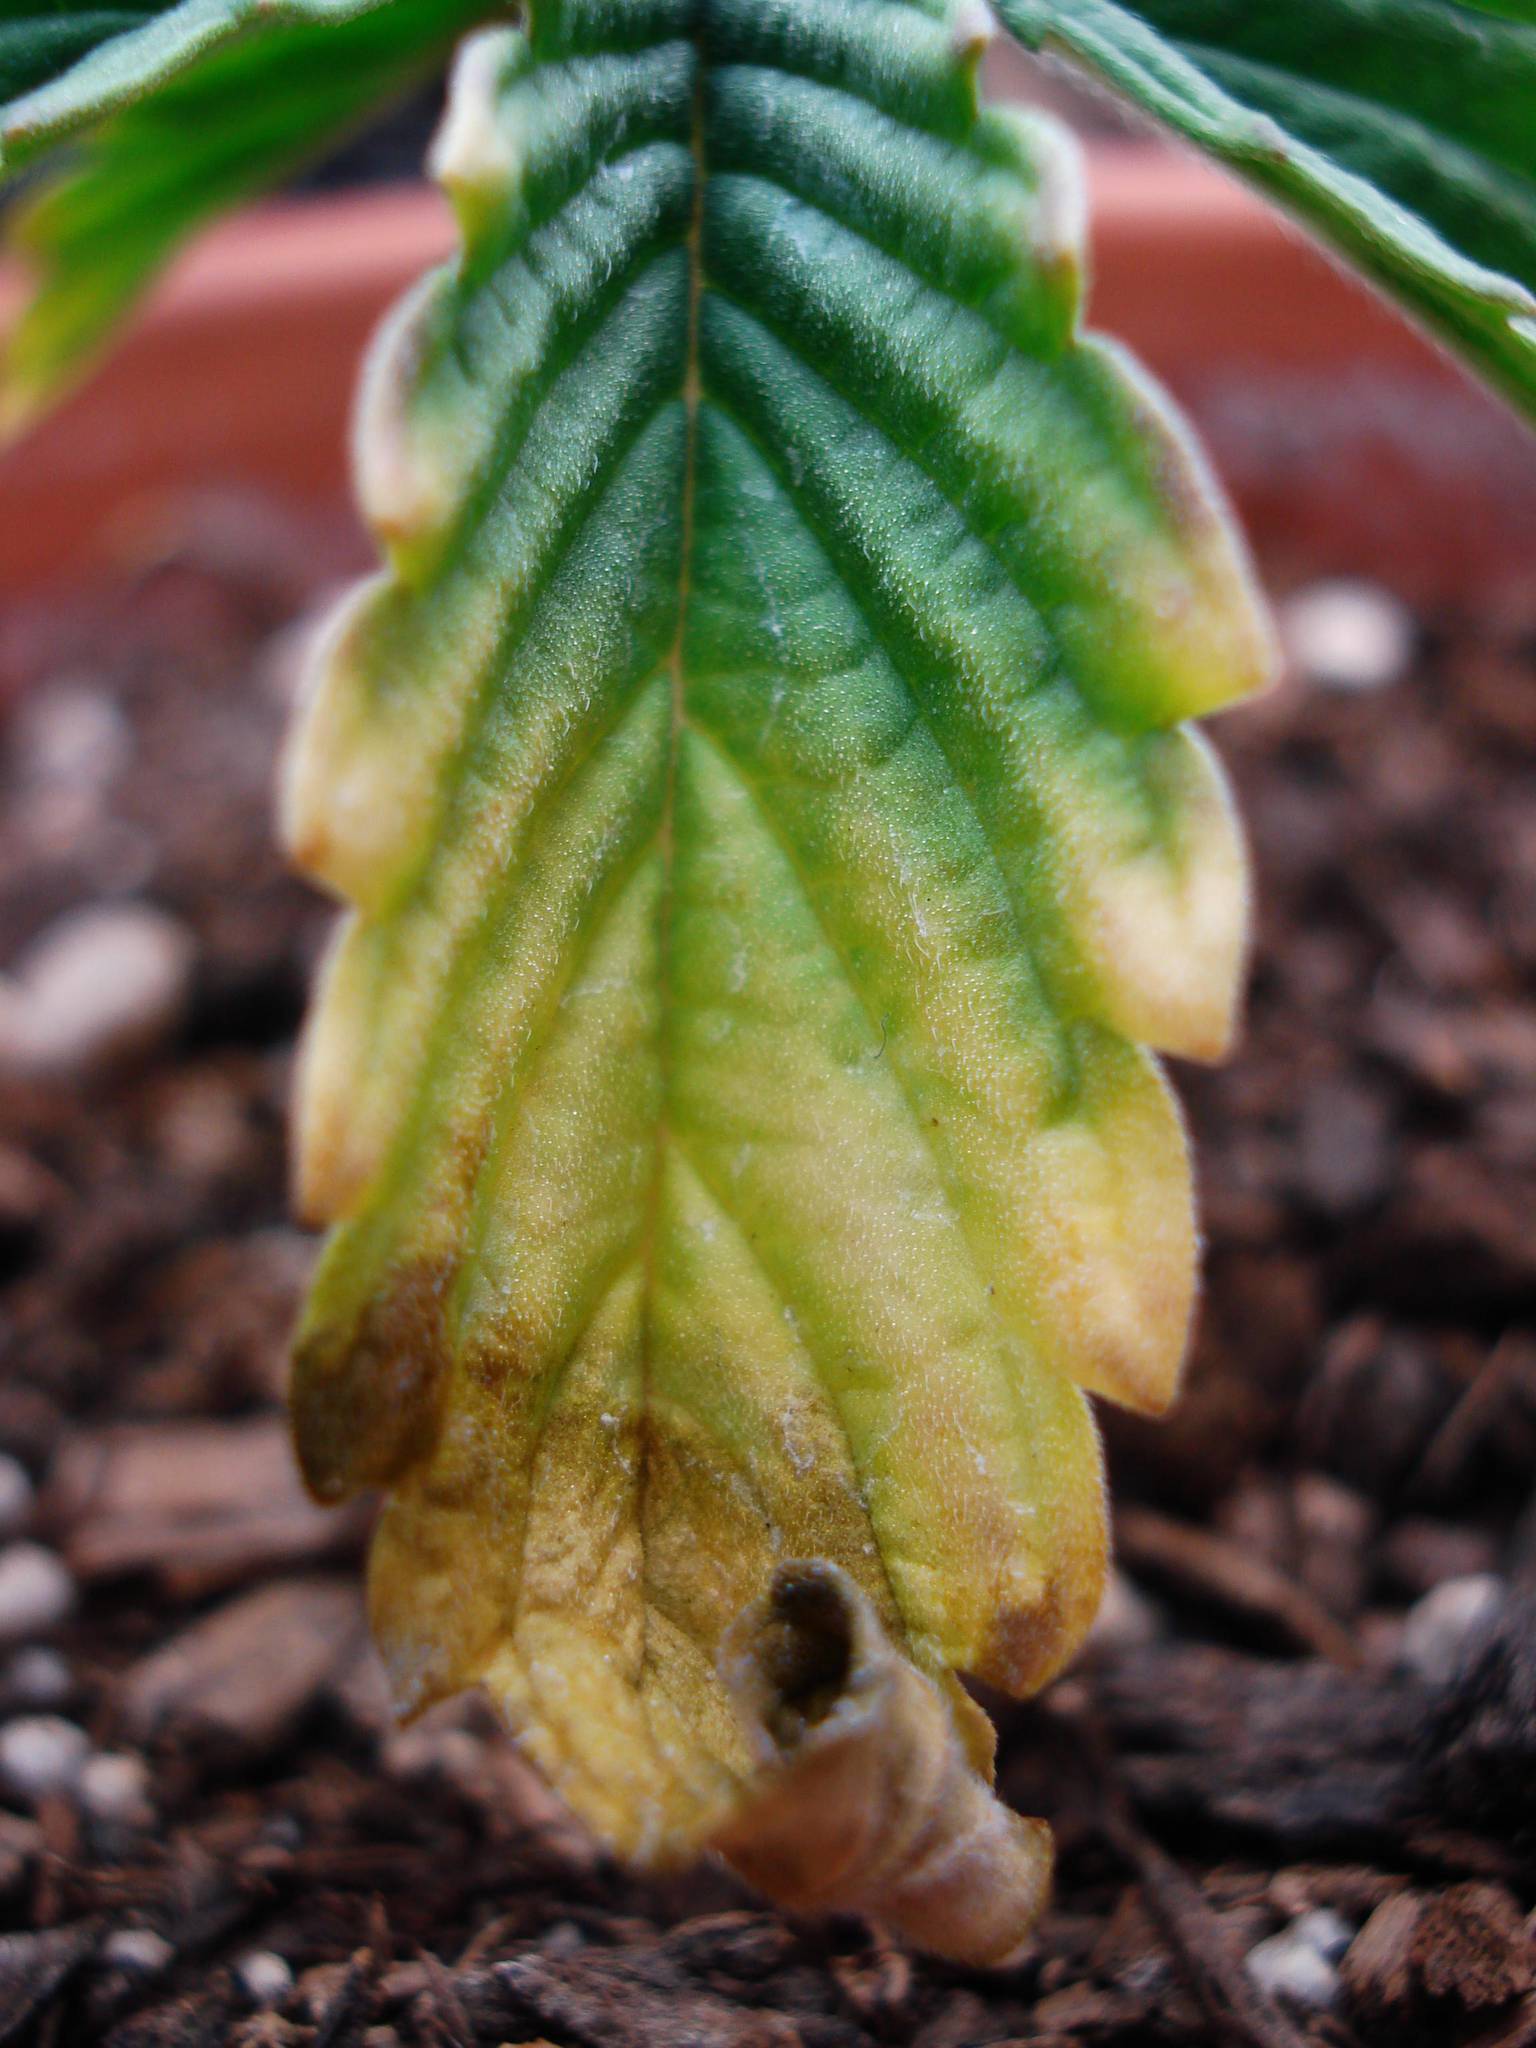
Day 25: March 1, 2010
    
Notes: Yellowing and dying tips on the bottom leaves are still a problem, and it looks pretty bad here (photo 2, 3). The top canopy is also showing signs too (last photo). But still alive, so its not too bad.
Day 27: March 3, 2010
     
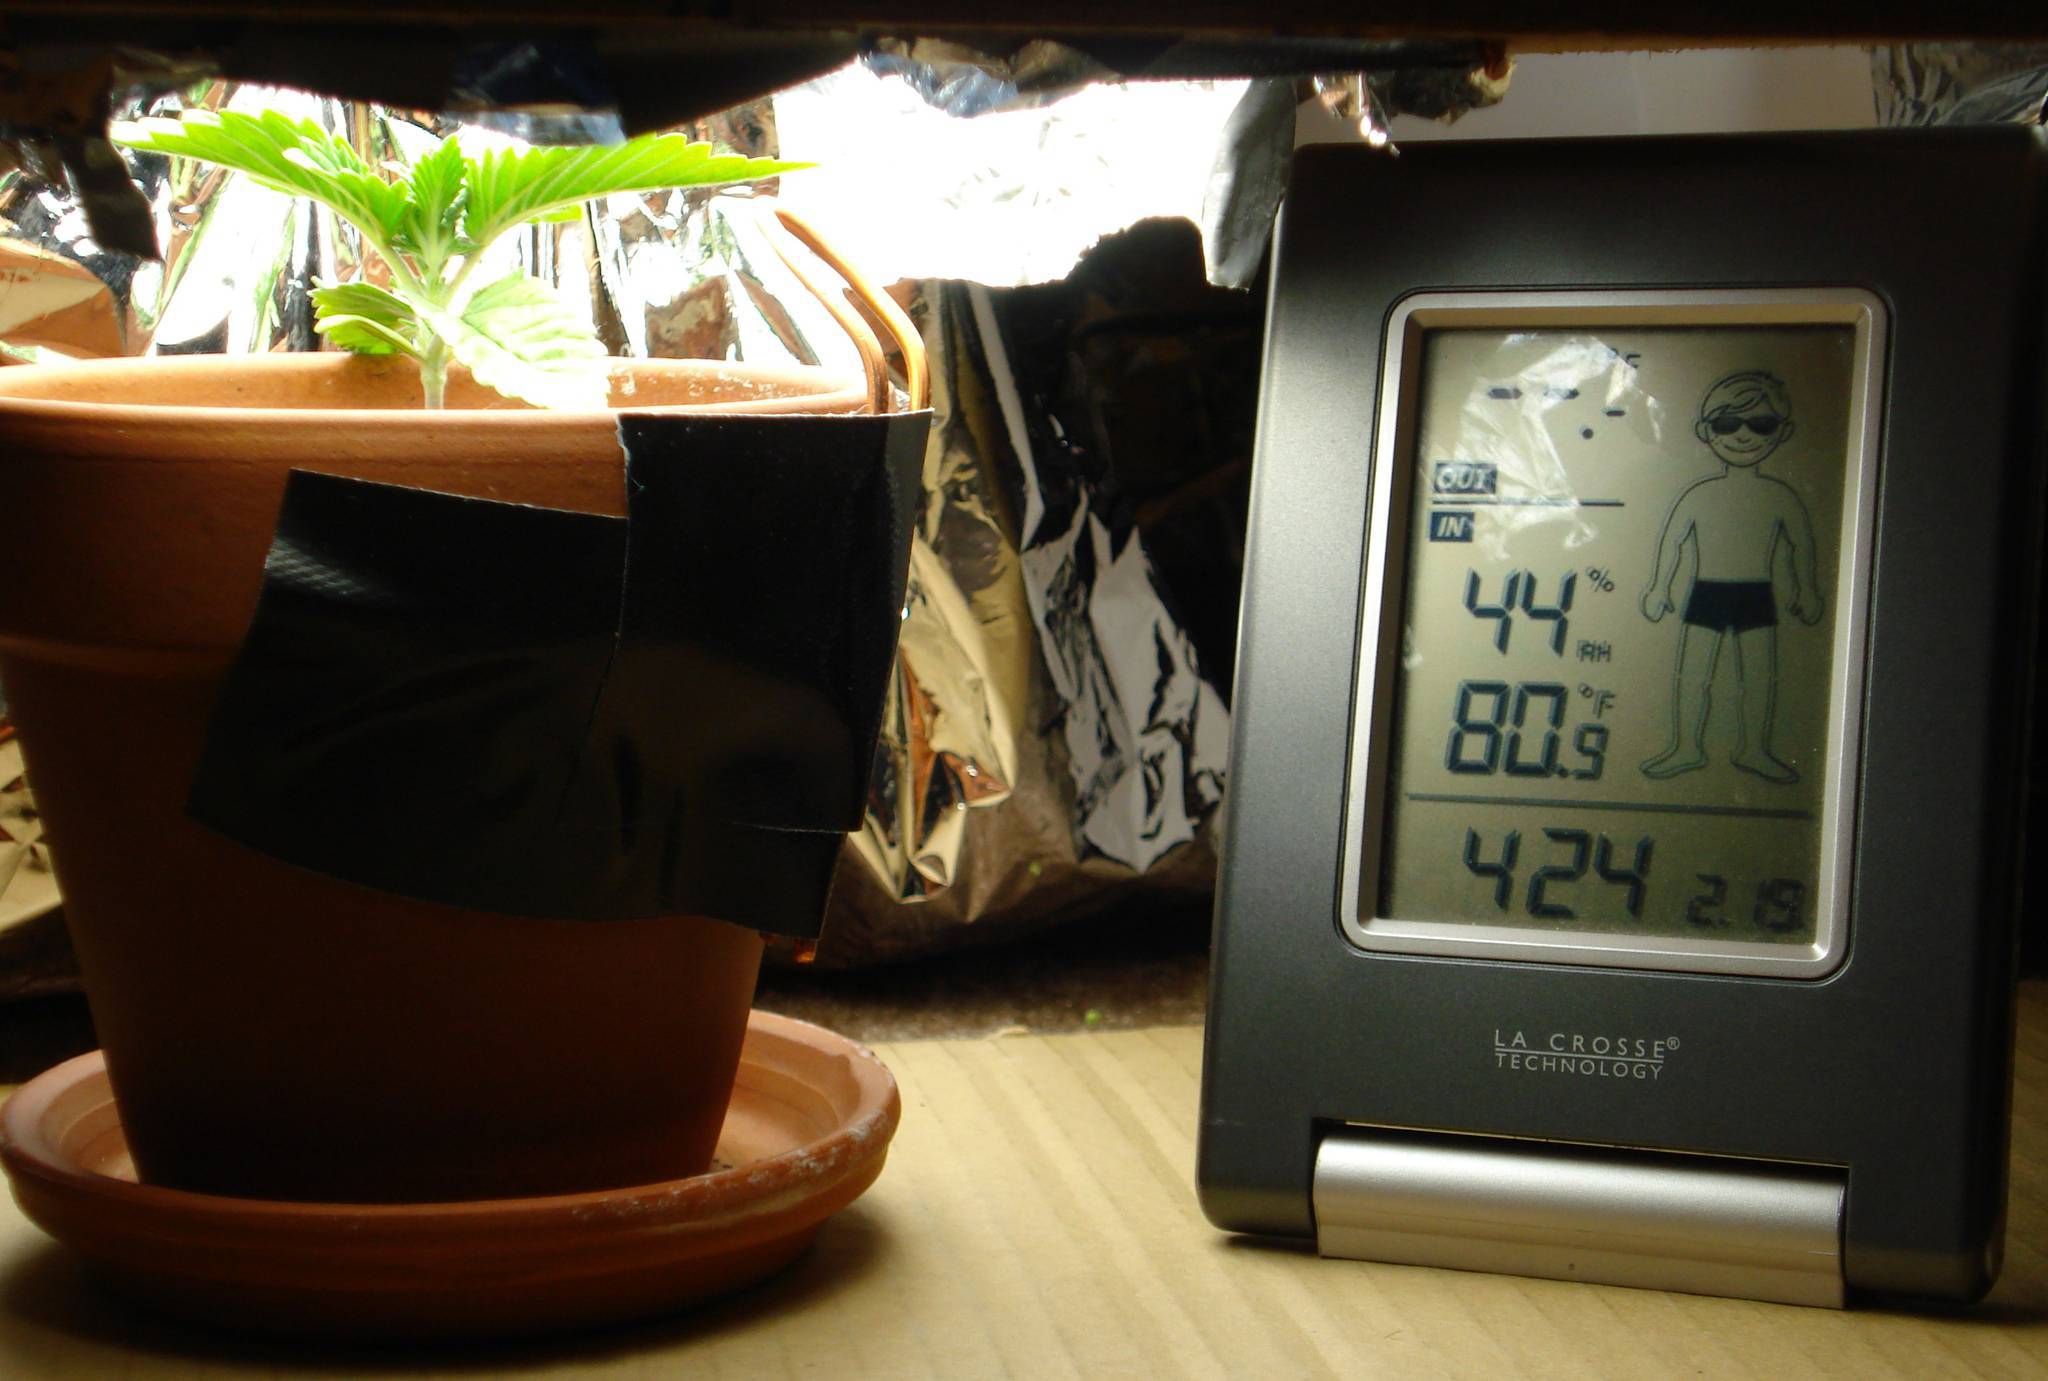
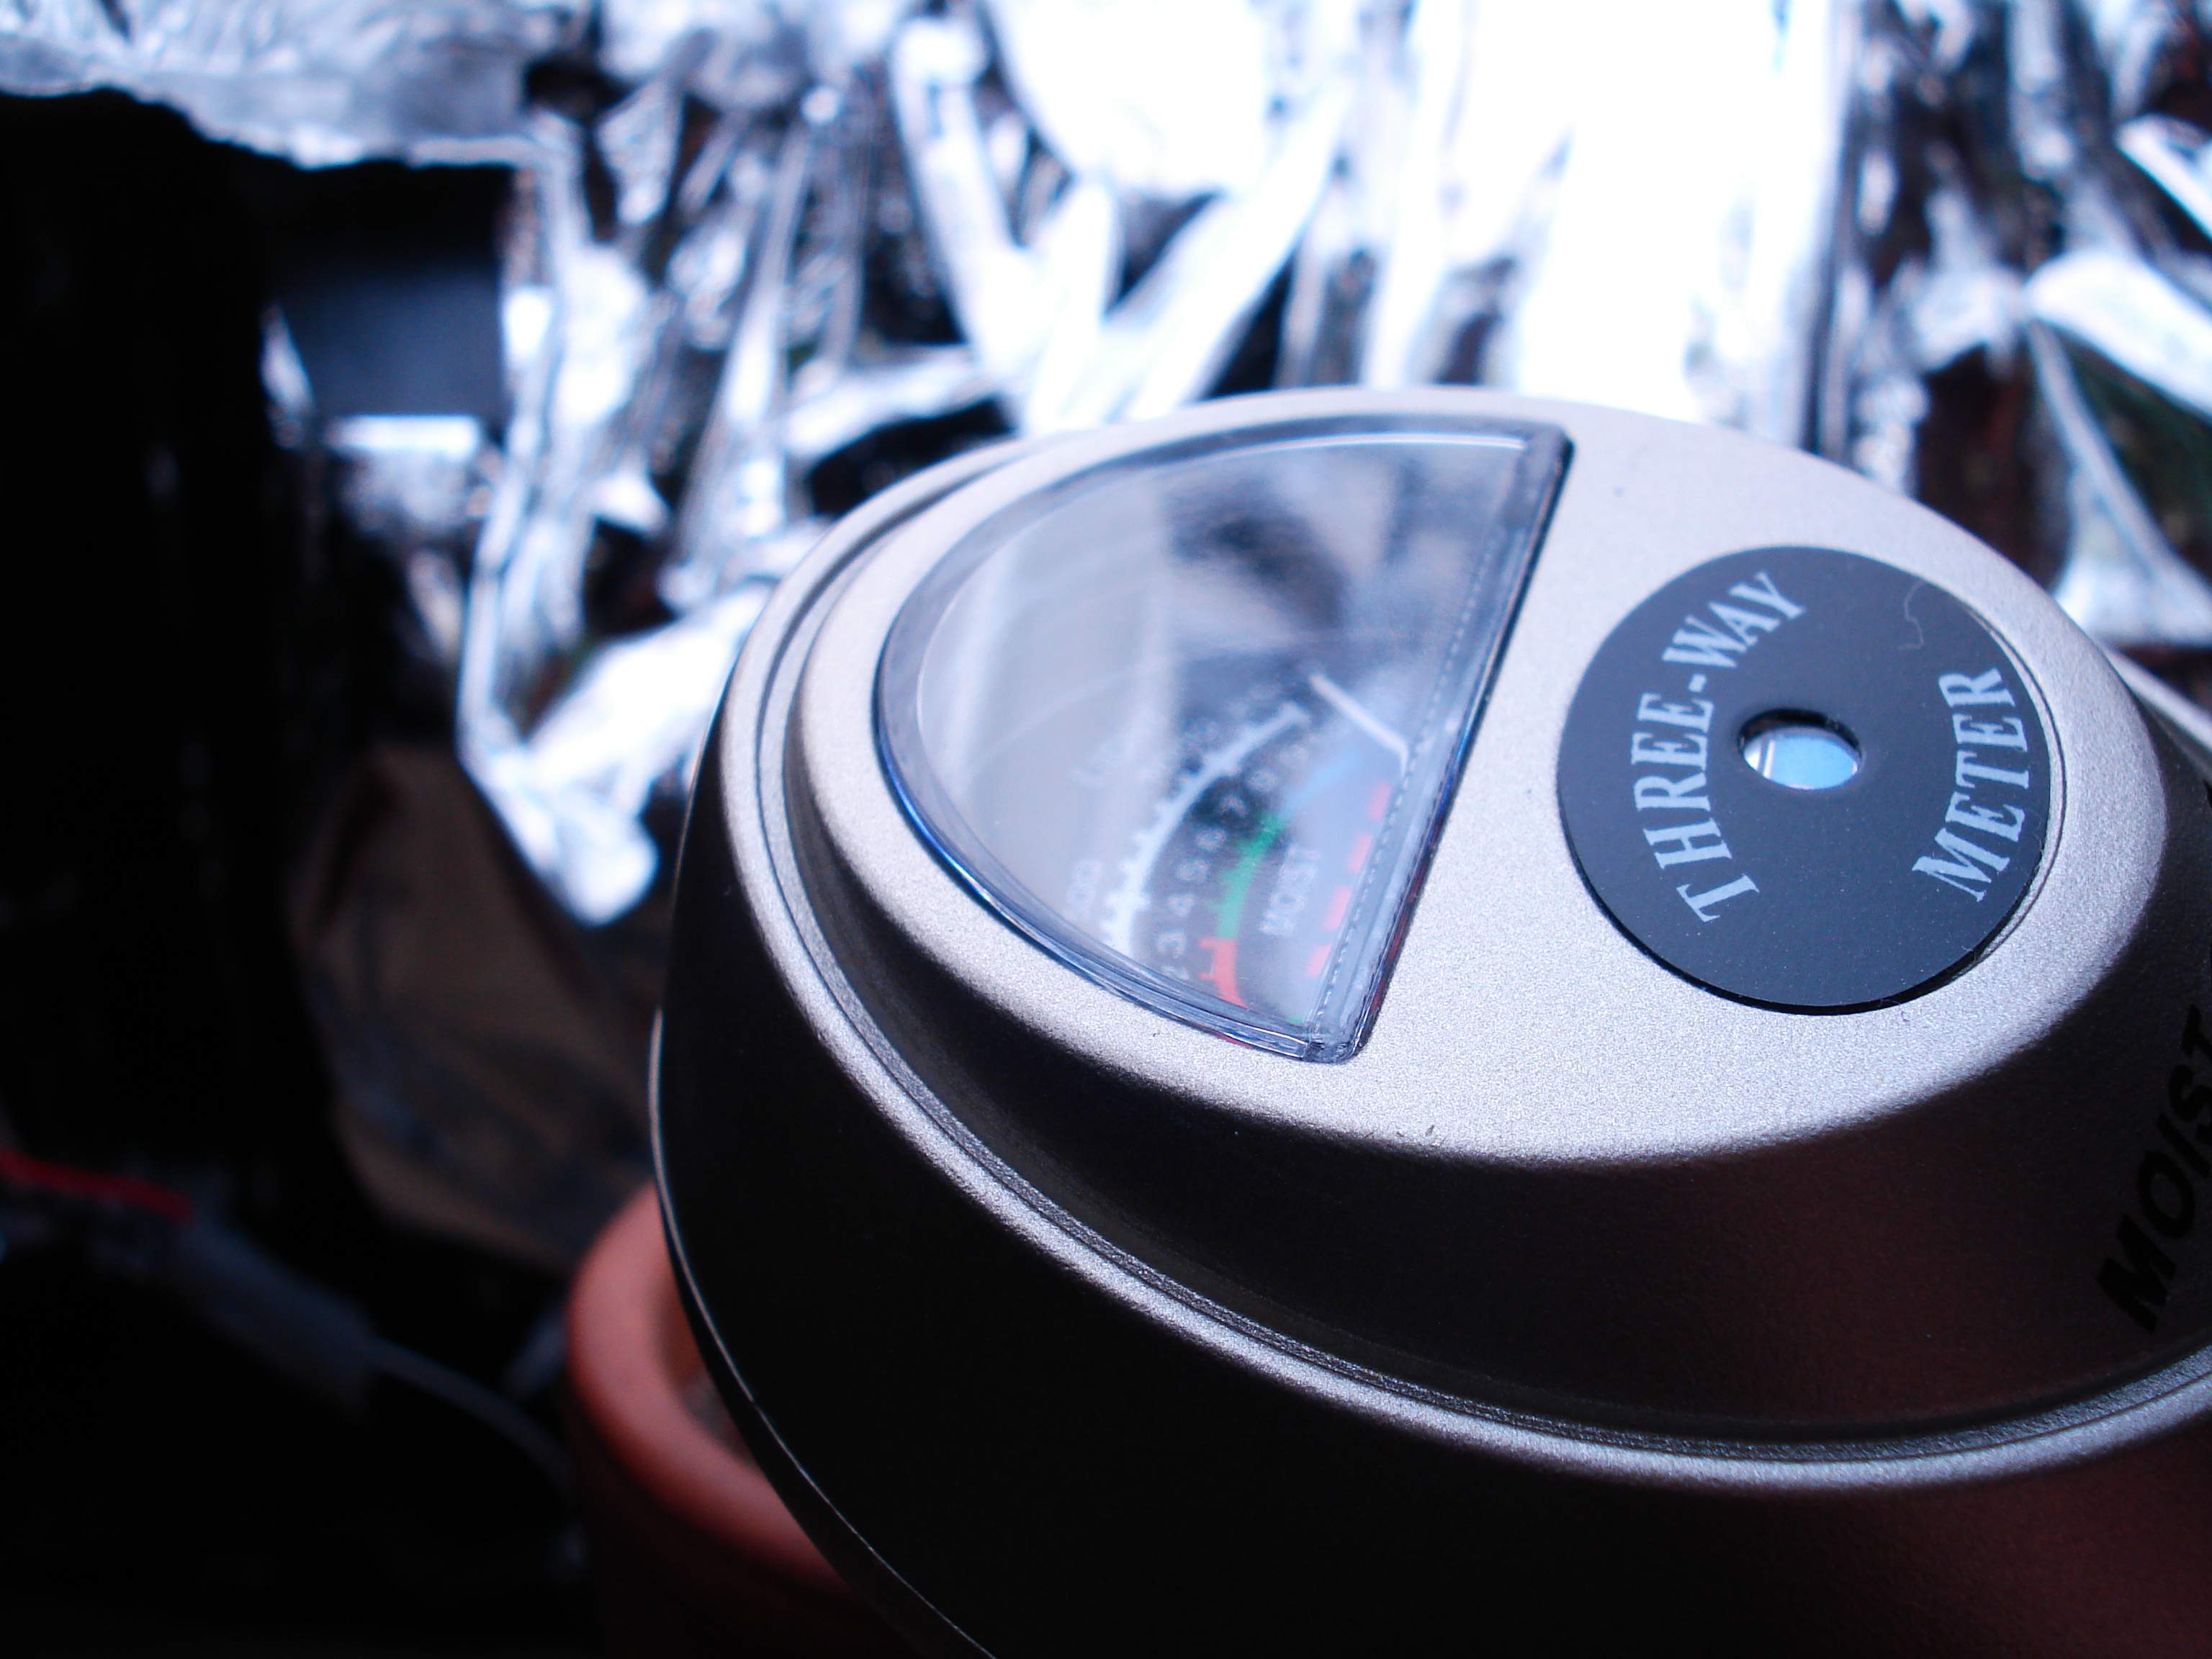
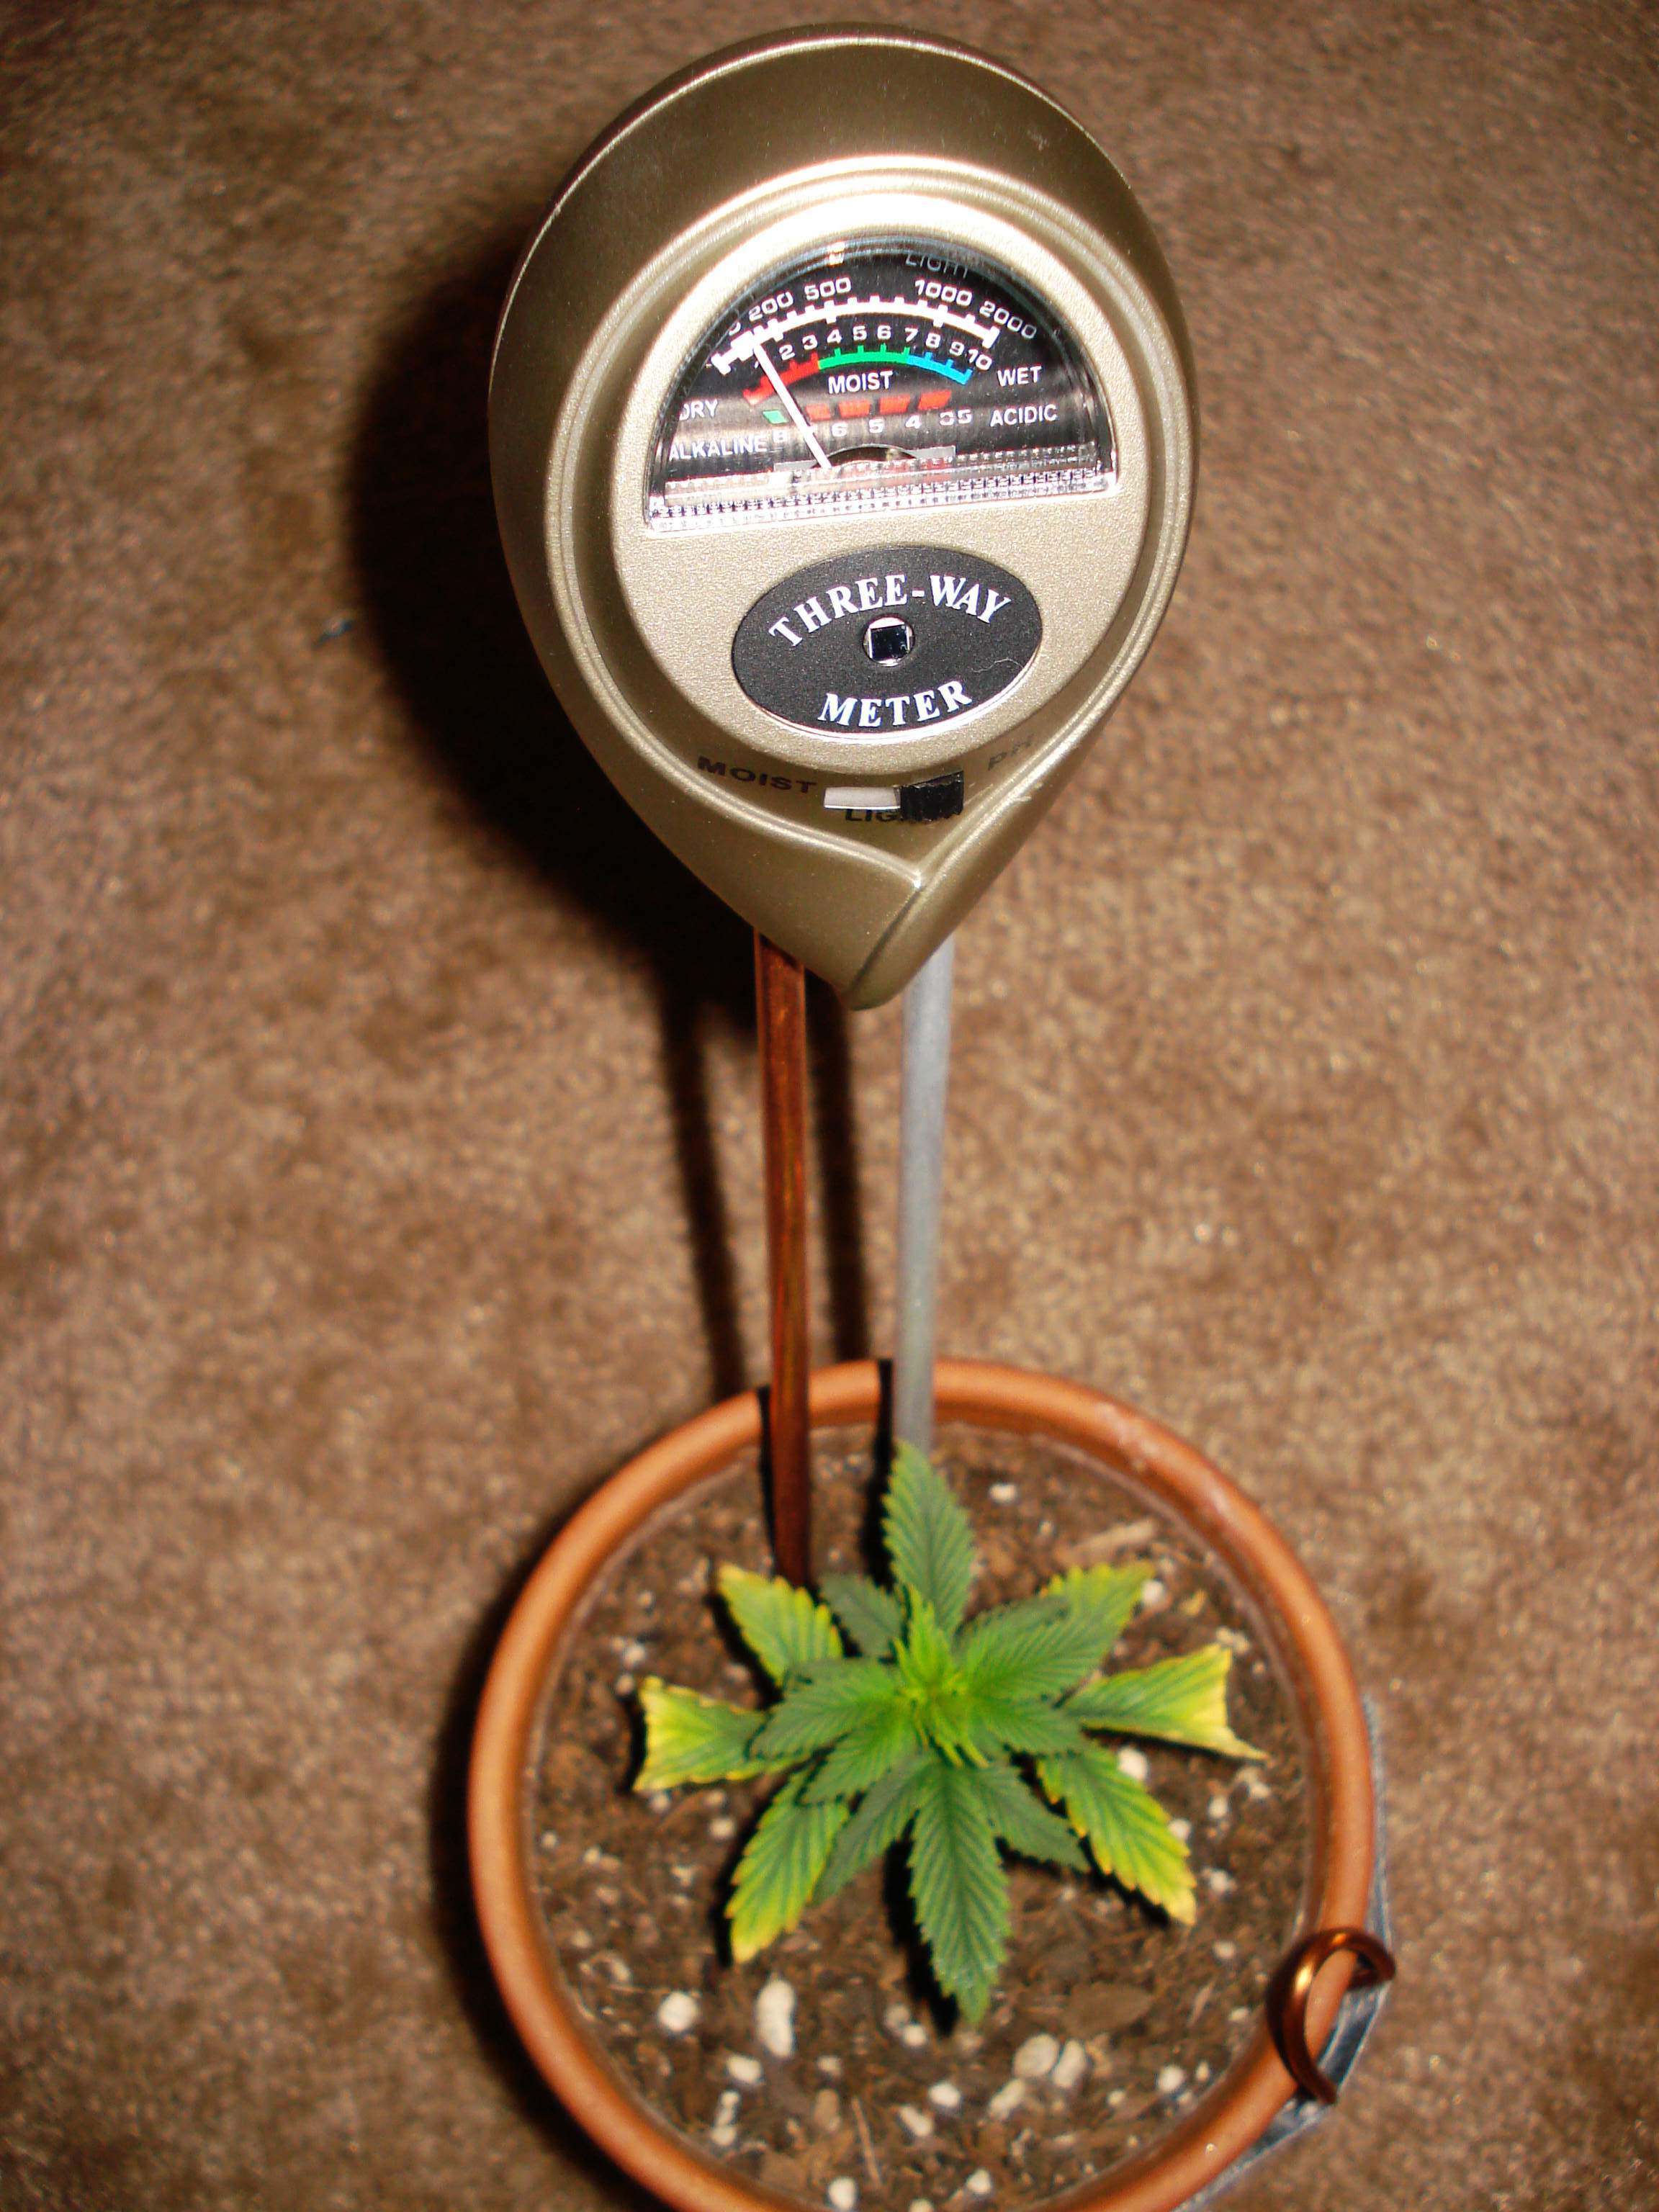
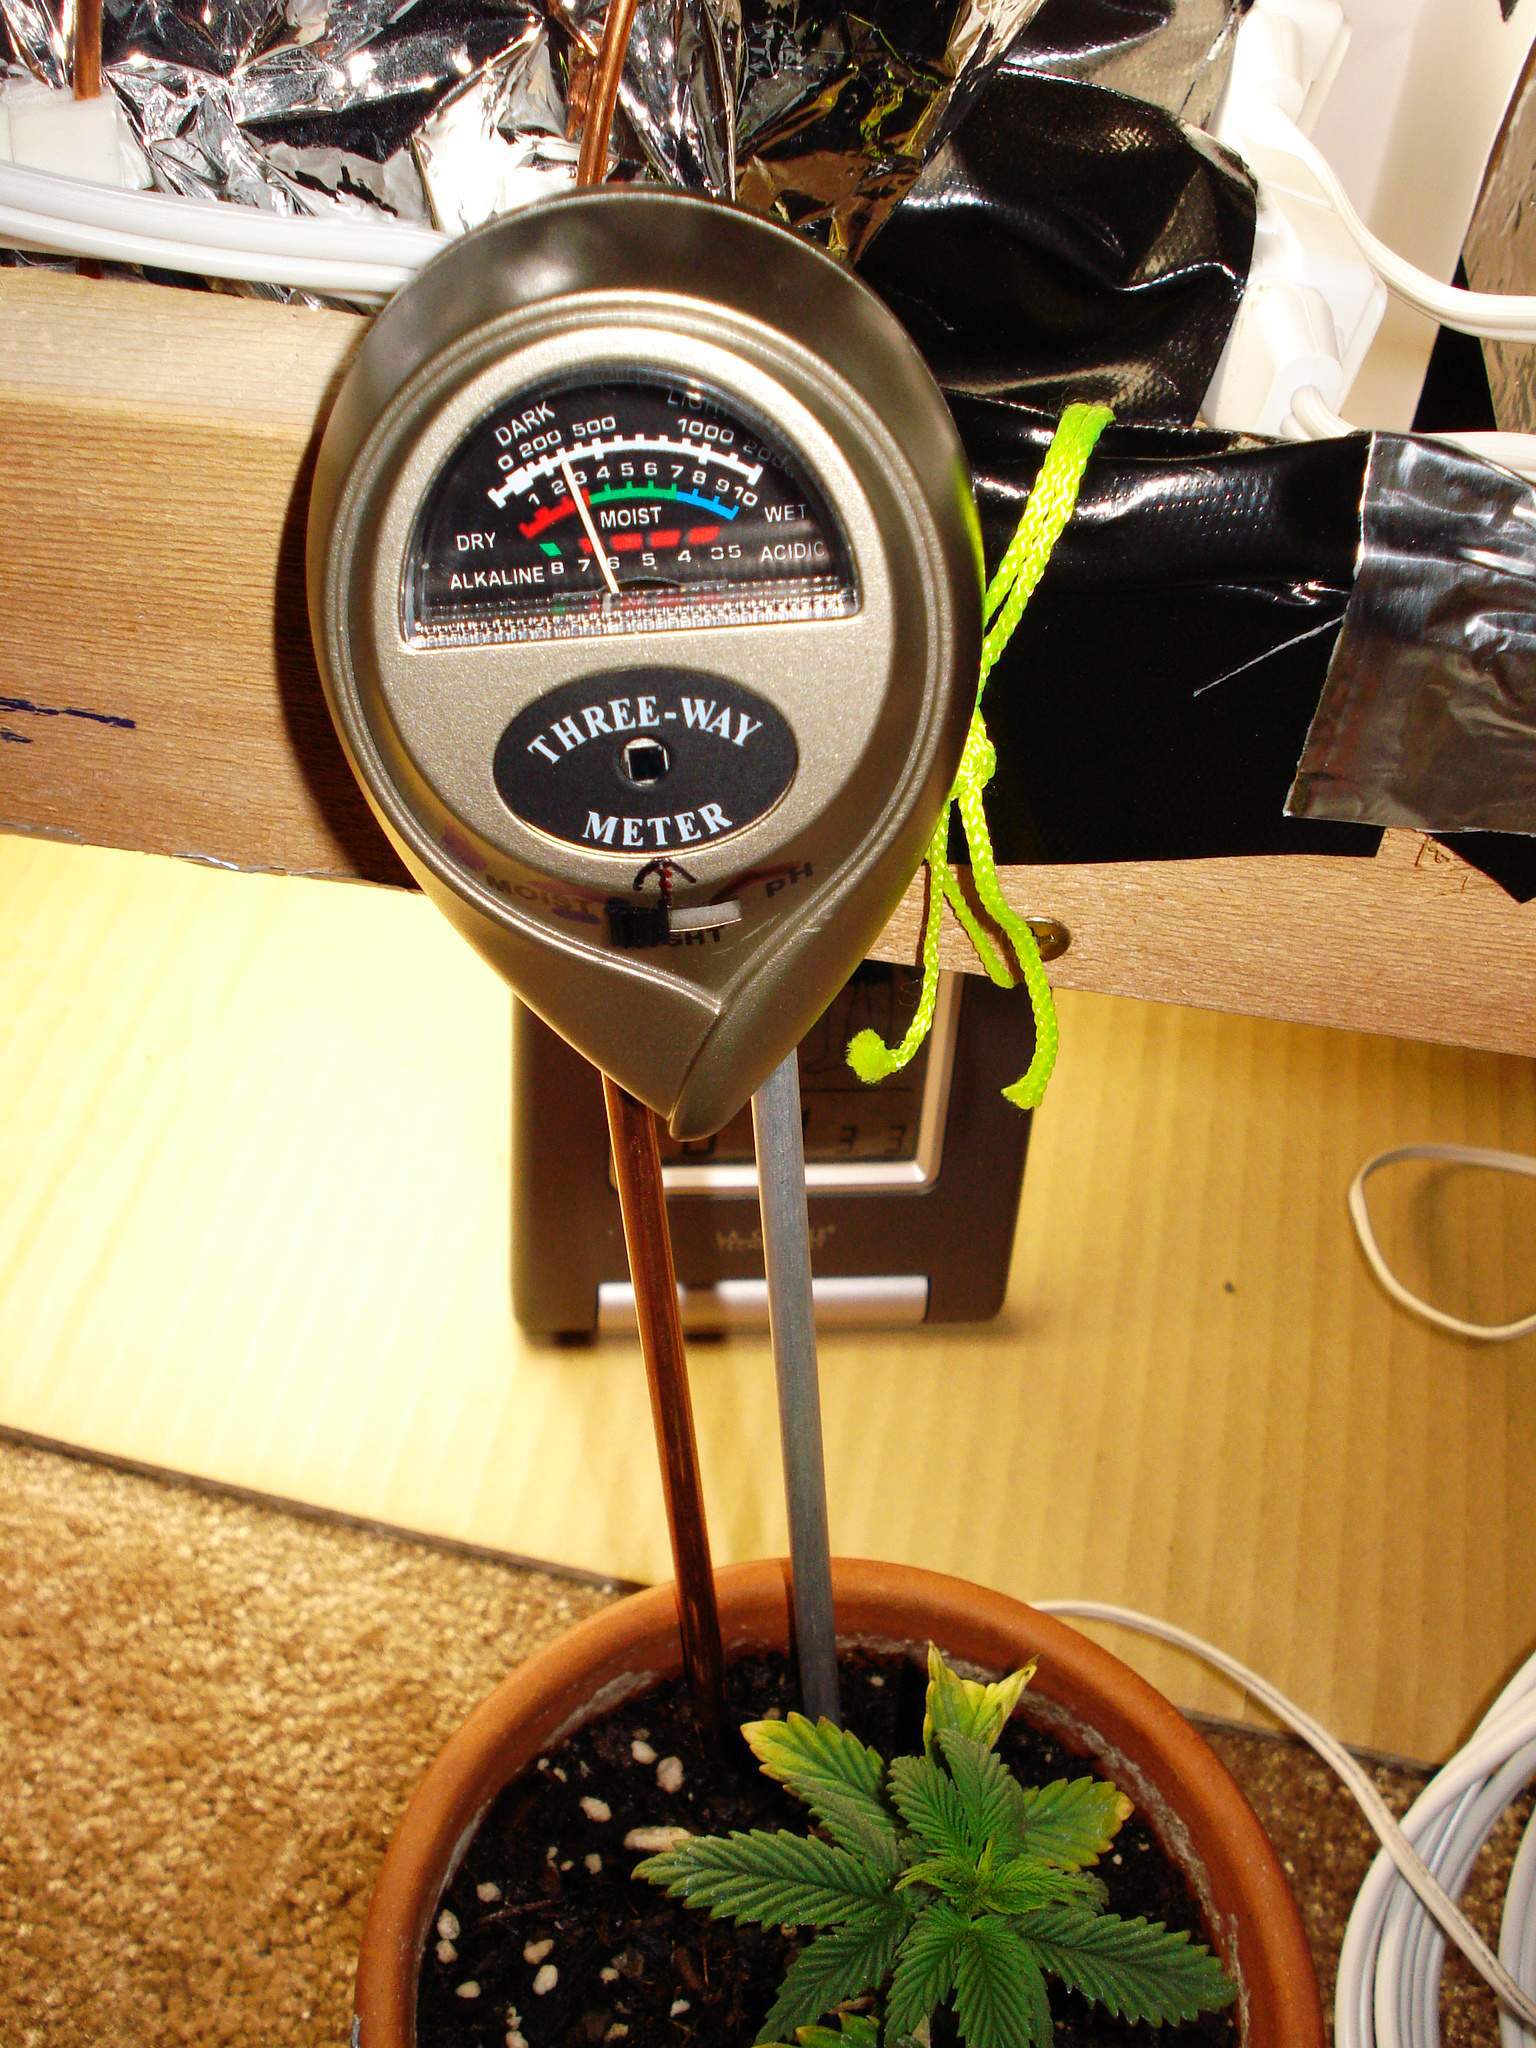
Notes: Bought a 3-in-1 meter, for light, soil wetness, and pH (photo 3). Light output is off the charts on the needle (photo 4). The pH is about 6.5, not too good (Photo 5). Wetness between damp and dry (last photo).
I also made some improvements to my light-bulb holders (used to have just duct tape) and the light bulb cooling (I added another 80mm PC fan, this time, on top of the wooden light wagon)
  
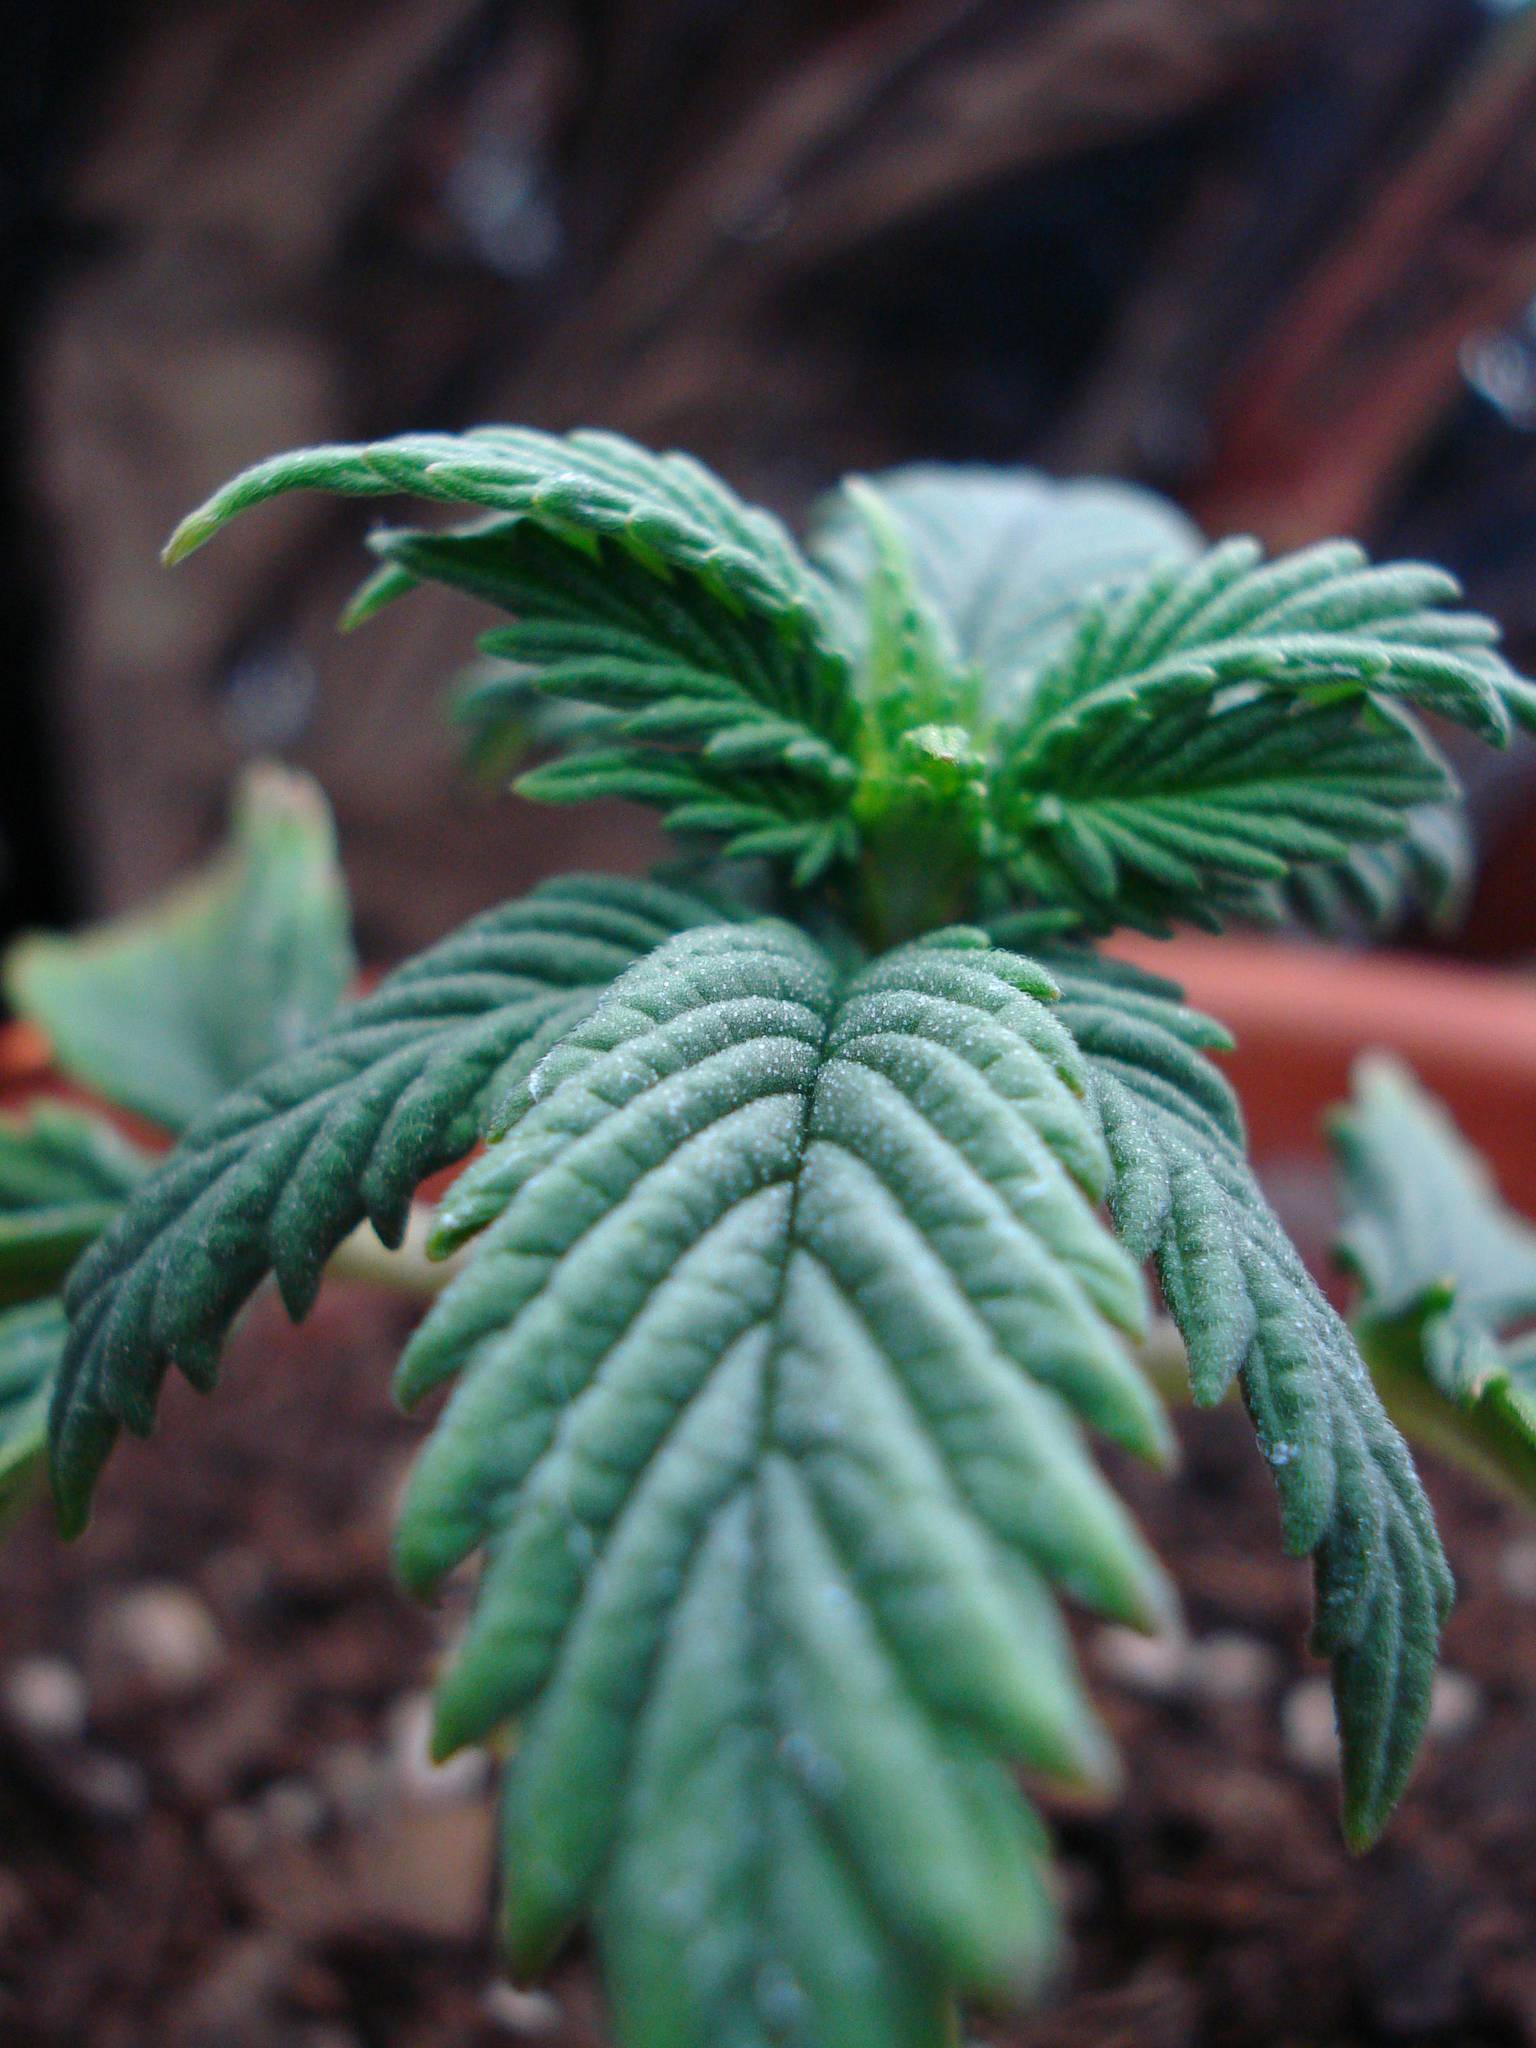
Day 30: March 6, 2010
 
Notes: Lookin' much healthier...
Day 32: March 8, 2010
 
Notes: Big growth changes. Still growing healthy, but some yellowing on bottom.
Day 35: March 11, 2010
   
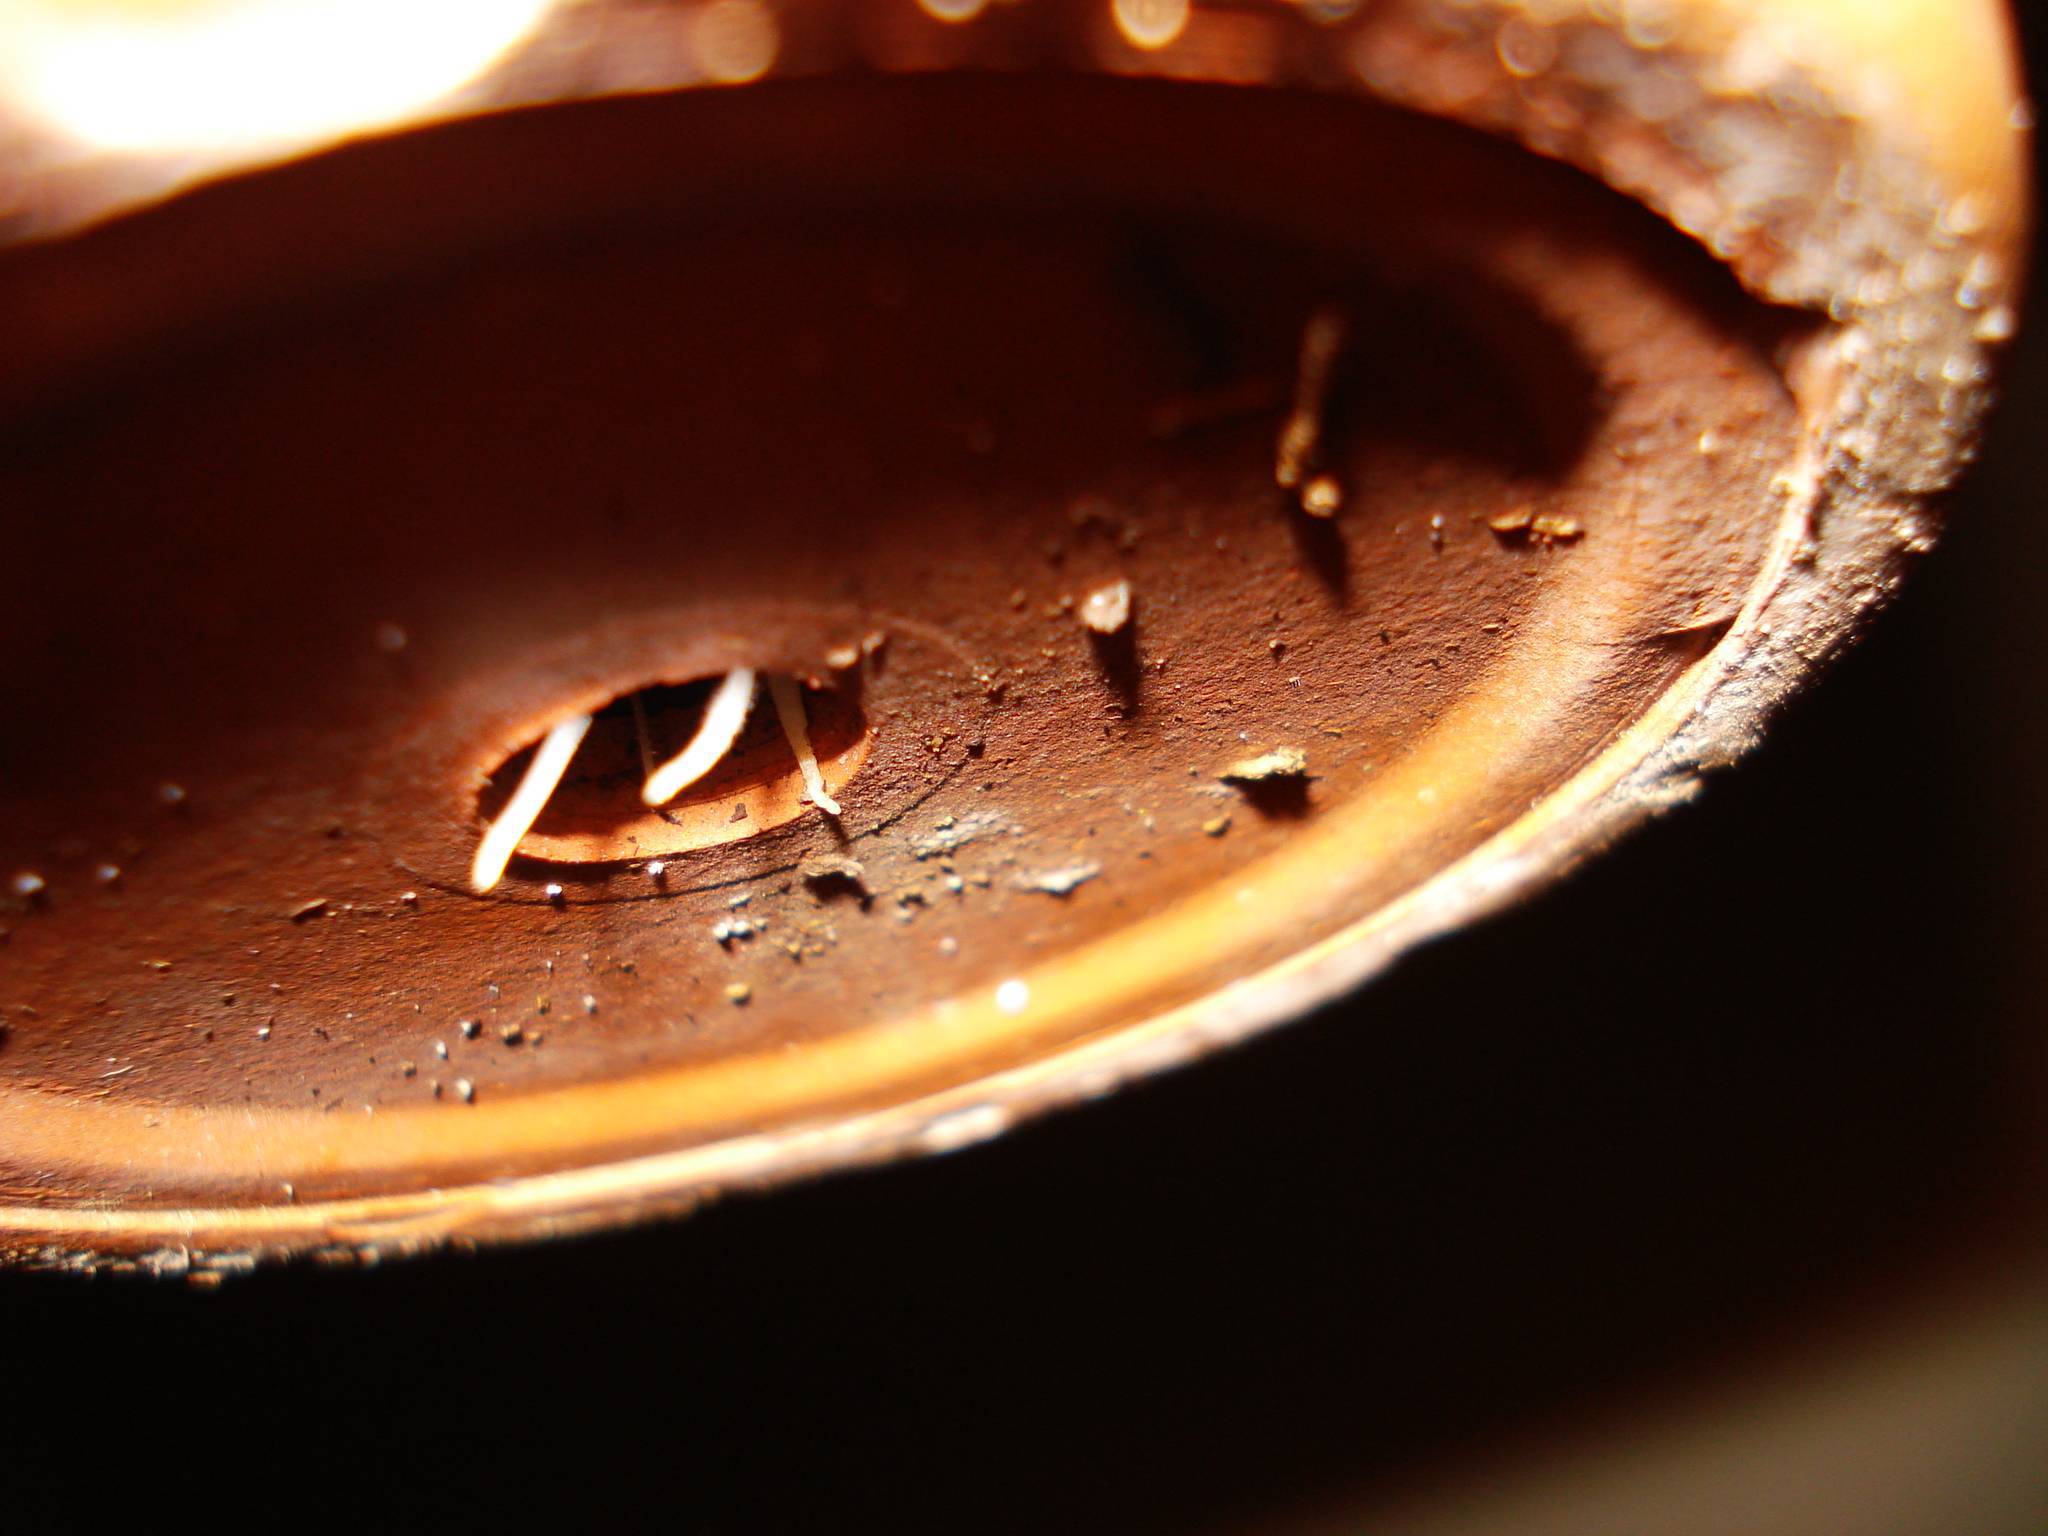
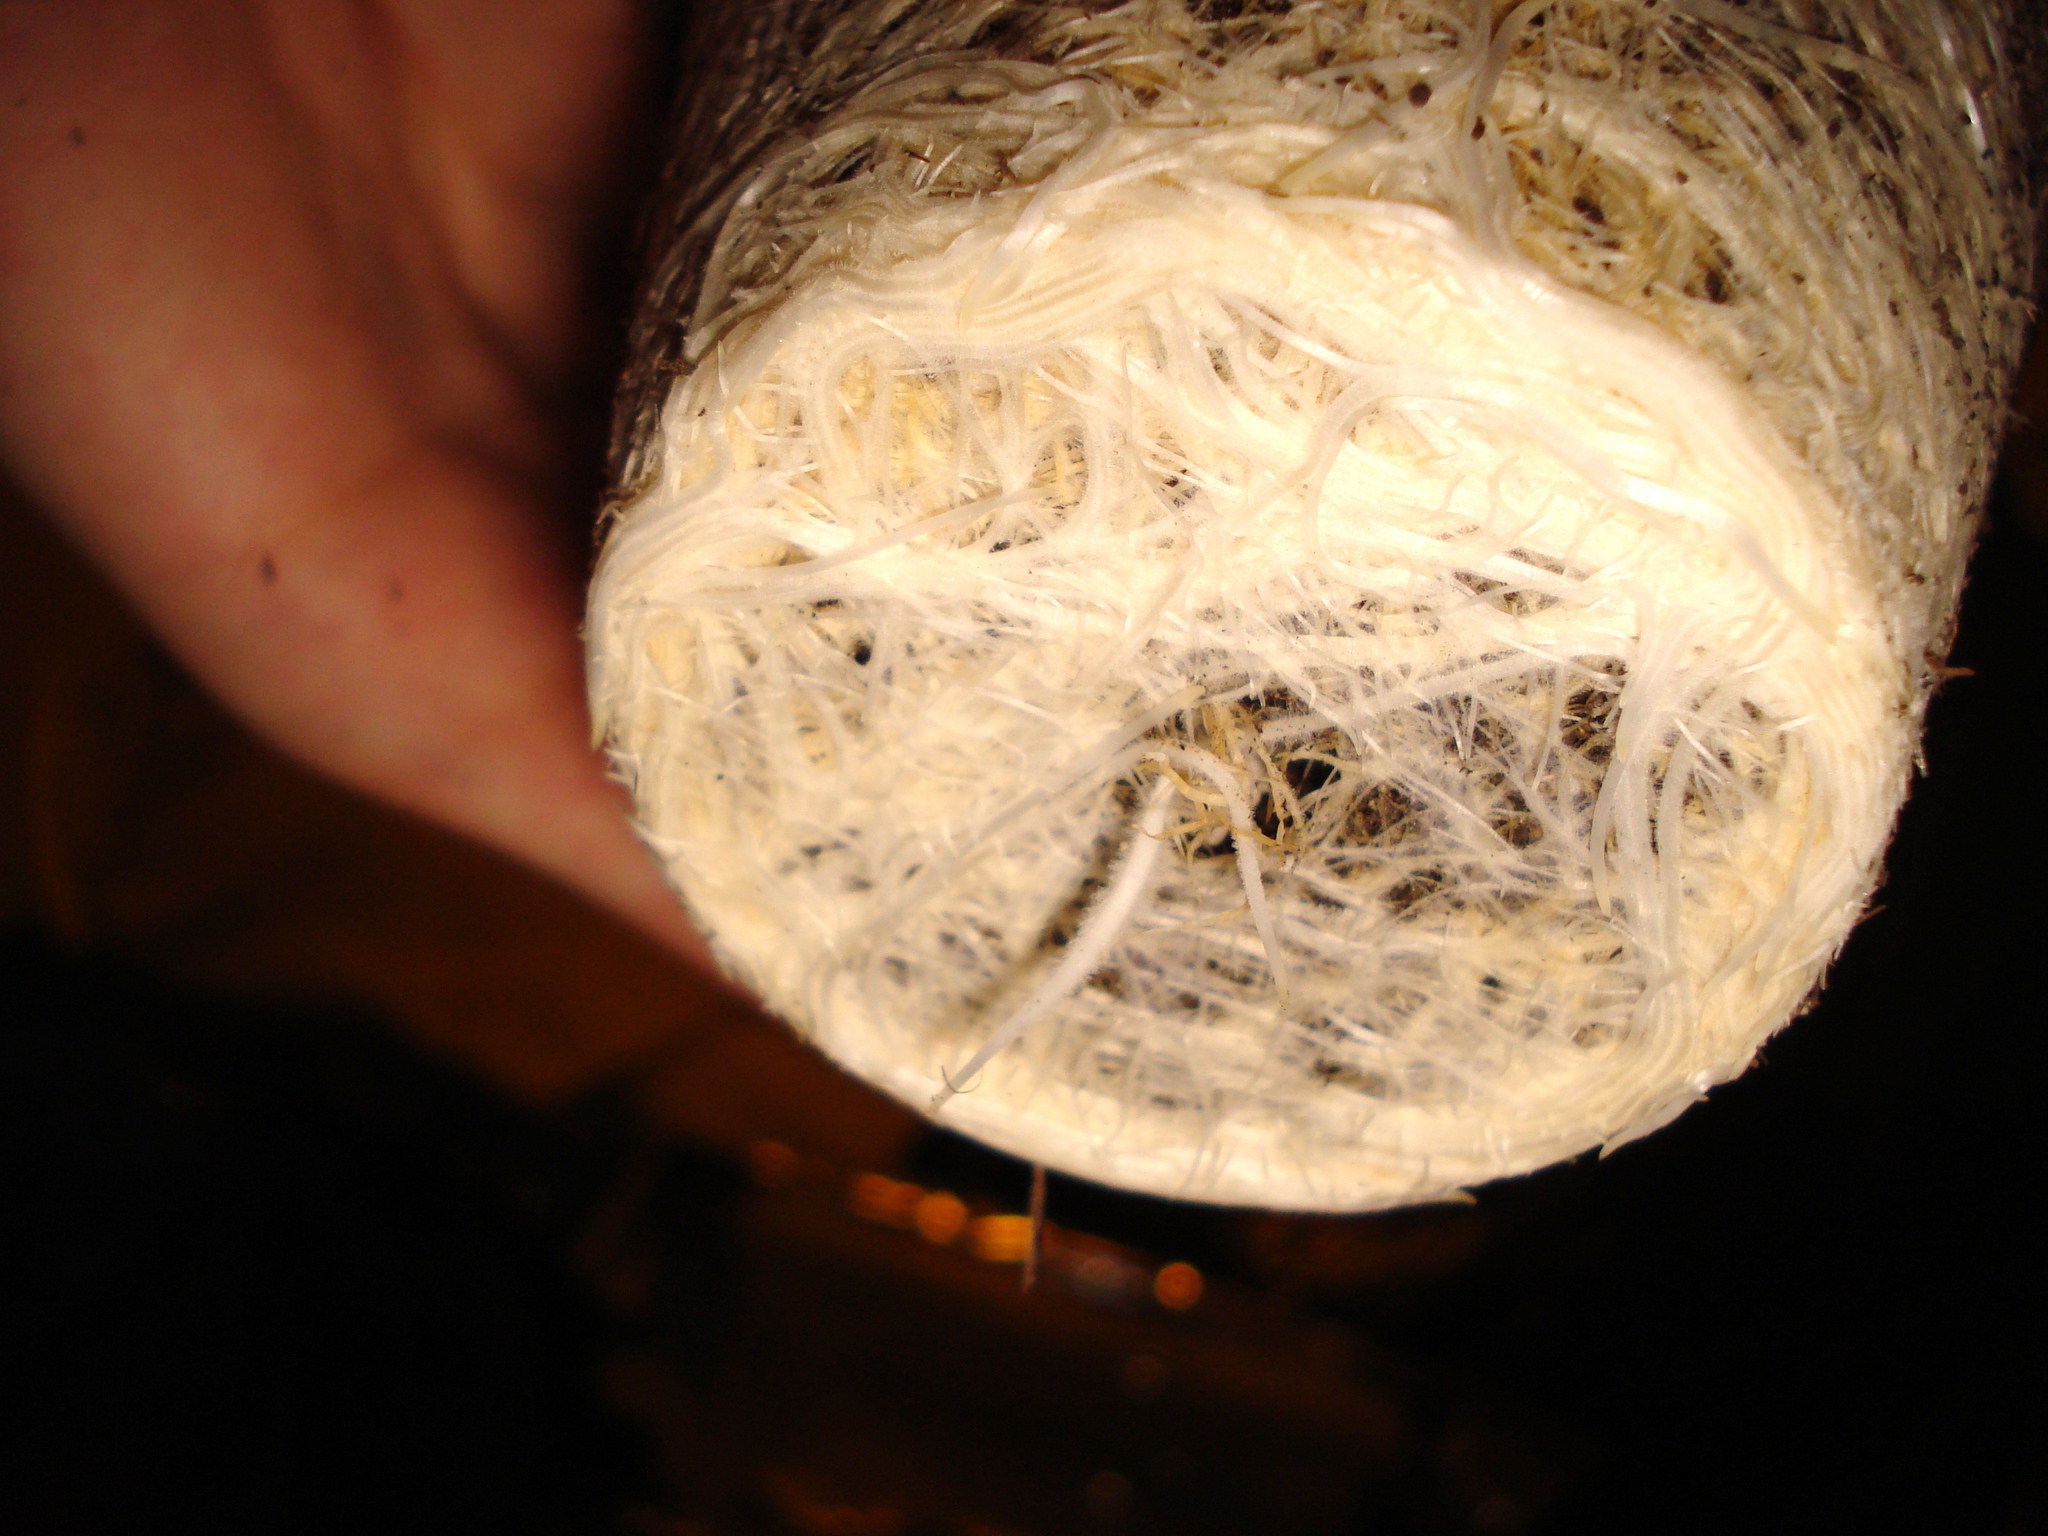
Notes: Growing great now. Really fast. In the last photo, you can see that the roots are starting to come out the bottom of the pot. I thought this meant its ready for transplant: but, according to Inverted, I was wrong. So, I kept it inside the small clay pot. Like he said, Water control is KeY! Large pots mean poor water/moisture control, which should be avoided. So, small pot it is.
Day 39: March 15, 2010
  [/url] [/url] 
Notes: Today was the day I implemented my simple CO2 supplementation idea (using the gravity drip system I used for watering previously). I used the classic Baking soda + vinegar chemical reaction to make CO2. The reason why I wanted to use CO2 supplementing was because I had been doing research on it, and what I've learned that plants grow a lot faster when you add it (because plants use CO2 from the air to create carbon-based organic chemicals to grow, thru photosynthesis). And the reason why I started doing this now is because I am moving out of this place around June 5, 2010. And I want to be finished flowering by at the latest, May 15, 2010 and with my plants advertised flowering period of 7 weeks, that means I have to start flowering at the latest, March 20, which is exactly 1 month from the sacred holiday, April 20. So the CO2 is to "catch-up" on the vegging, a last attempt to get as much growth in these last days as I possibly can. So, my *new* plan is to have some immature budz to smoke by that international holiday. We'll have to see.
As for the effective of the CO2. It seems to be working, but it would be unscientific to say its causing more growth. Too many factors to make that claim. But, what I have noticed is that when I soak the soil, it goes almost completely dry in about 1 full day. Before it took 2-3 days to get totally dry. It might be the plant uptaking more water because of the increase in CO2. Who knows. I'll be taking some measurements with a ruler to show how its grown over these days of CO2 supplementation. Hopefully that will provide some interesting observations to this artifical CO2 environment, and if it actually benefits the plant in some observable way...
Later that day, 7 hours from above photos:
And here's what a difference water does to the plant.
Note how stift and "up" the leaves are now....the difference is stricking!
  
Day 43 (2 Days before Flowering): Thursday, March 18, 2010
^Didn't post photos because its only one day apart from the day below, so I put the link instead....the original post has interesting dropping patterns you might wanna look at.
Day 44 (1 Day before Flowering): Friday, March 19, 2010

8 hours later....

^As you can see, the perking/drooping pattern continues to occur on a regular timeline. Its at the point where I believe it is just natural rhythms of the plant, and is NOT a sign of ill health. However, this pattern is not something I see with other tropical plants I've grown in my place like palms, so this is all new to me.
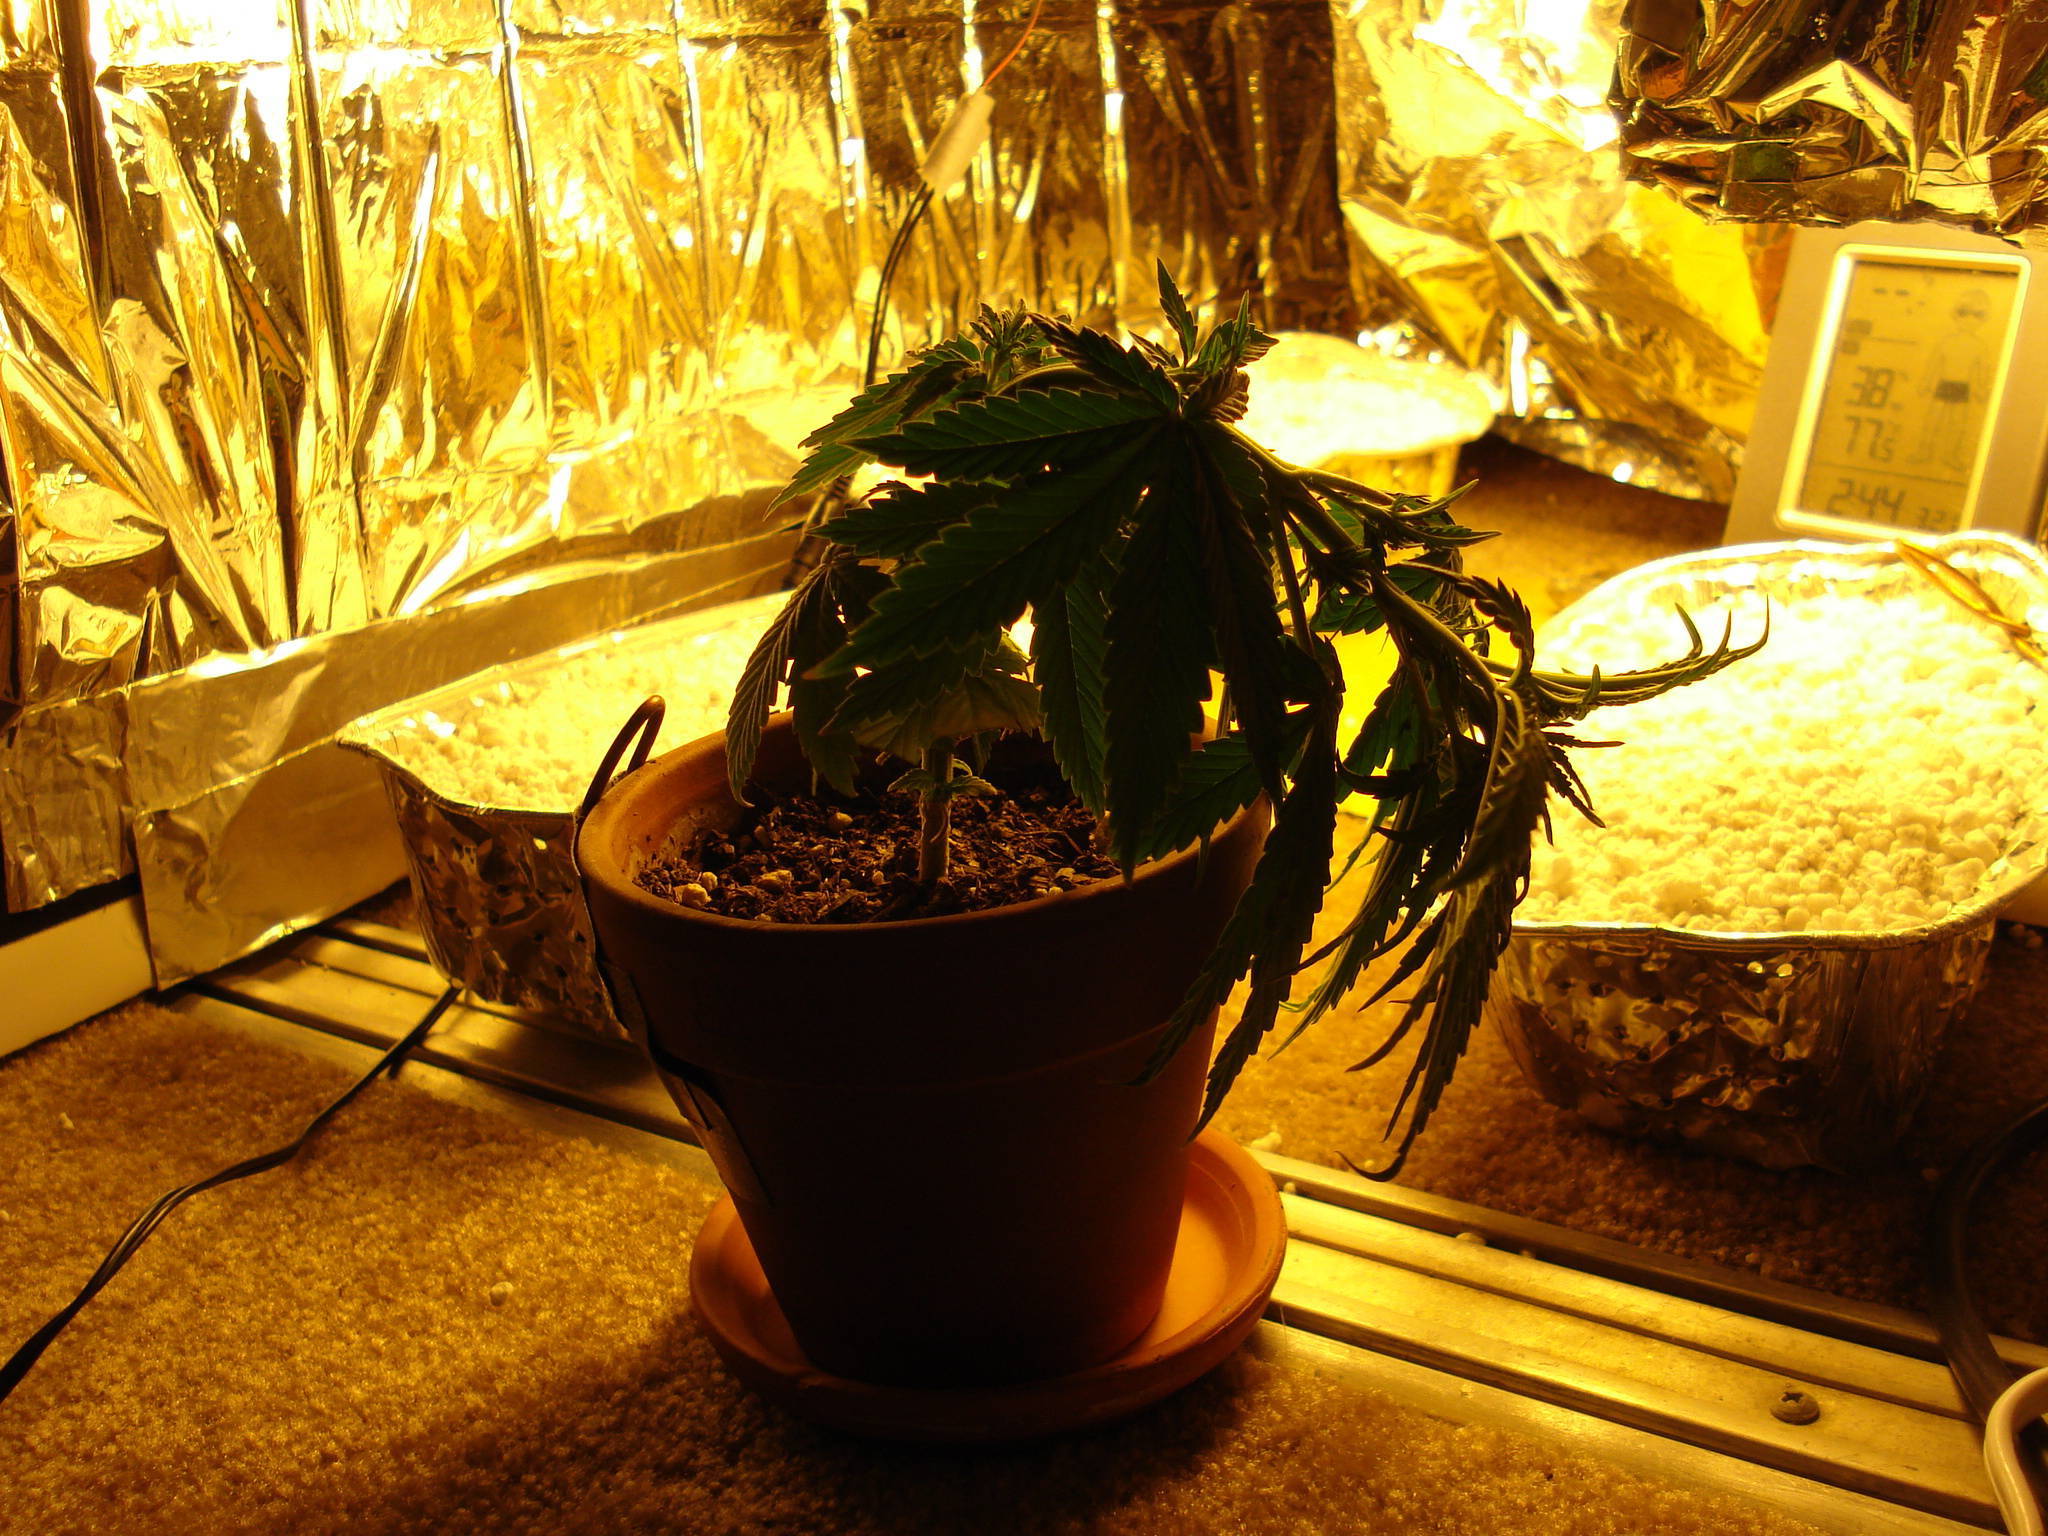
Day 46 (Day 2 of Flowering): Sunday, March 21, 2010
  
^Drooping at its worst (see 1st photo background for date and time). At first, I thought I killed my plant, because the drooping was happening at the stem too, and so was dramatic. I figured with my new lighting that consists of three 42 watters and one 23 watter CFL (total 149 watts, 42 more watts than during vegging), I might have stressed her with heat. Then, I checked the soil, and it was really dry, even thou I just watered her a day ago. So, soaked the water with the usual vegging mixture, and after about 1 hour, she perked back up, like some kind of magical plant life (last photo on right). It seems that this small plant need more water than I realized. It may be the time to transplant to a larger pot.
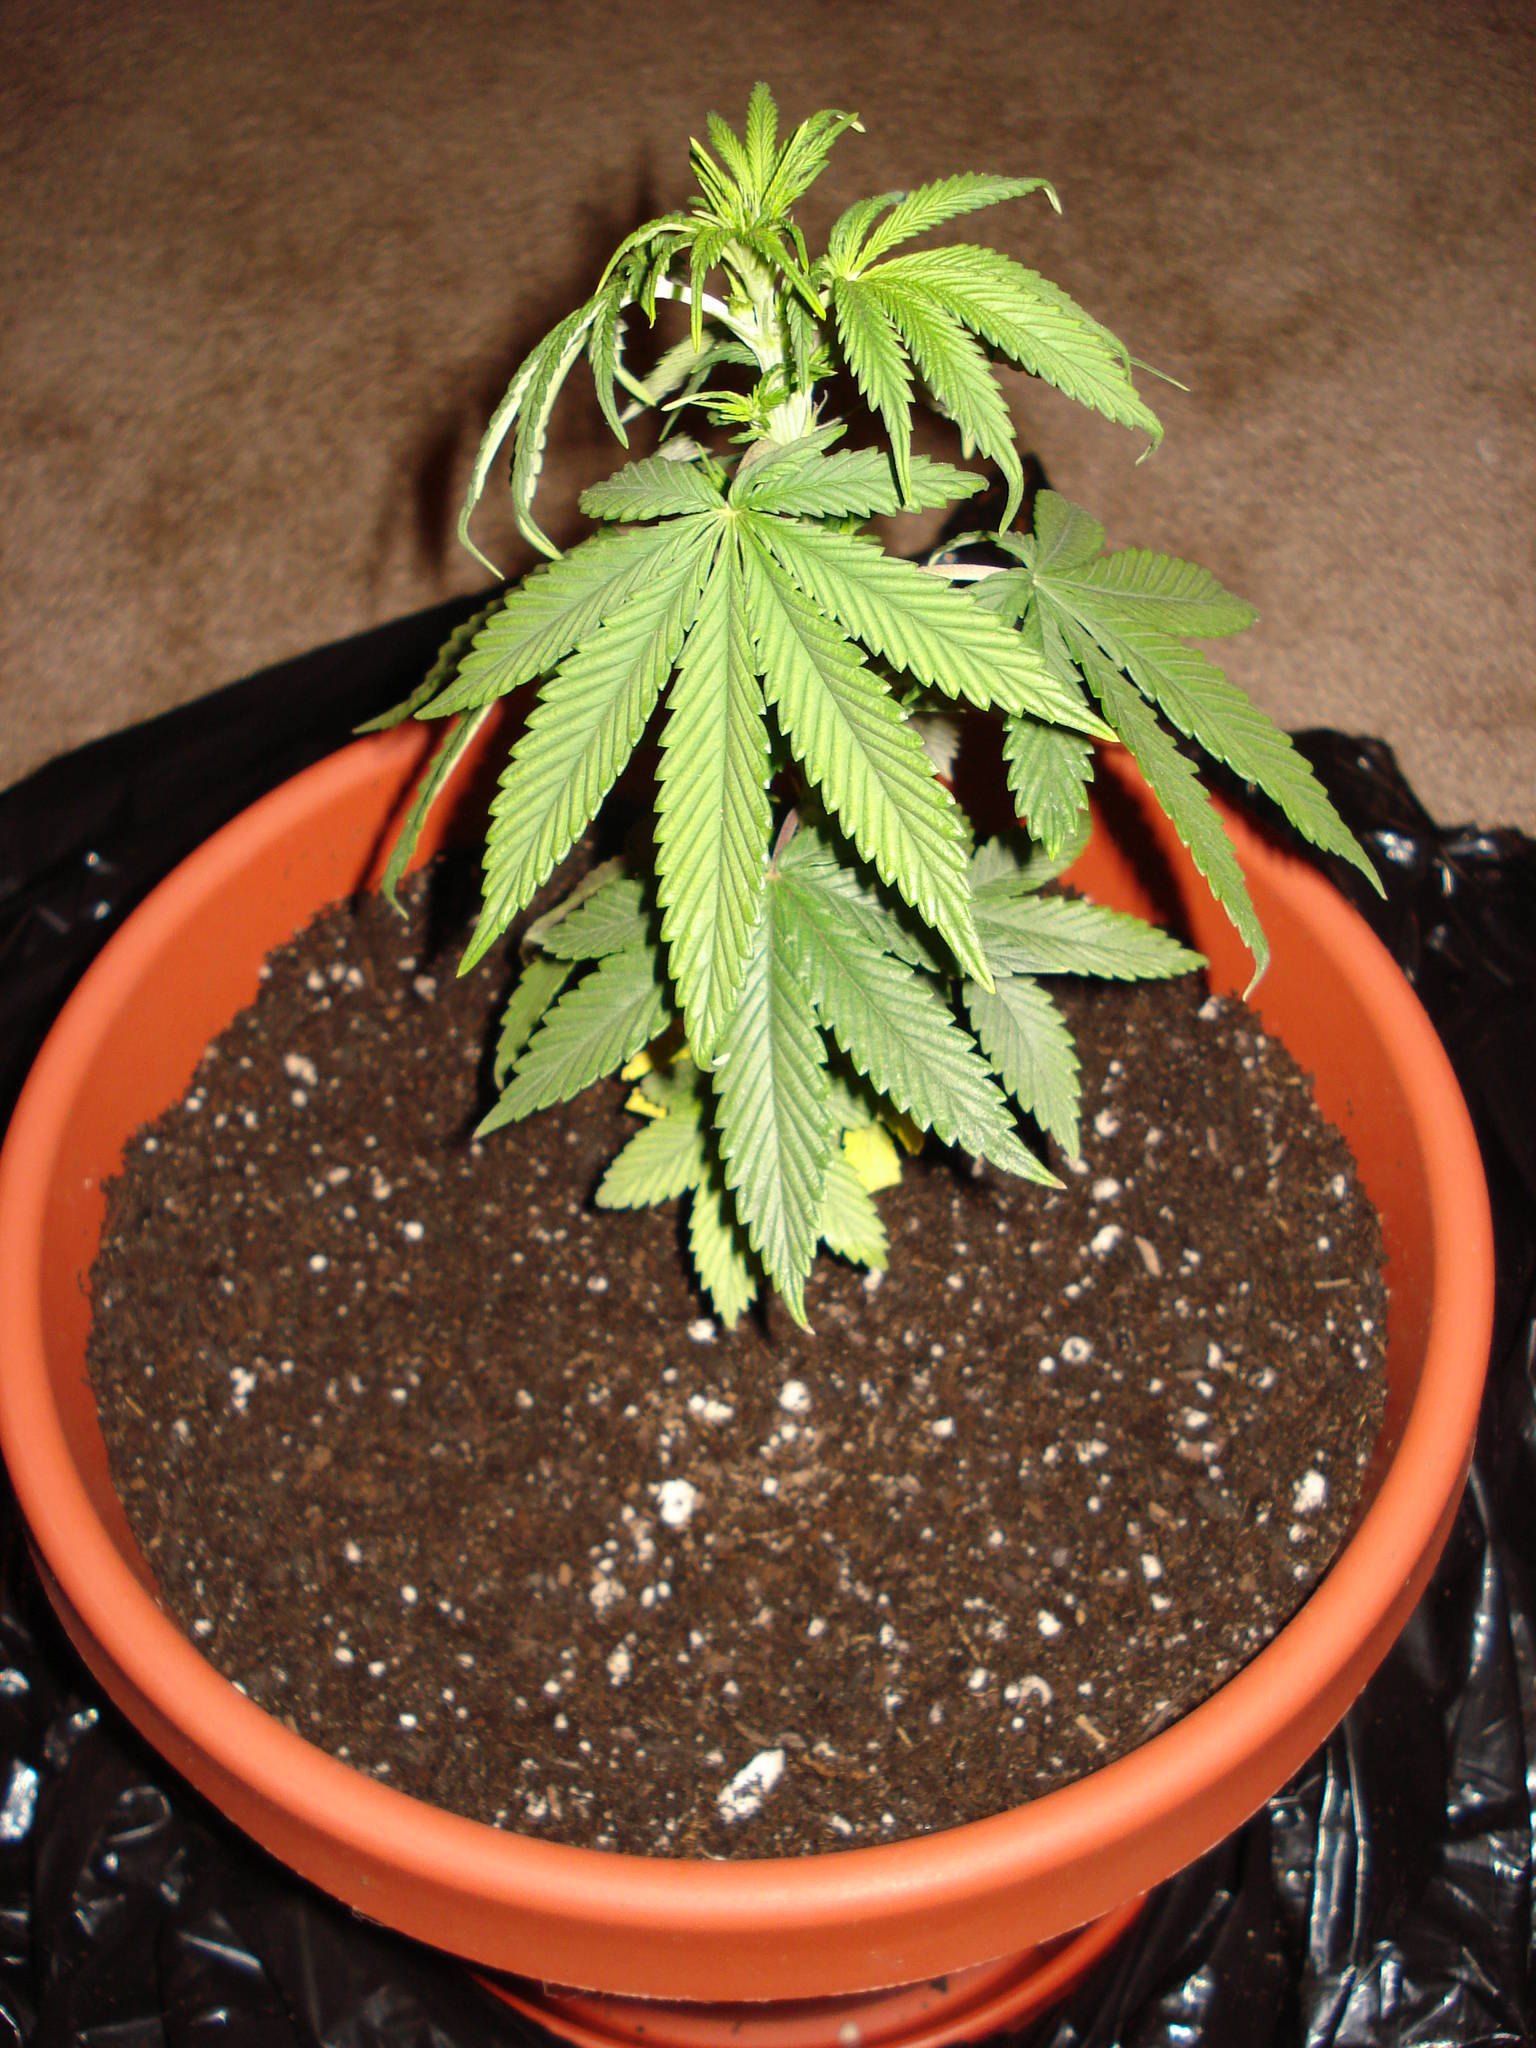
Day 47 (Day 3 of Flowering): Monday, March 22, 2010 ~ Transplant Day ~
   
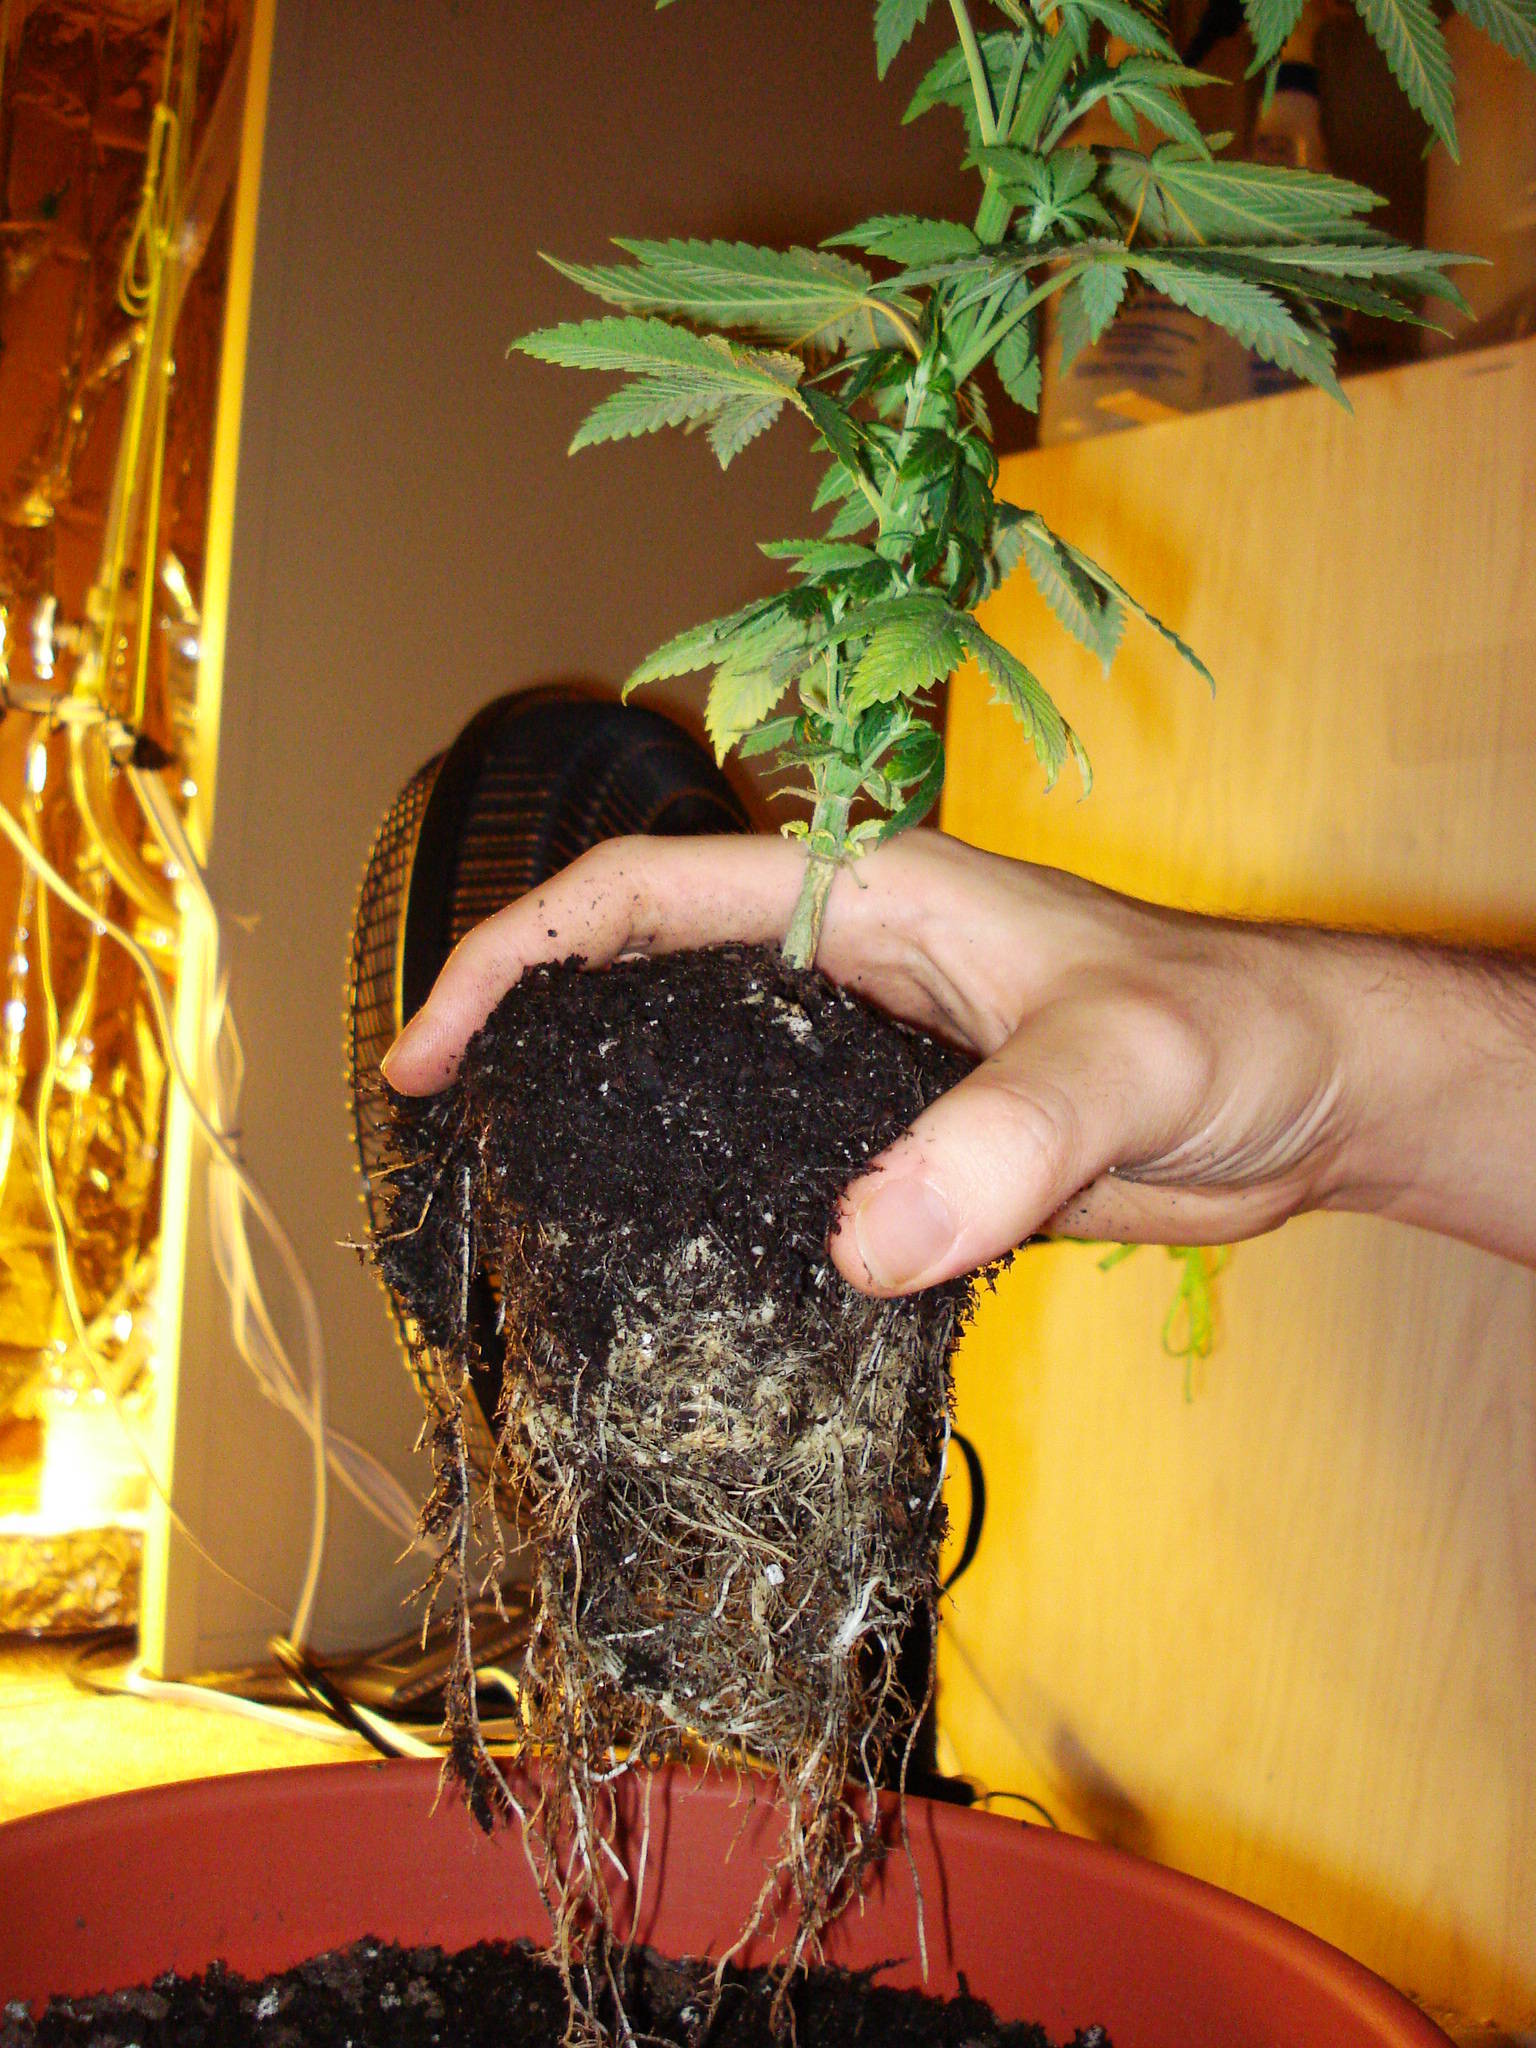
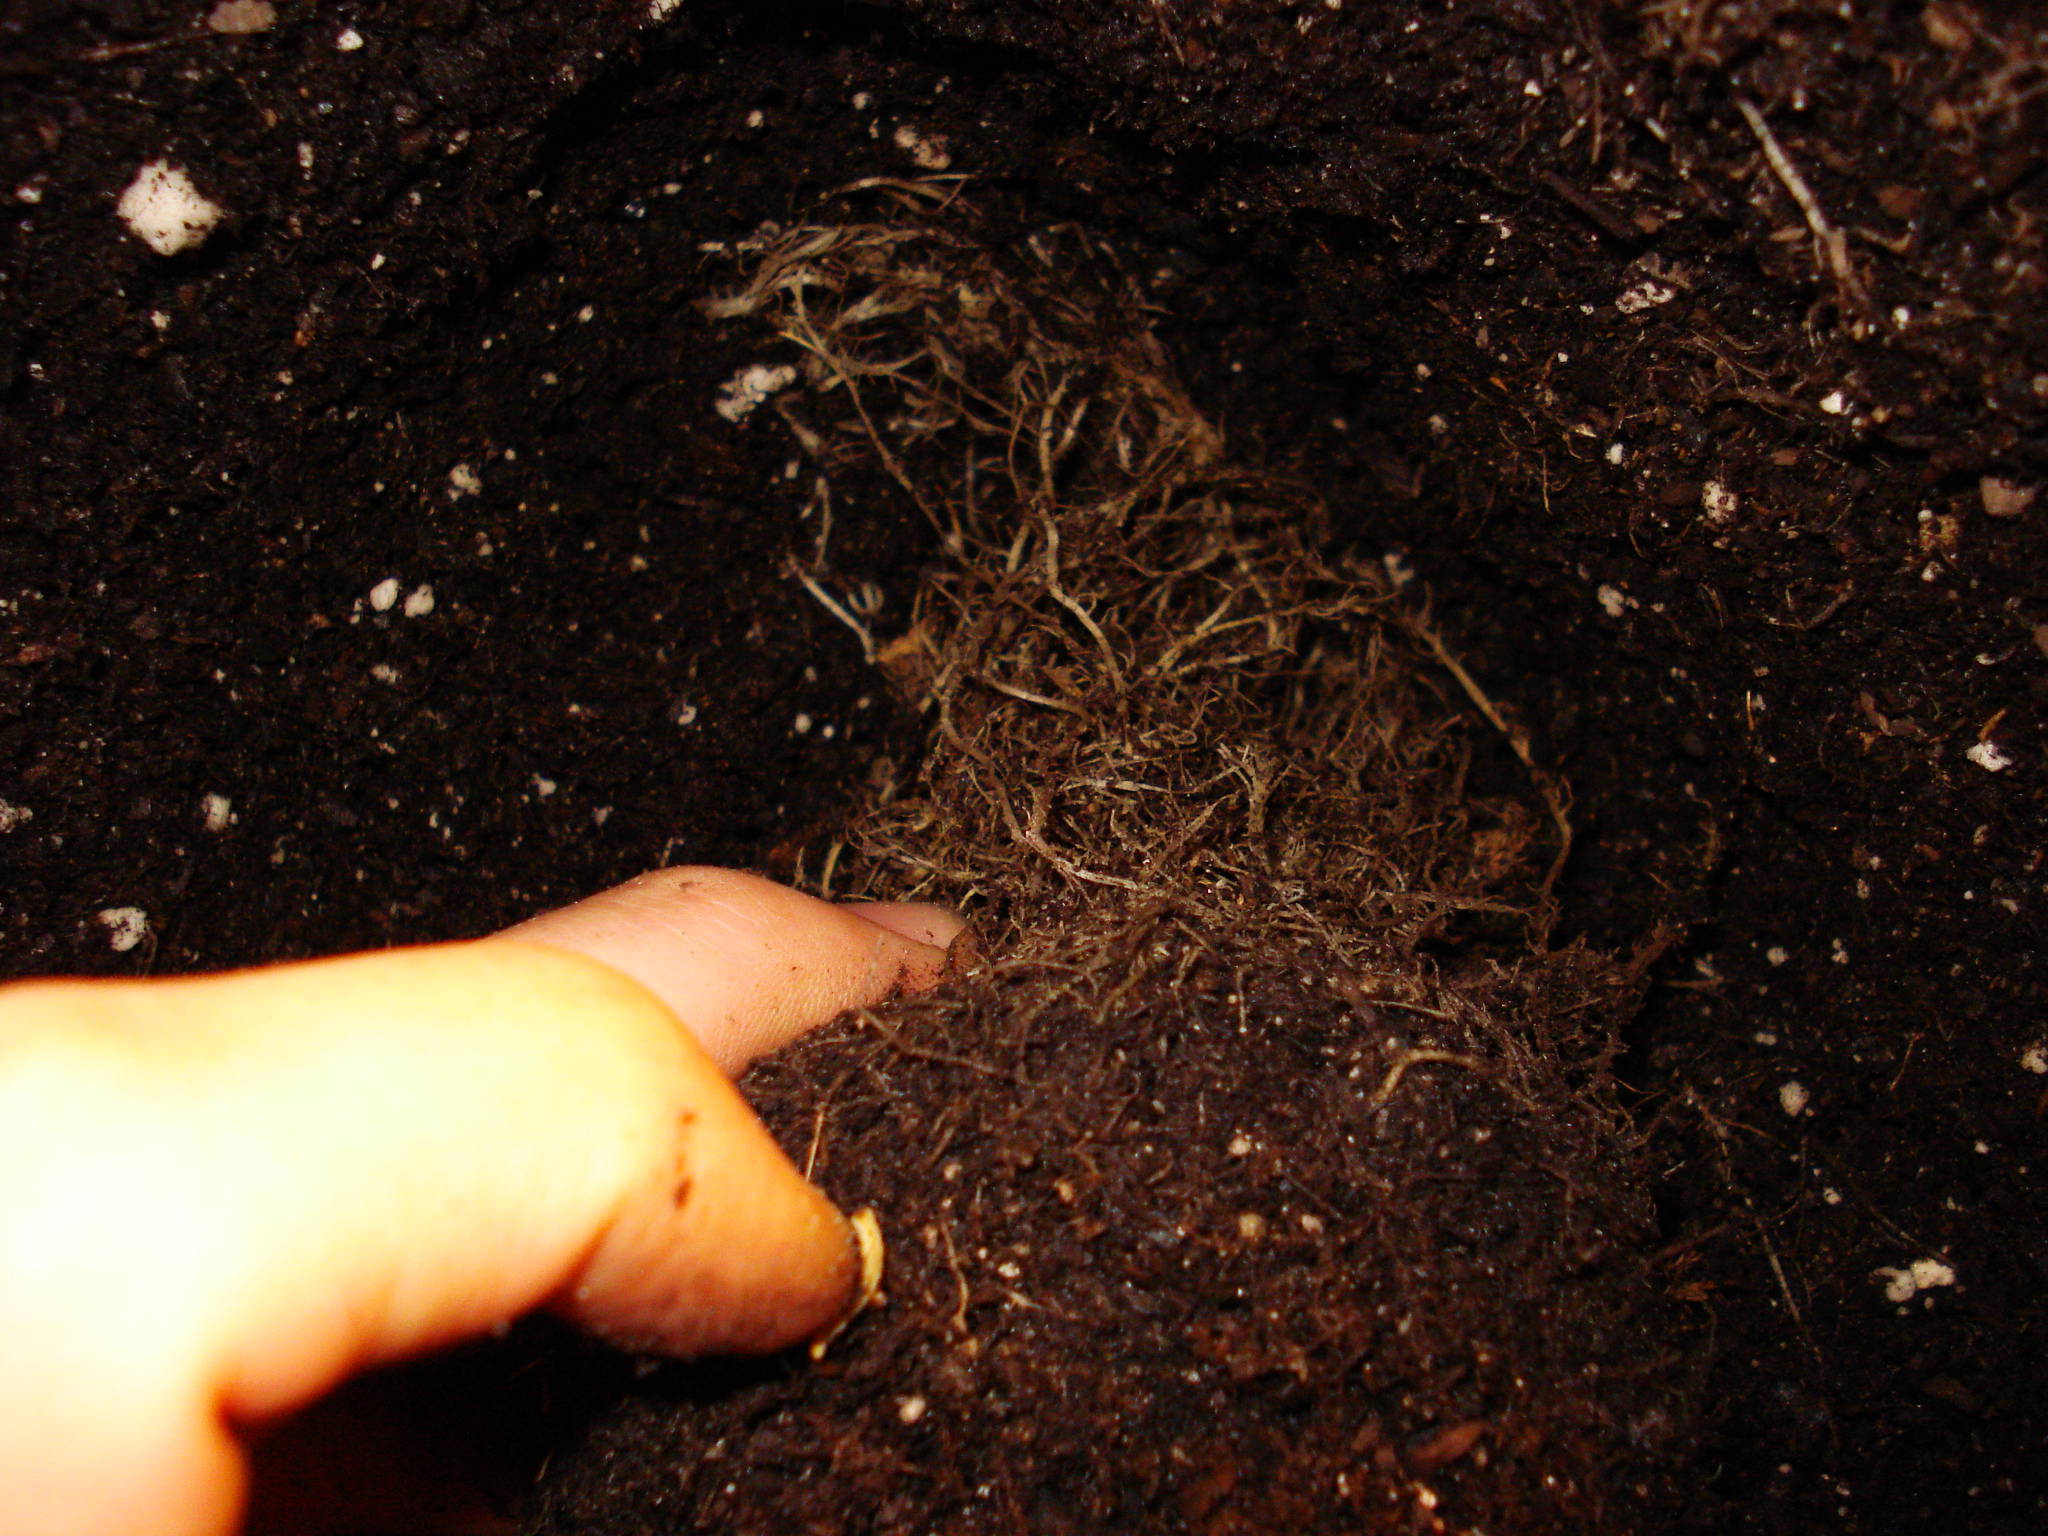
Day 51 (Day 7 of Flowering): Friday, March 26, 2010 - Root-Rip Re-Transplant (From Inverted's Transplant Advice) -
  
^I was very hesitate to do this, but after considering Inverted's expert advice, I decided to "take the risk" and pull out my girl and man-handle the roots in the purpose of improving the growth of the new roots. The whole process of ripping apart the roots was an aweful experience, not knowing if it would kill her if I ripped the wrong root. But, she survived and she's bigger than ever! I glad I did it, even thou the whole process made me sick to my stomach...
Later that day....

^After this photo, I went on a 2 day vacation out of town, so she was on her own. I wanted to use my drip system, because thats why I built it, for vacations, but the T.C. advised against it, so I did the soak-and-leave it approach, and it worked great. Thanks guys.
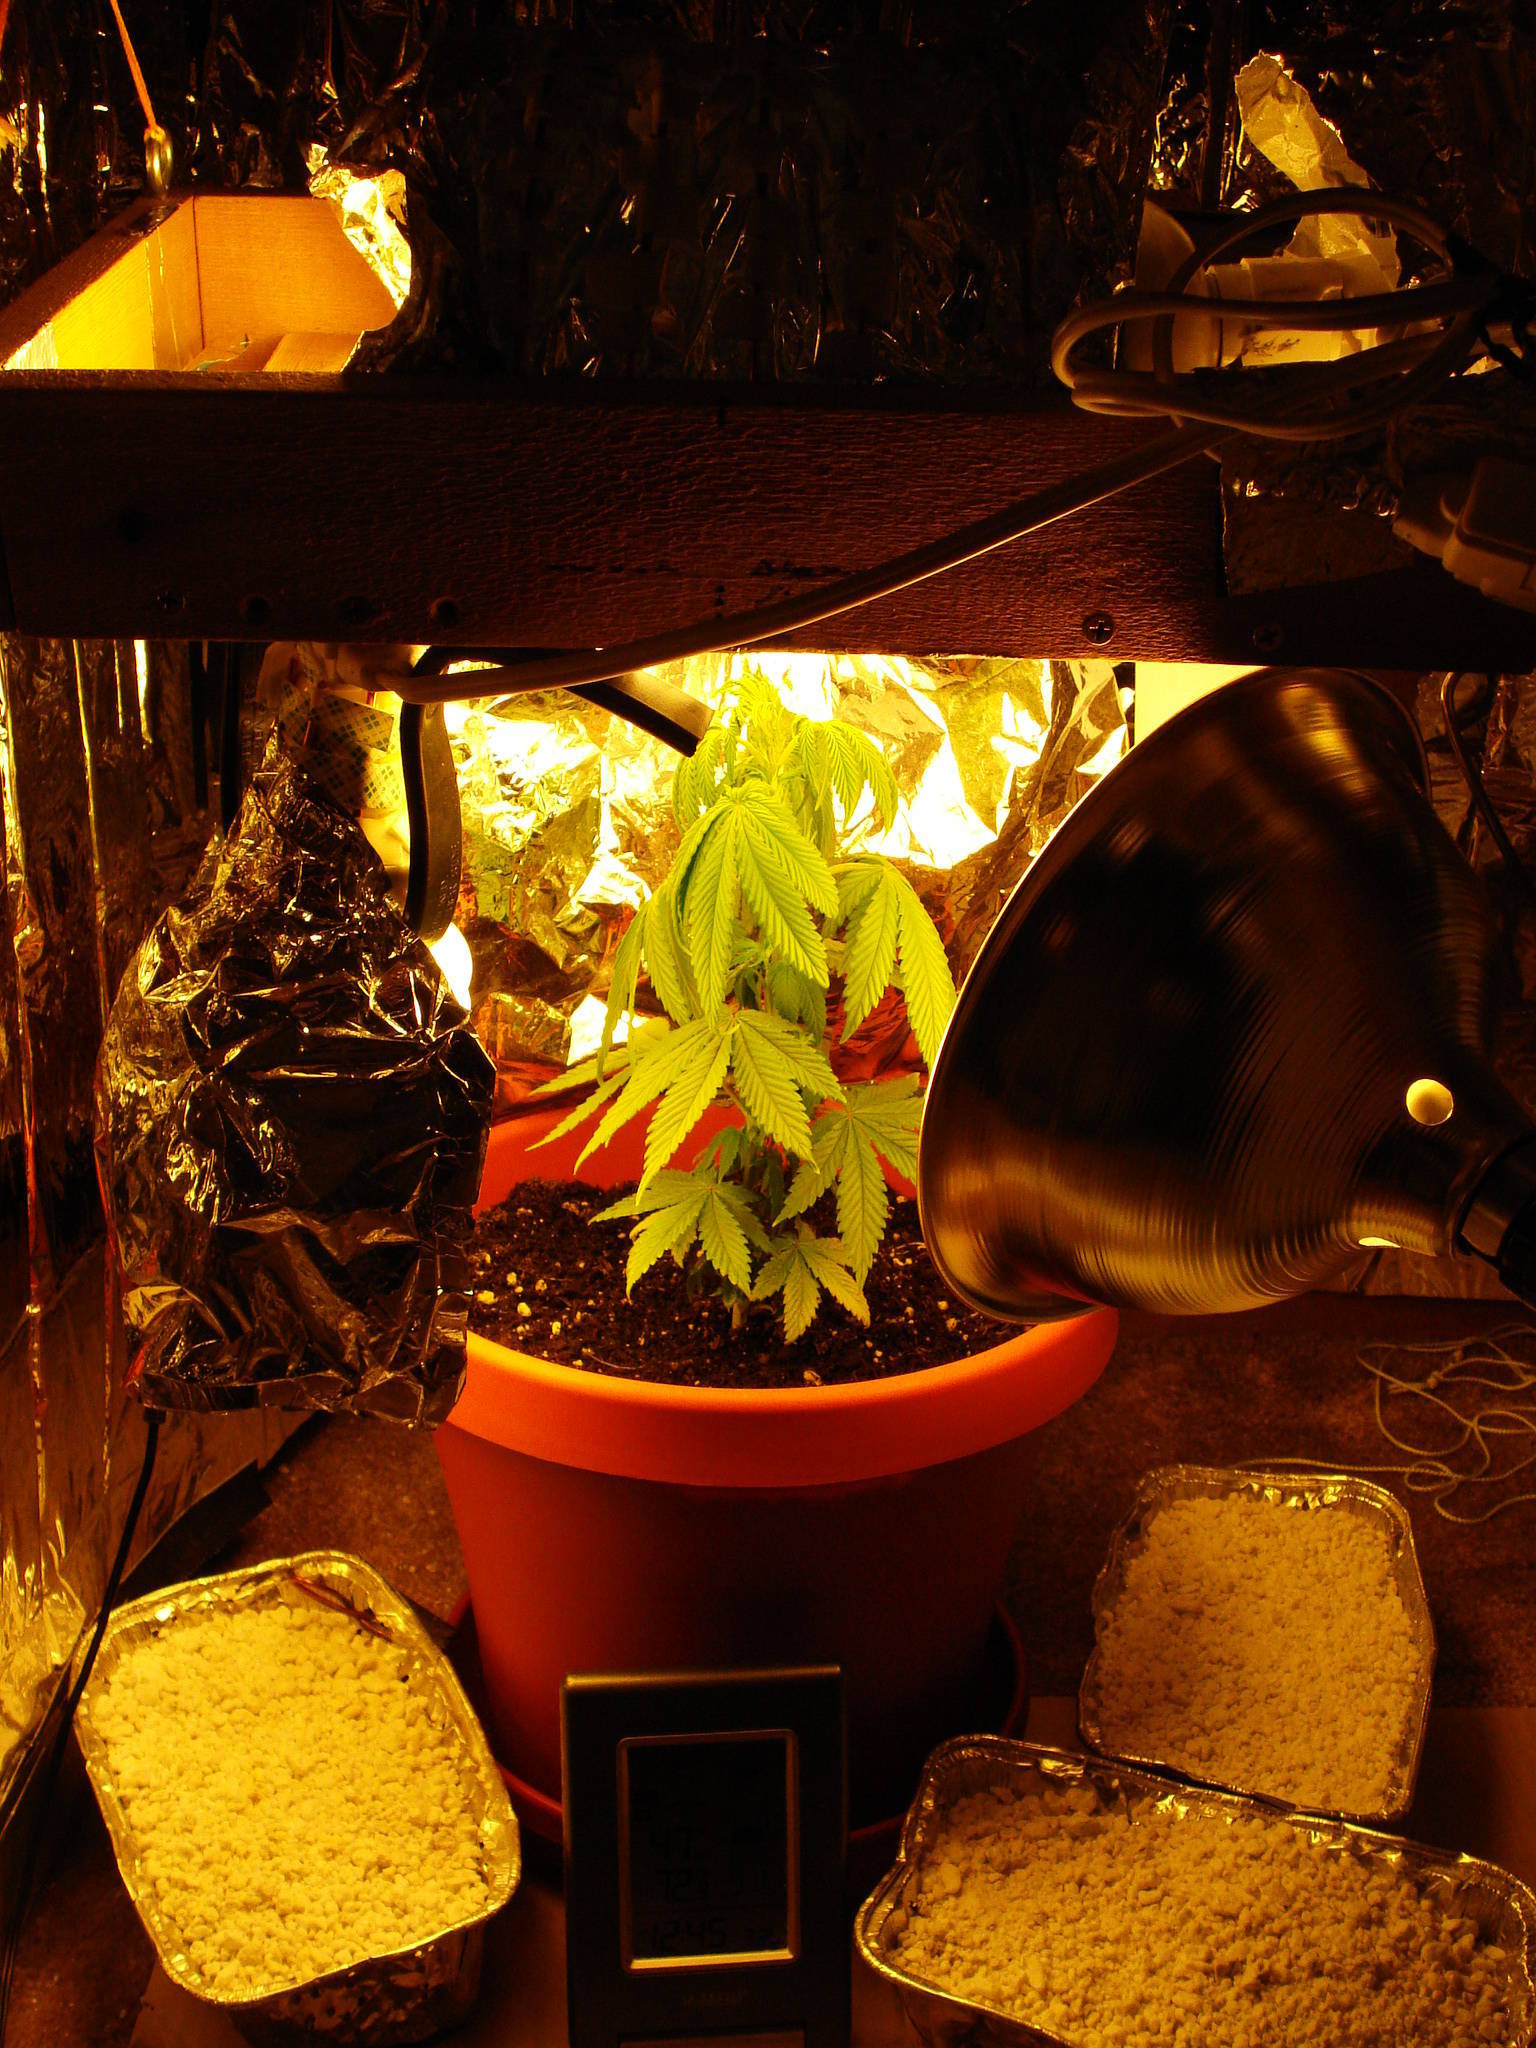
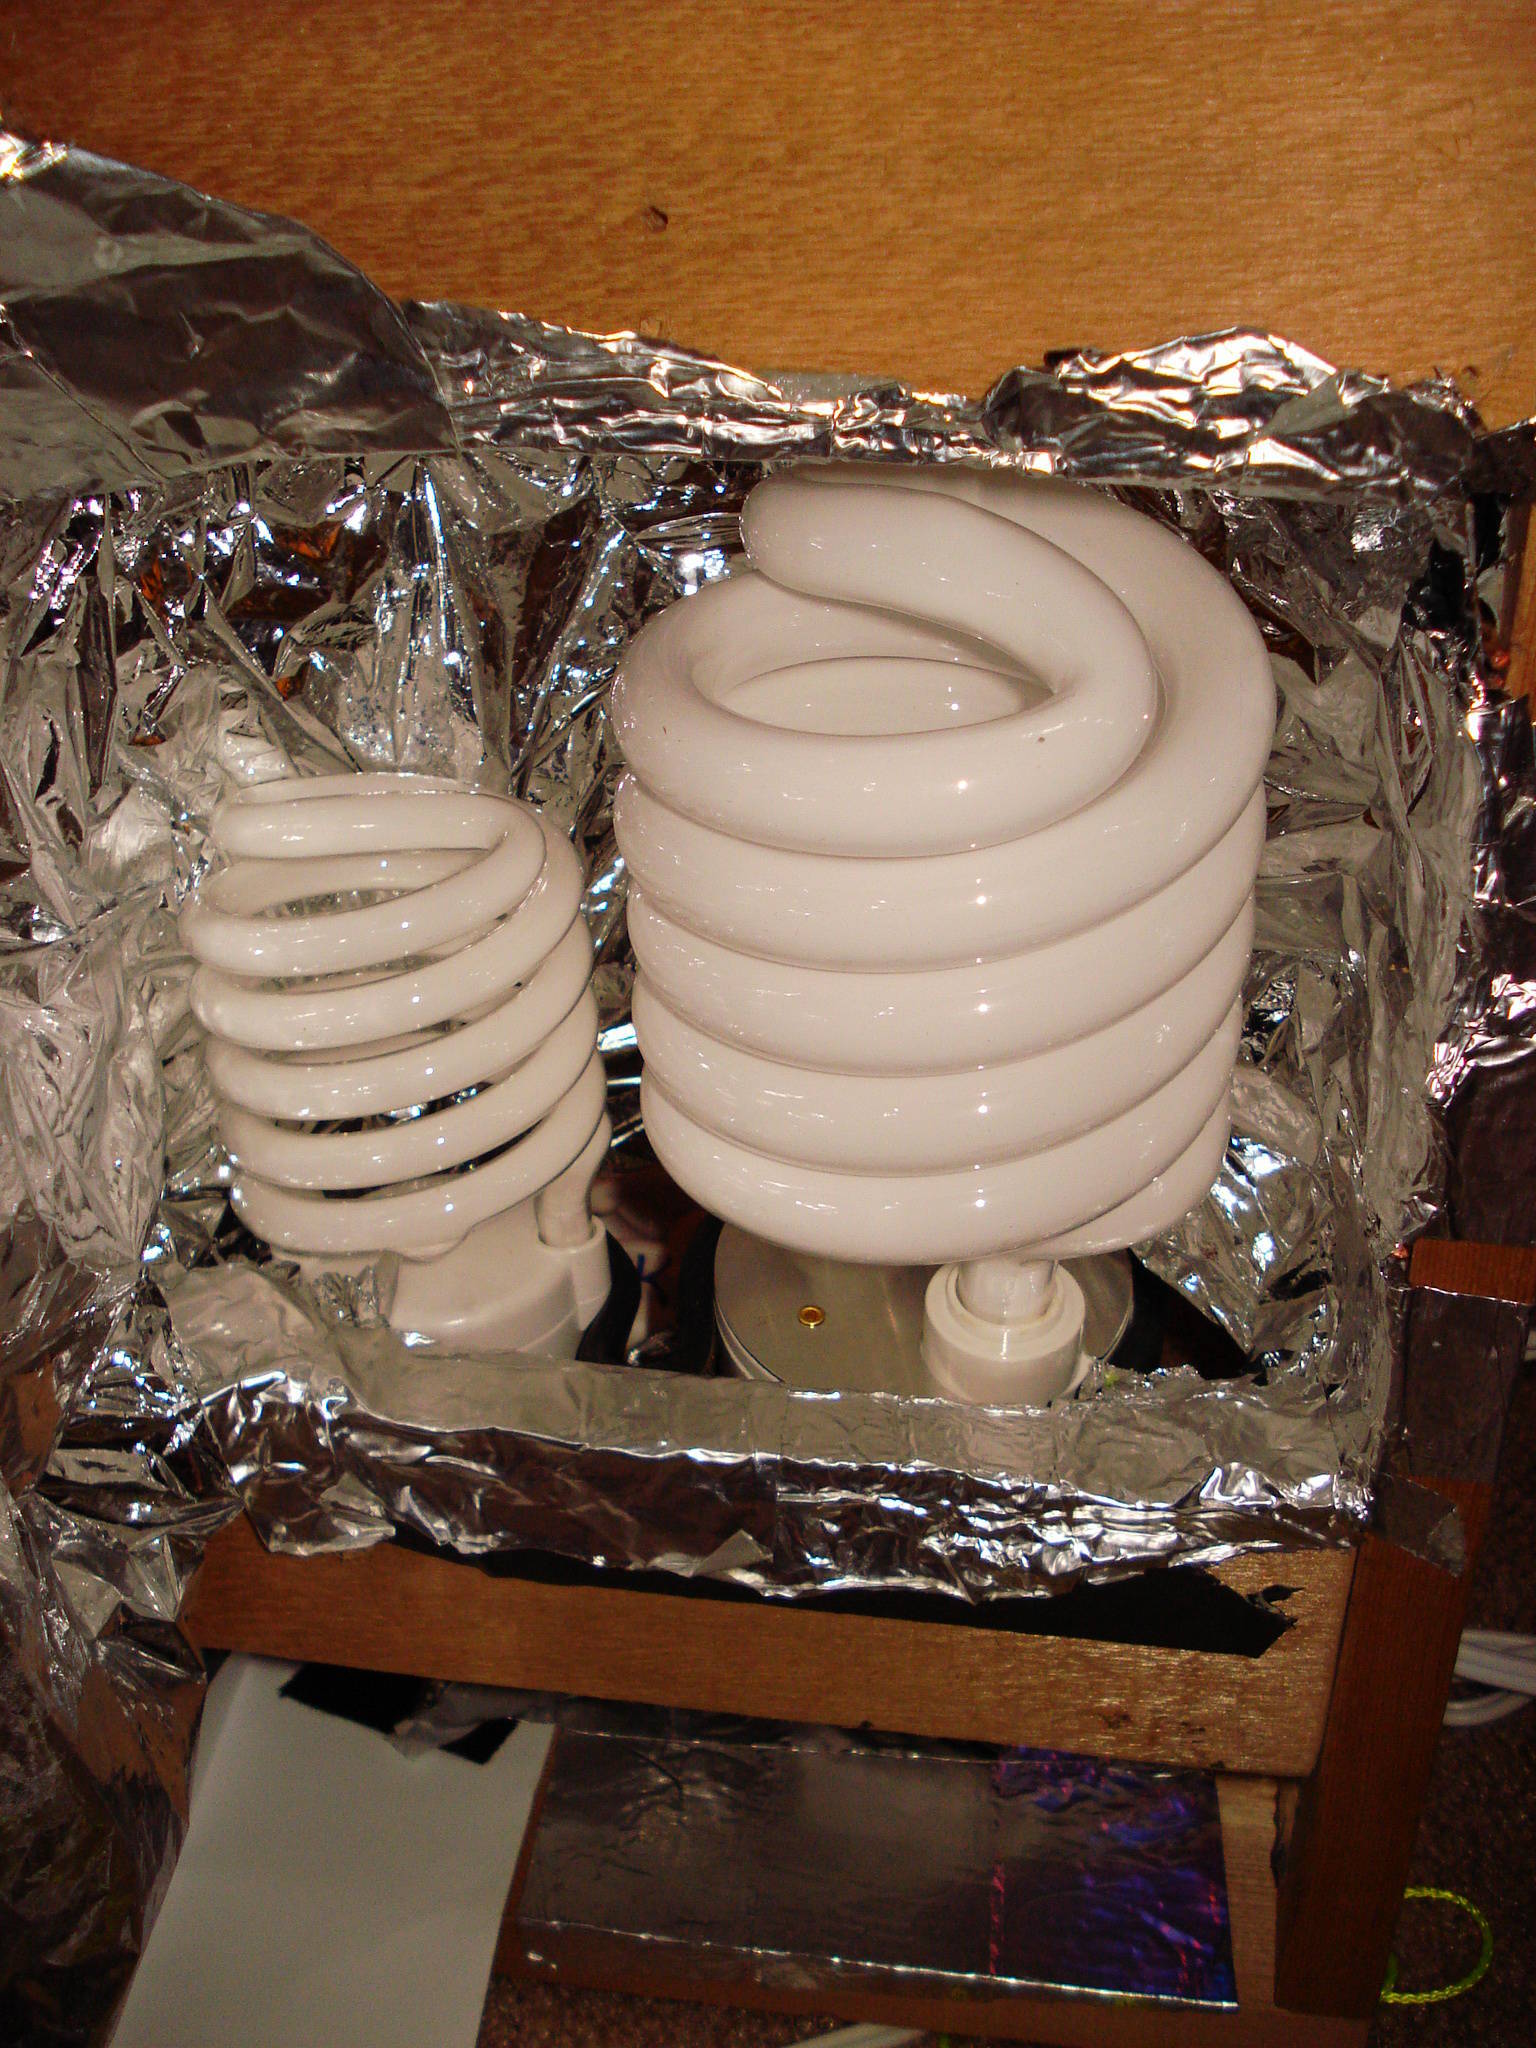
On Same Day (March 26) >>> Lighting Upgrade <<<<
I added this ridiculously massive 68 watts CFL (2,700K) bulb to my flower lighting set-up (on right, like you needed to be told)....

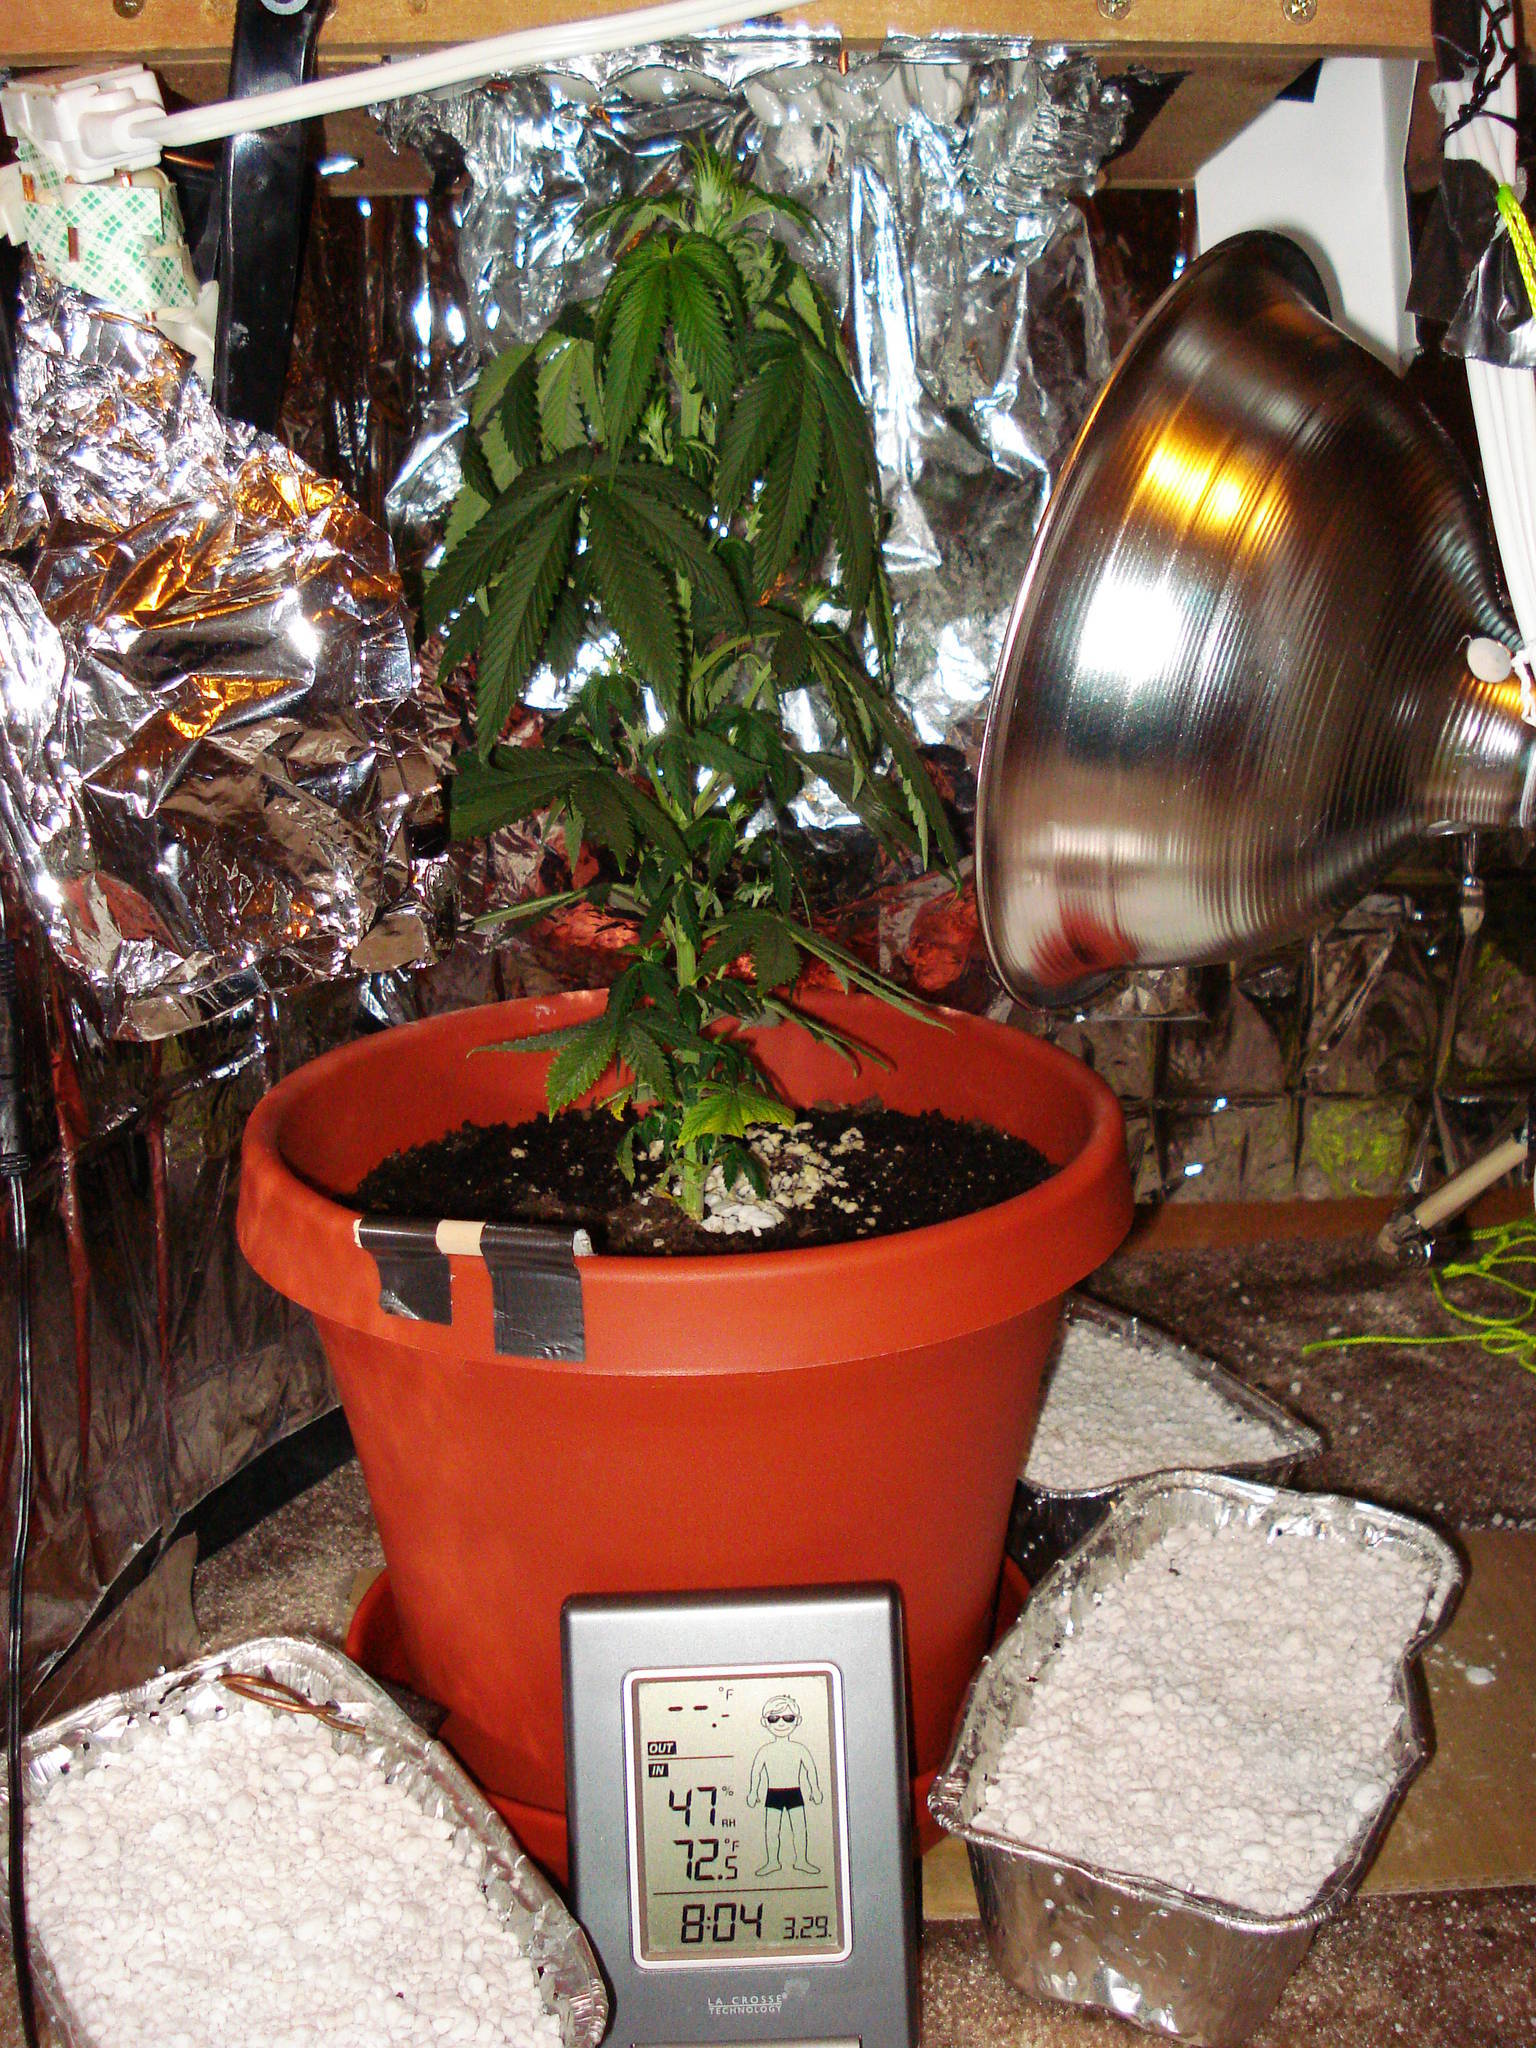
Day 54 (Day 9 of Flowering): Monday, March 29, 2010 - Got Home Today from 2 day Vacation - (Its near the bottom of the post link)
 
Main Photo: Well, she survived without me. How cool is that. The soil-soaking trick works very well, even for days. In my experience, its a proven method. Drip-system (aka constant water supply) unneeded.
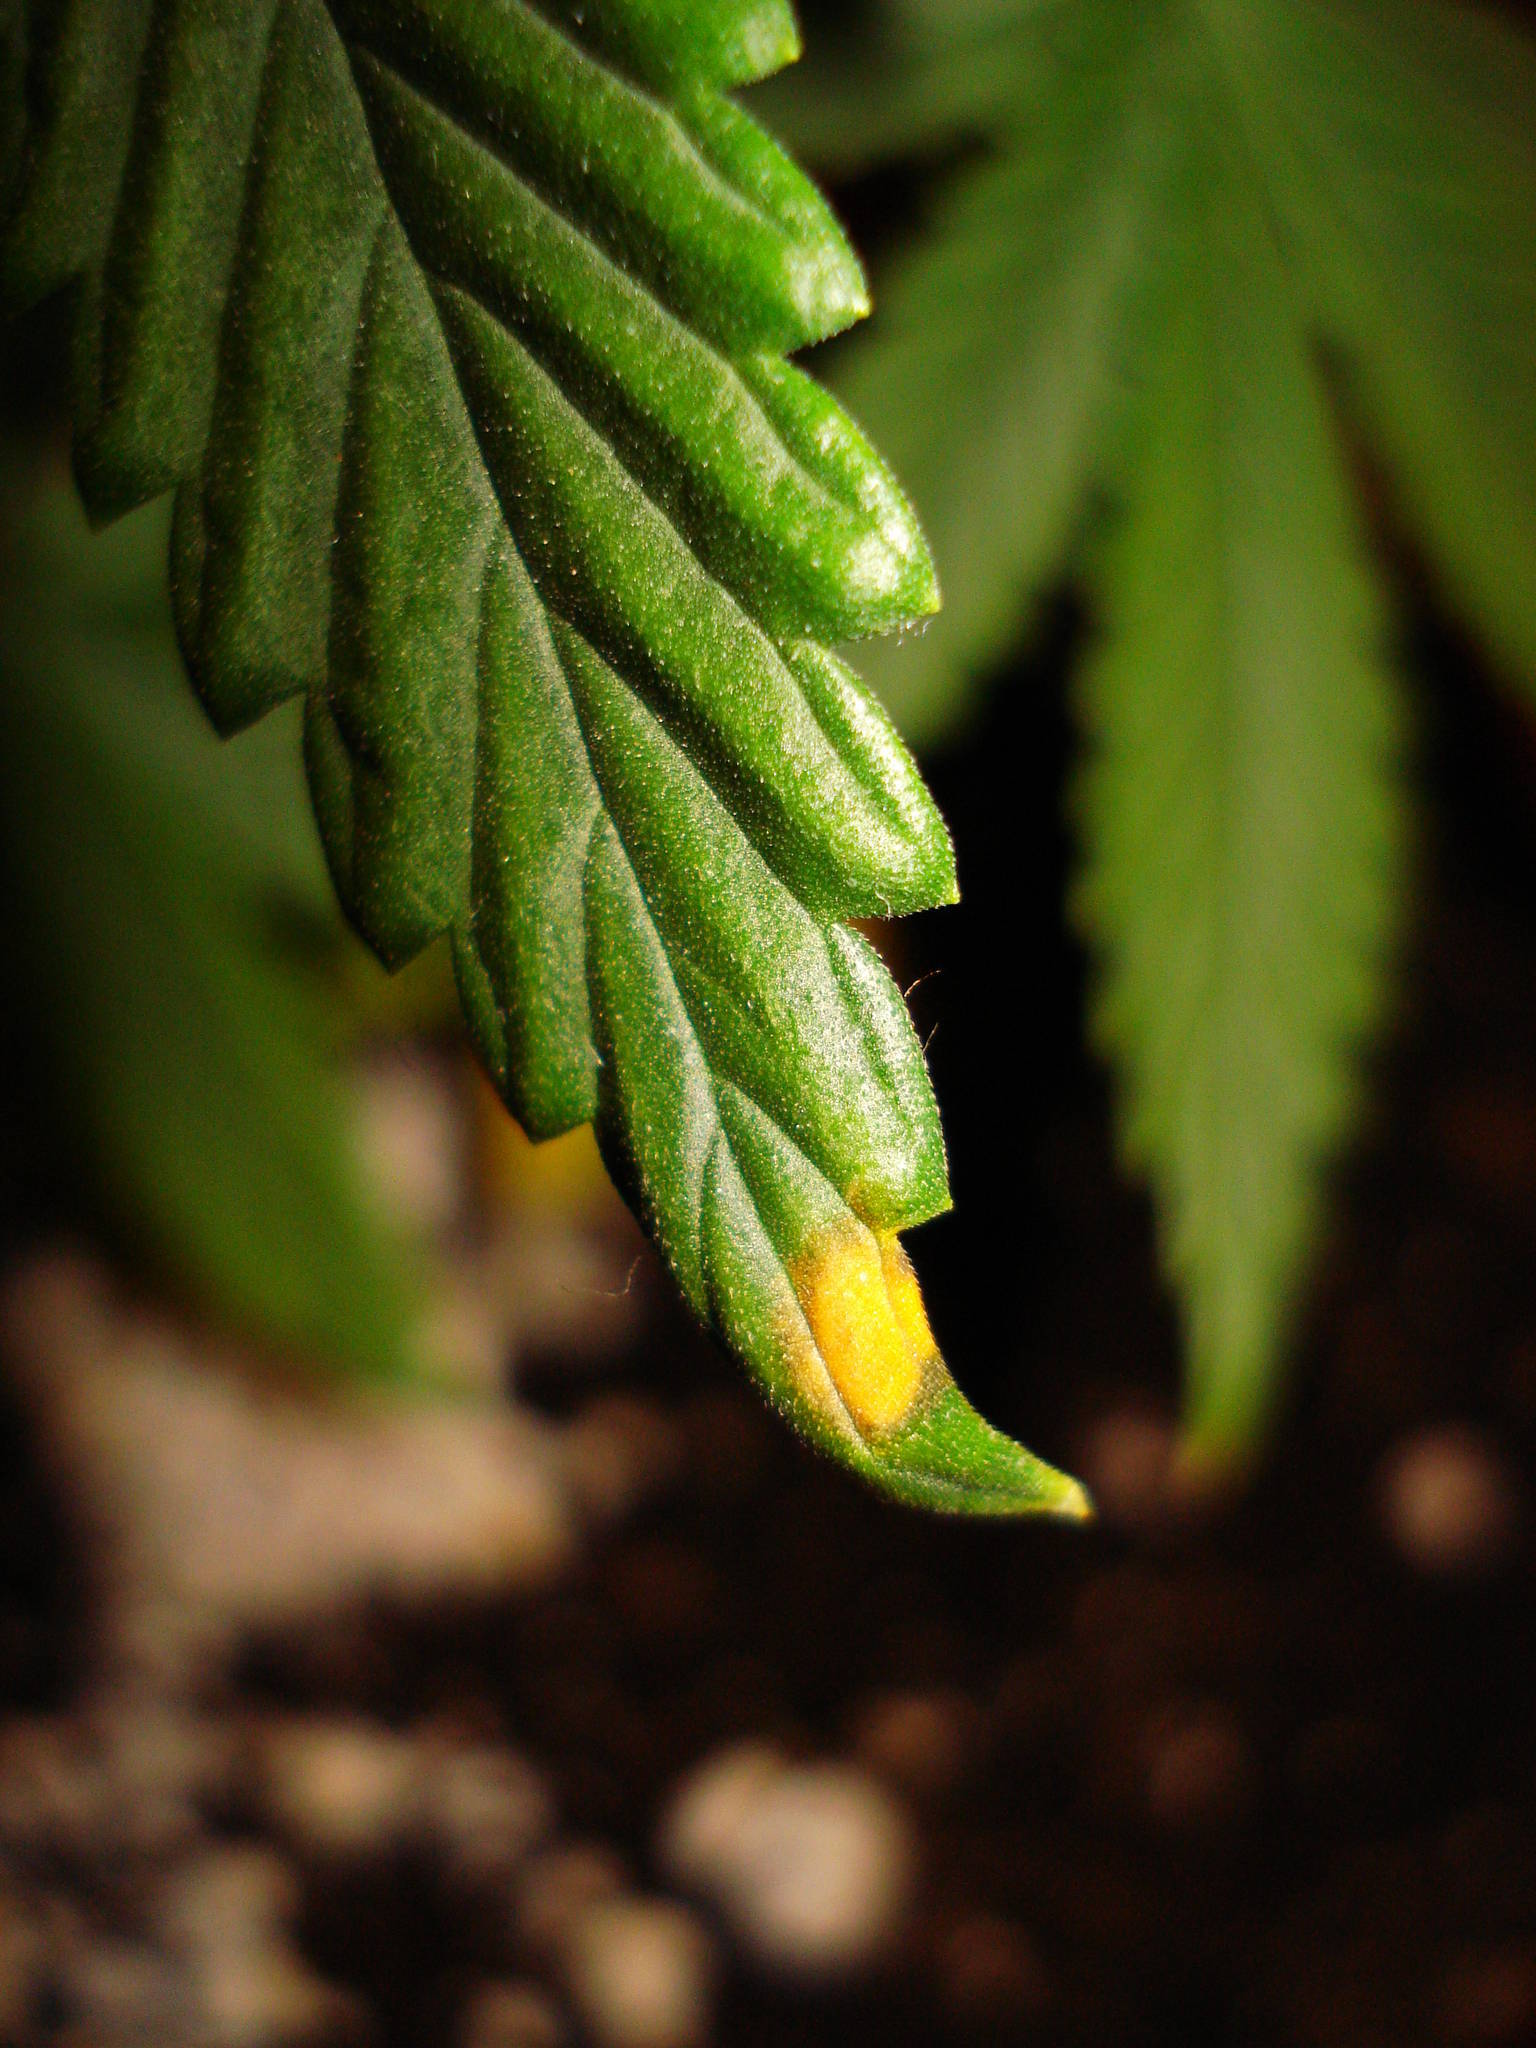
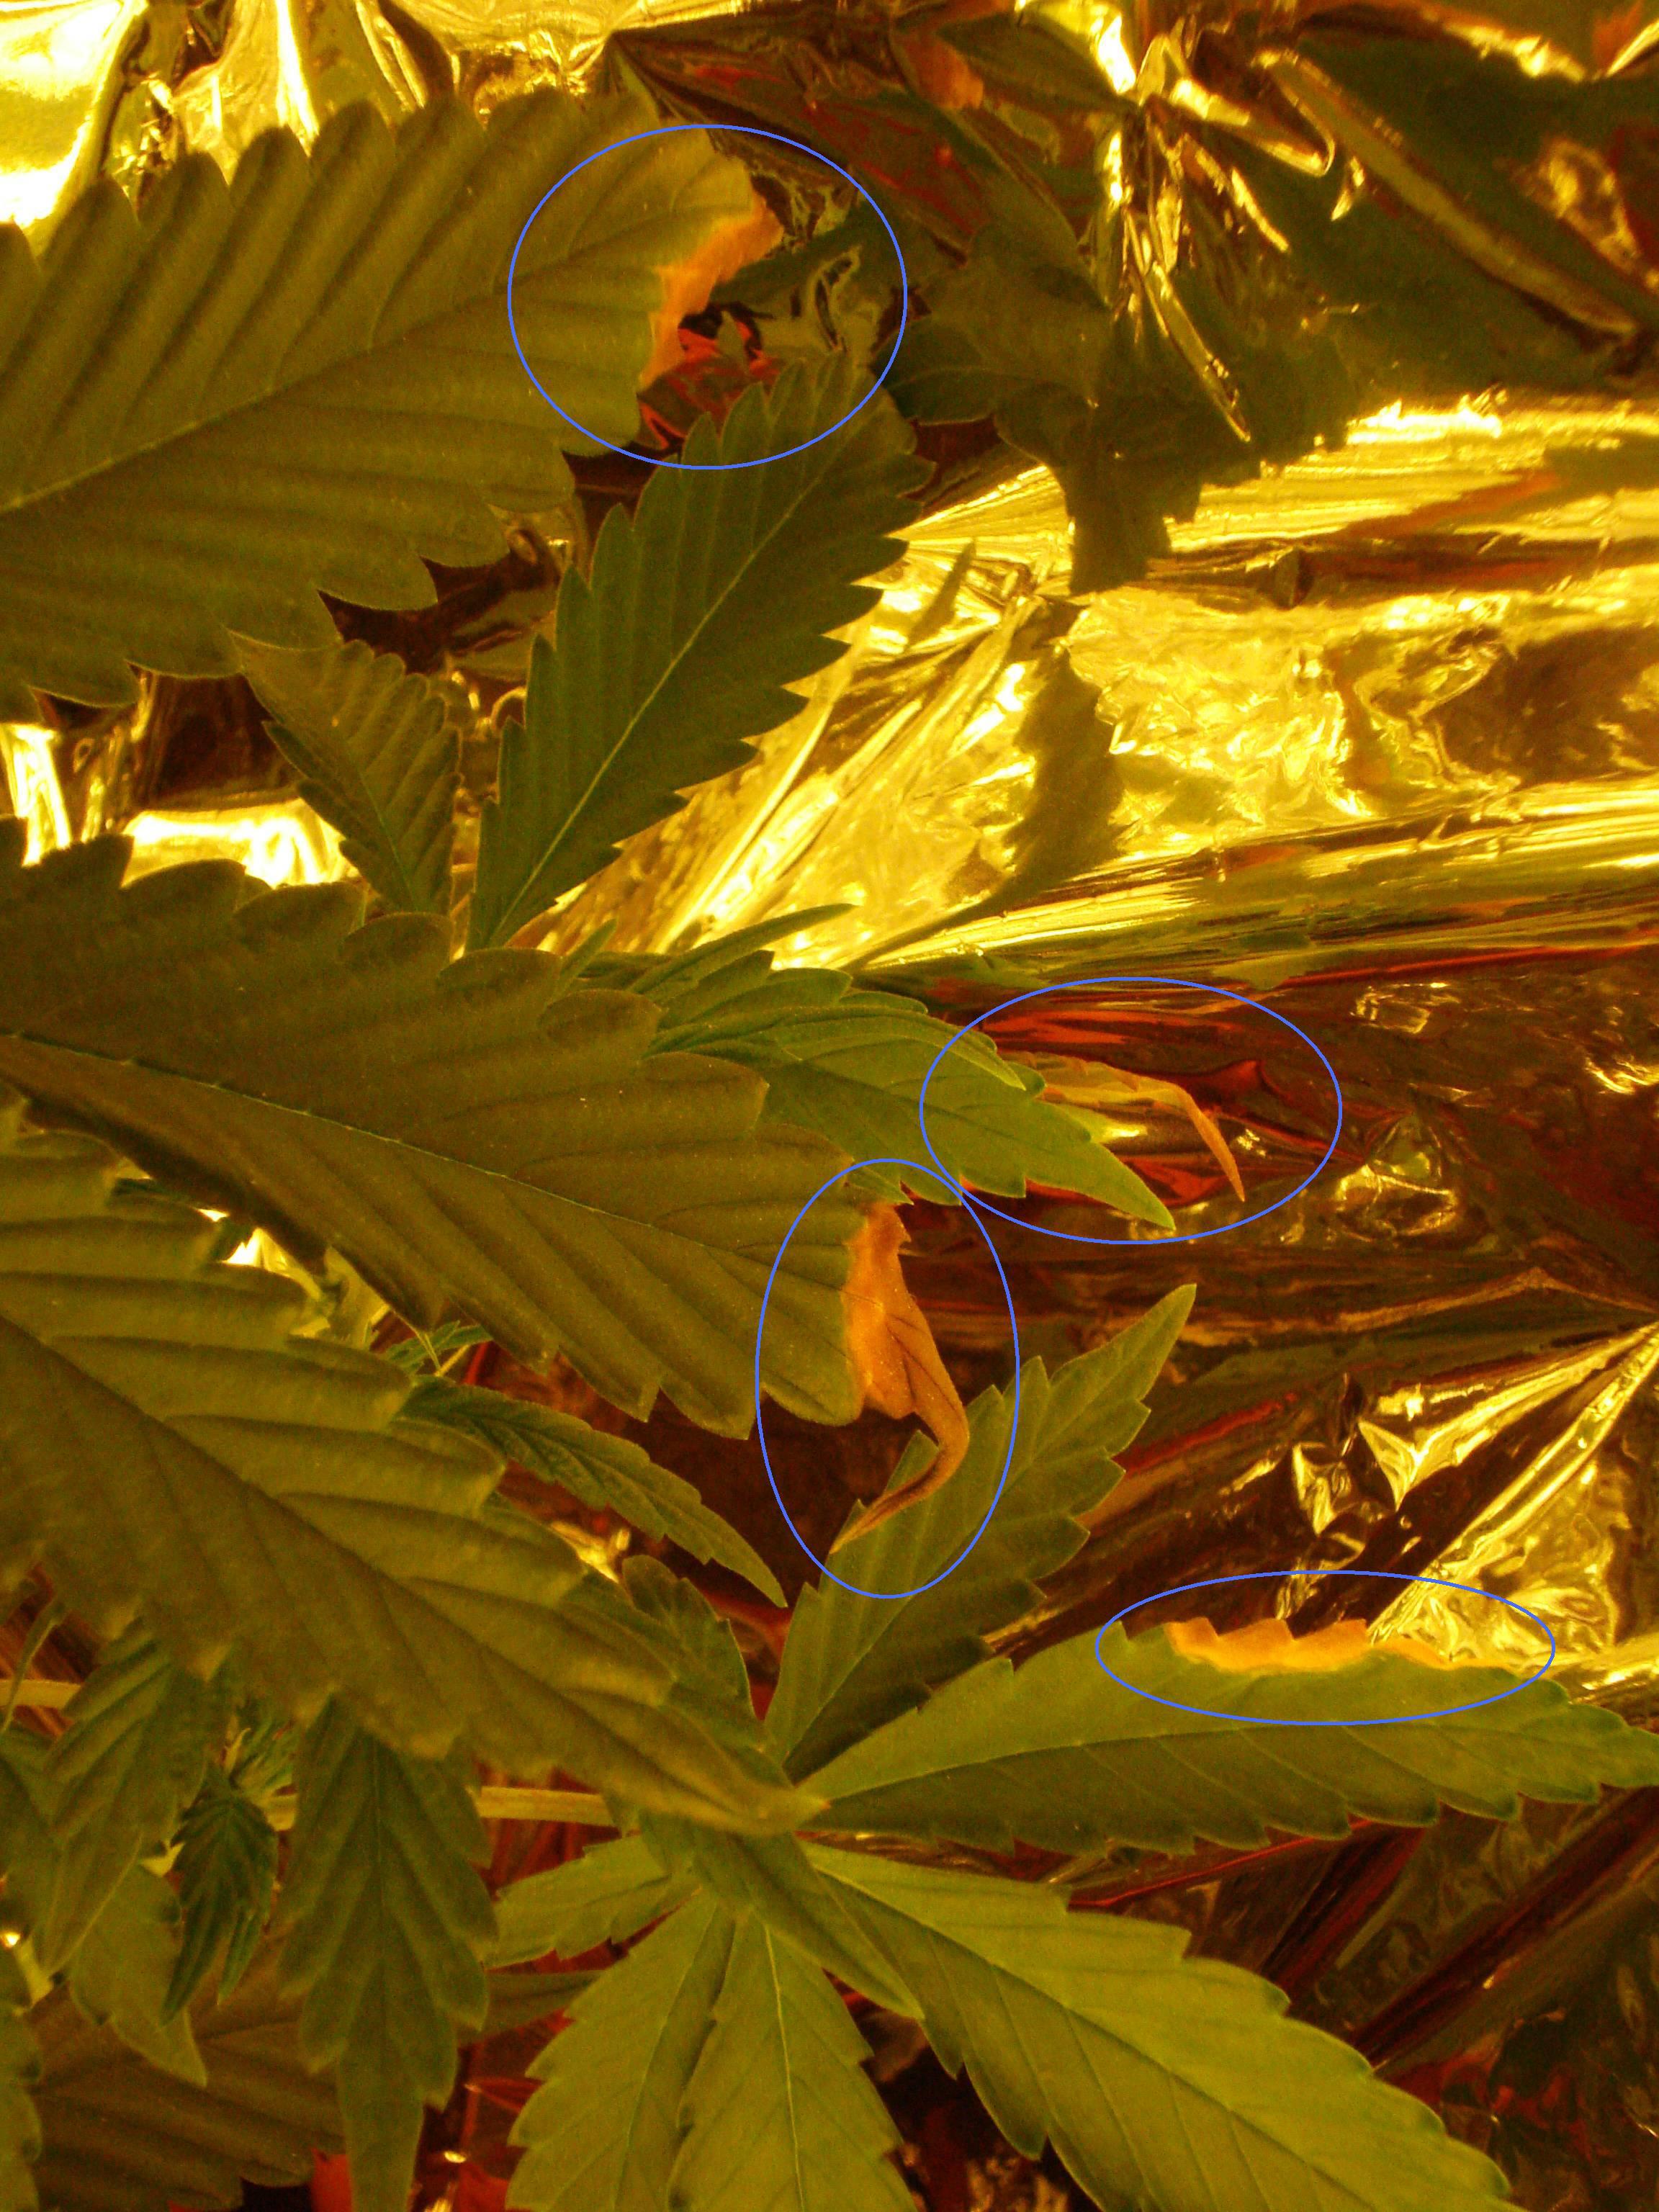
Photo on Right: As you can see, there's some burn damage on just this one leaf from a vertical-hanging 42 watt CFL flowering bulb. I actually had a feeling my left custom-reflector bulb was too close, but I didn't have time to move it over, so I just left it. But the damages is sooooo minor, I don't even care. I think it looks cool, like a battle scar.
Day 59 (Day 14 of Flowering): April 3, 2010
   
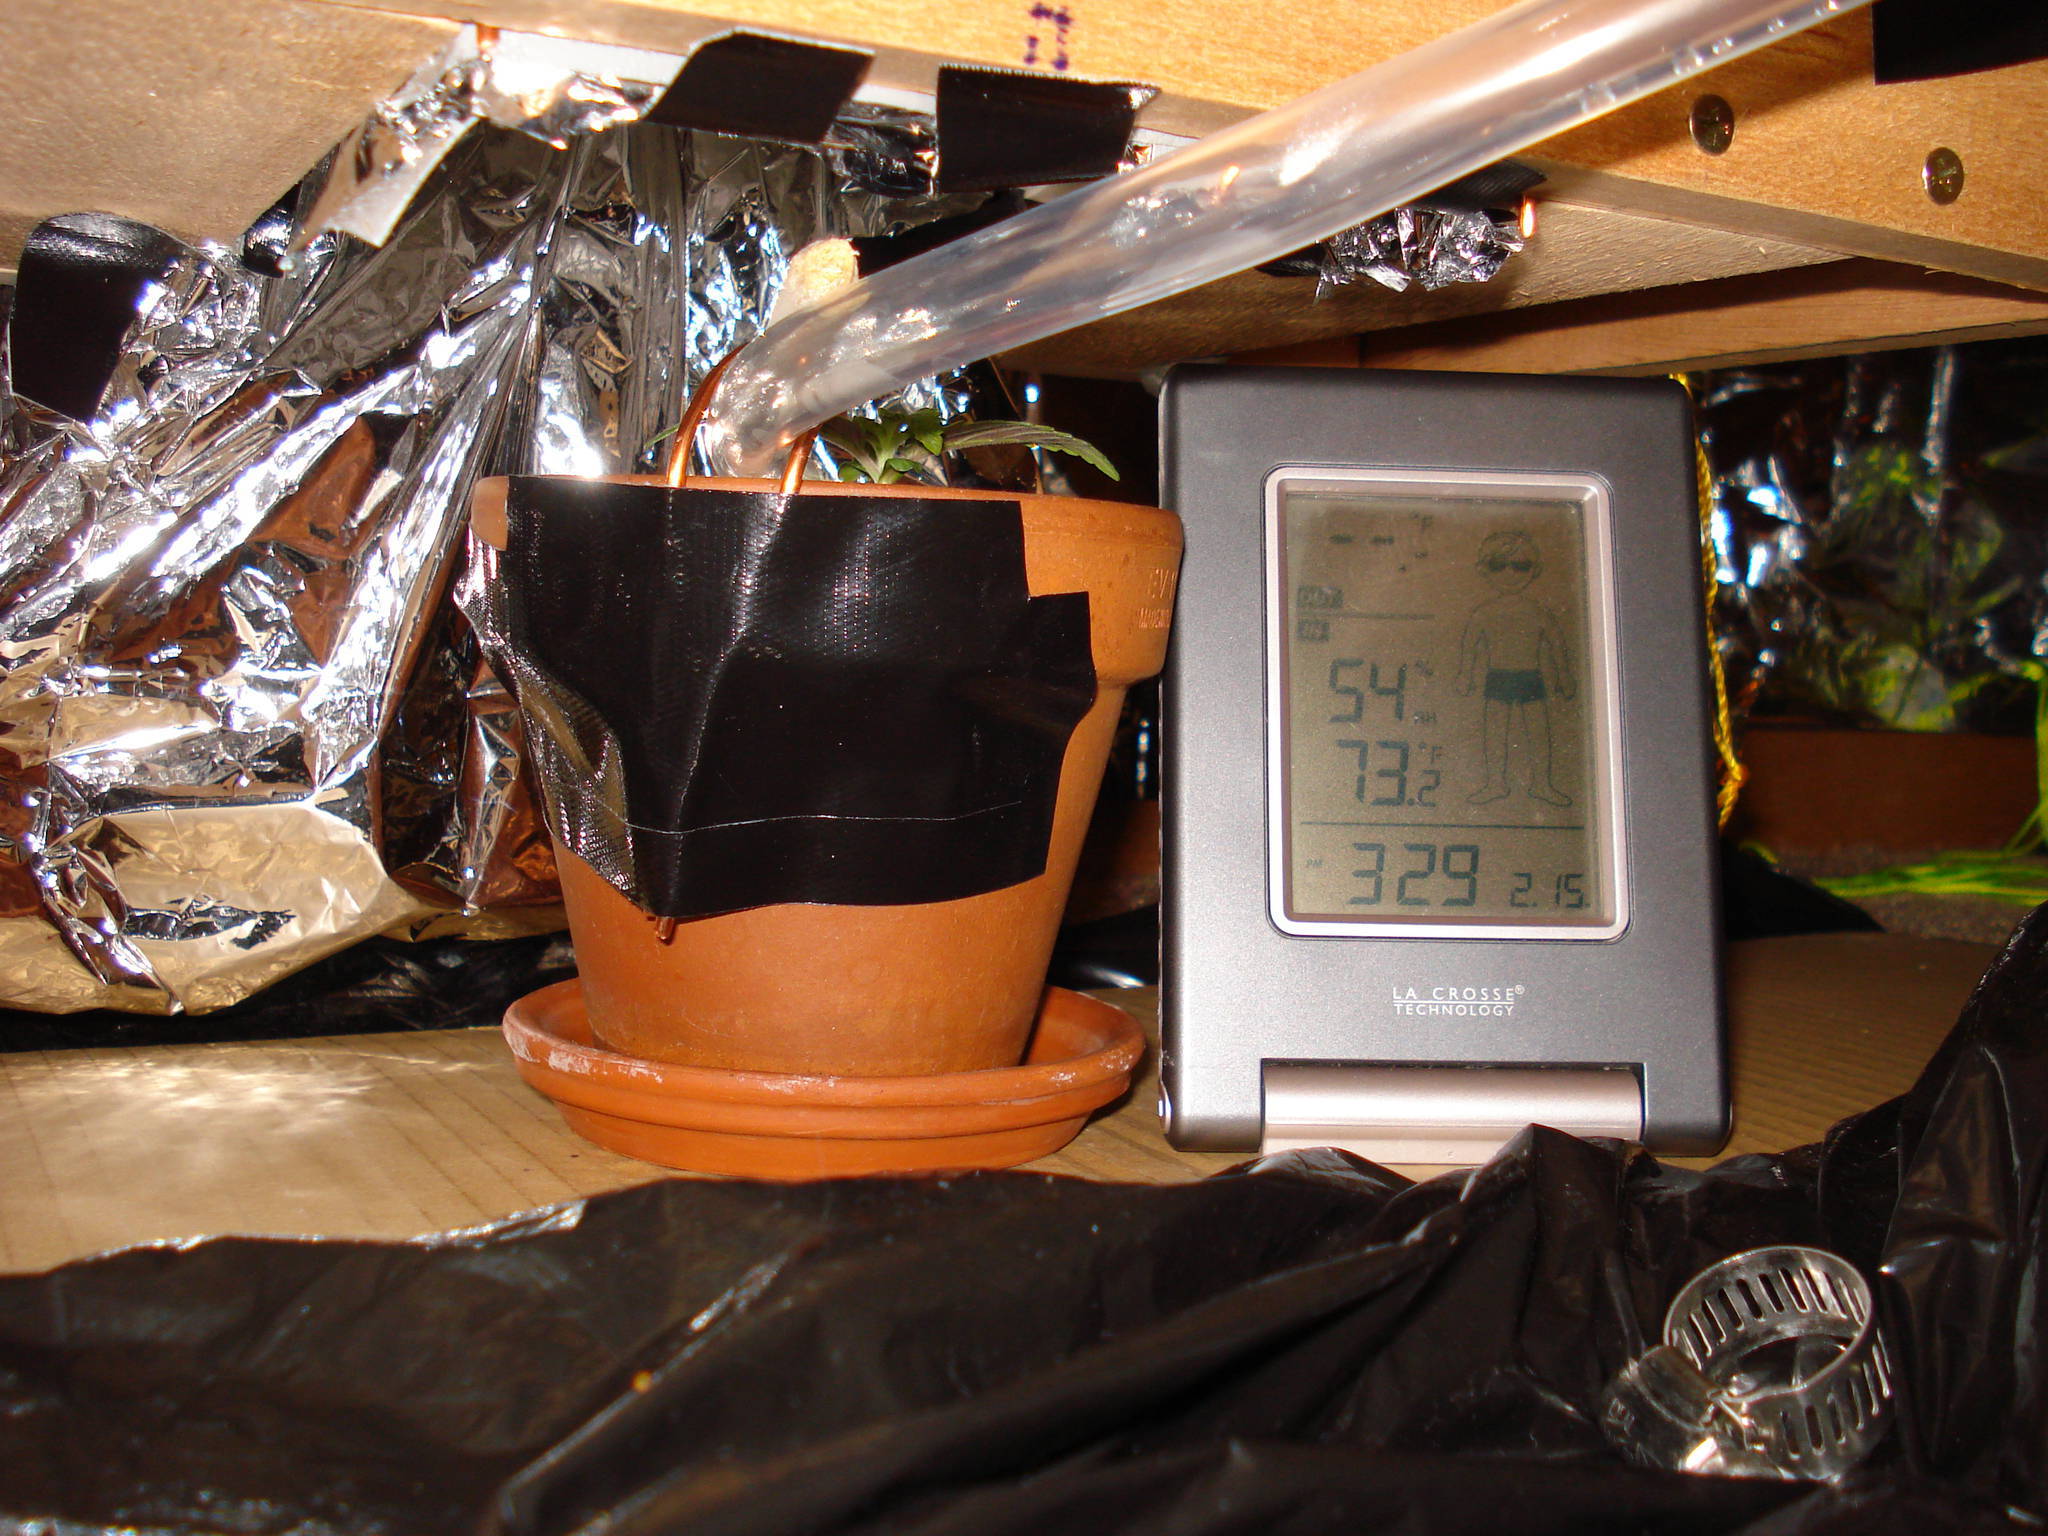
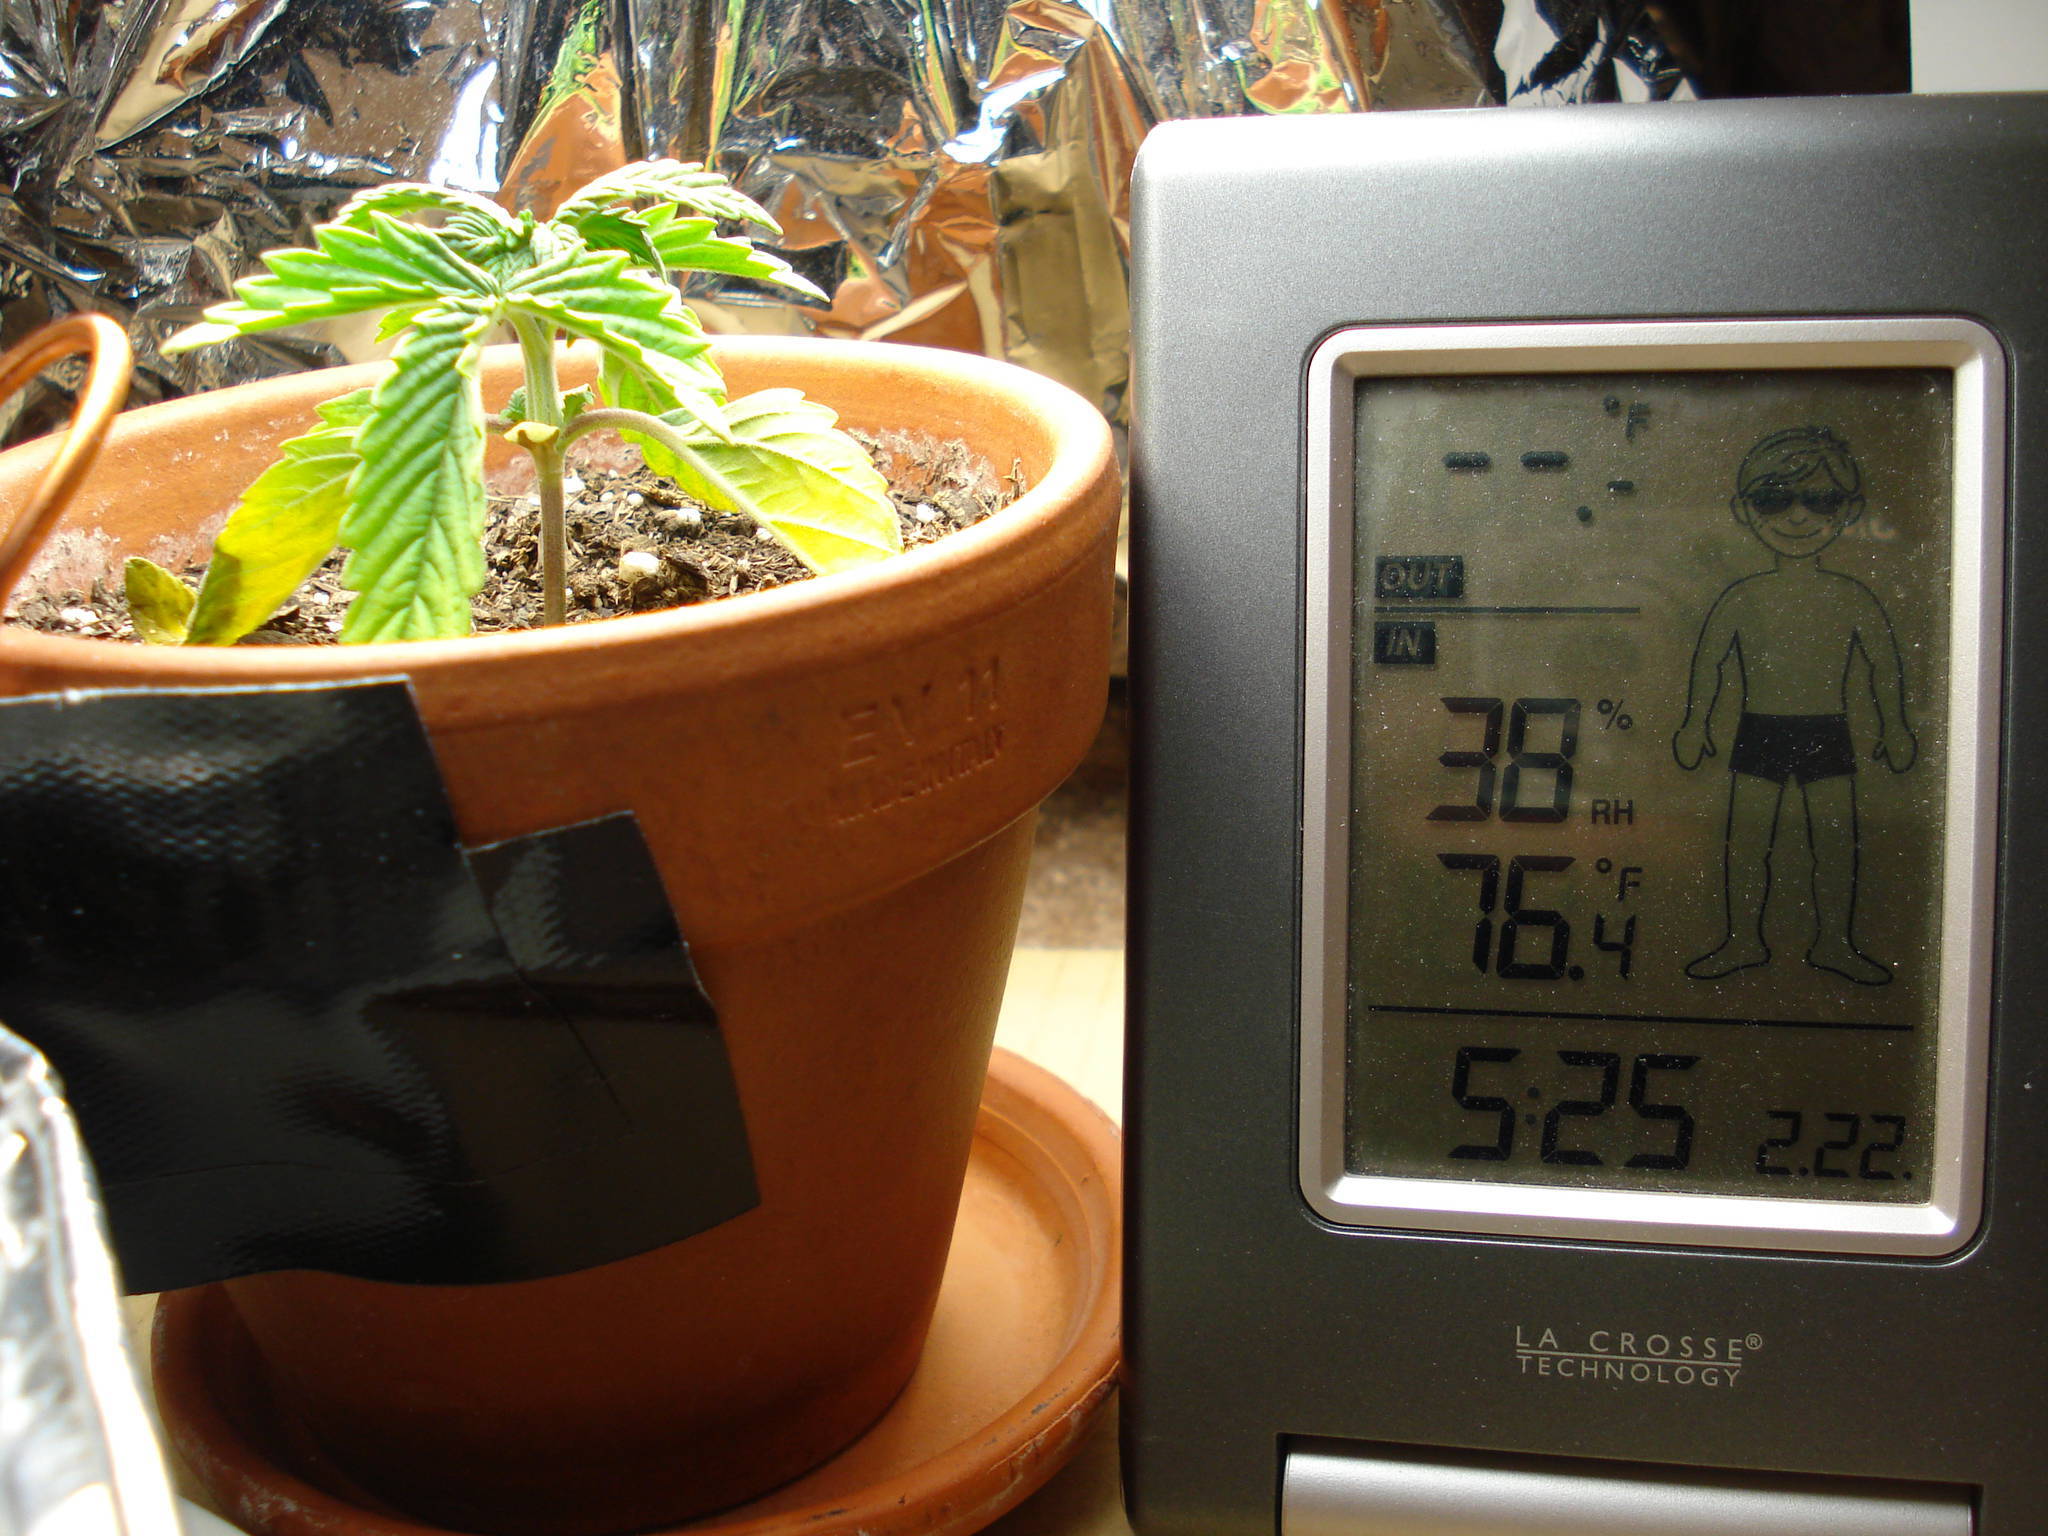
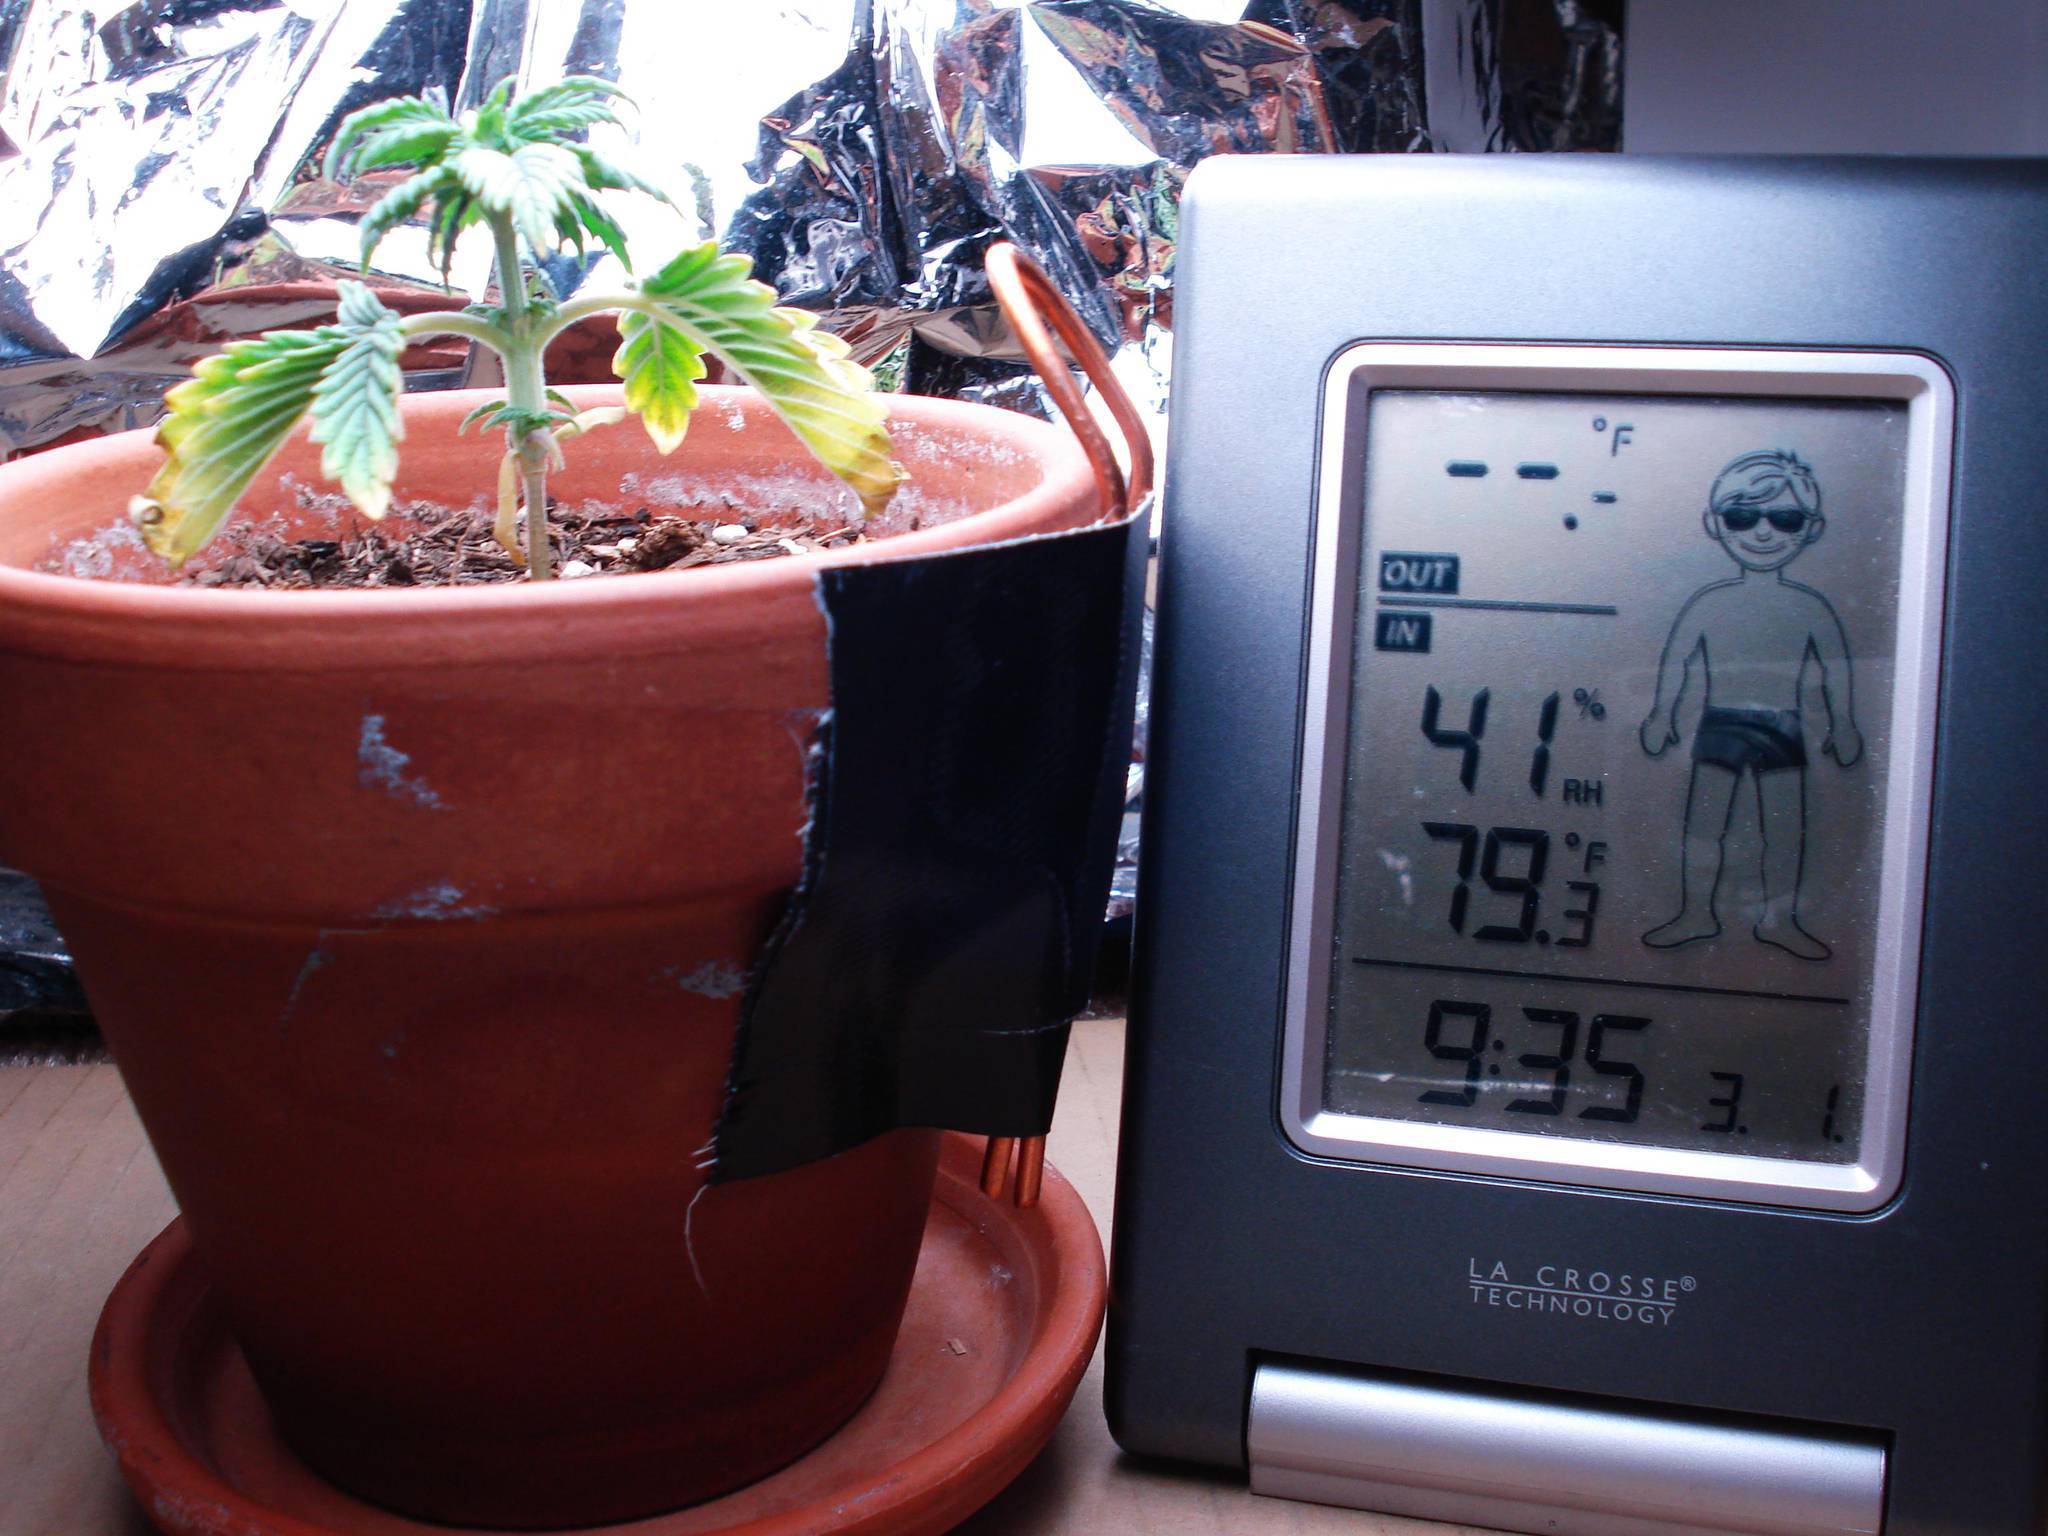
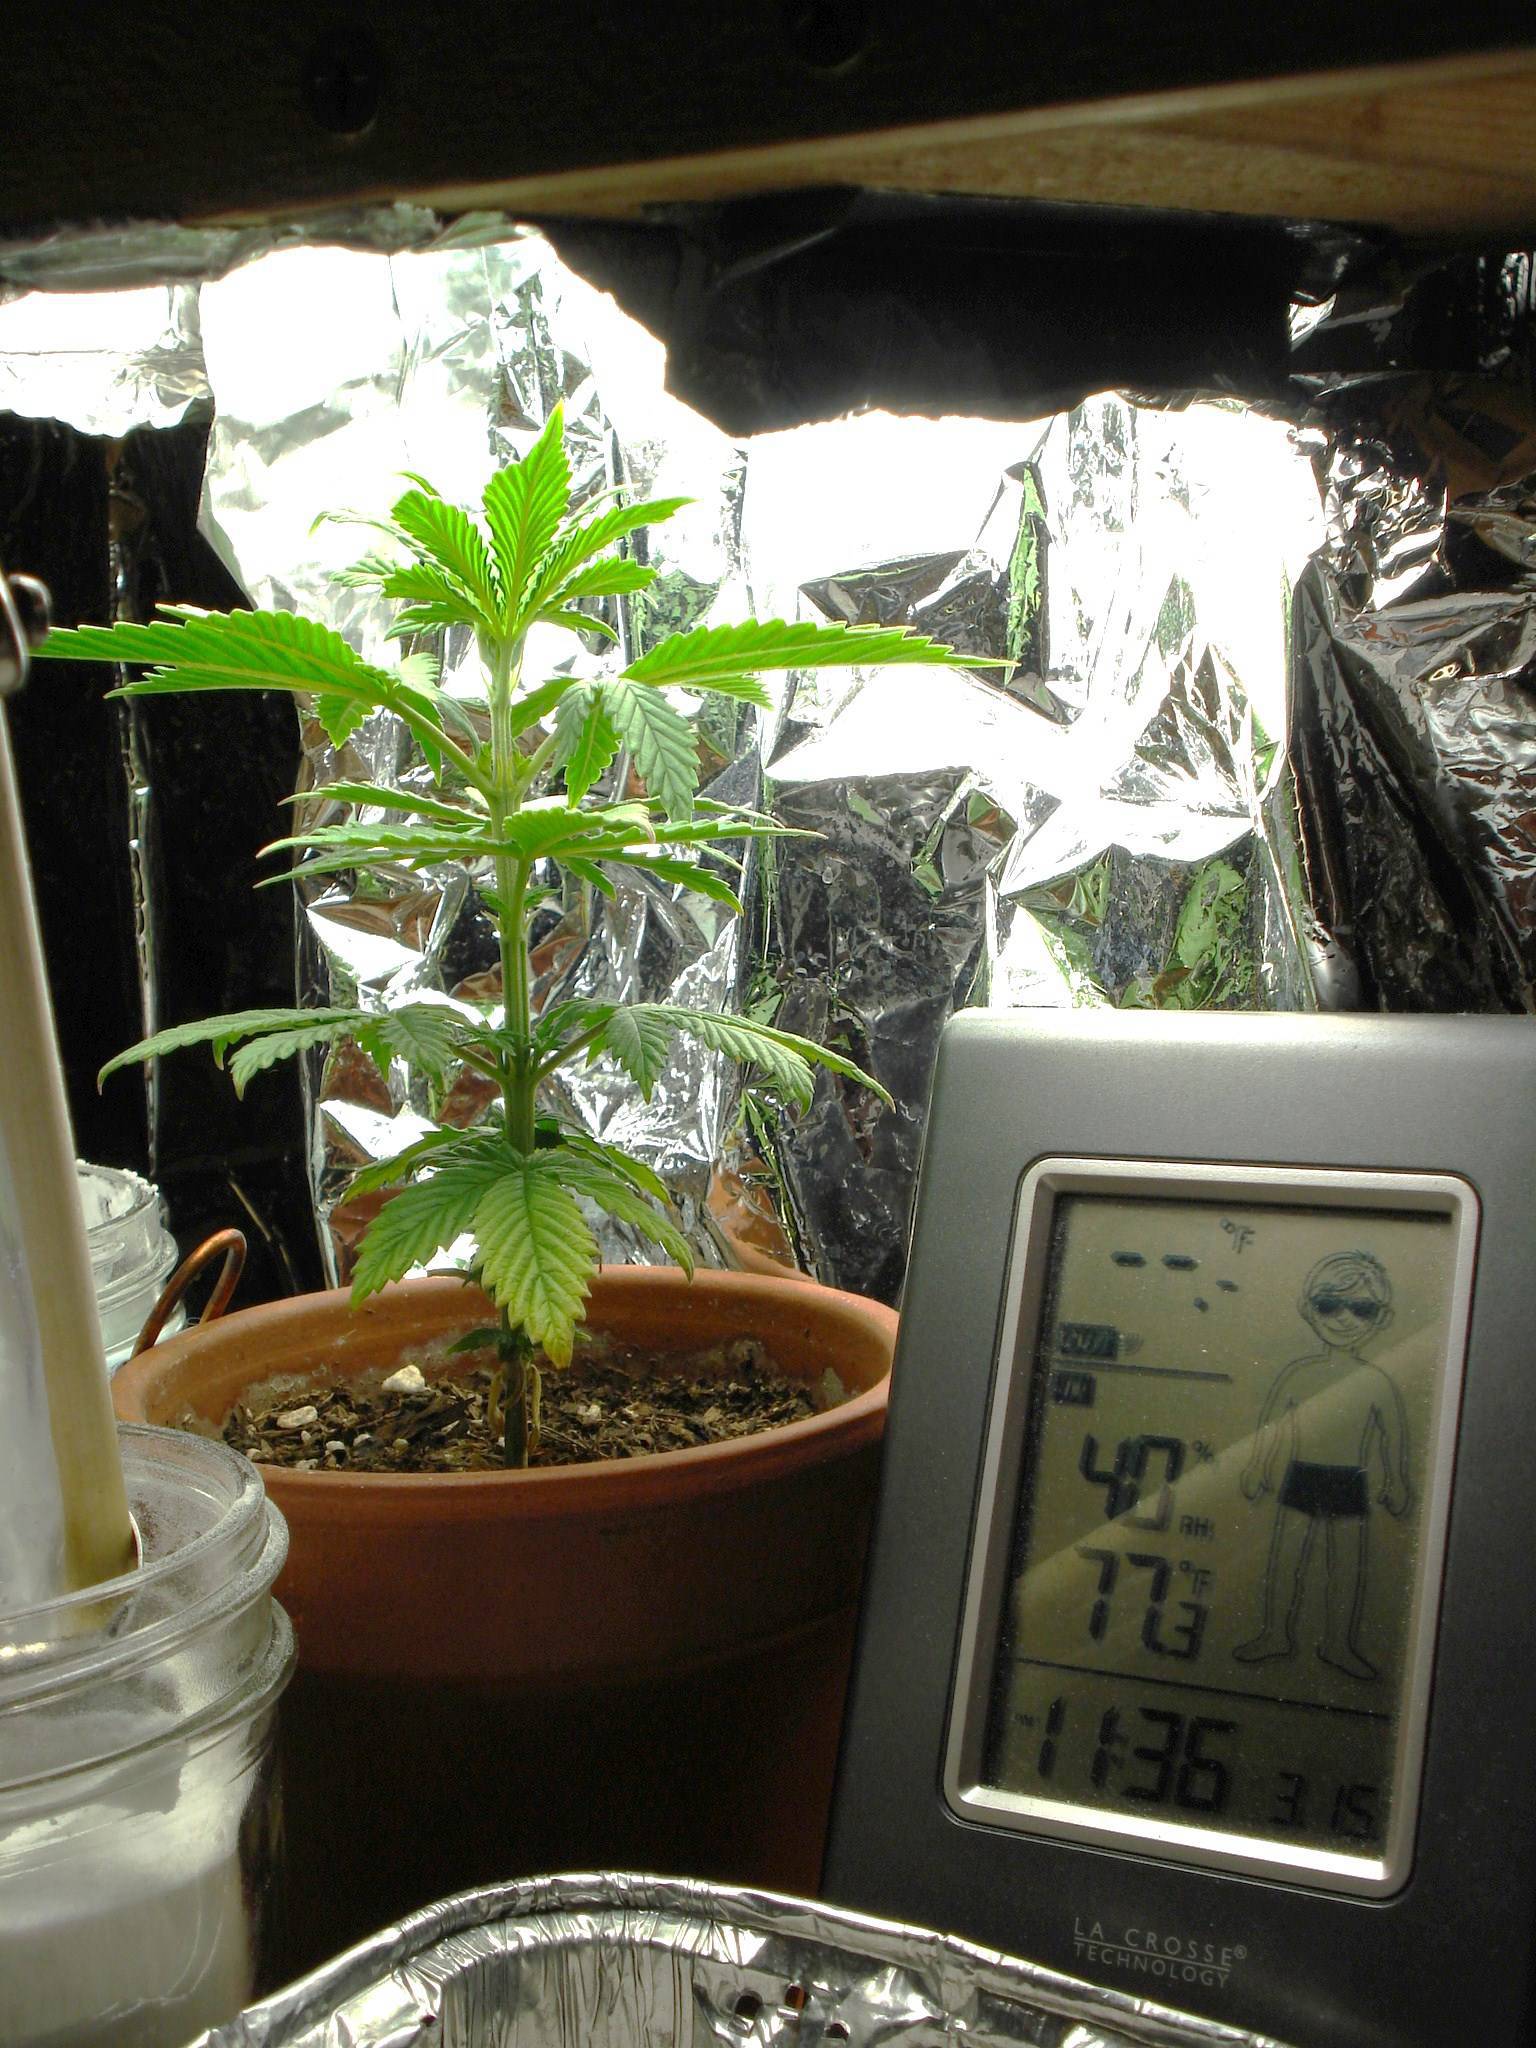
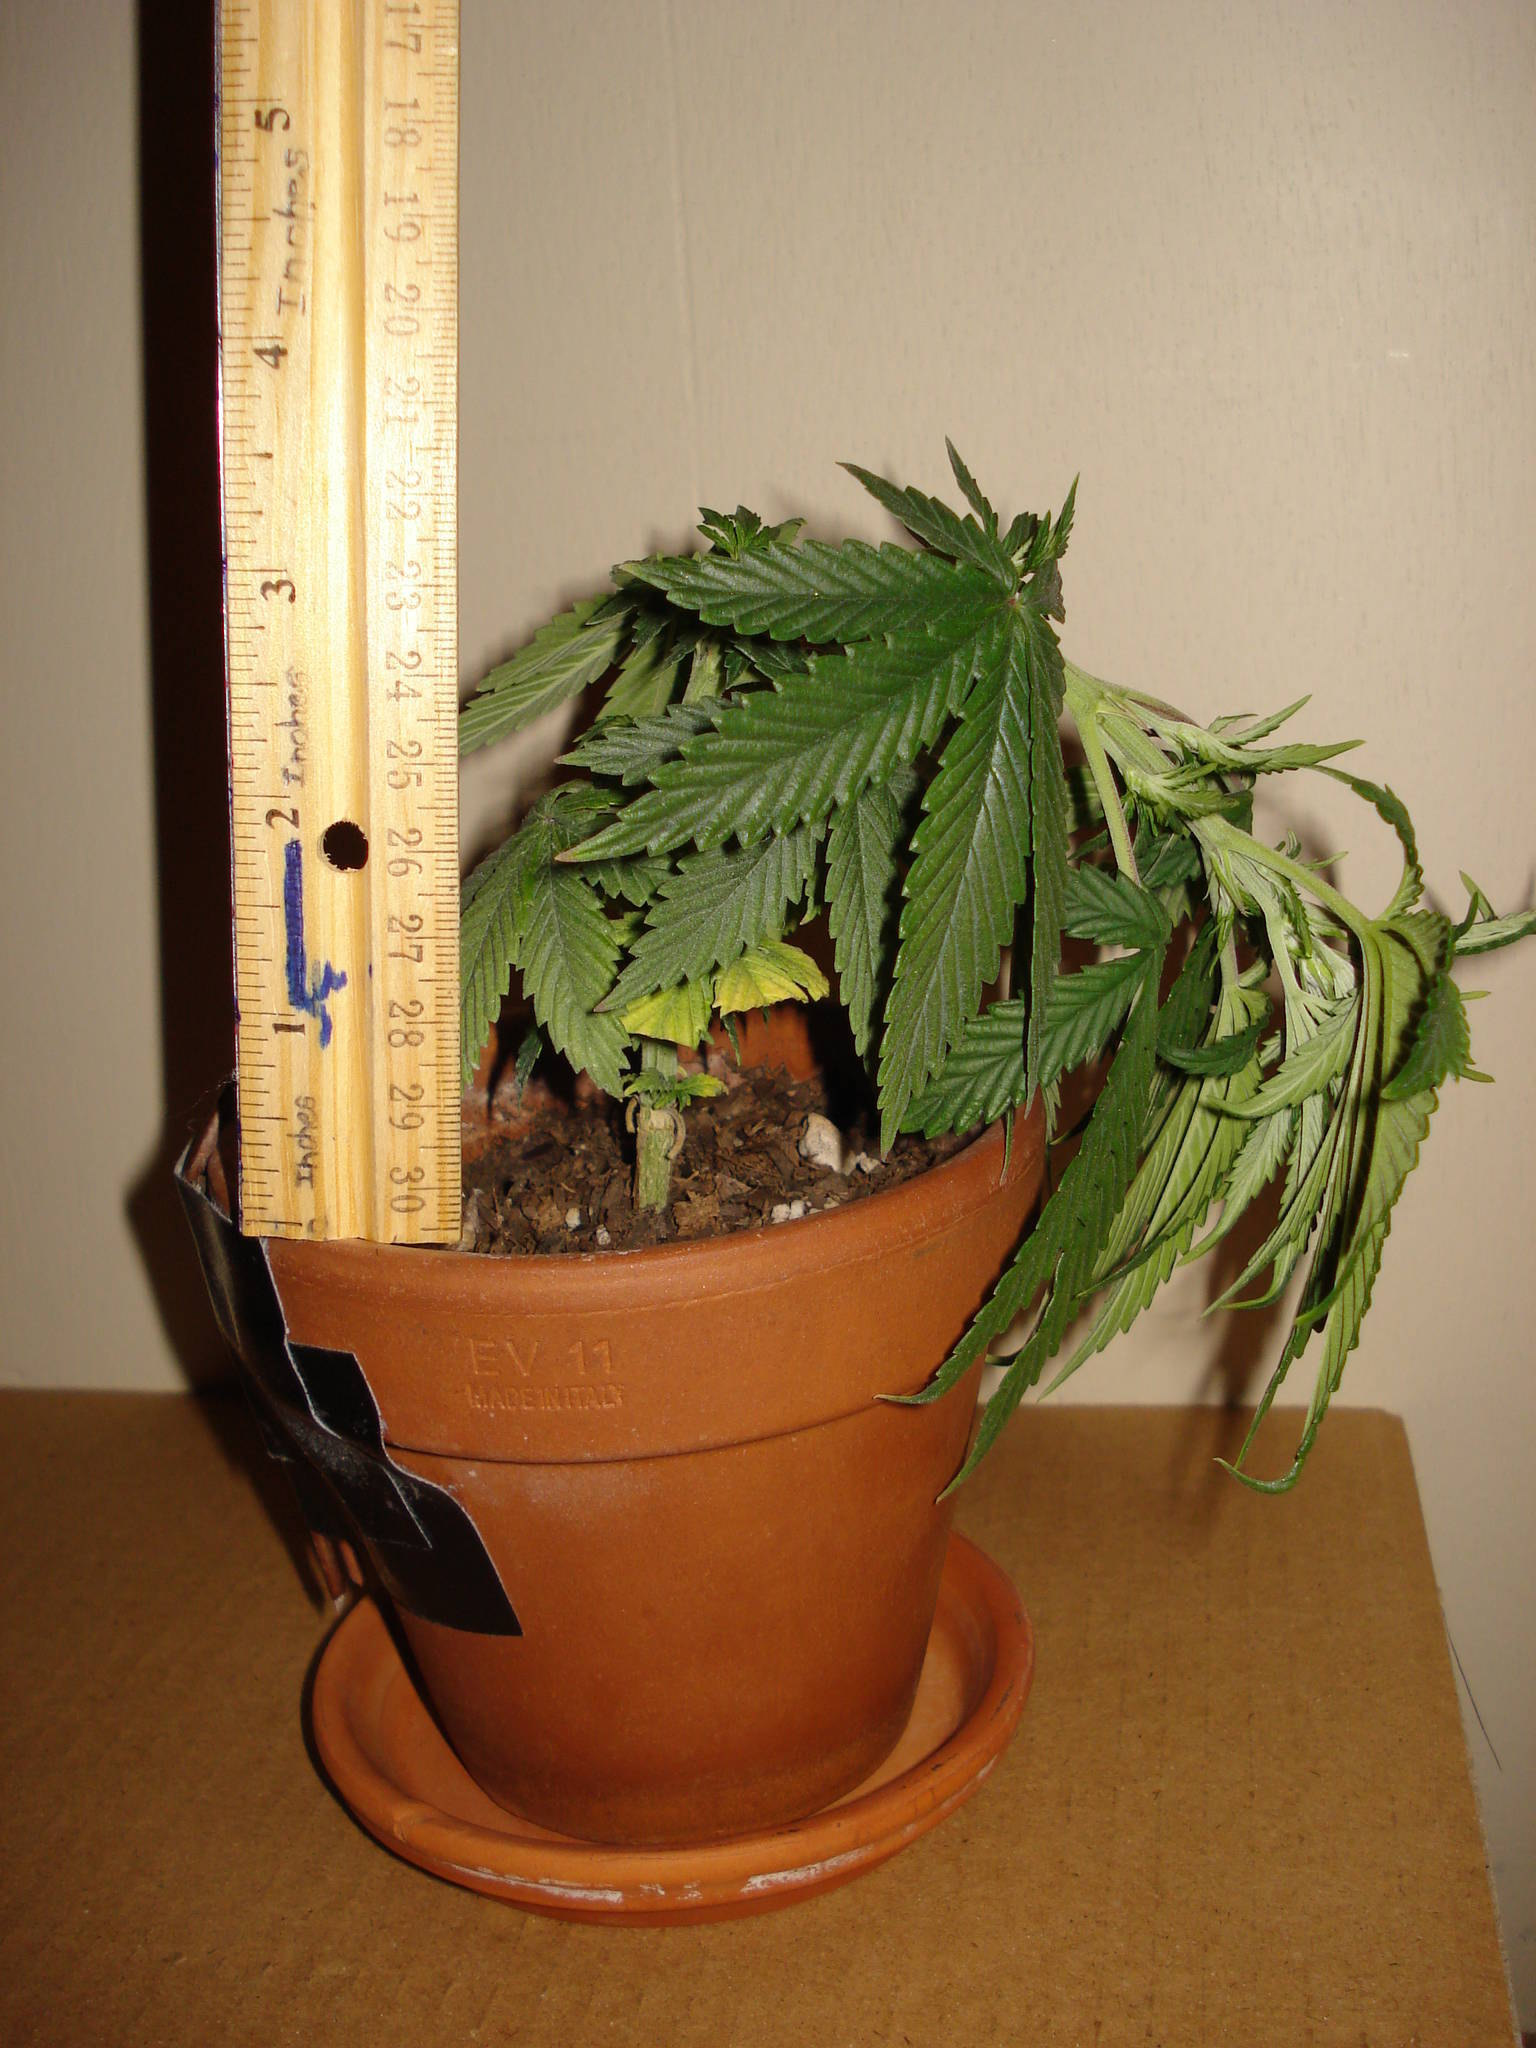
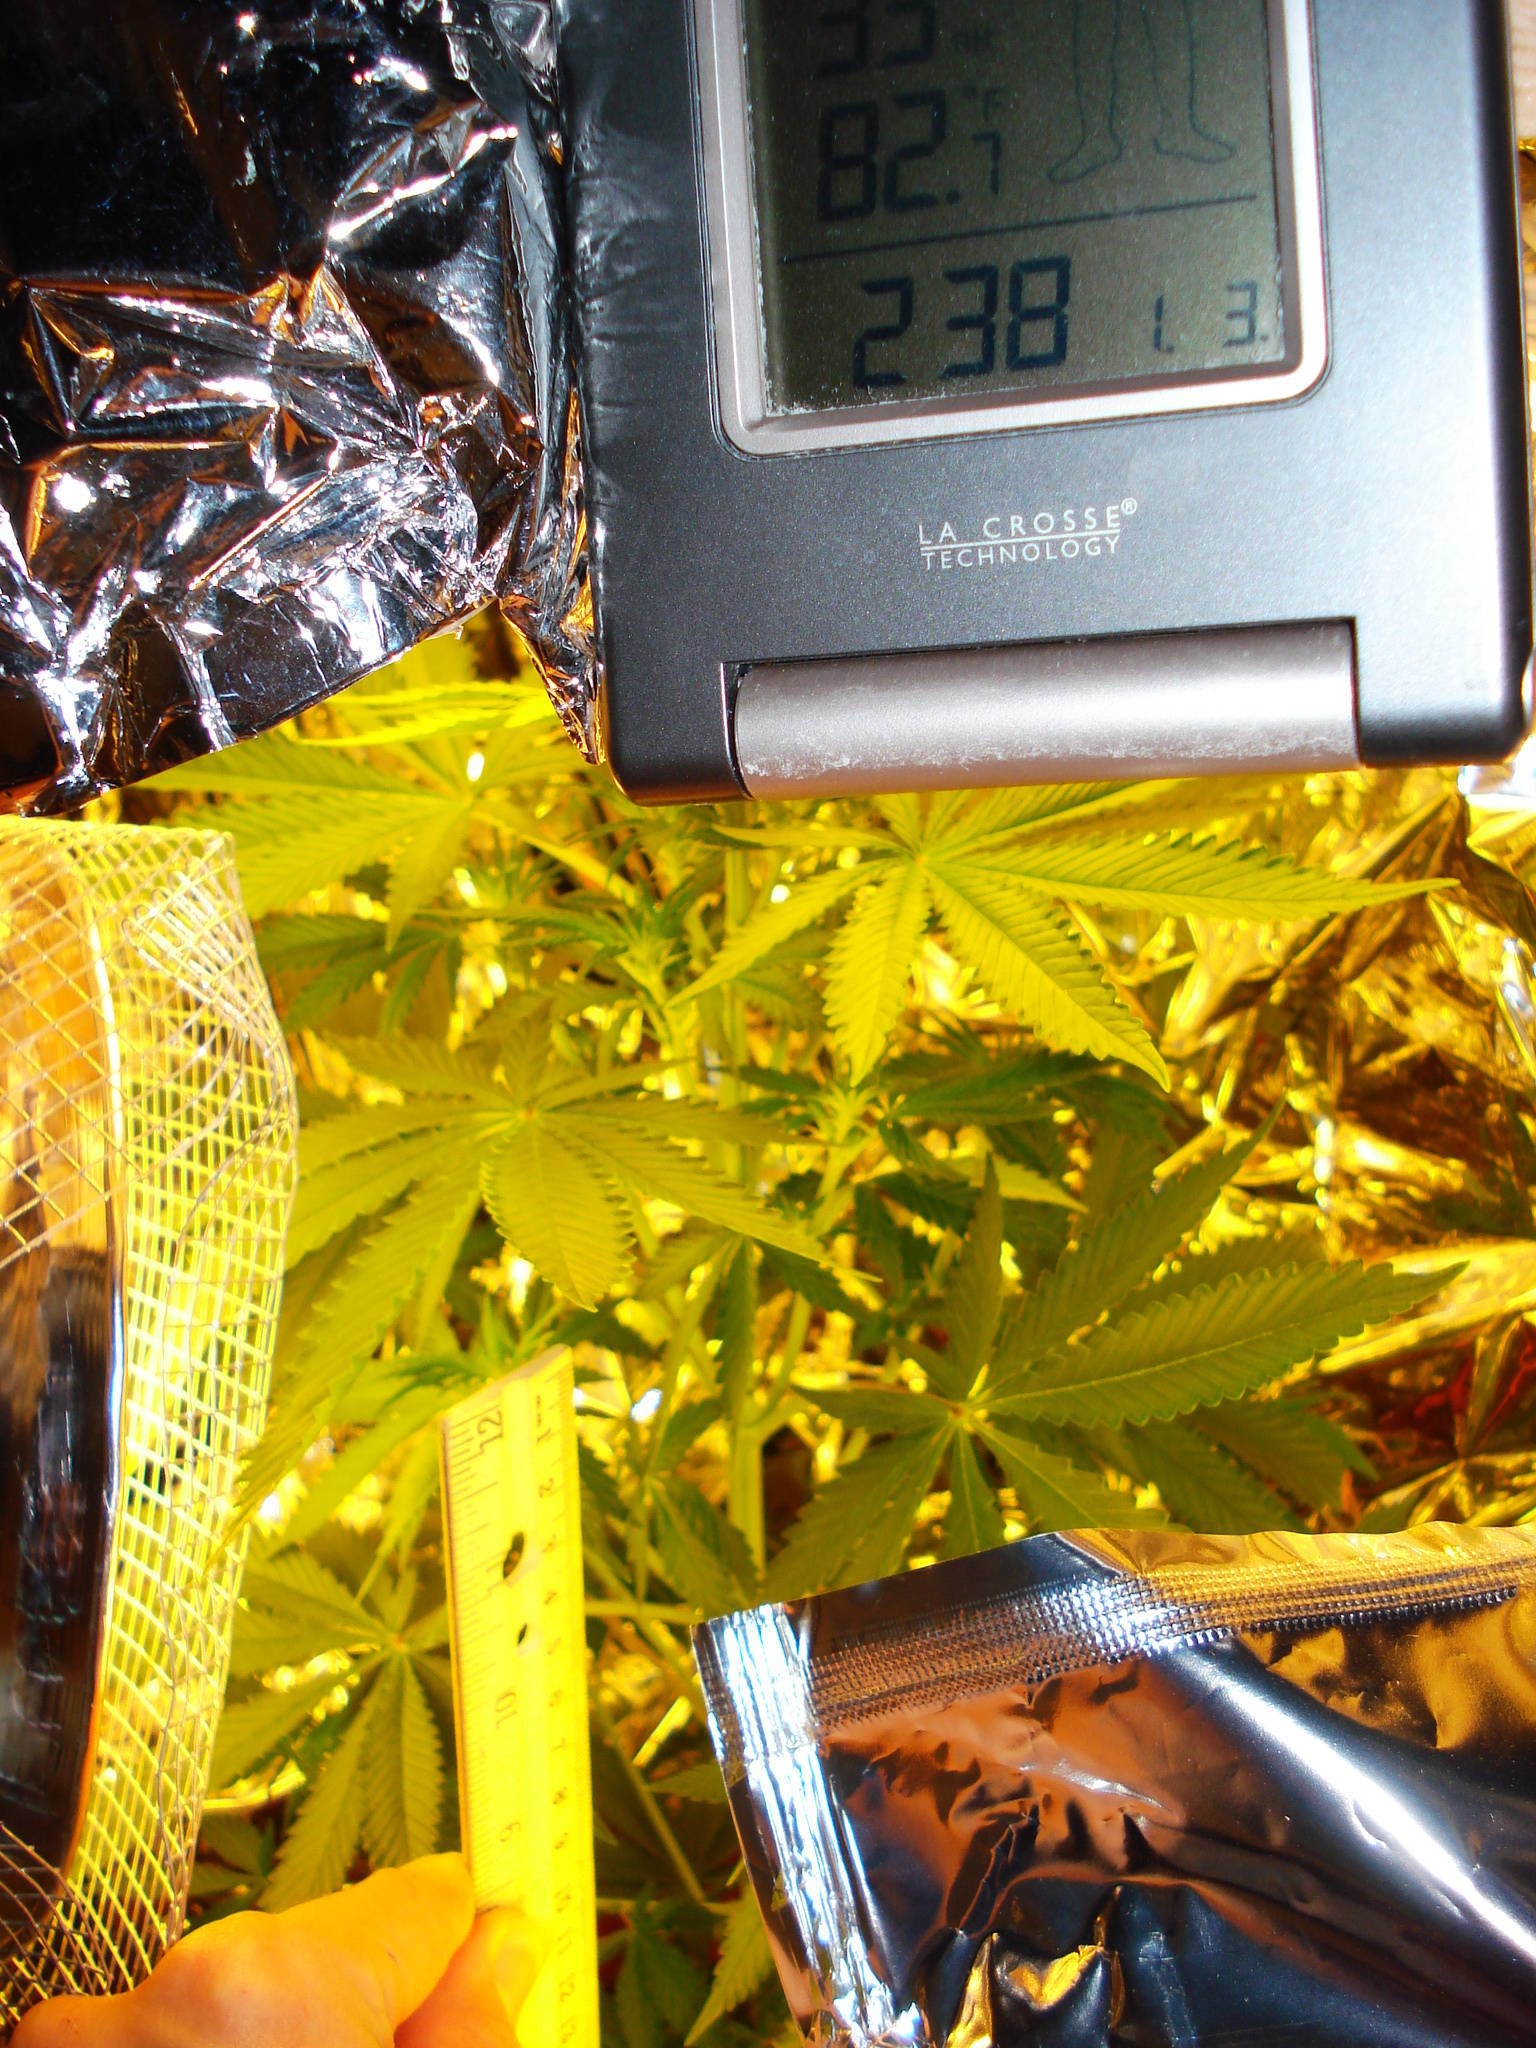
^First photo: She's getting so big, its hard to take photos of her. Also, my grow lights aren't helping either. I moved the rH/Temp gauge to the wooden light wagon to make a better estimate of the plants conditions (I wish I had a remote probe). A 1 foot ruler in the bottom-foreground is for reference (Couldn't find my tape-ruler: I hate being lazy and unorganized). She's about 14" tall.
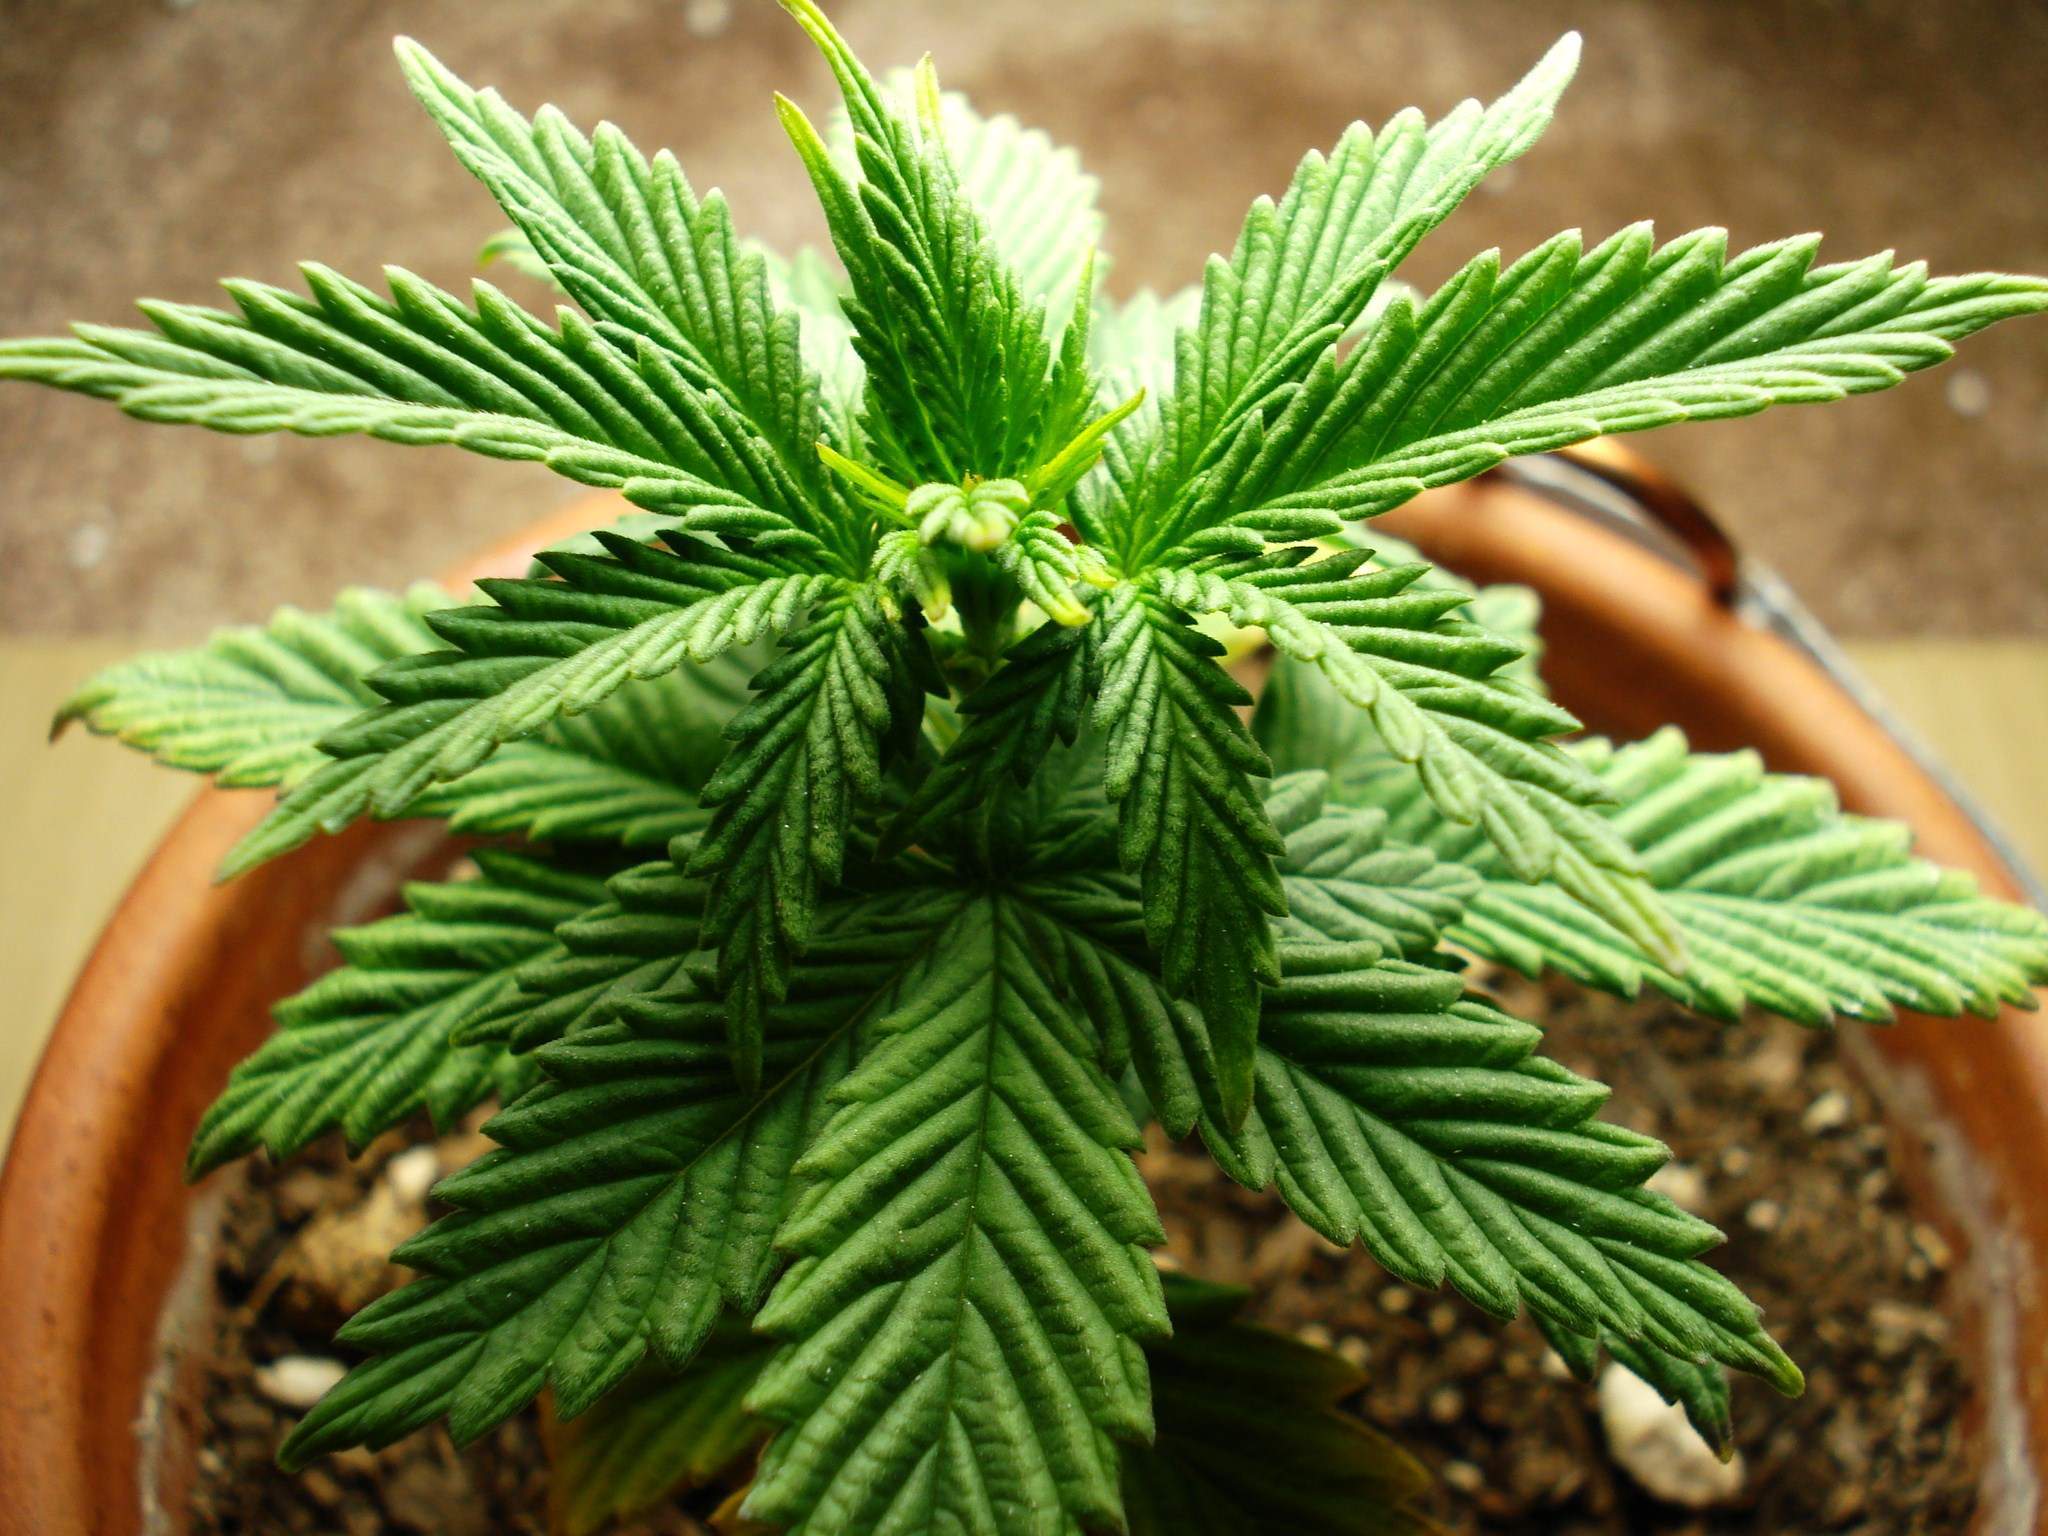
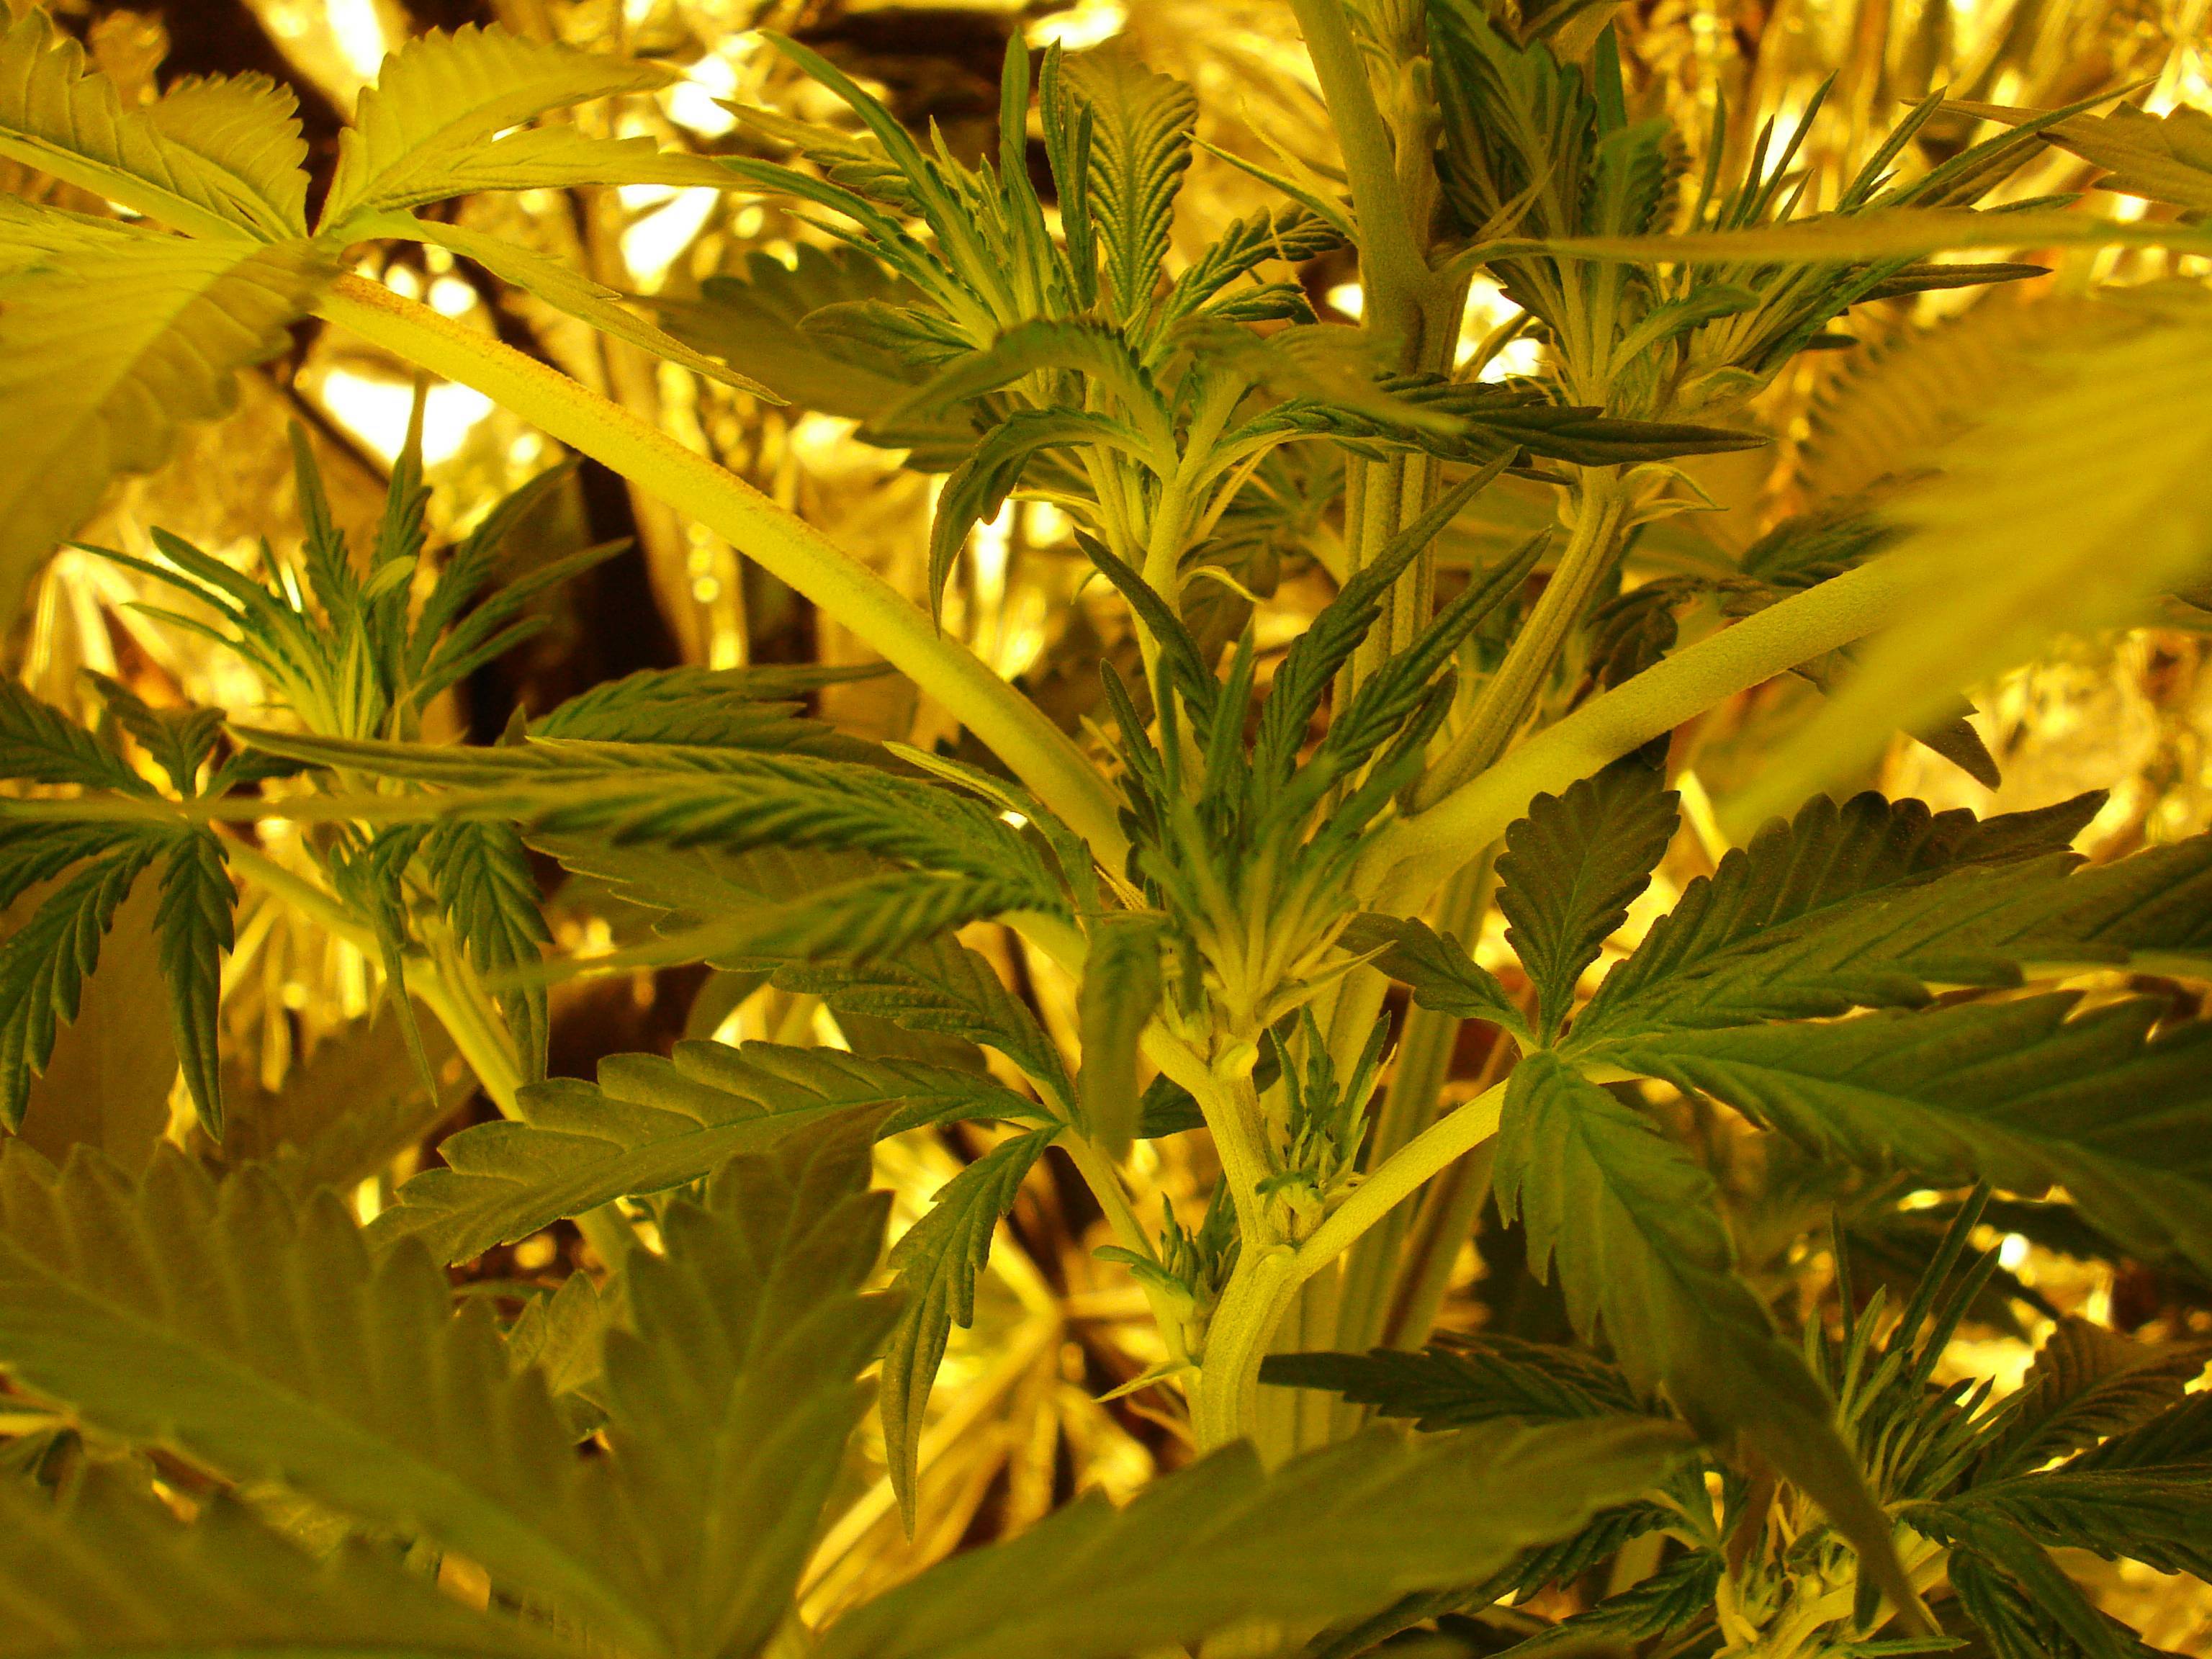
Photos 2 and 3: There's so many little stems and bud sites shooting up everywhere, its crazy. Its hard to keep track of them all. Its cool to see the pre-flowers already: I have an idea what it will look like in the end.
Last Photo: same as pictured above, taken April 2nd. Shows the burns of the bulb on my precious girl.
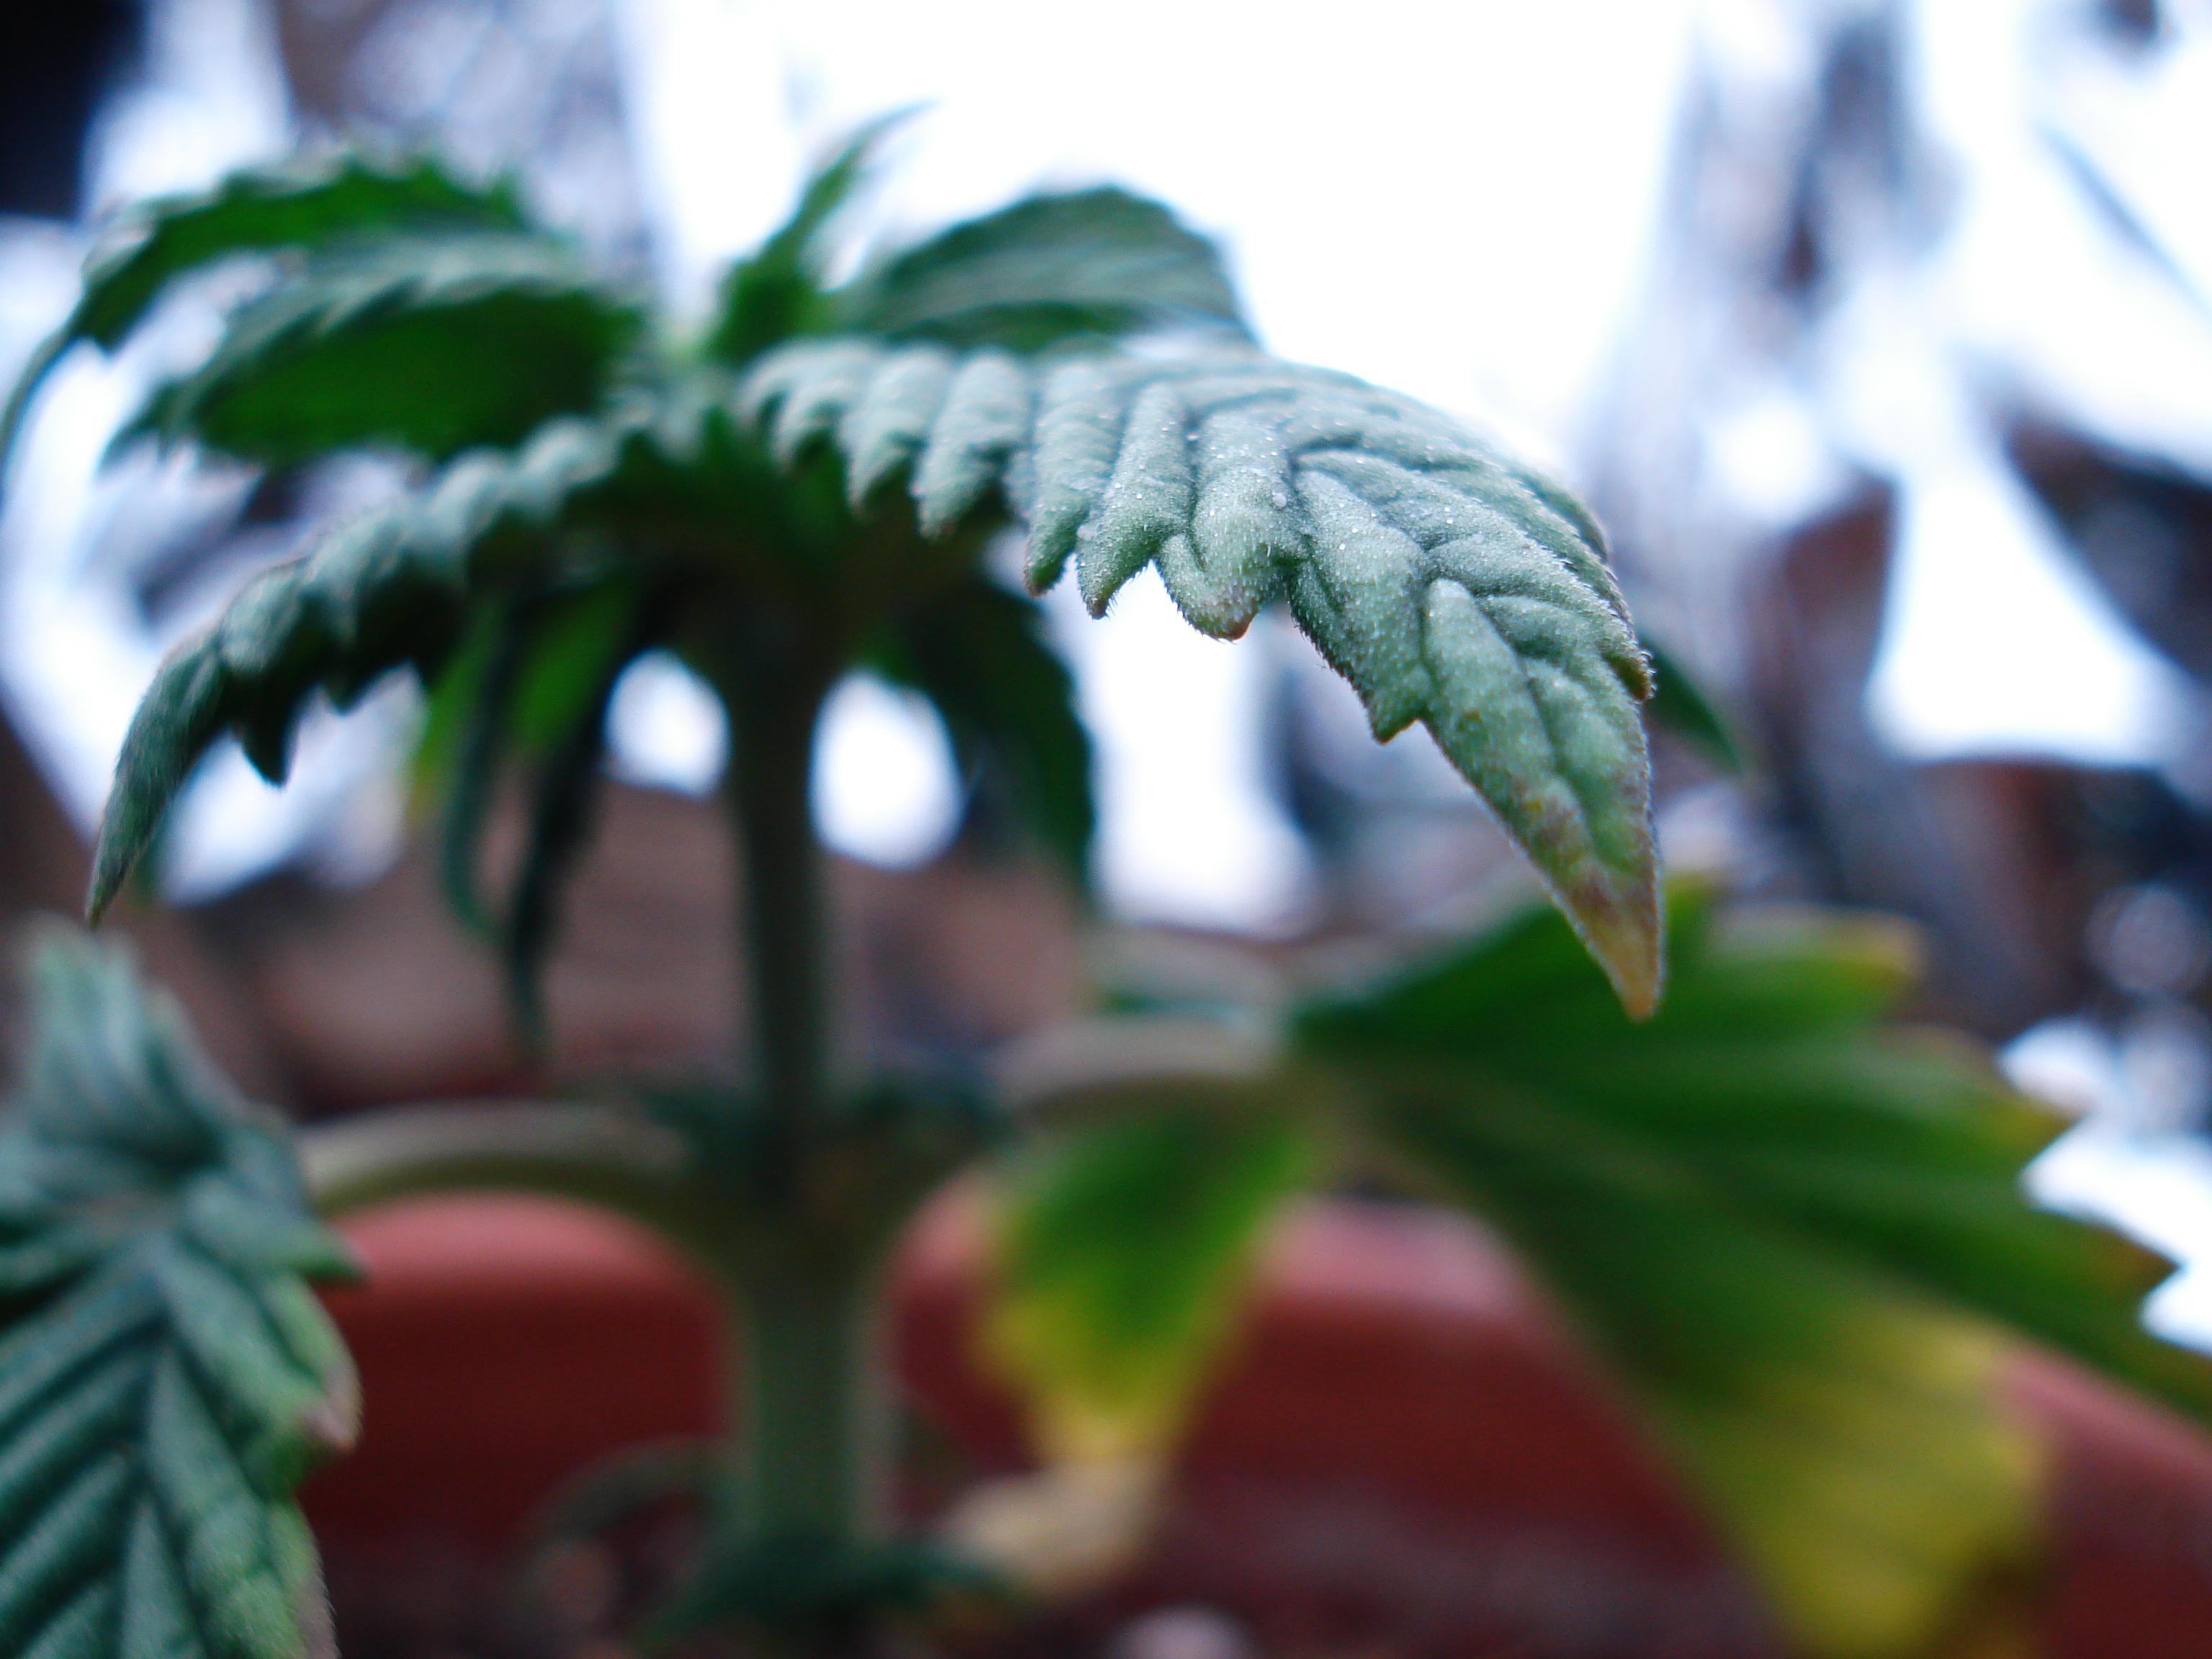
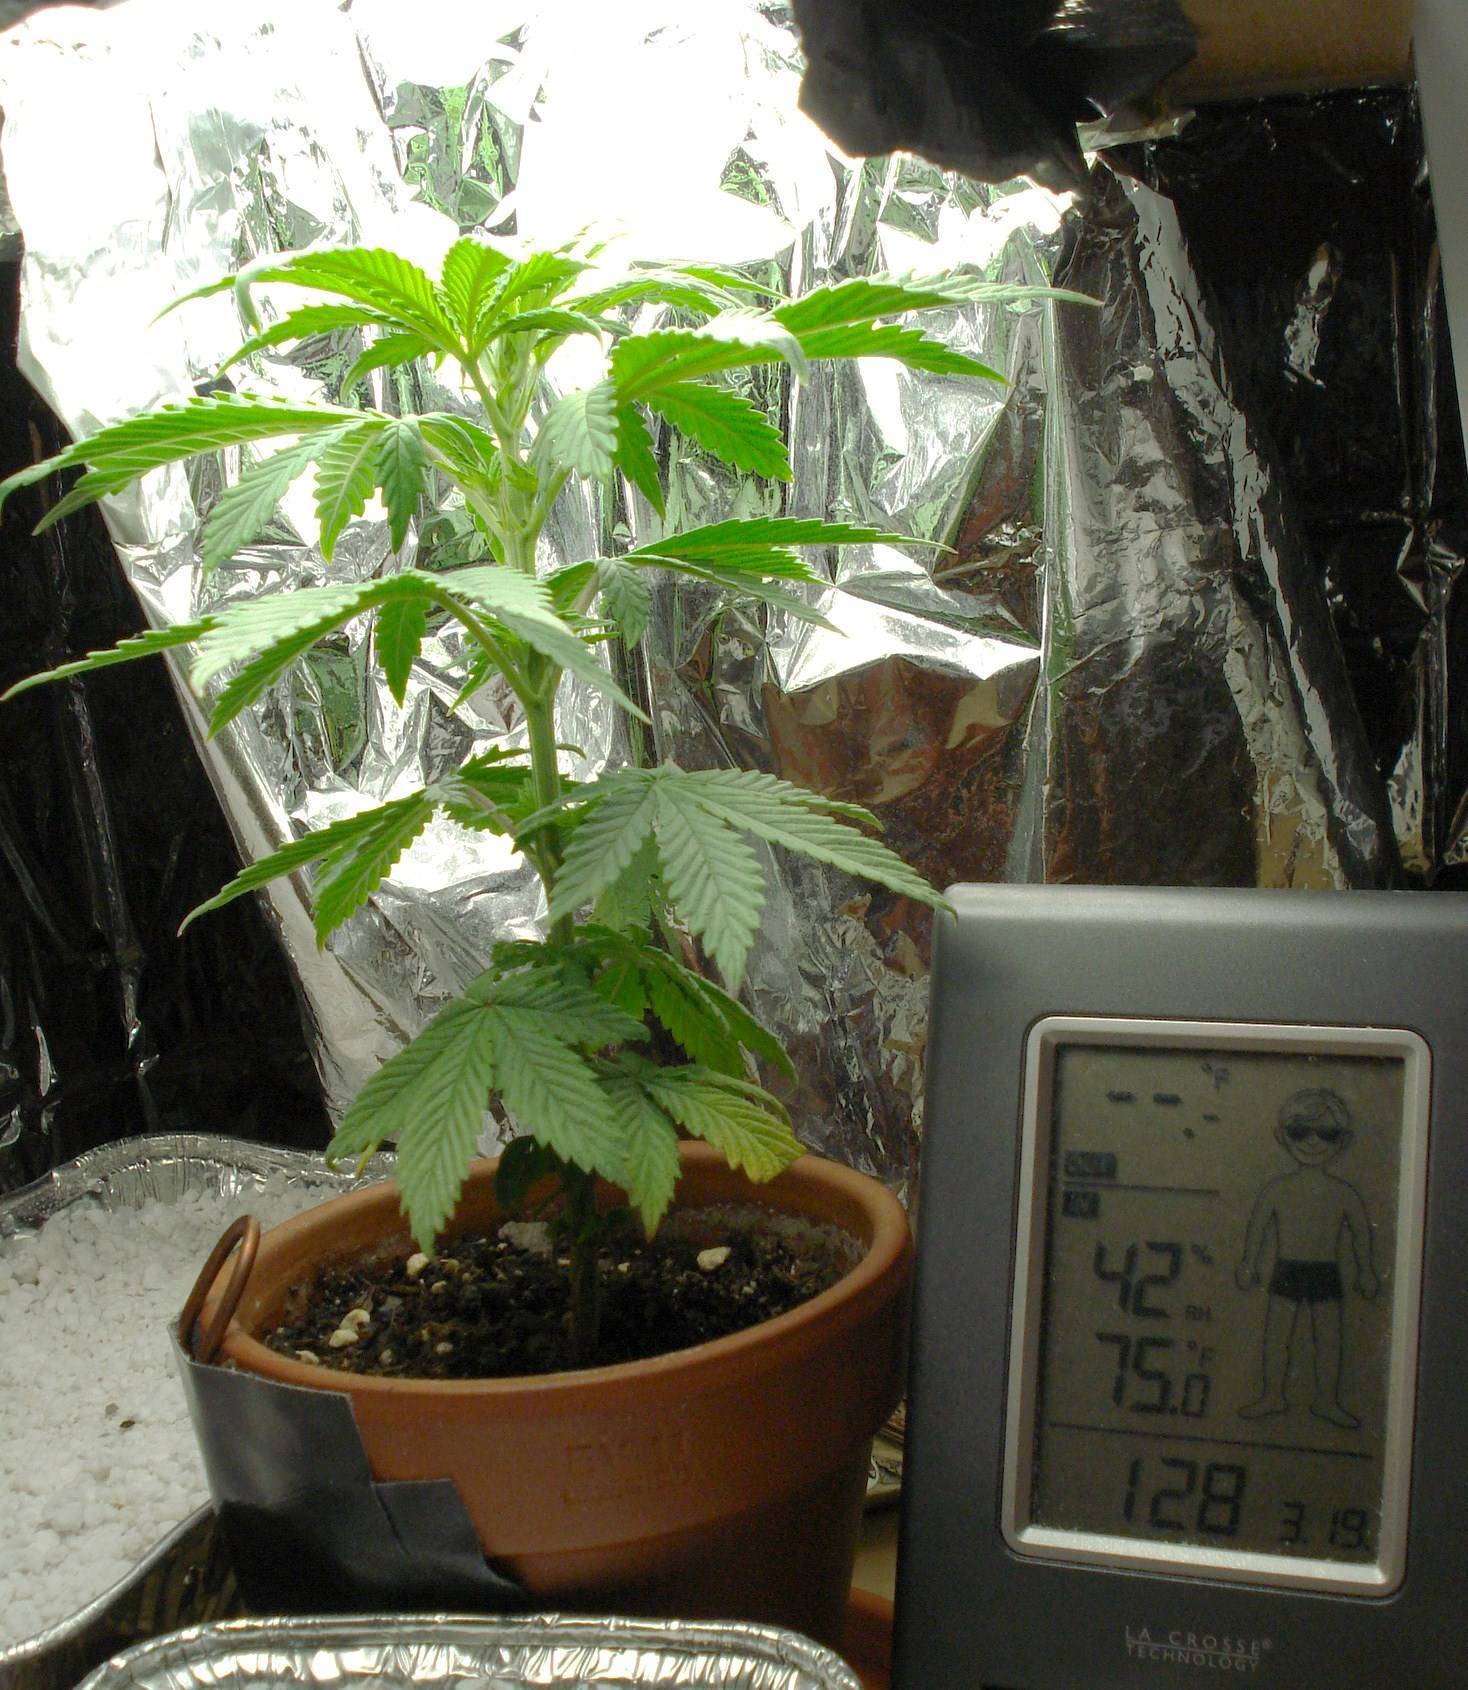
Day 68 (Day 23 of Flowering): April 12, 2010
   
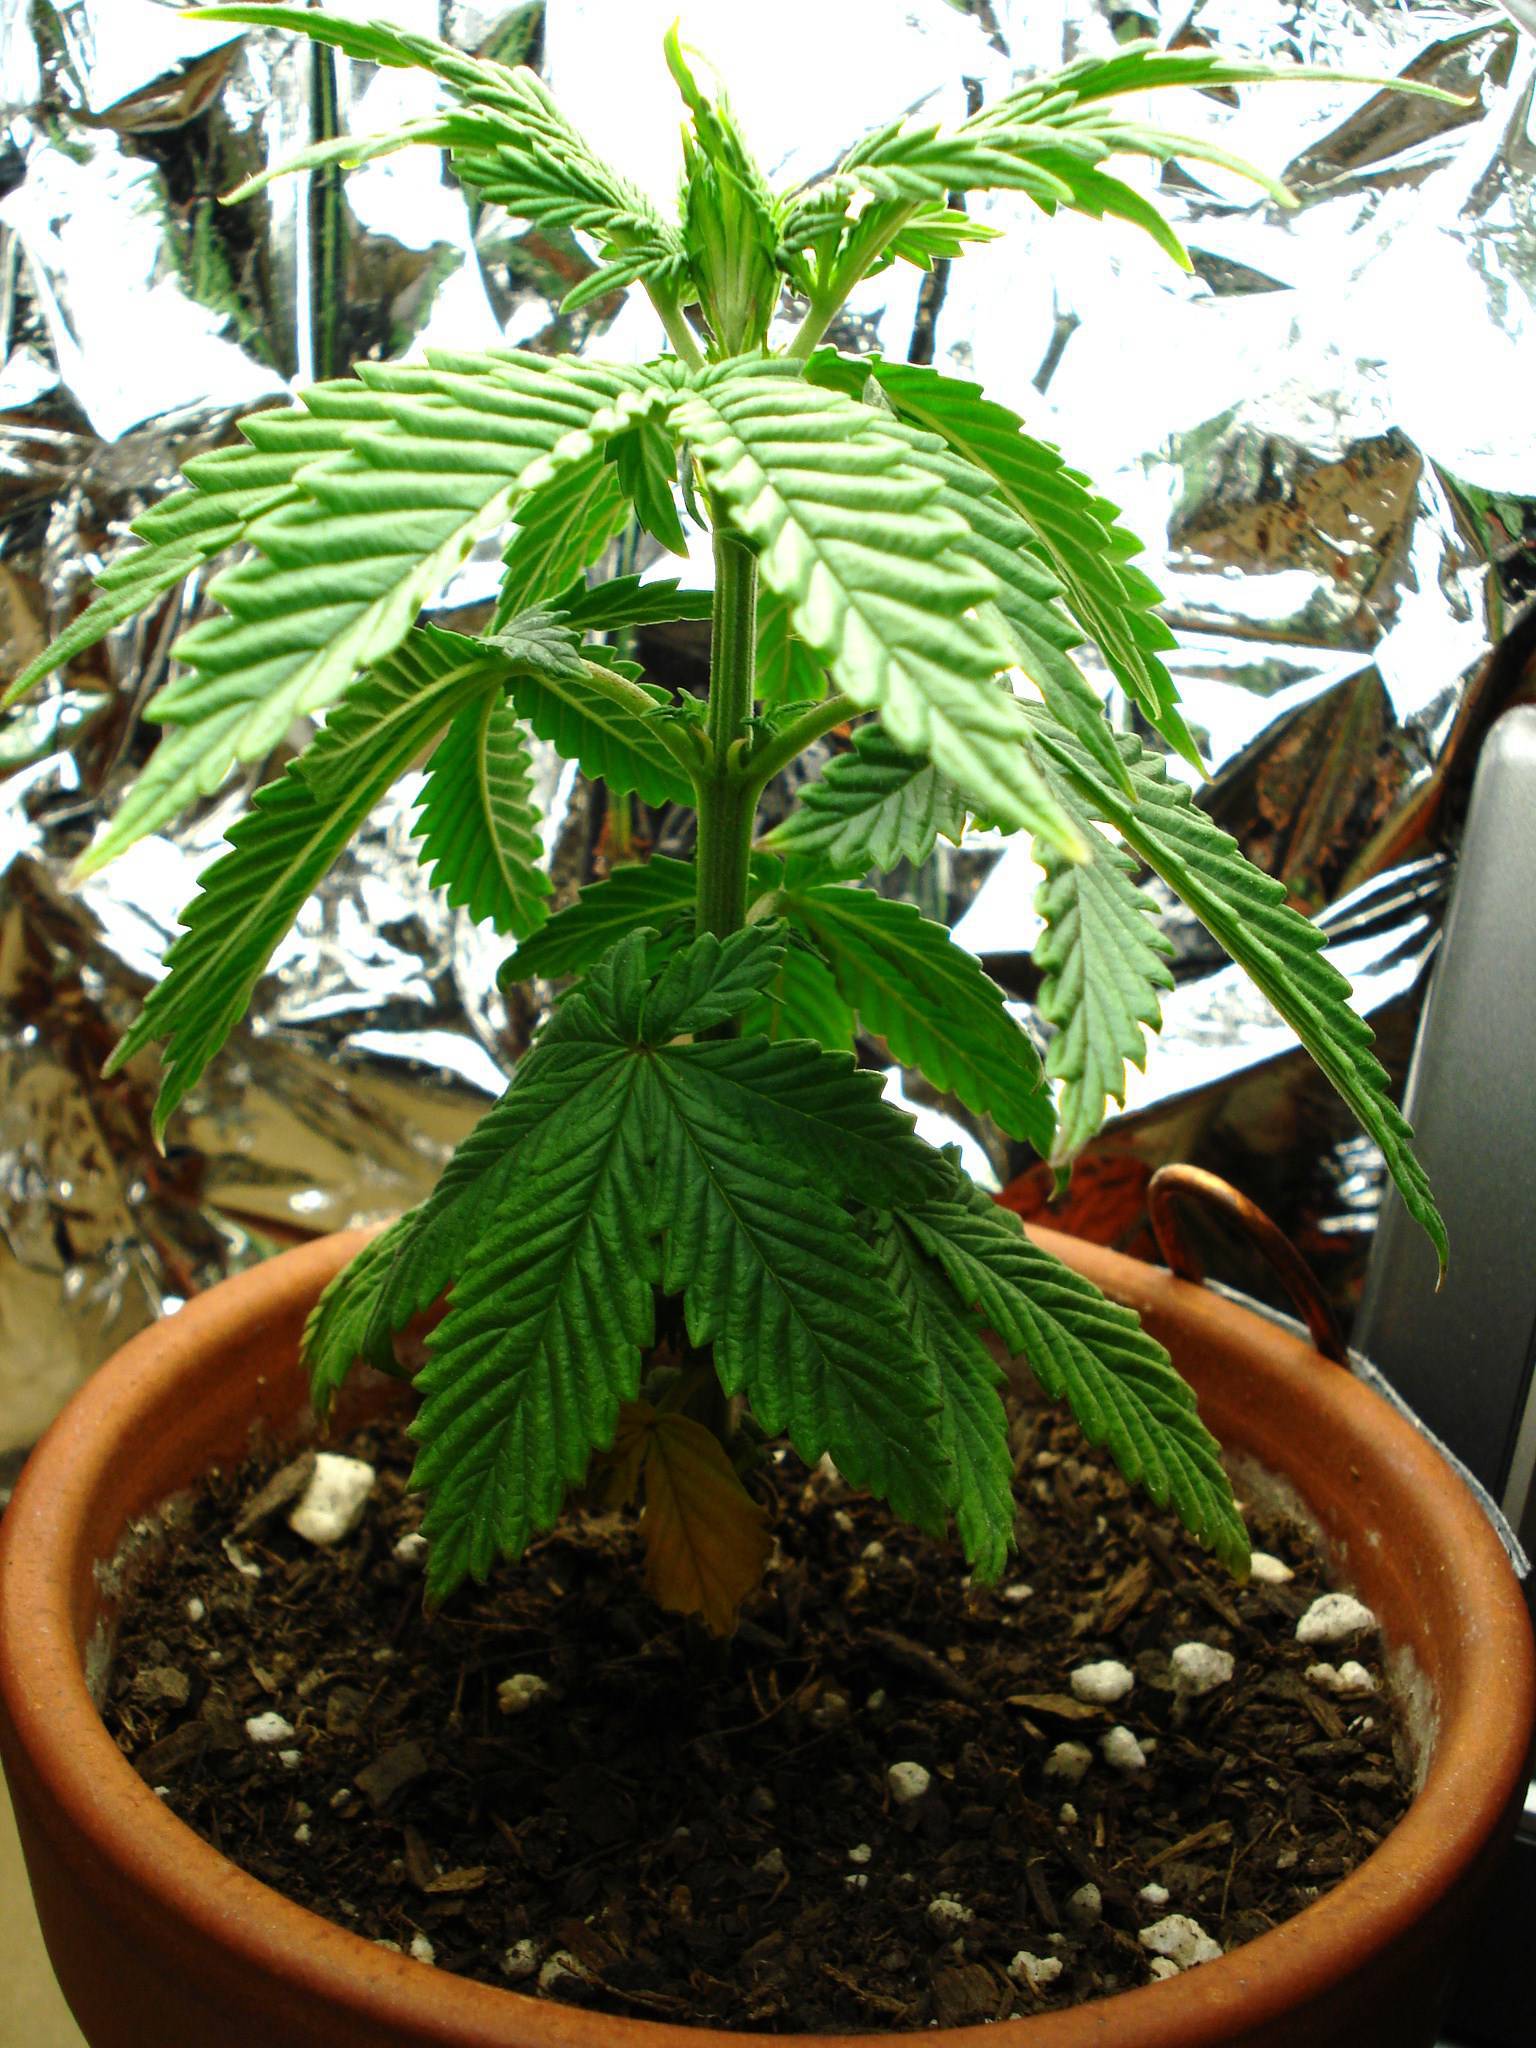
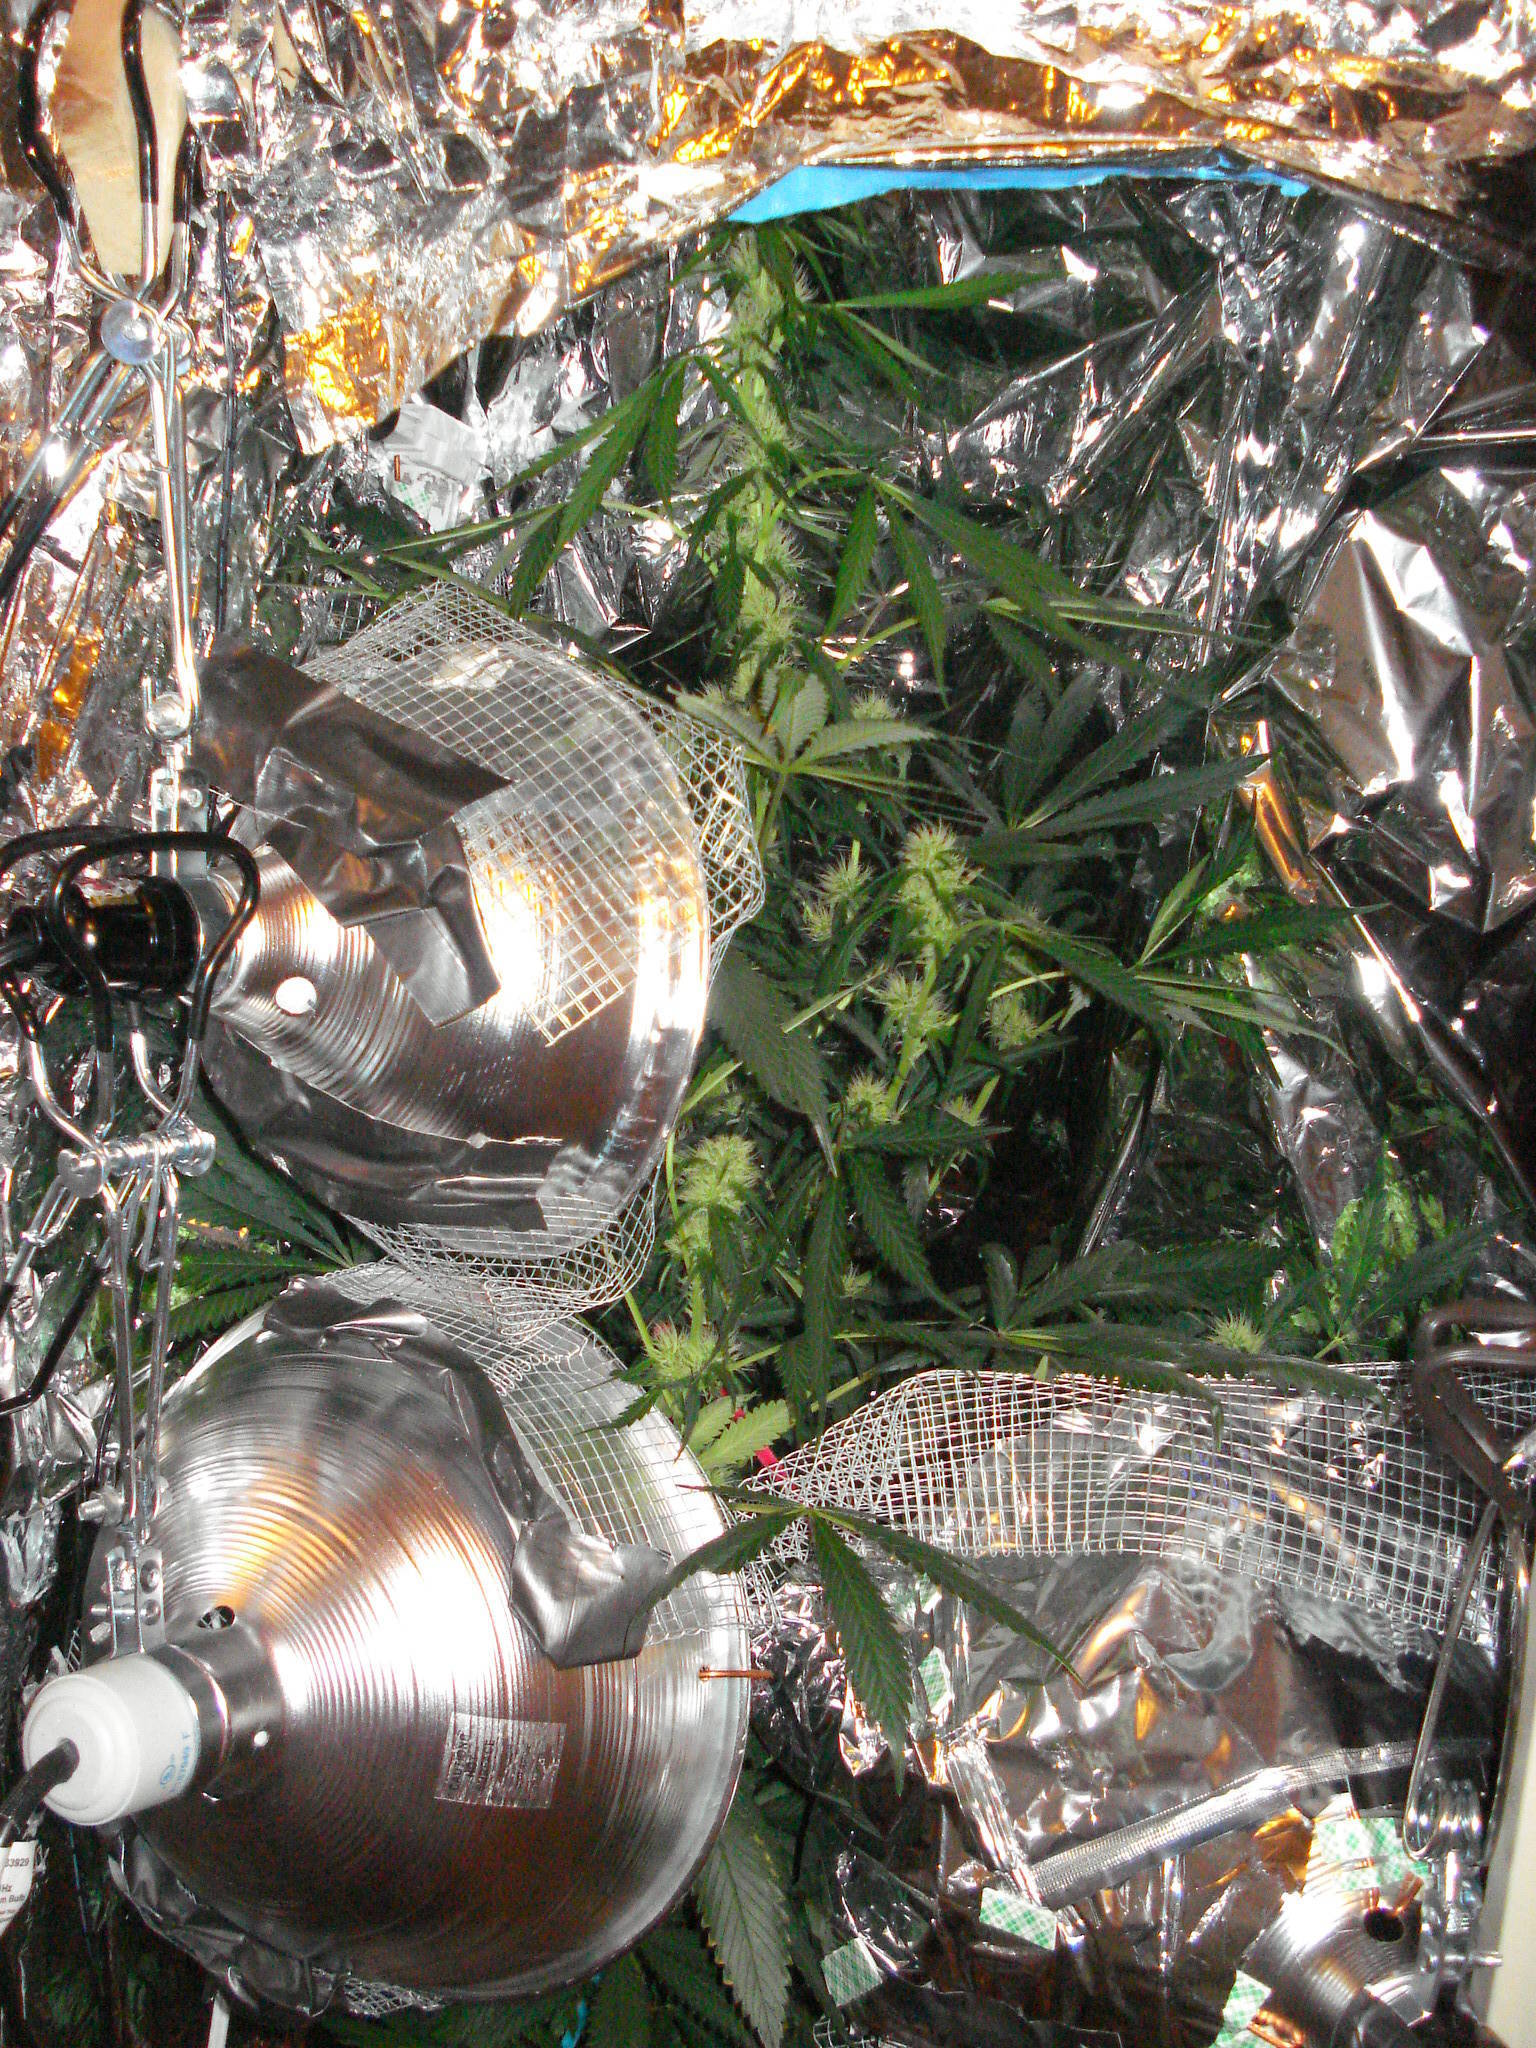
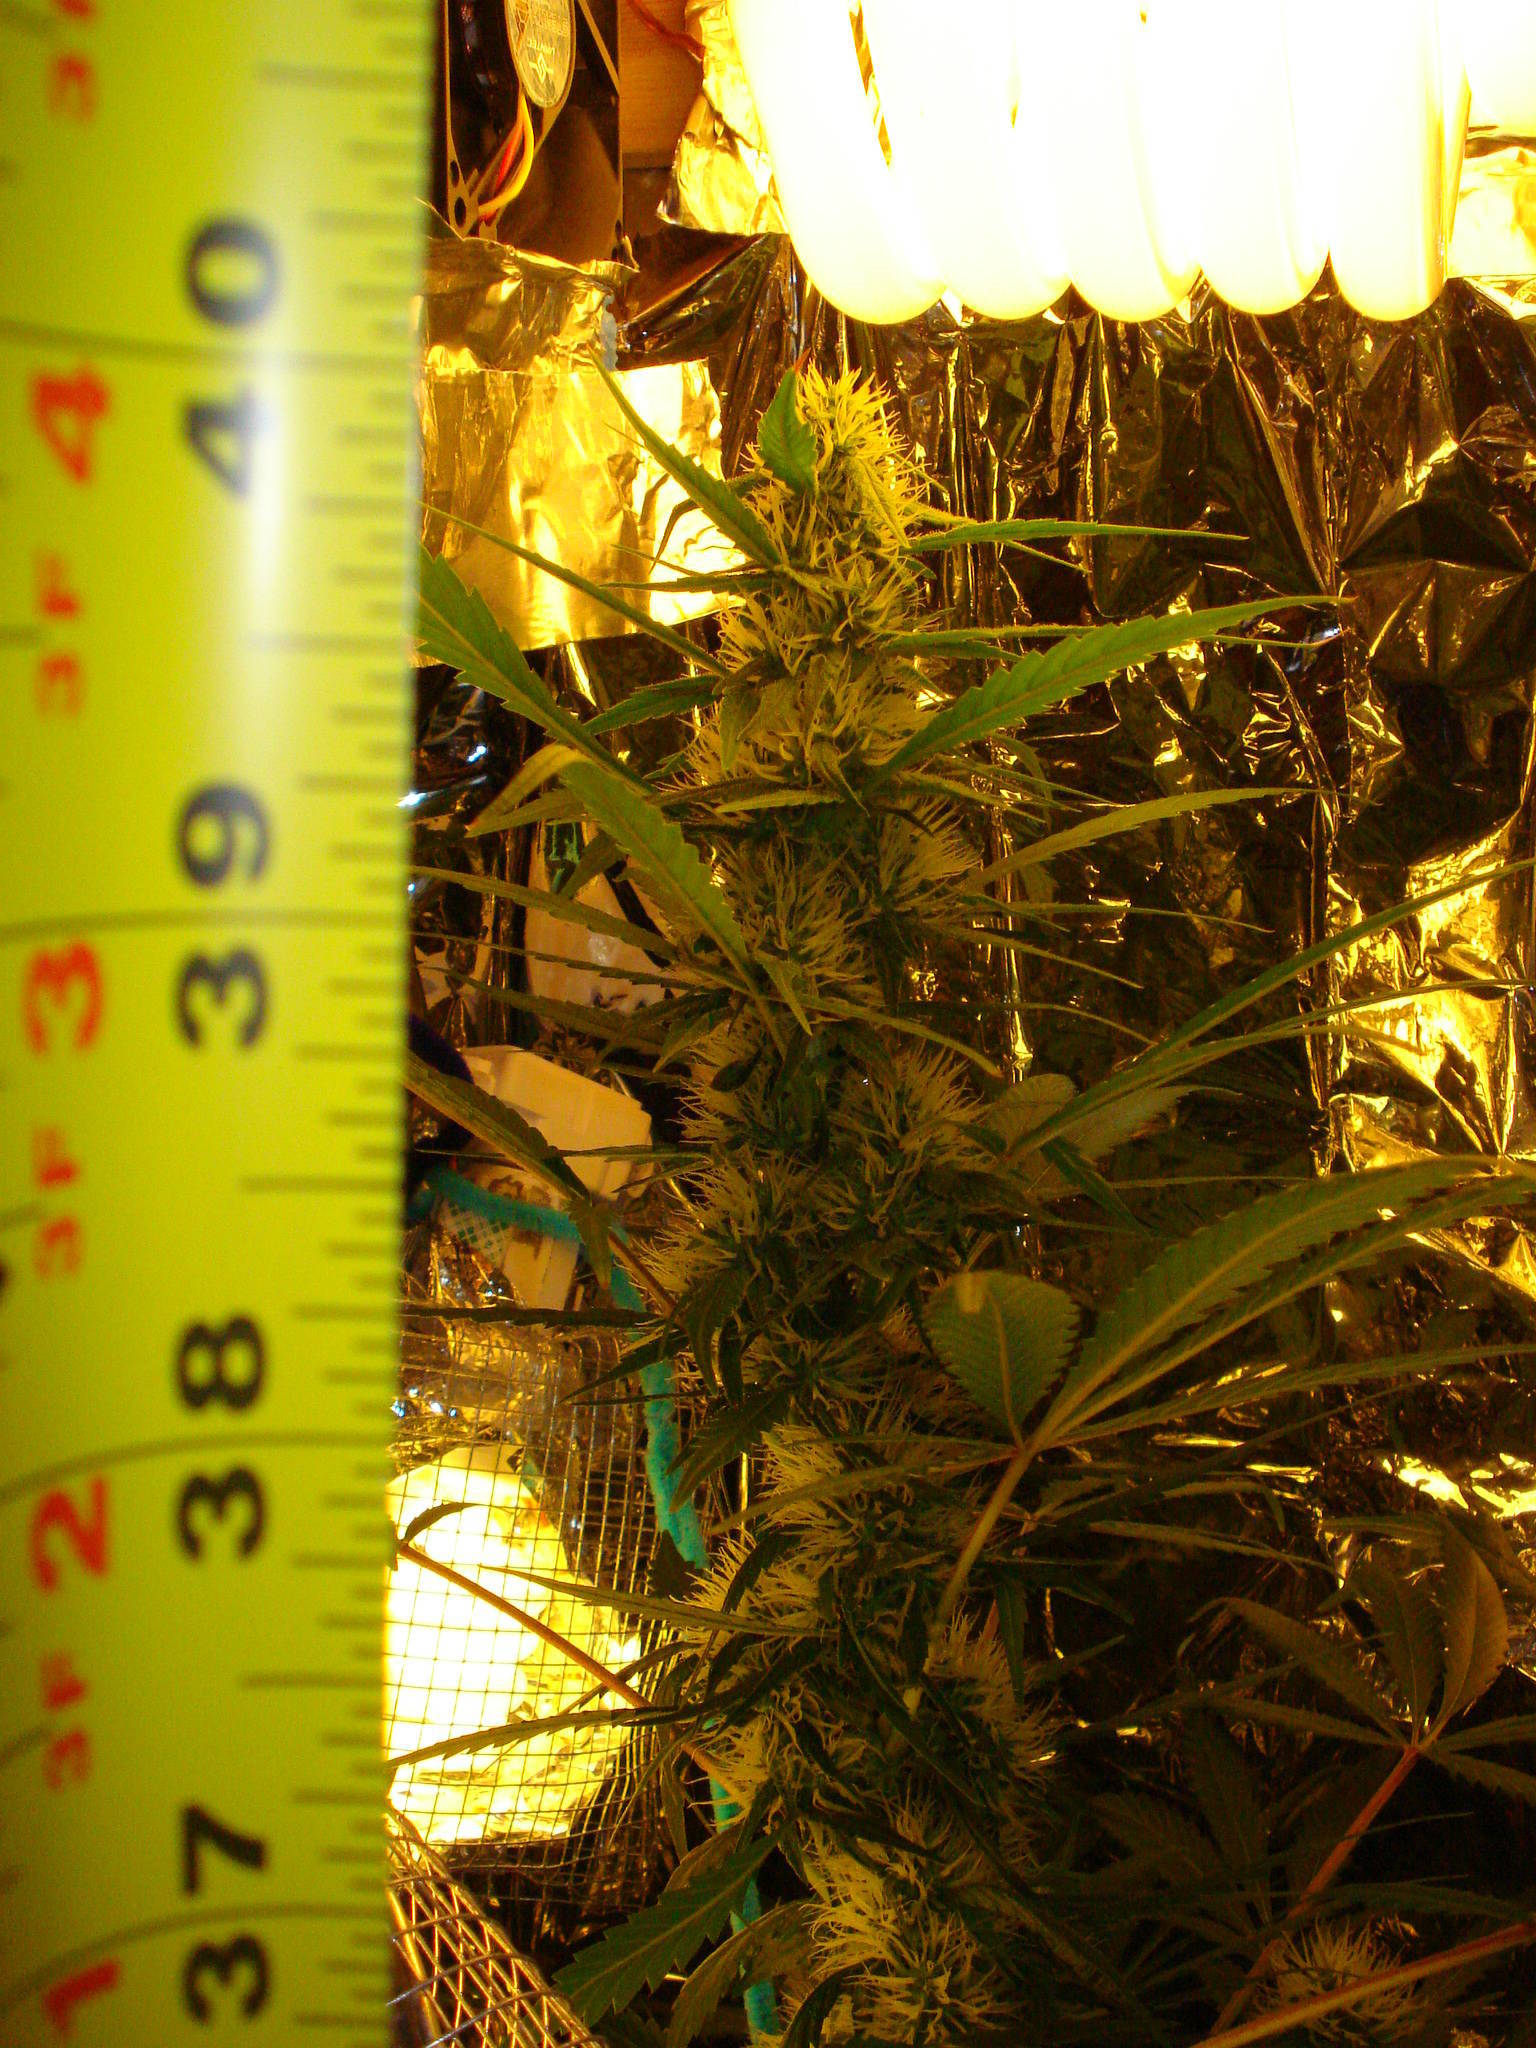
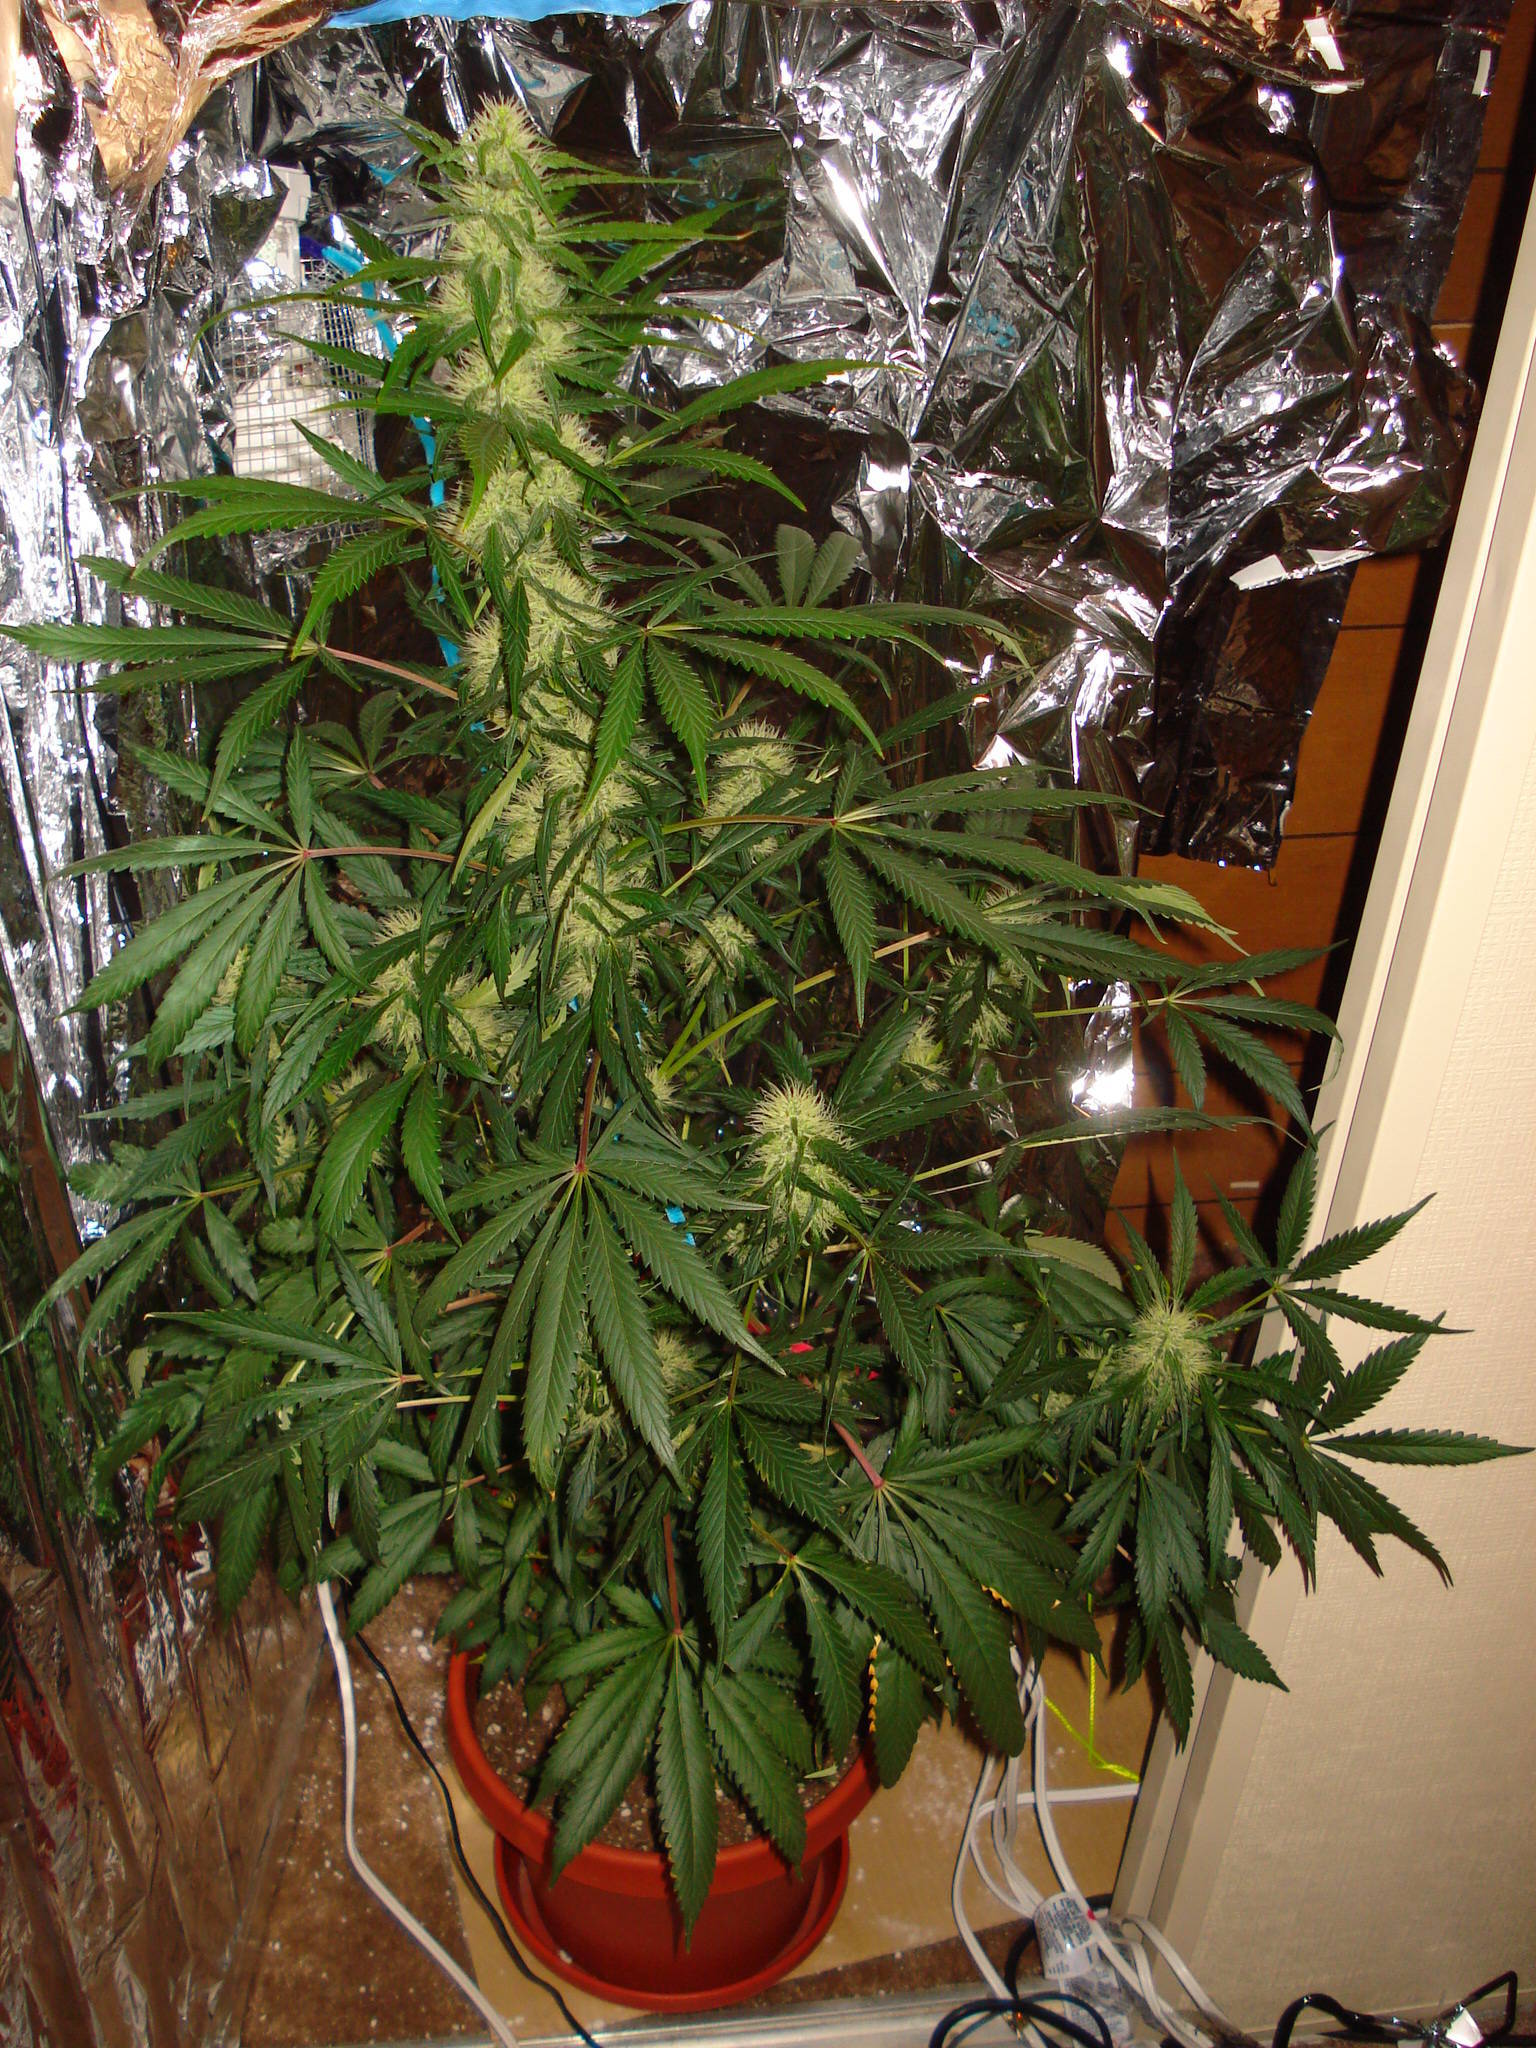
^Photo 1: Those pre-budz are really maturing fast! Looks so hairy now! I can even see some Herb Crystals on some of the small bud leaves. Pretty stoked! Photo 2: She has been doing A LOT of growing over the past week. I almost have to adjust the string every day! I measured the height: Shes about 28 inches (2 ft. 4 inches) tall now. I will try to measure her every time, because the growth I've seen recently is mind-bogging! Photo 3: The bottom canopy looks miniature, and is a great example of what NOT having enough light penetration (i.e. CFL bulbs). Looks like I will be harvesting it a little because it likely won't get anywhere with the little light.
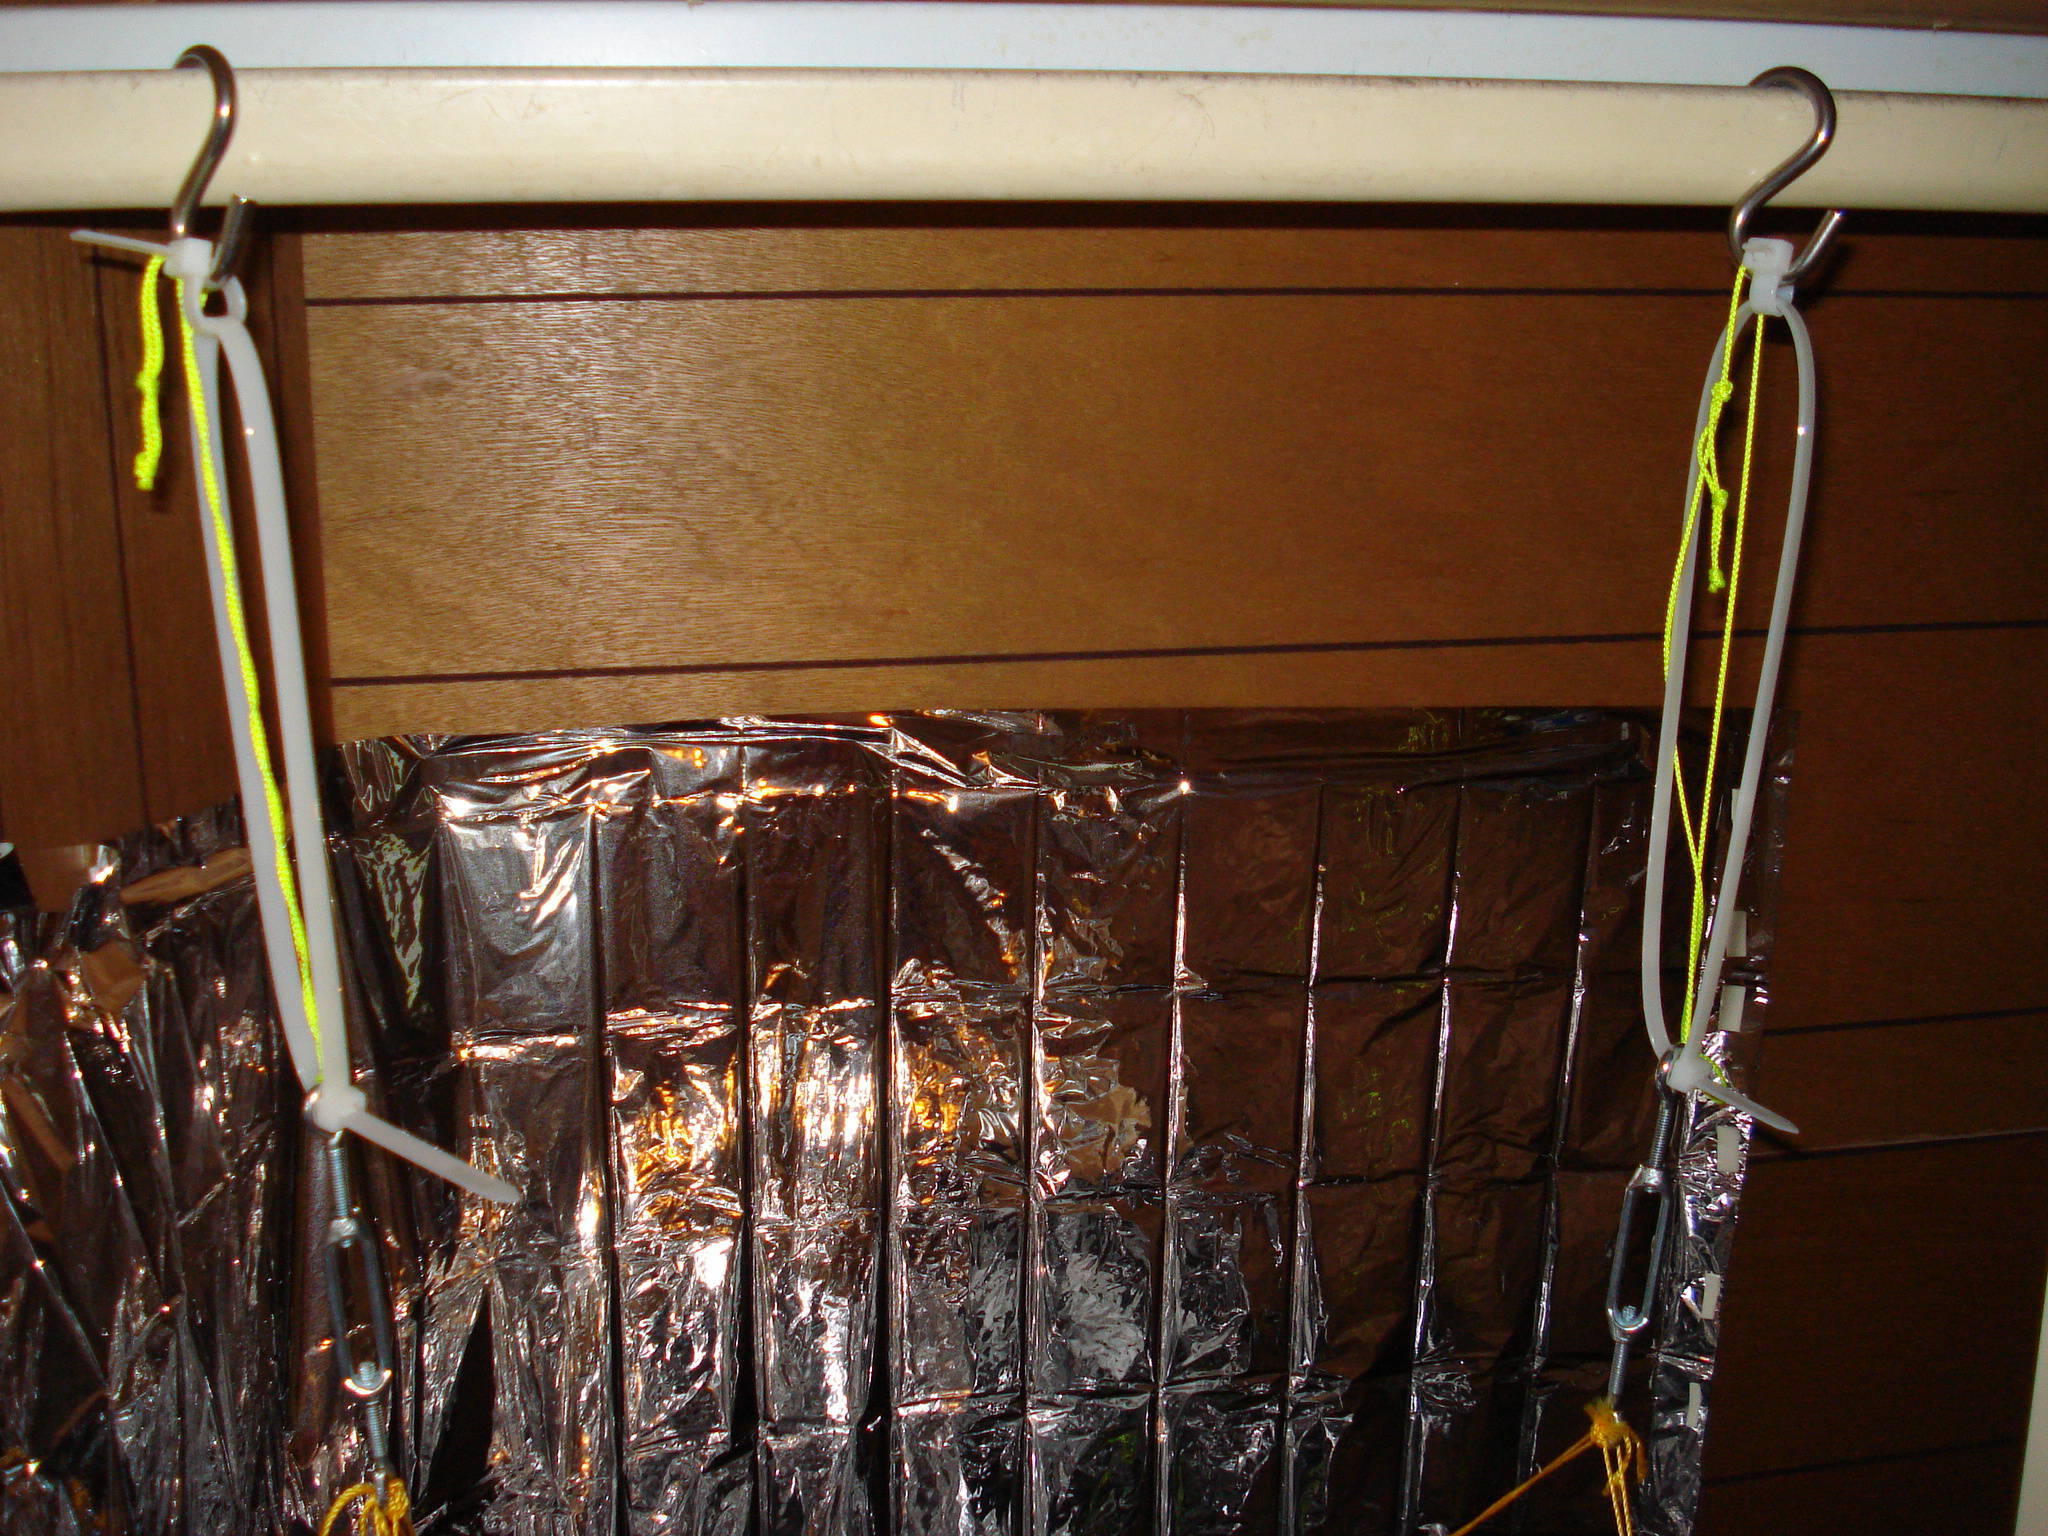
From 13ettlejuice's main post on his 'accidental' GrowLog, I got this idea: use large zip-ties to hold up my wooden light wagon.

^So much better! Never have to take off the string again! Its always supported, even during adjusting! Feels so good! 
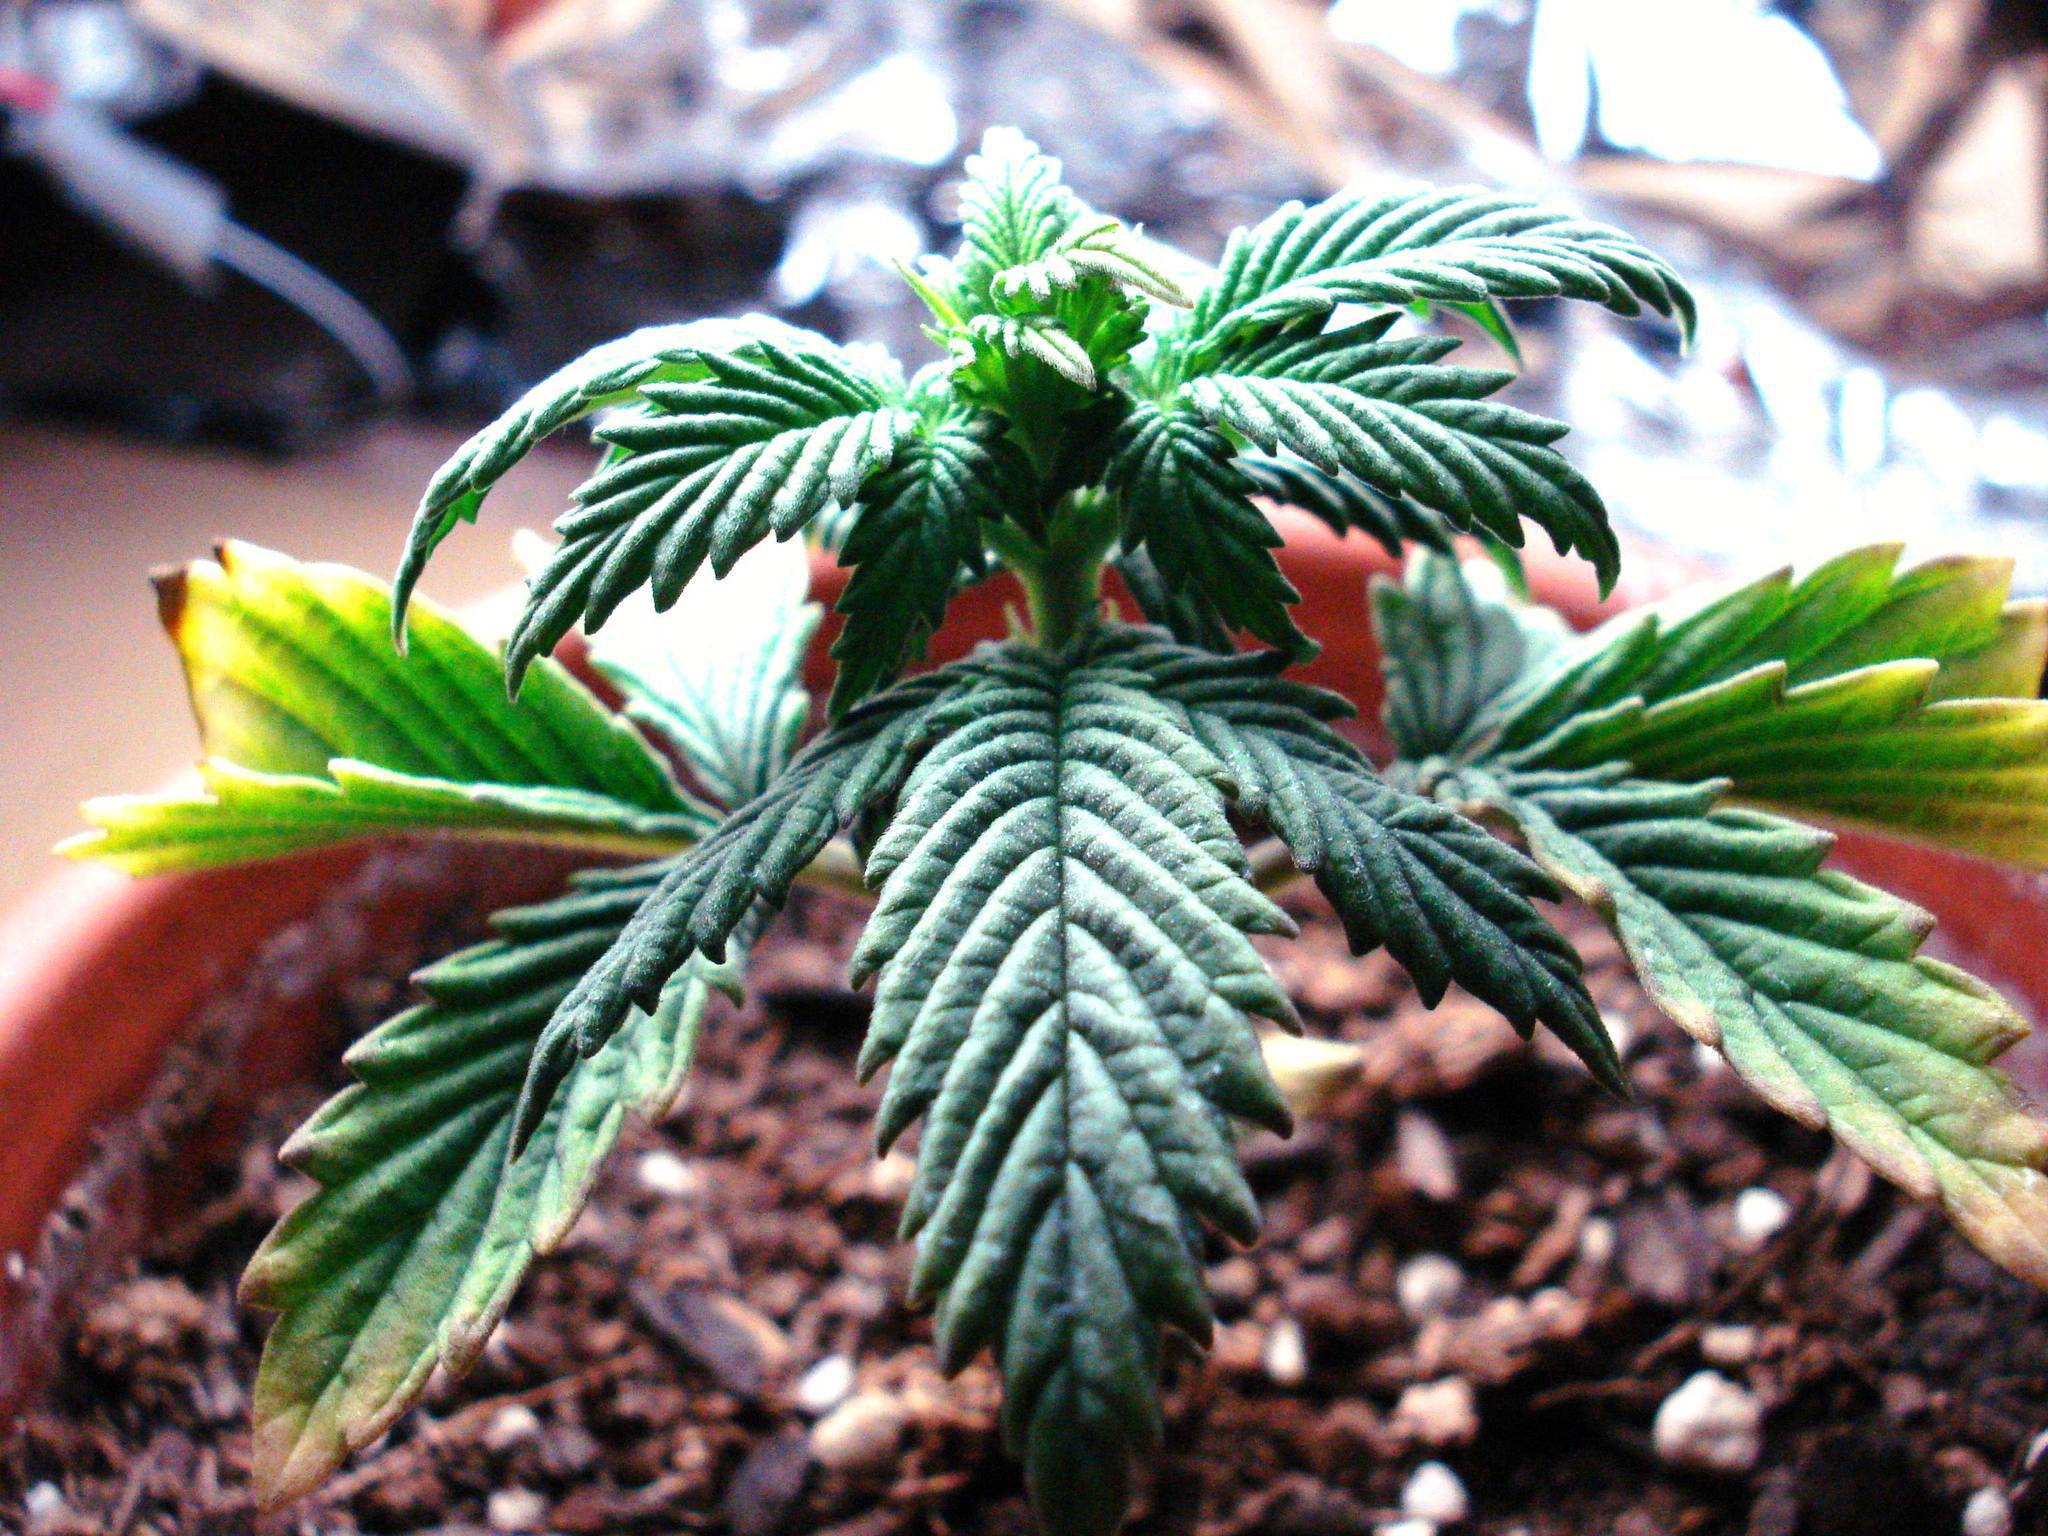
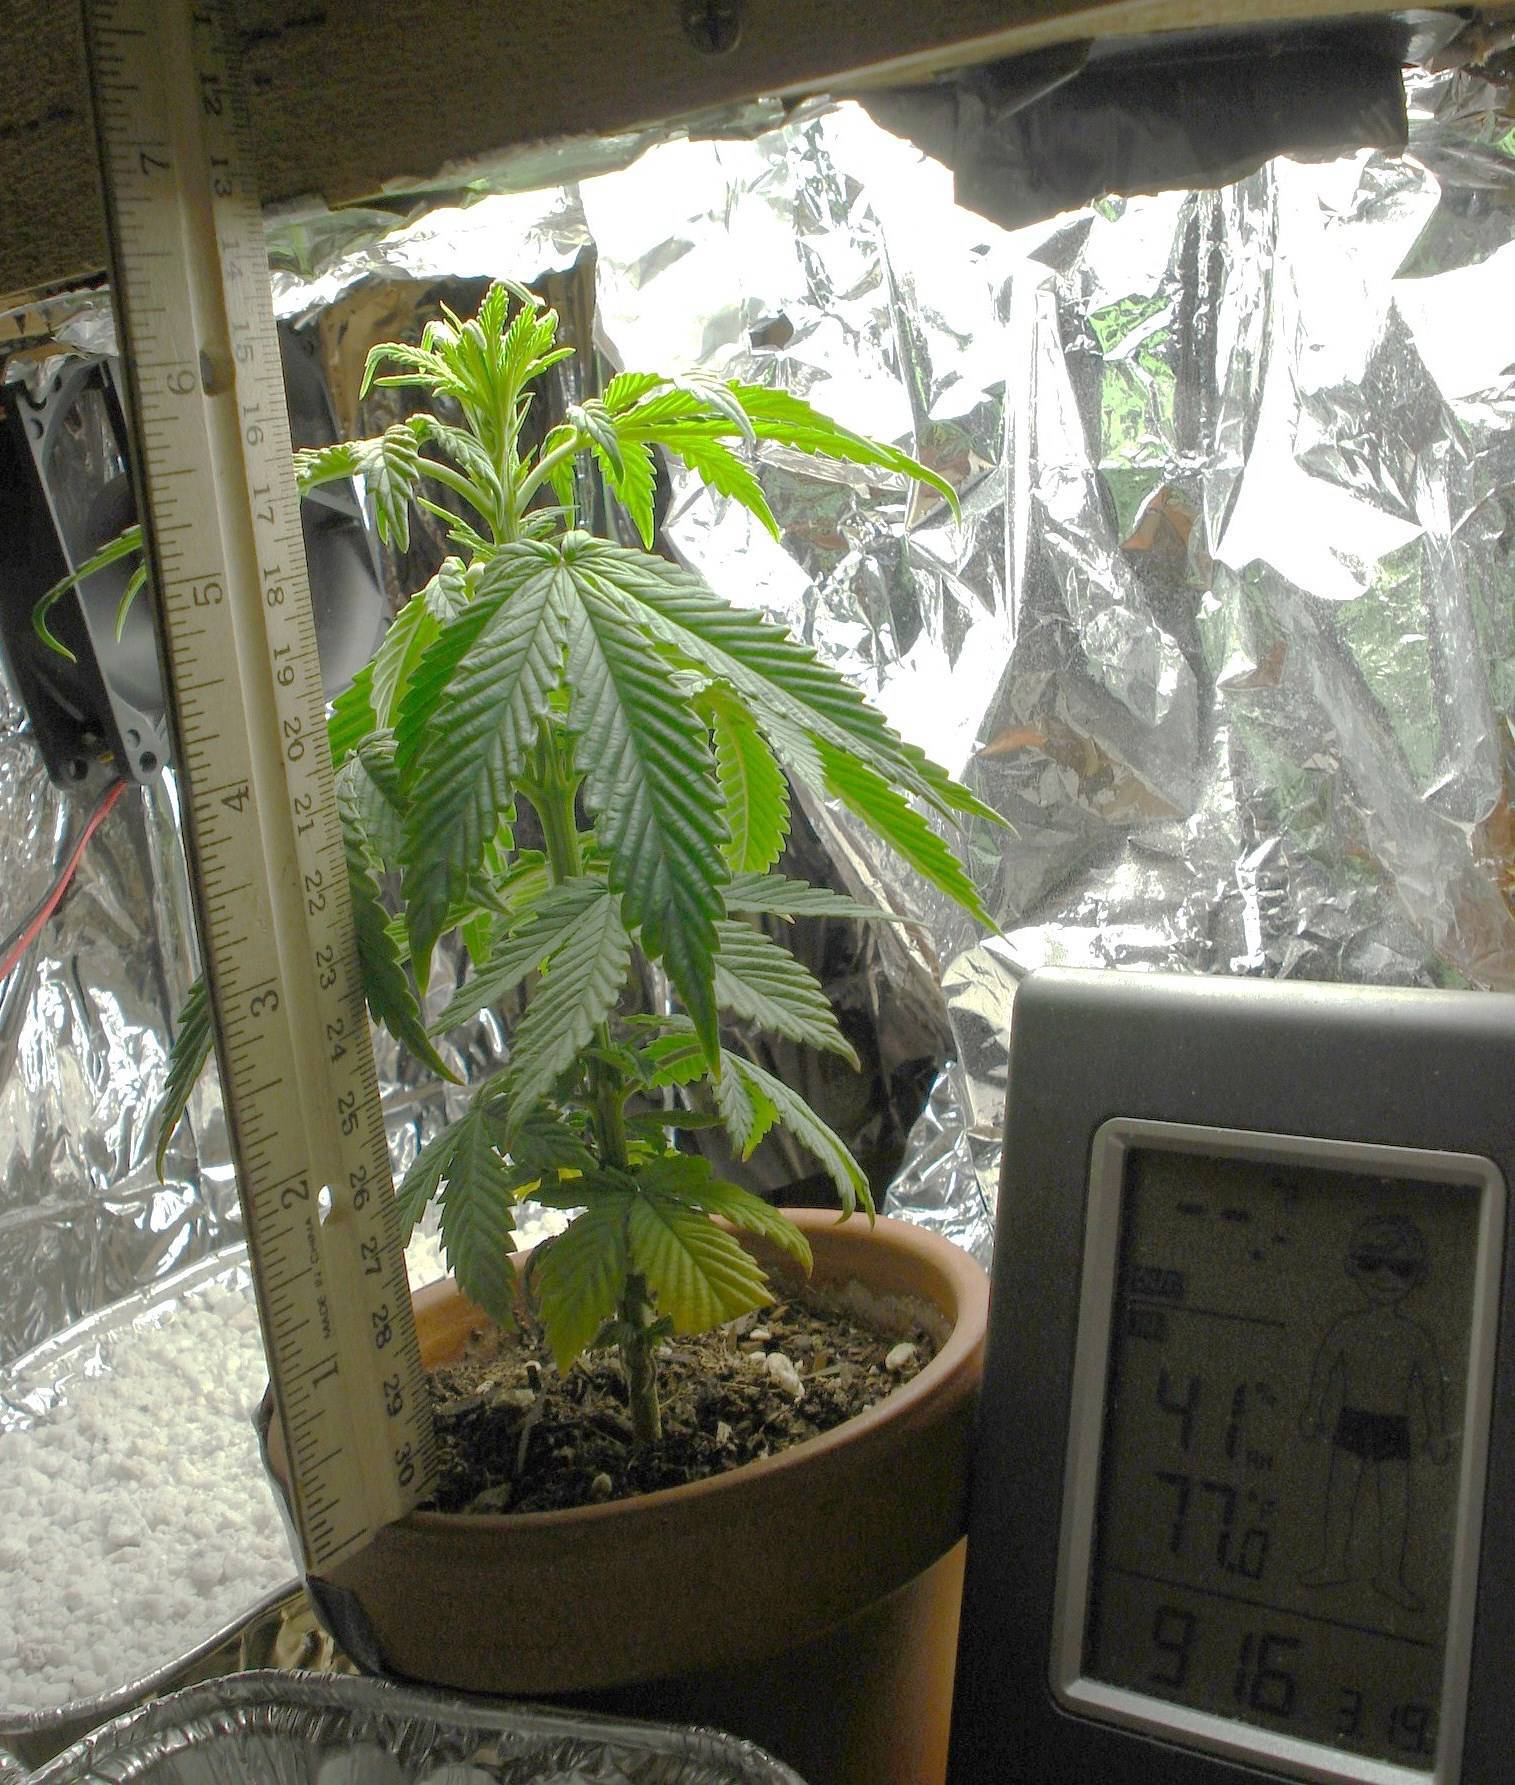
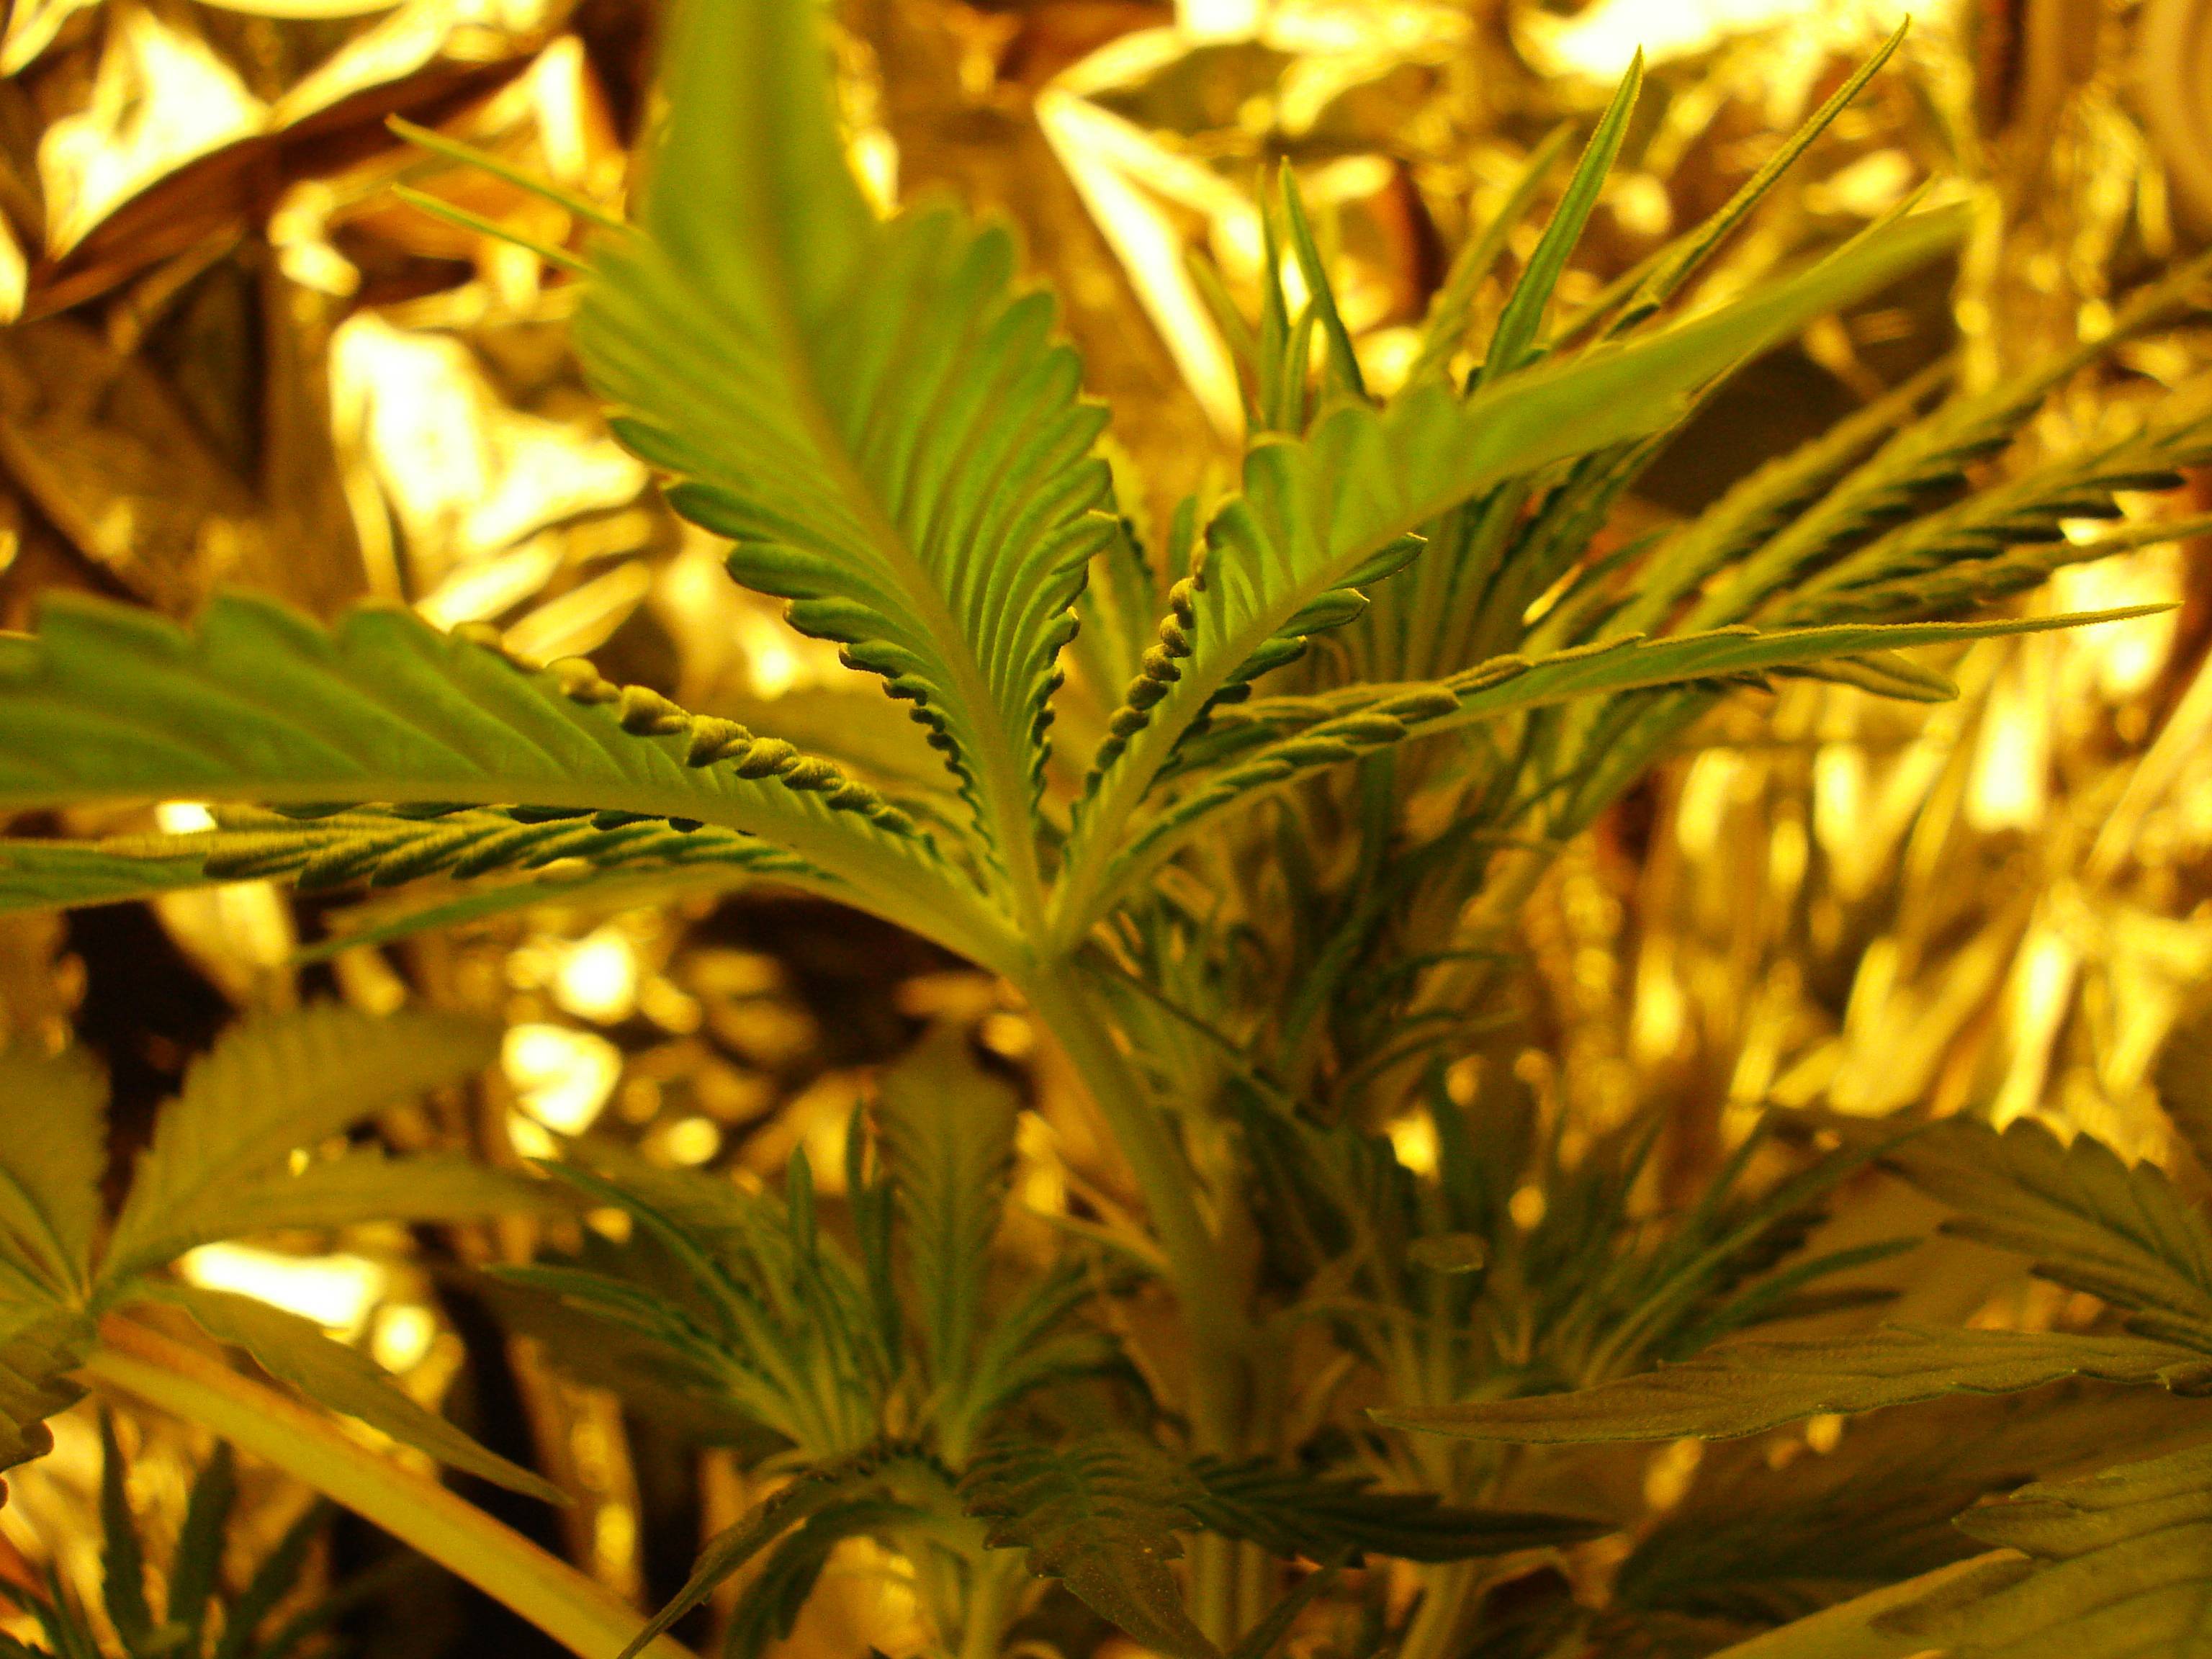
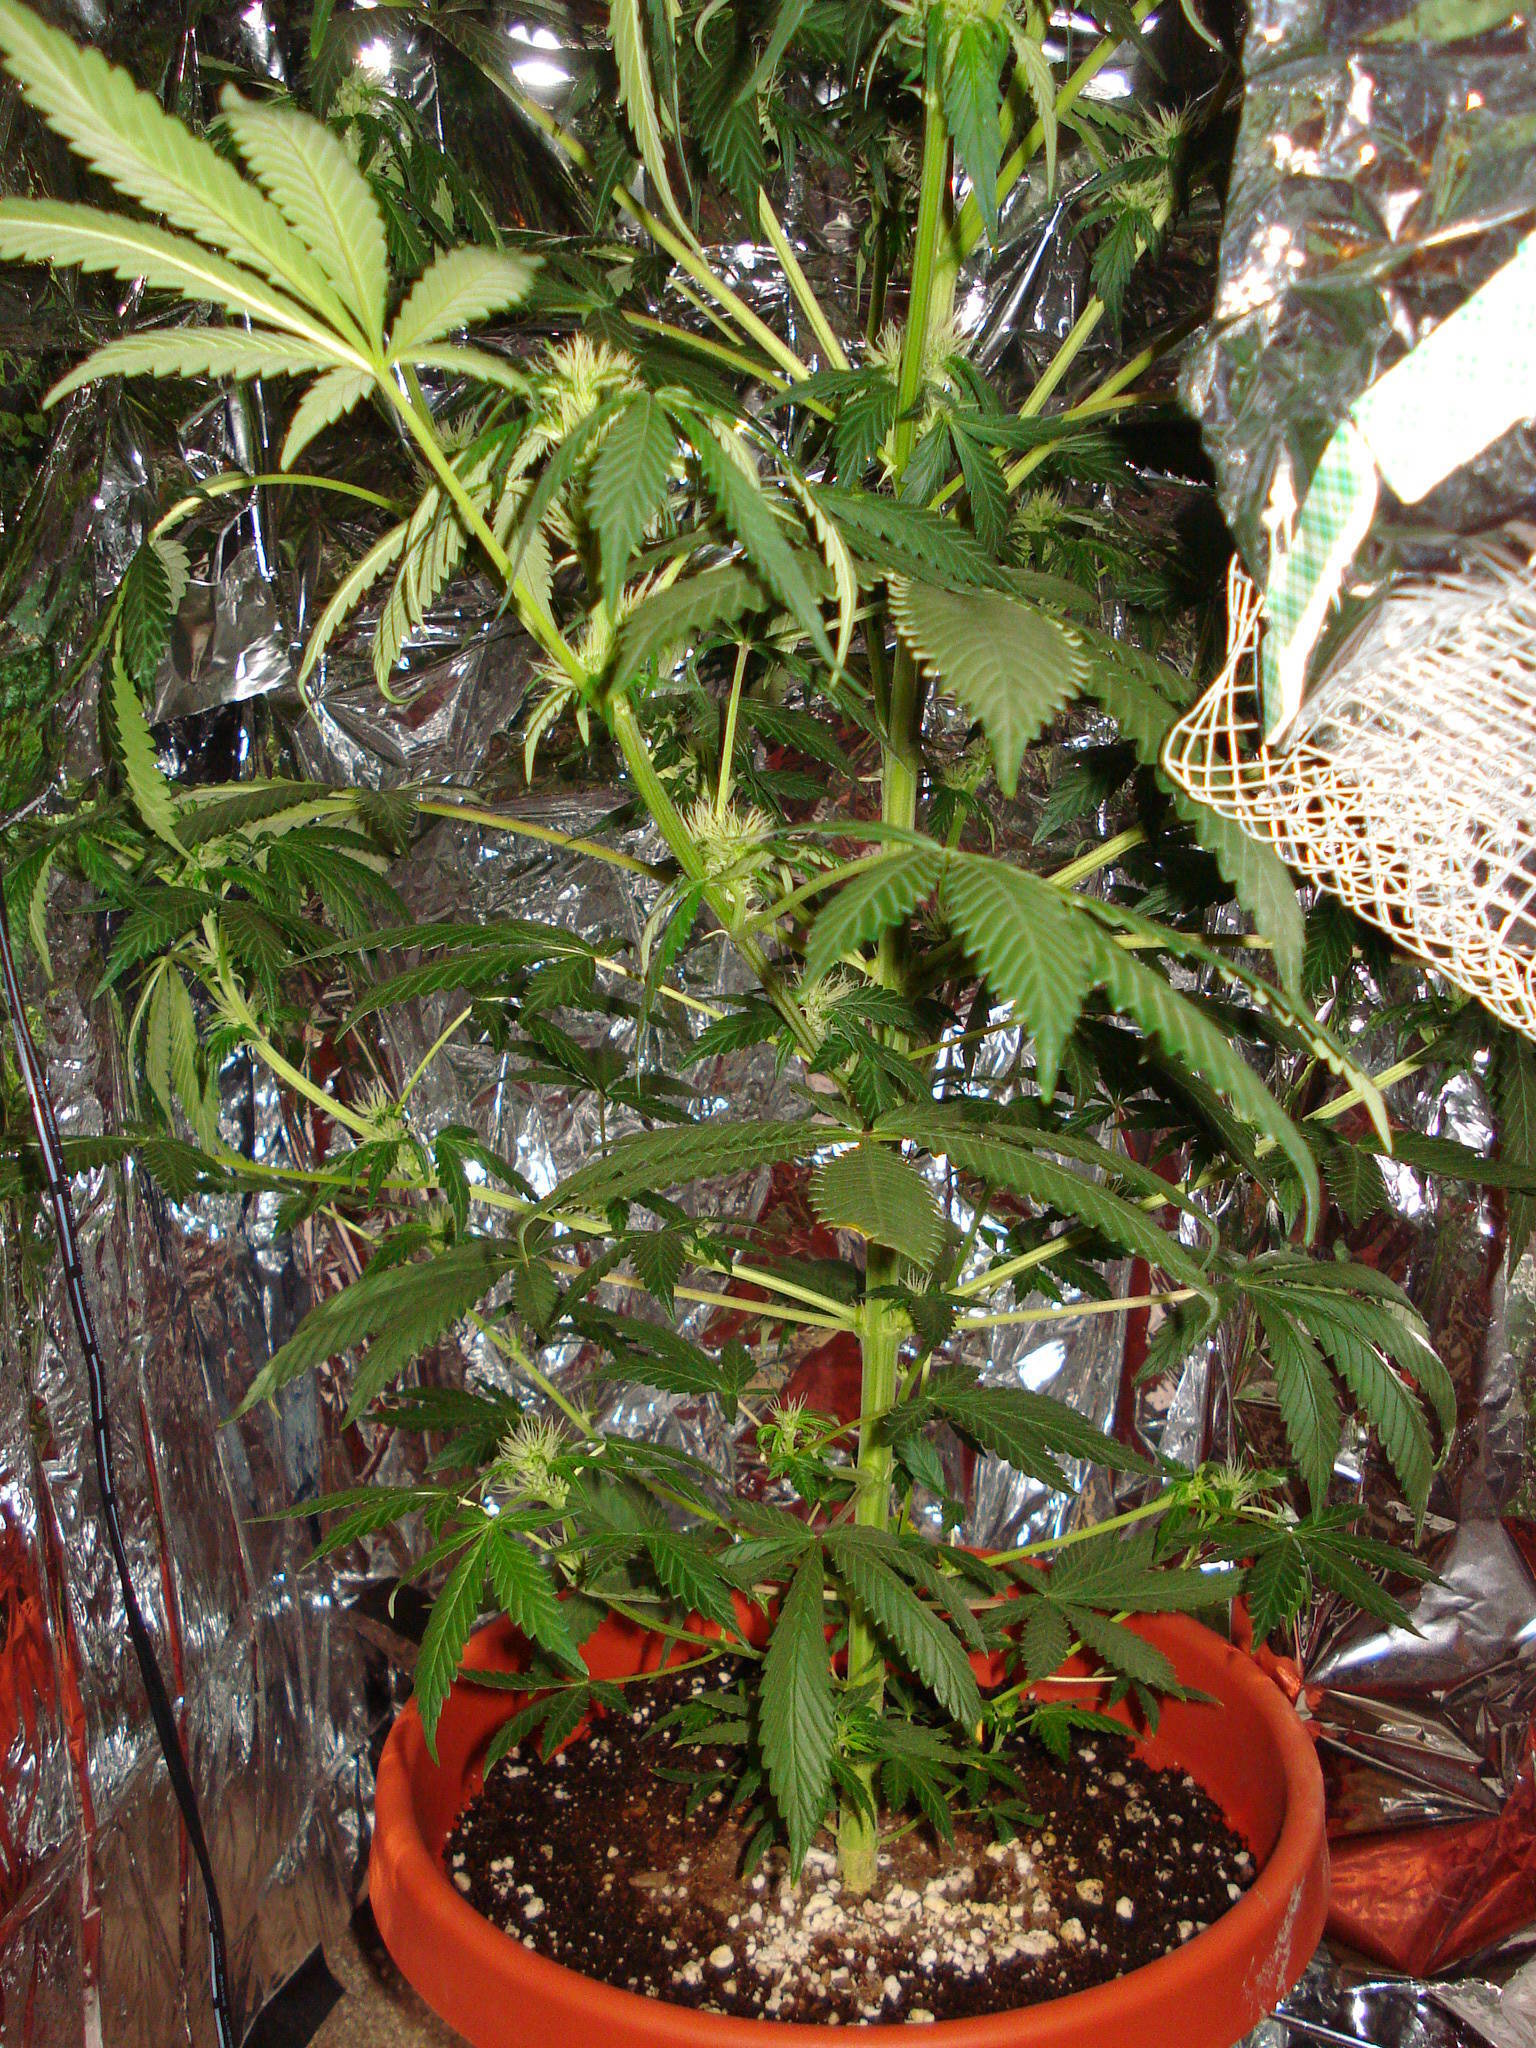
Day 73 (Day 28 of Flowering): April 17, 2010
     
^Photo 1: Wide-view. I added another lamp on the bottom with a 23 watt flower bulb, for a total of 263 watts for all bulbs. I added this bulb because I will be harvesting some lower budz for April 20 in honor of the holiday, and those lower budz barely get any light (should of trained her  ). I know for next time. ). I know for next time.
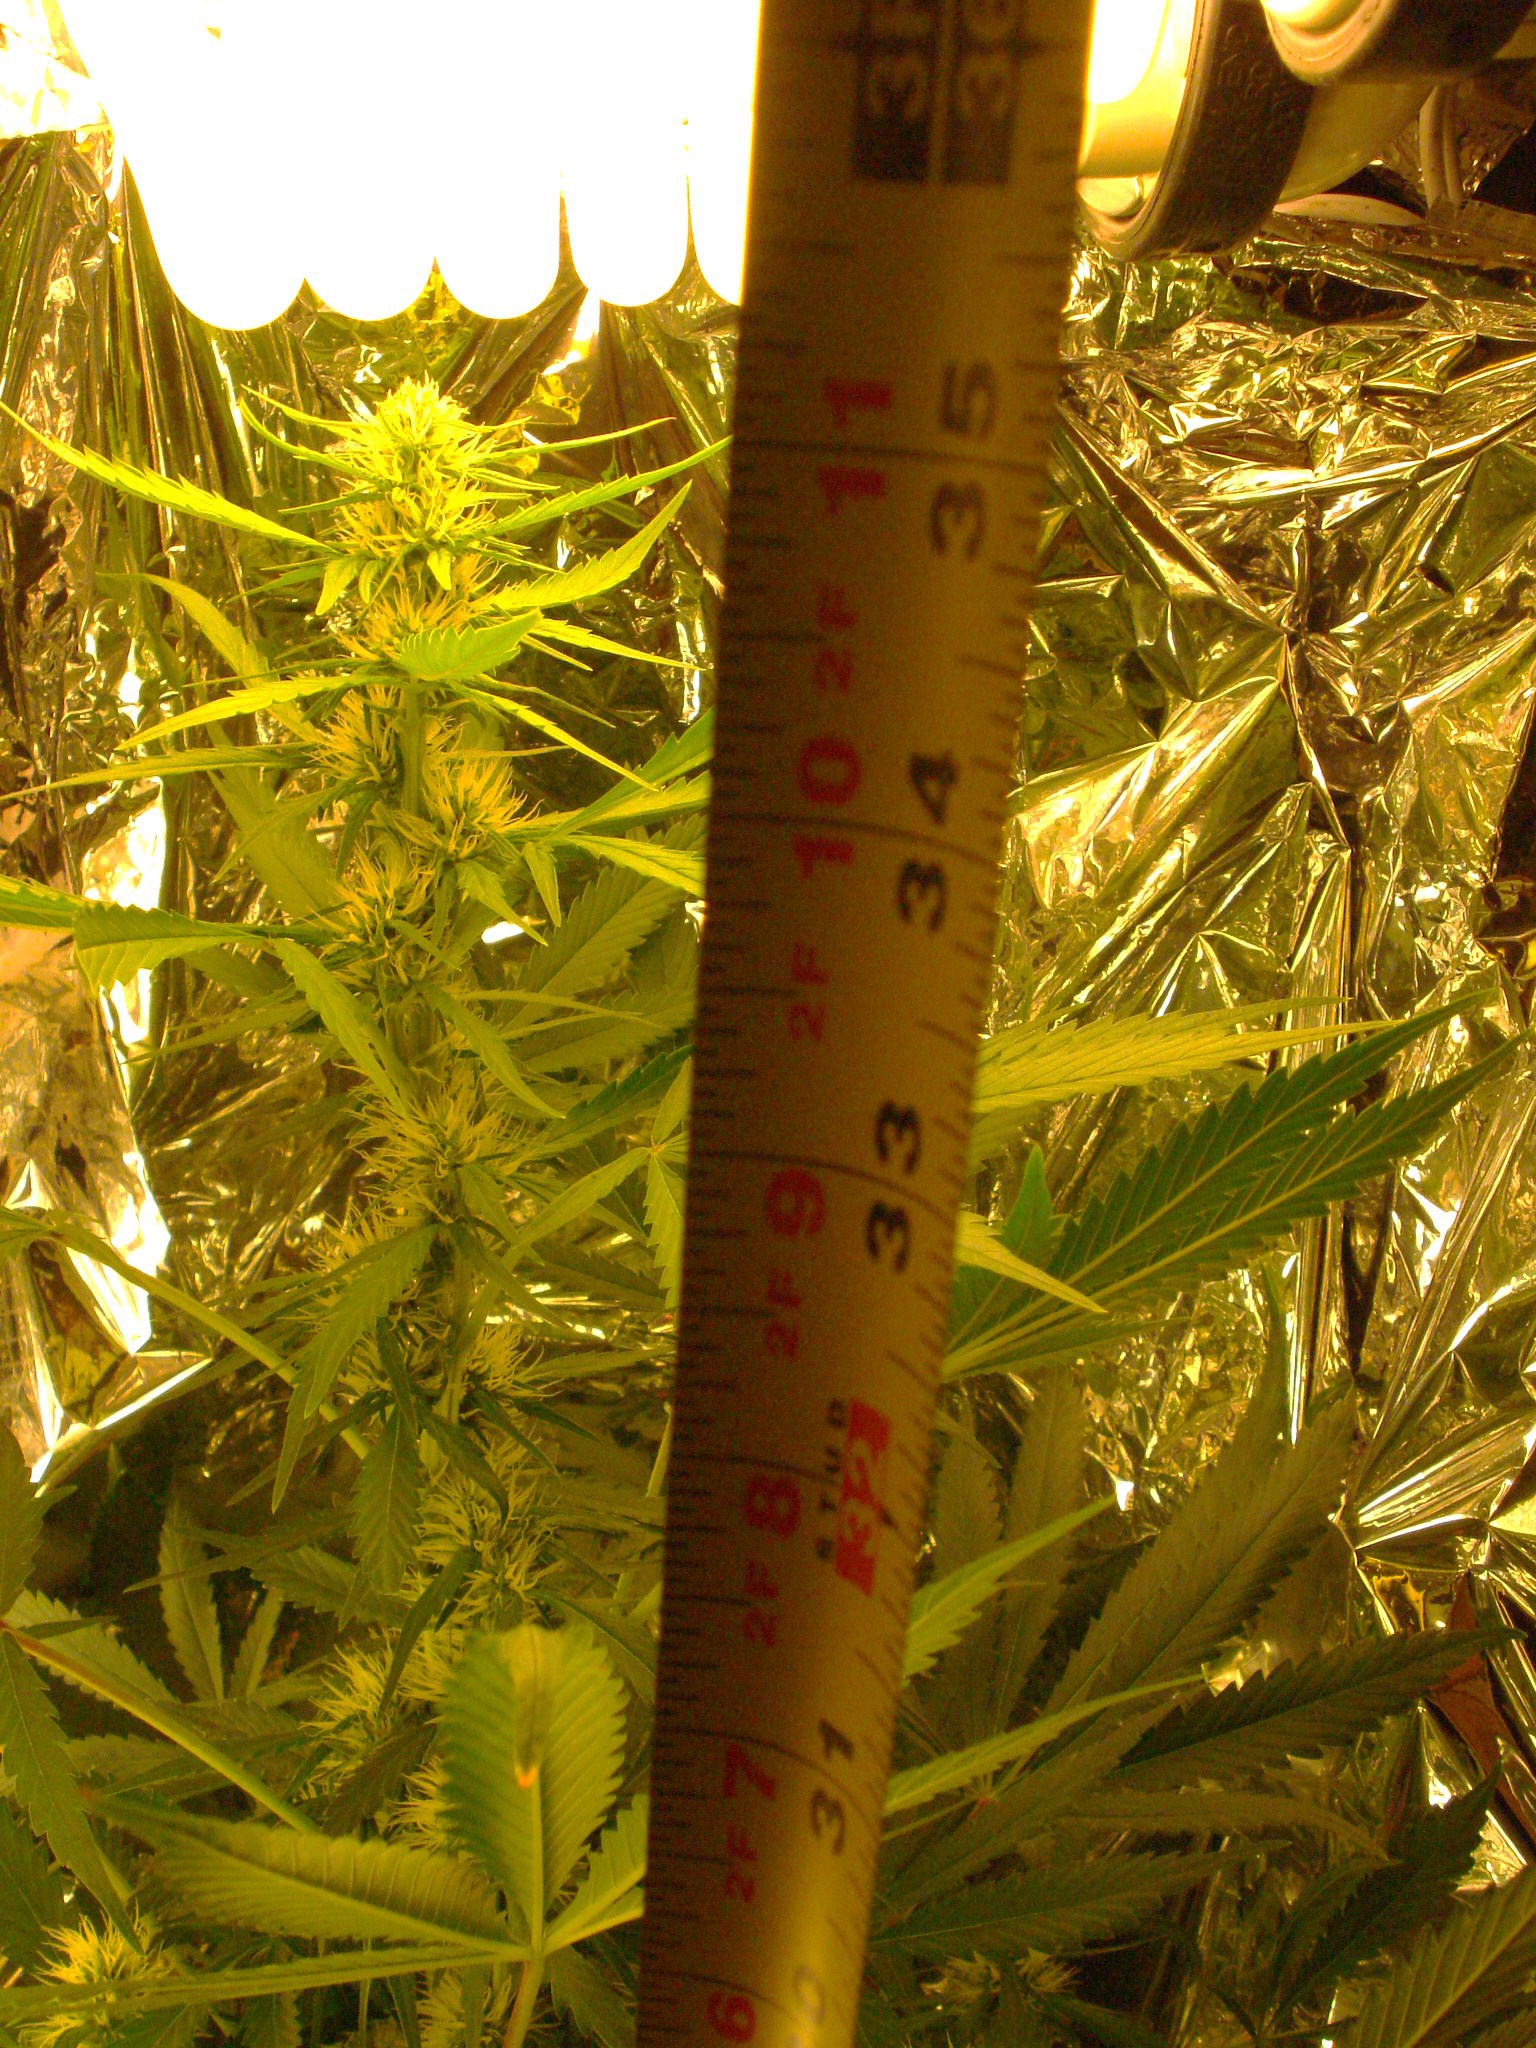
^Photo 2: Total height is about 35" or about 3 feet tall. This is about a 6 inch increase from last journal. This troubles me, because I am running out of vertical height in my closet. Should I add a 5,000K to prevent this stretching? I still have like 20 days left of flowering...at this rate of vertical growth, I'm going to run out of room. Not good.
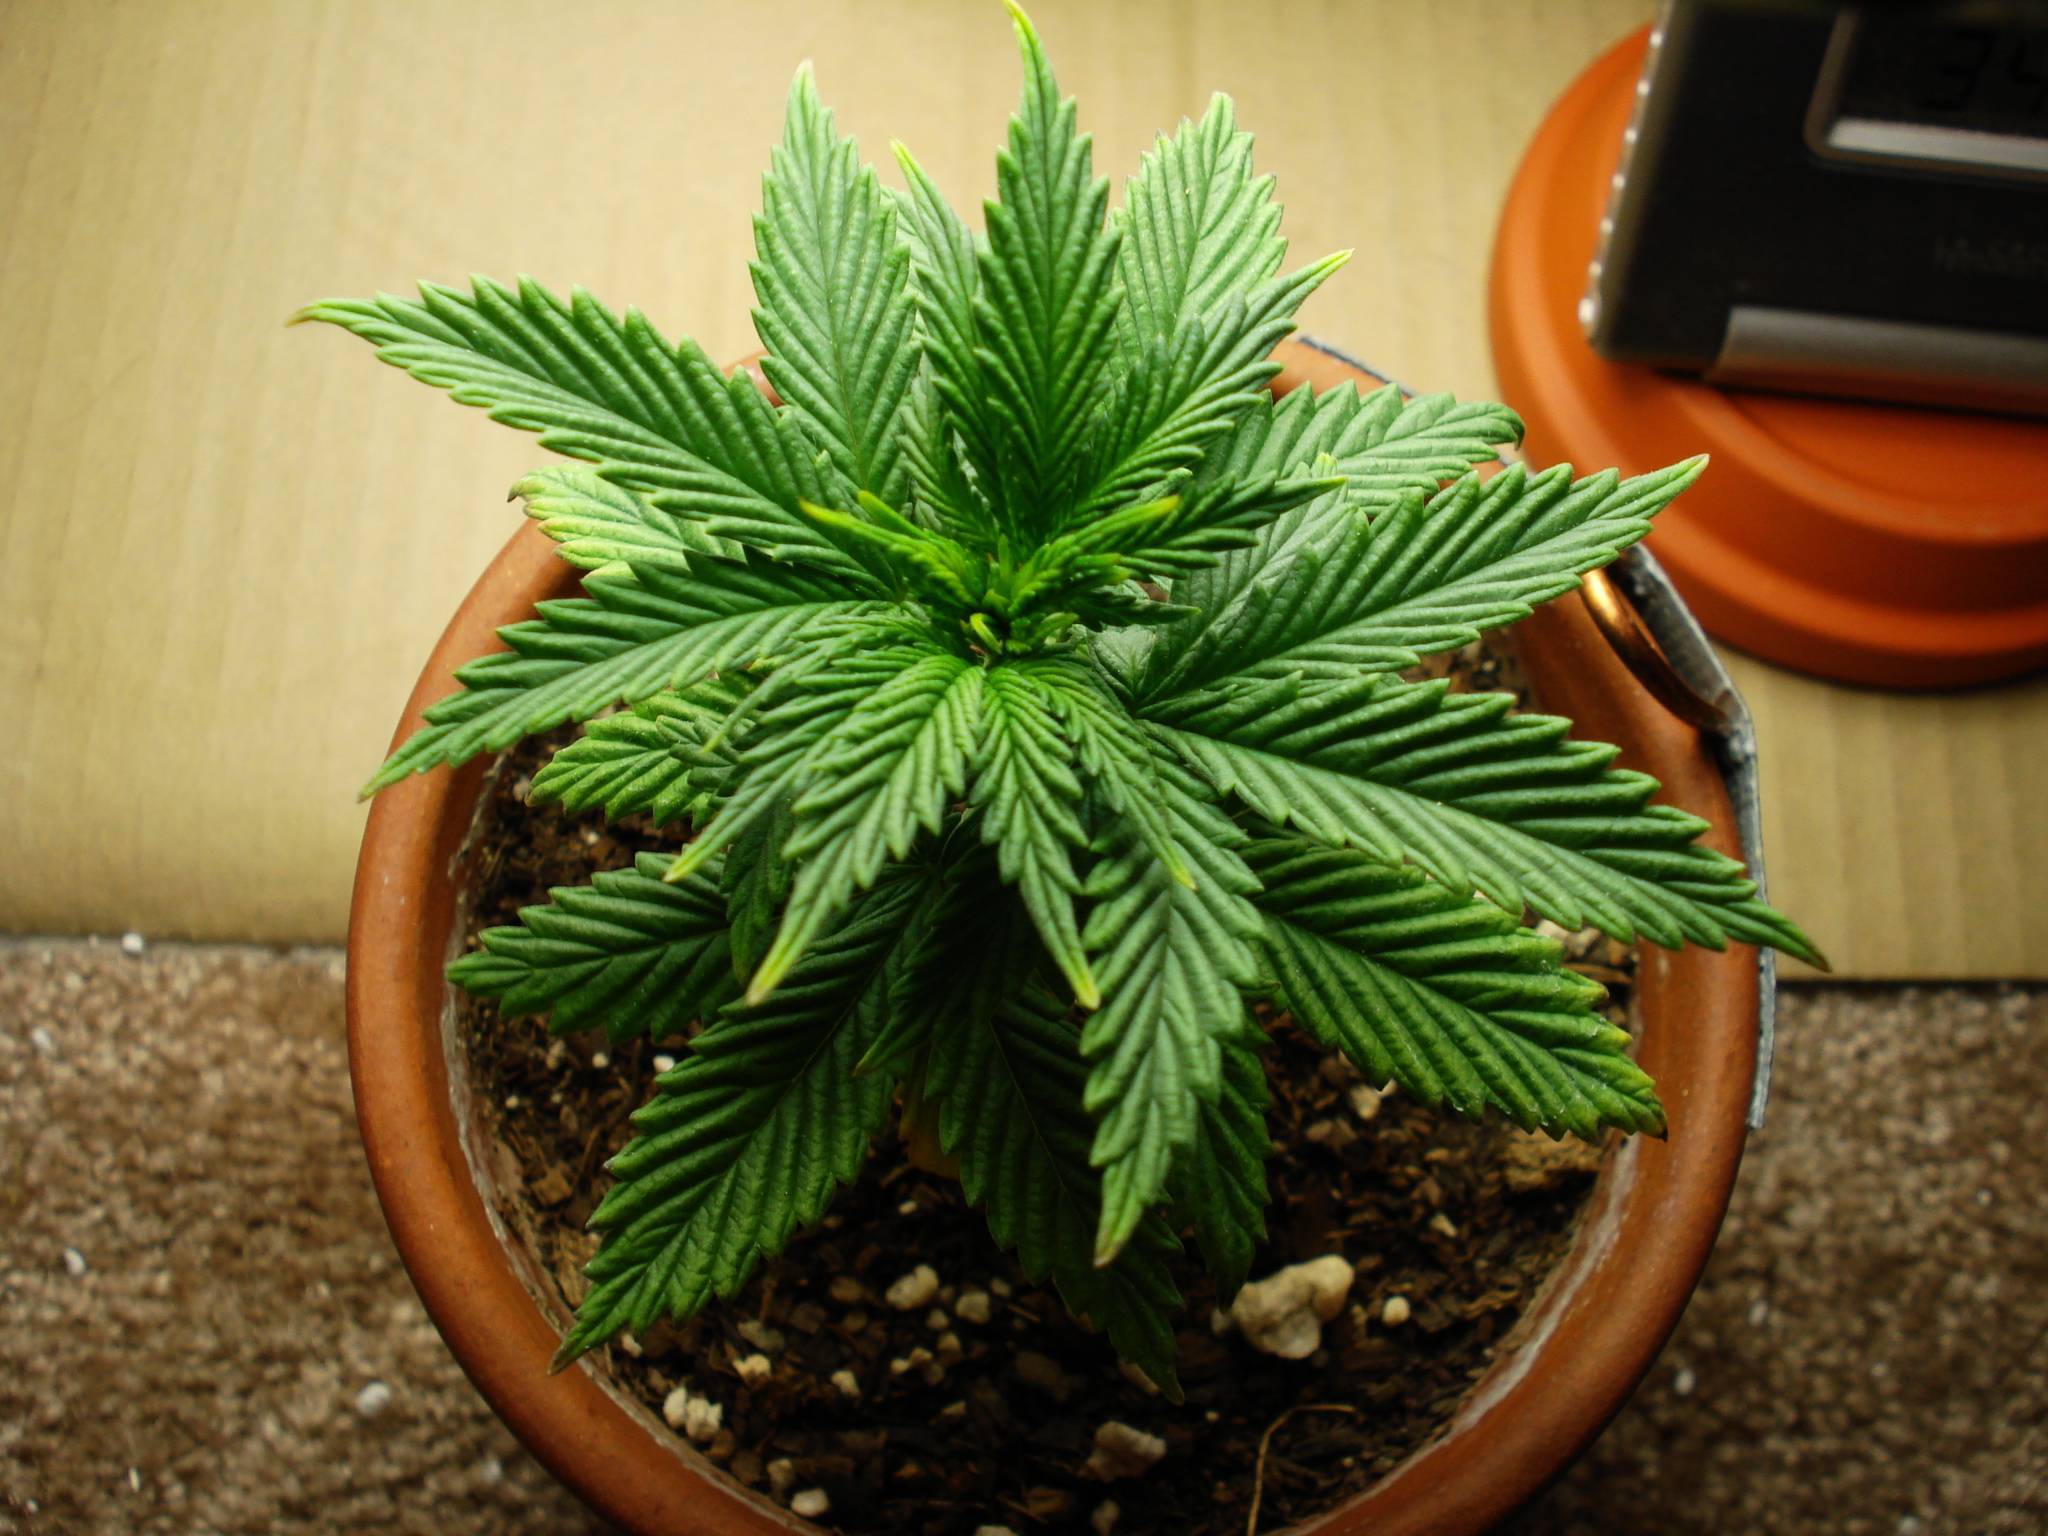
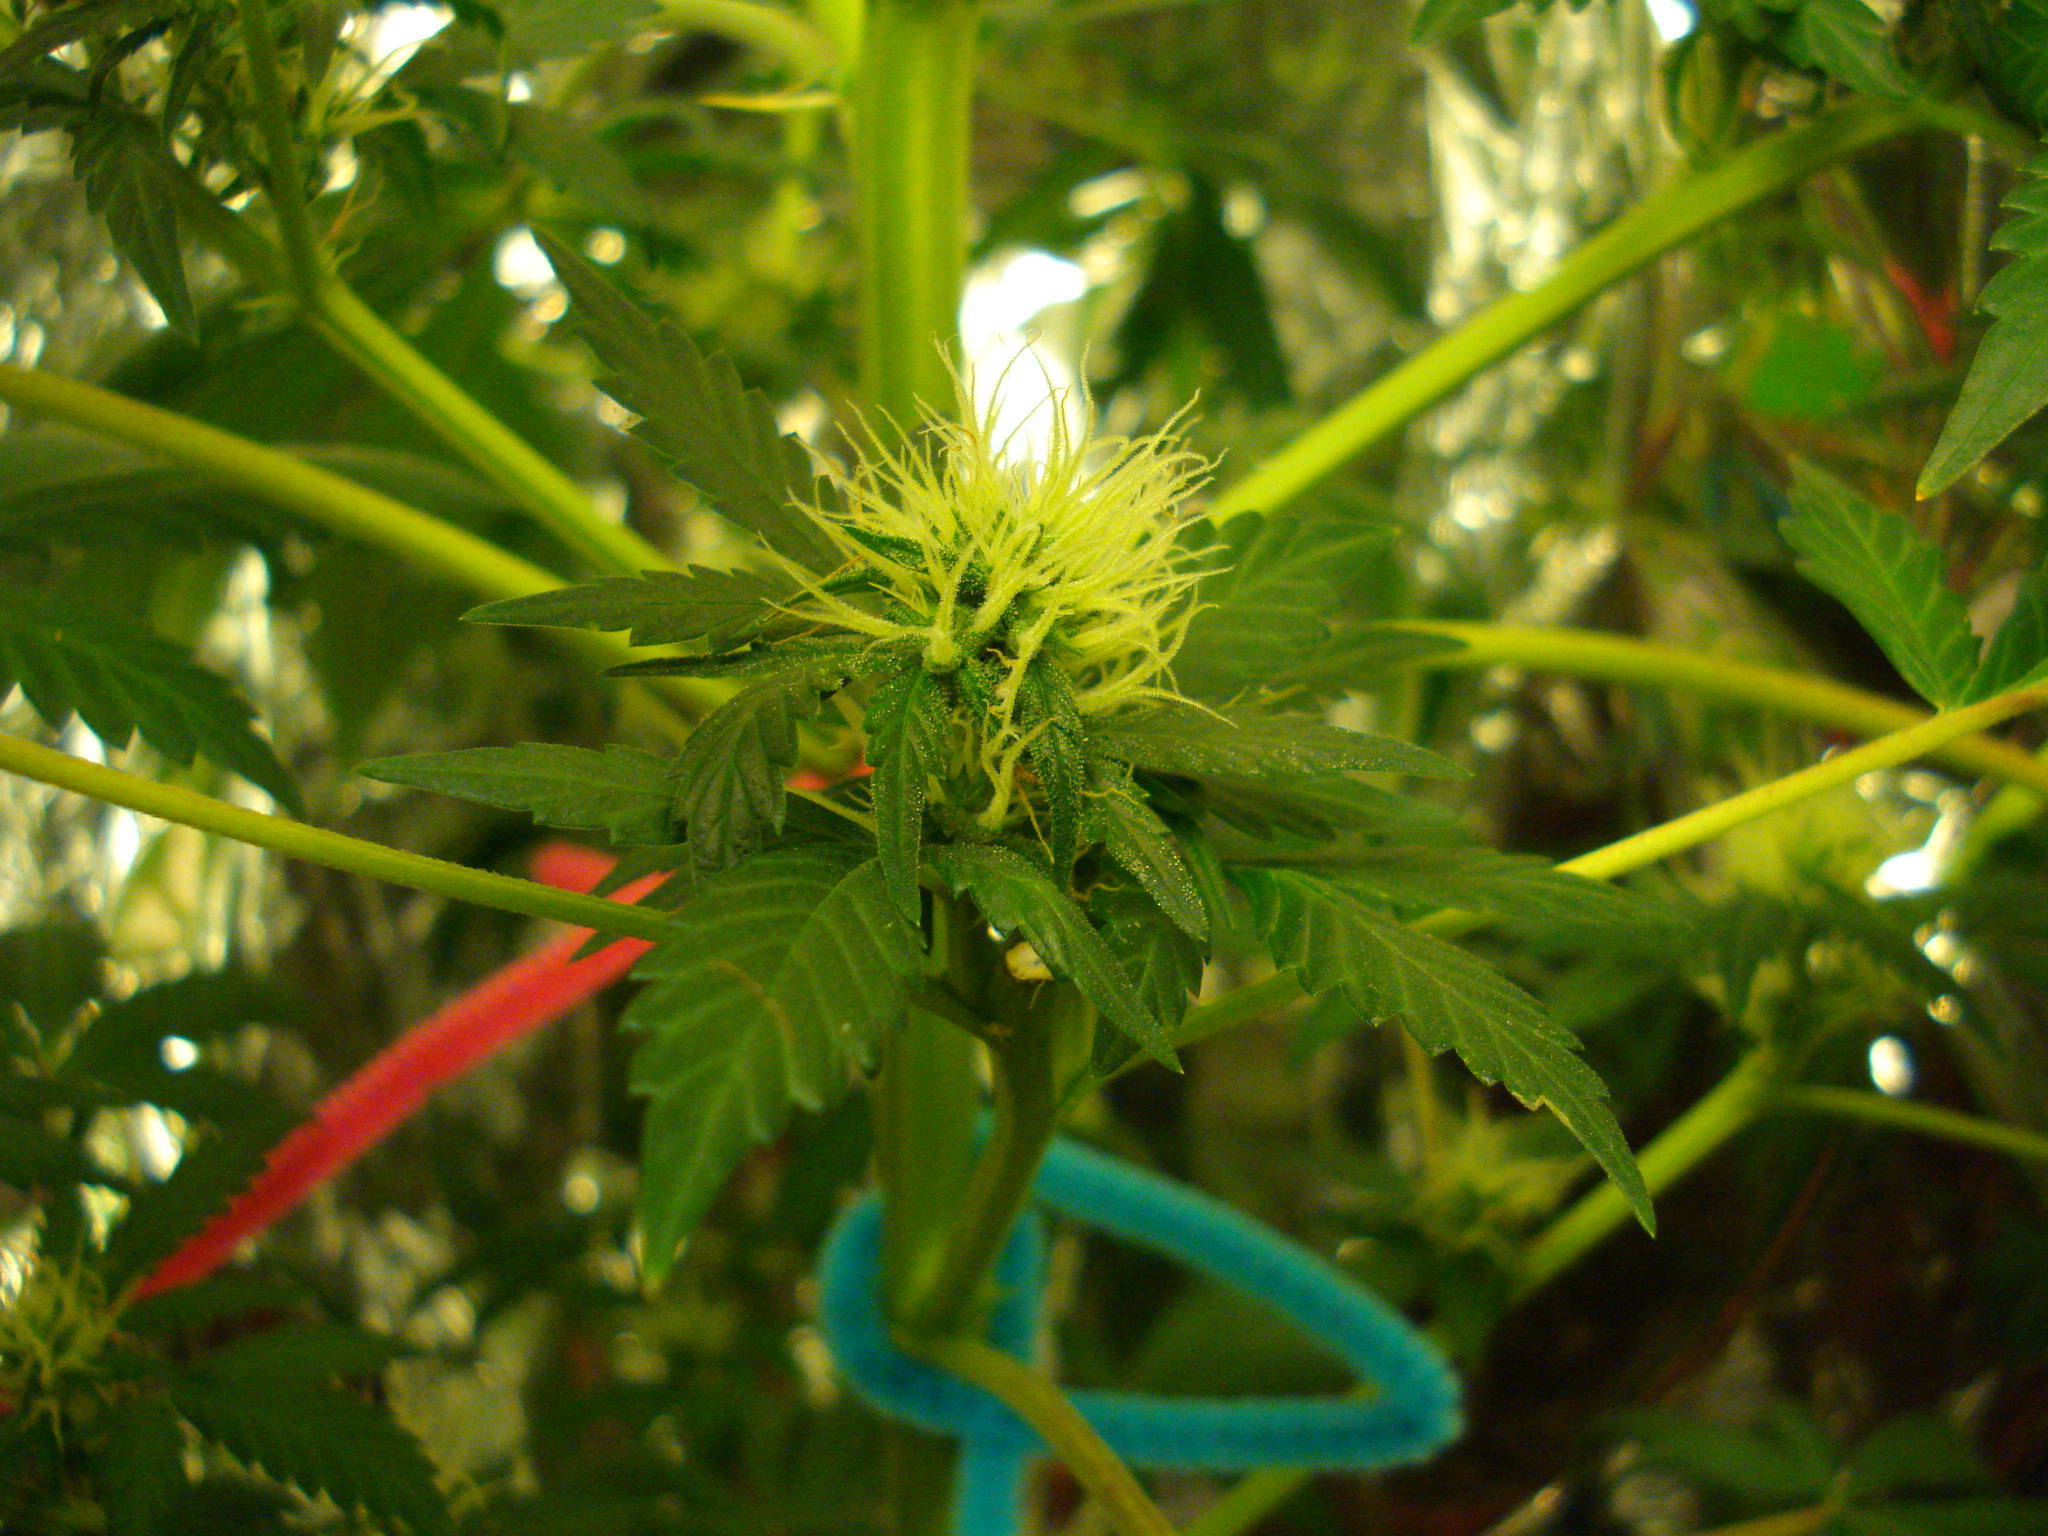
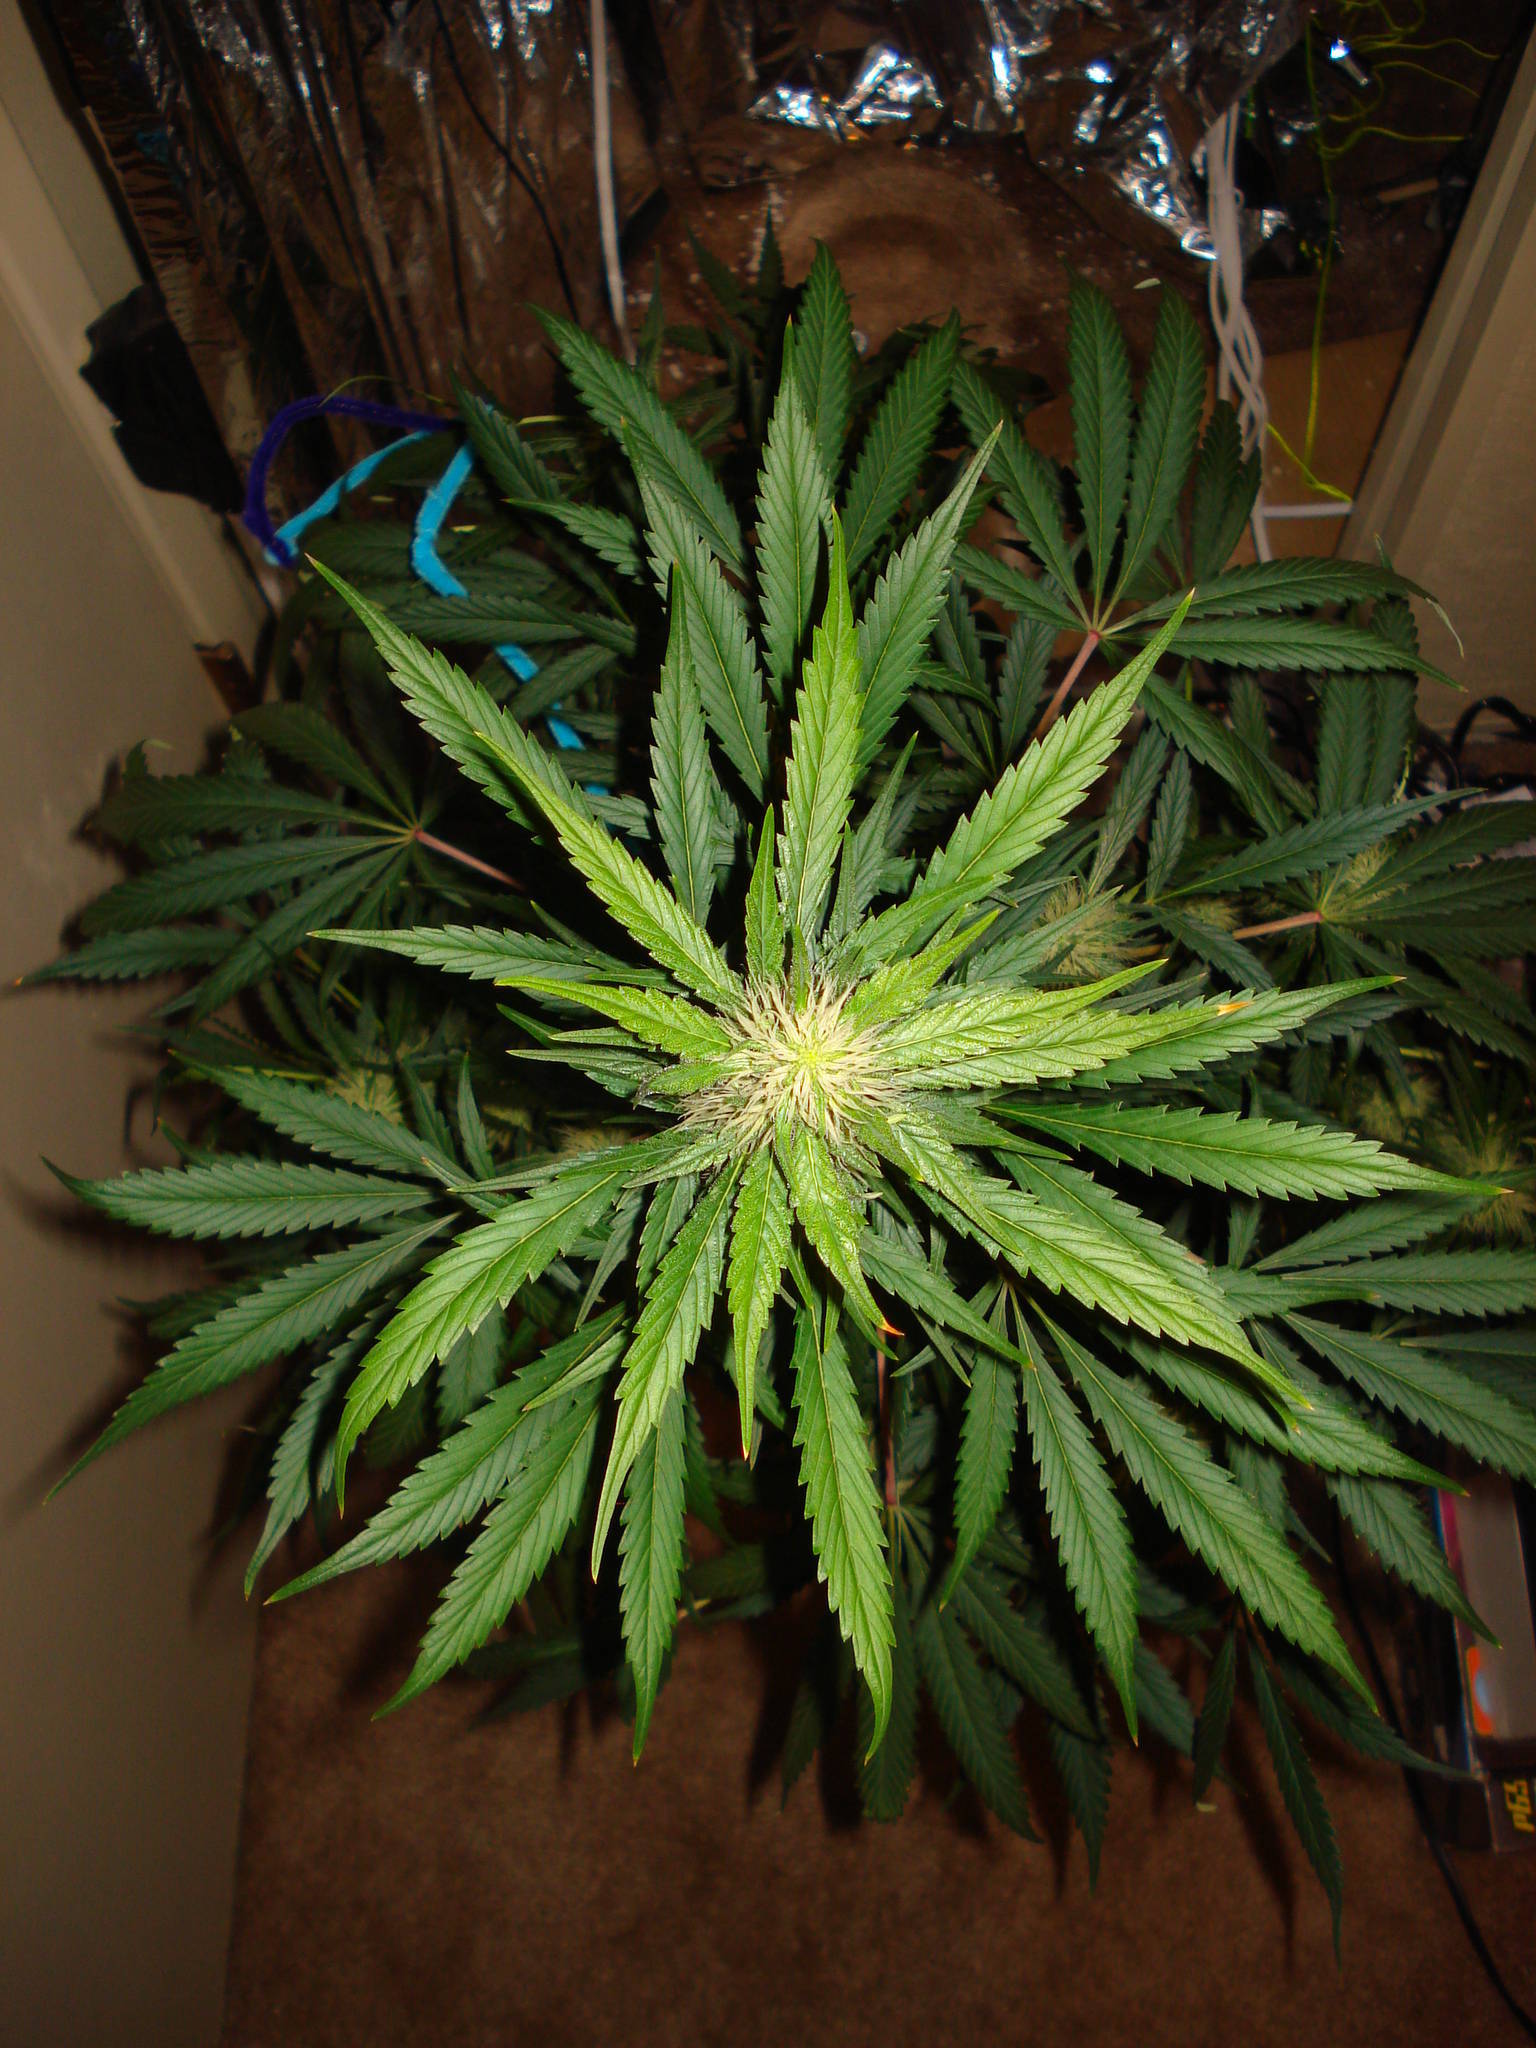
^Photo 3: Main Cola (is that the name) is looking lovely. Lots of white hairs everywhere. Fan leaves are looking healthy too. Only bad thing is the top got kinda burnt because of the super-fast vertical growth. But it was minor damage.
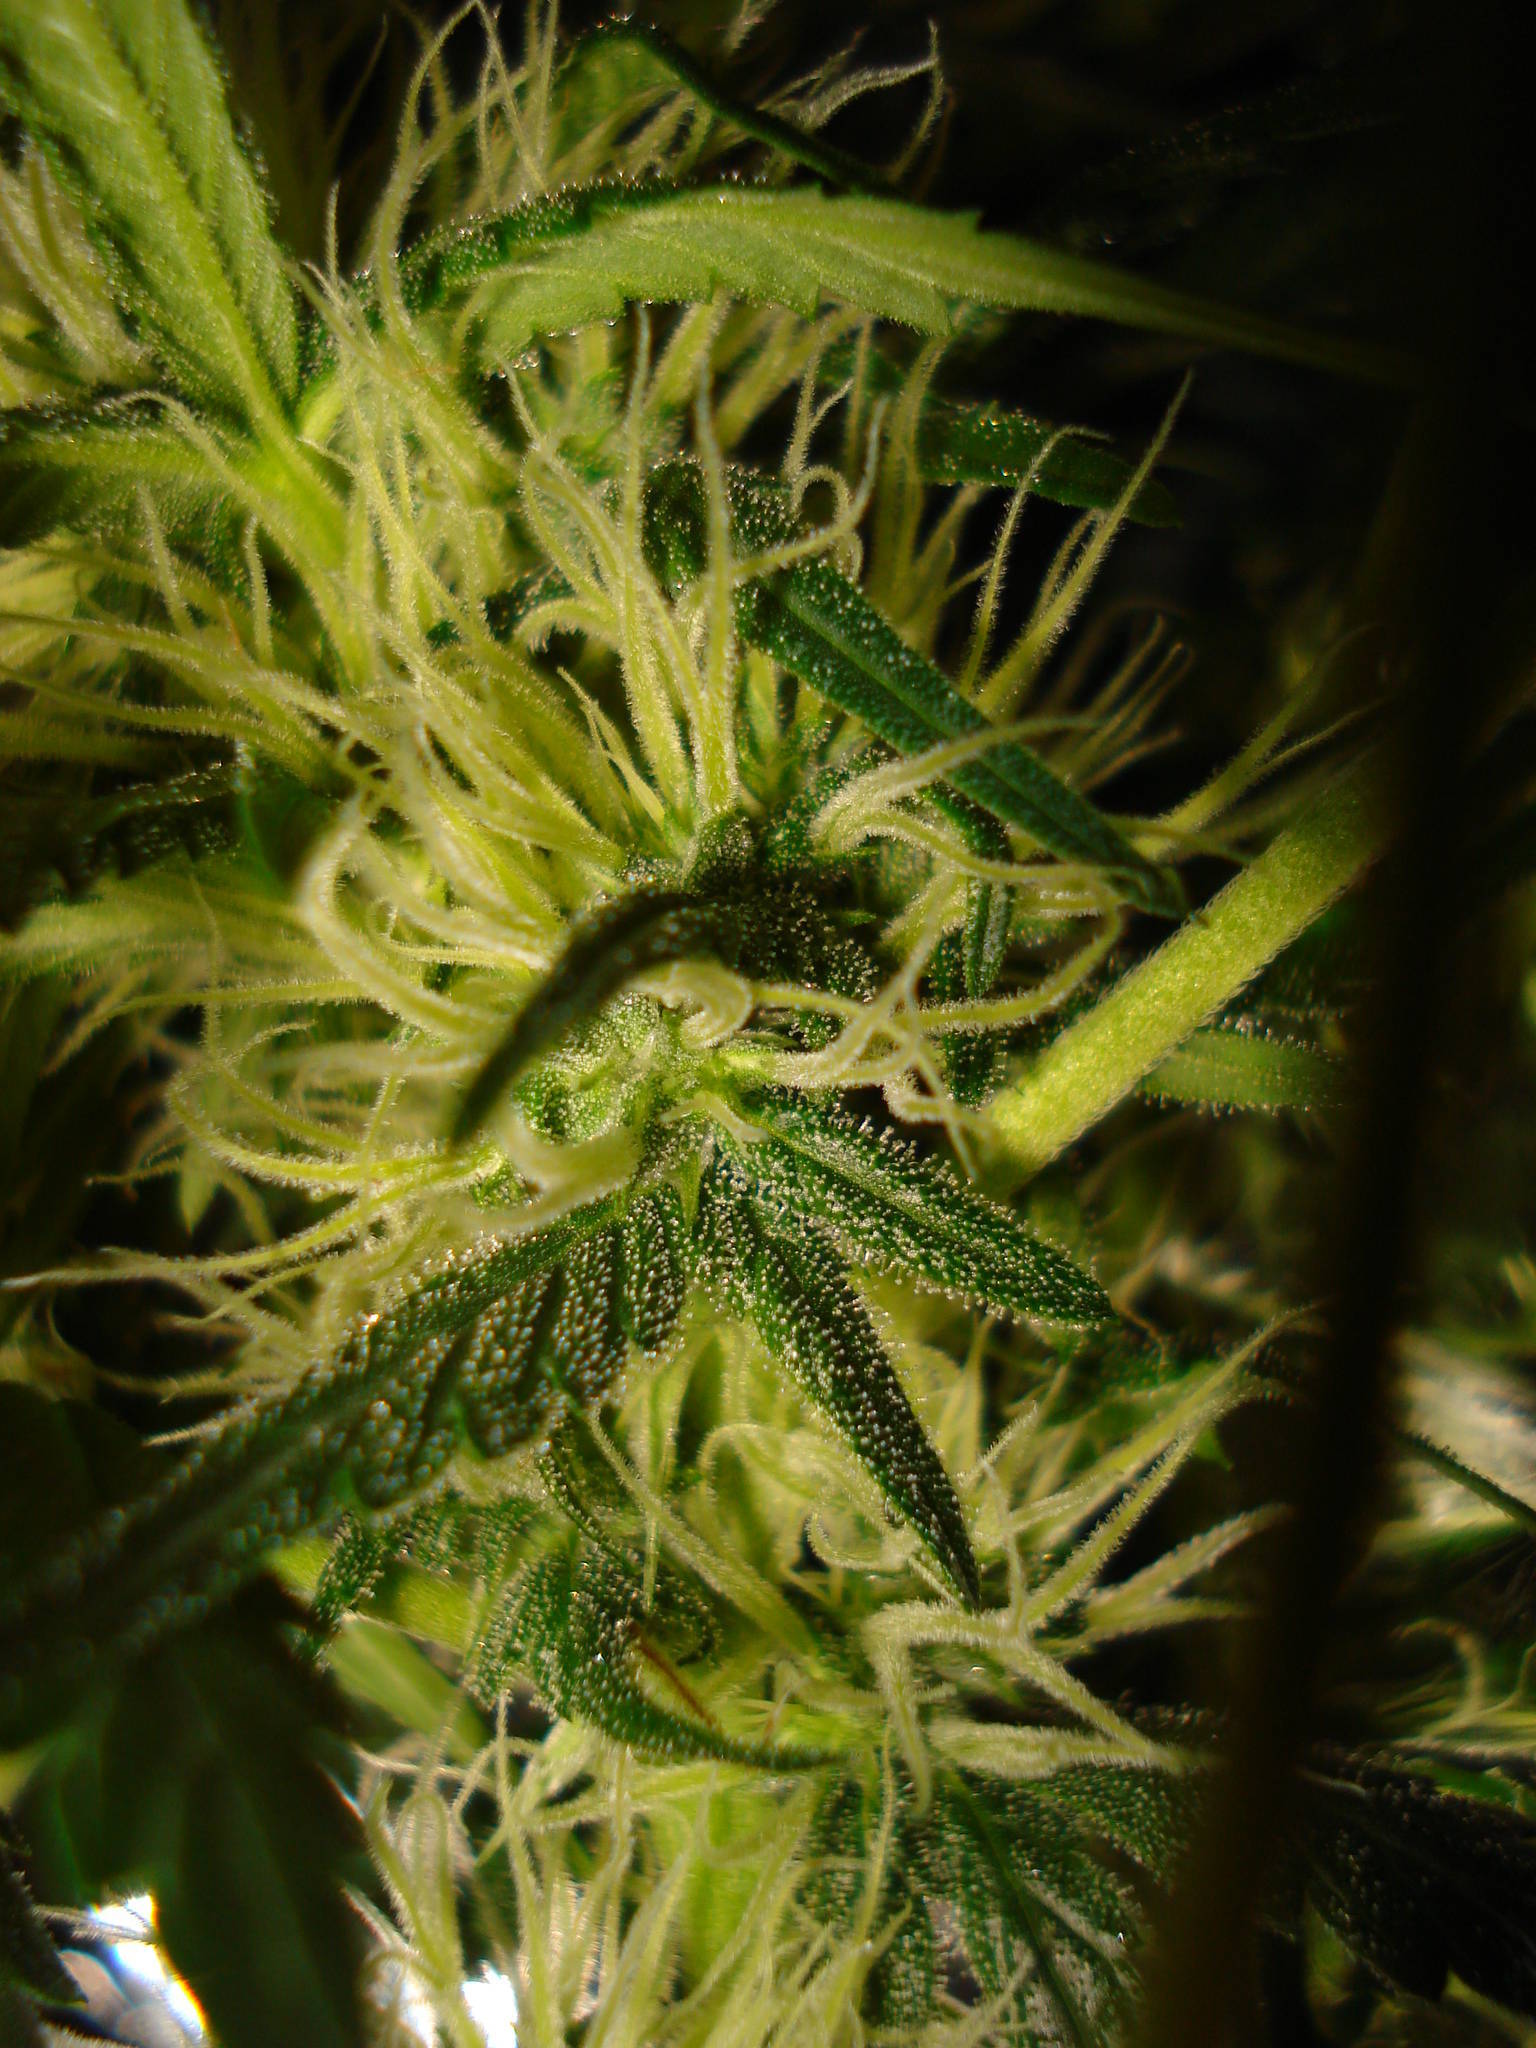
^Photo 4: One of the mid-height budz. Only young bud with these dark tips. All the rest are white. Not sure why.
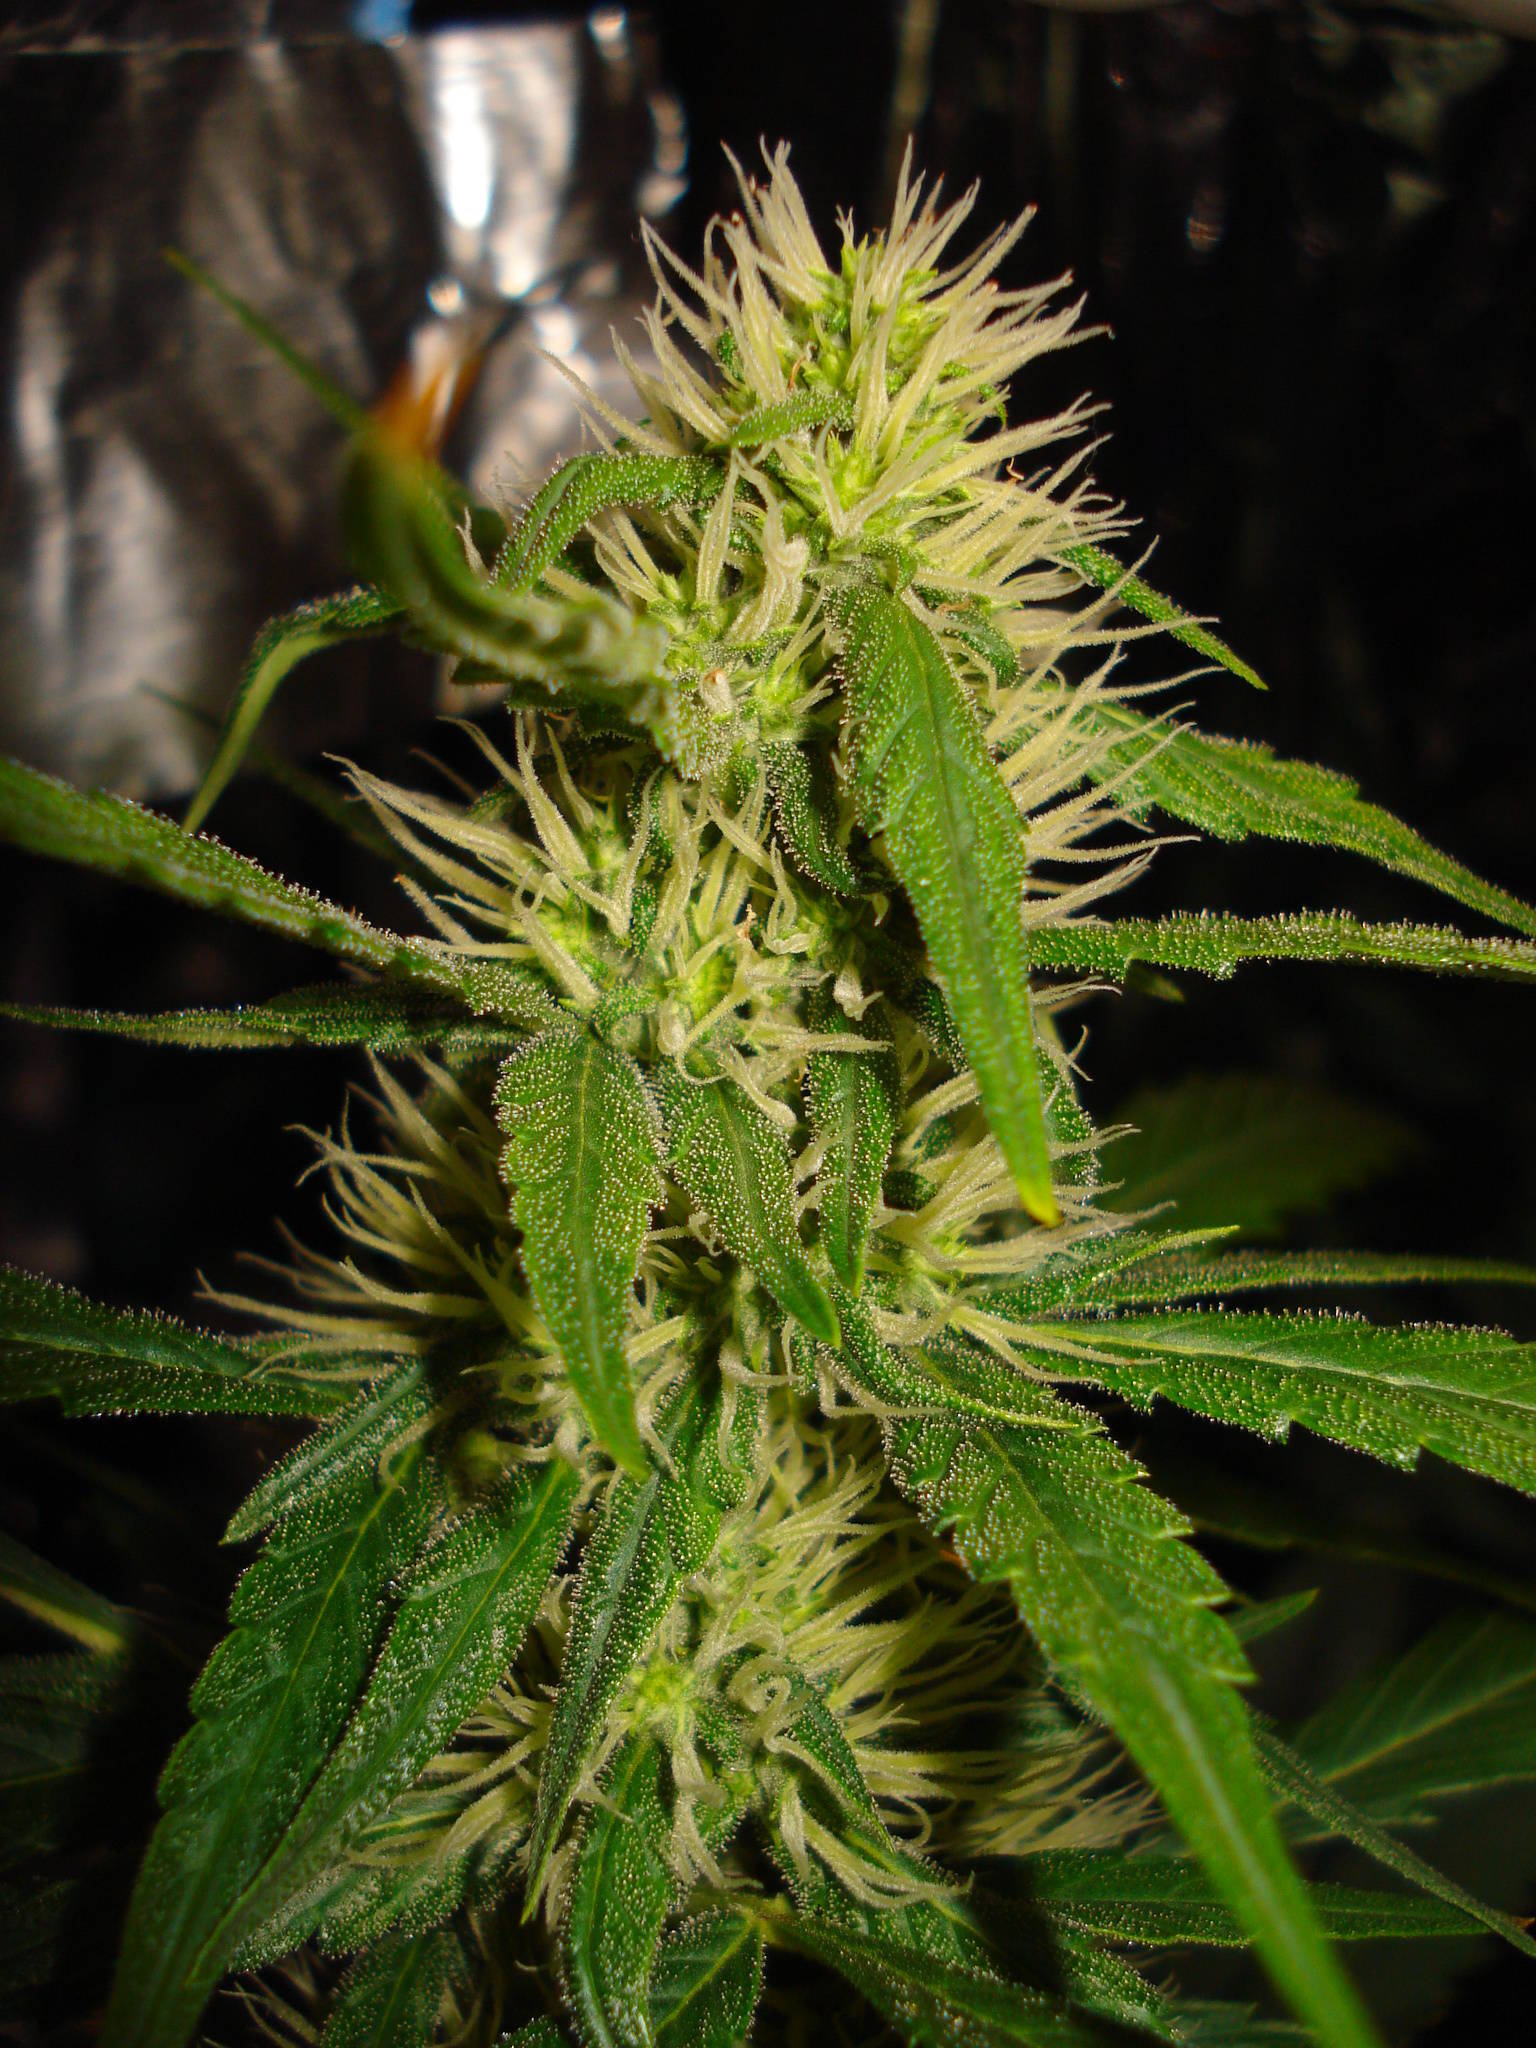
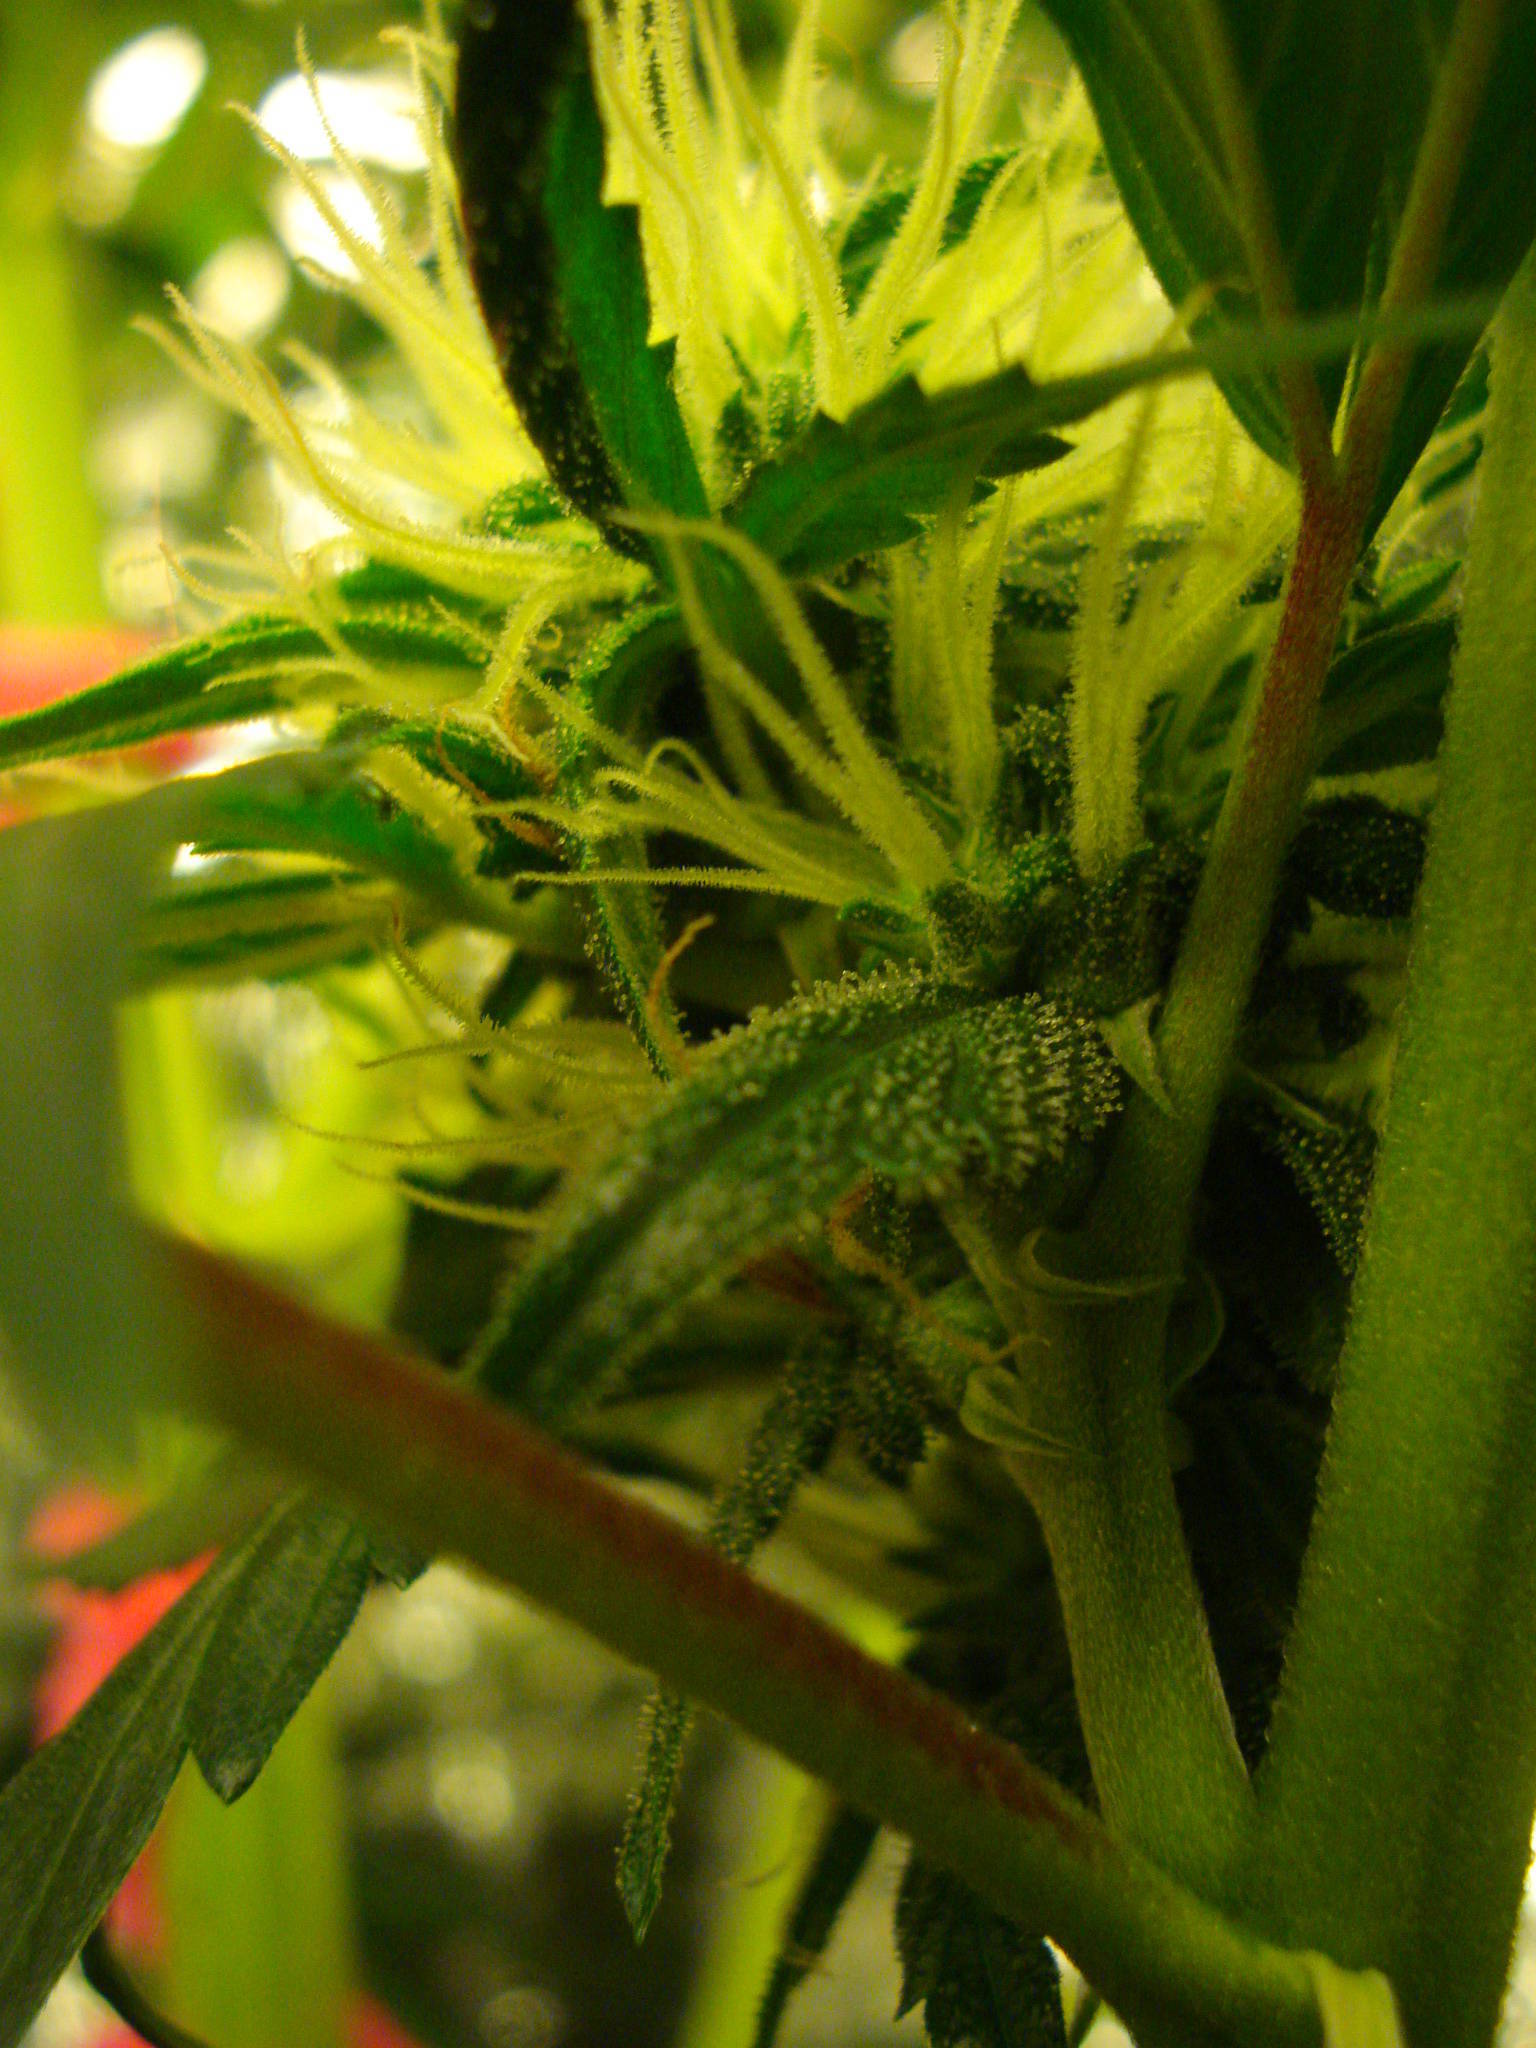
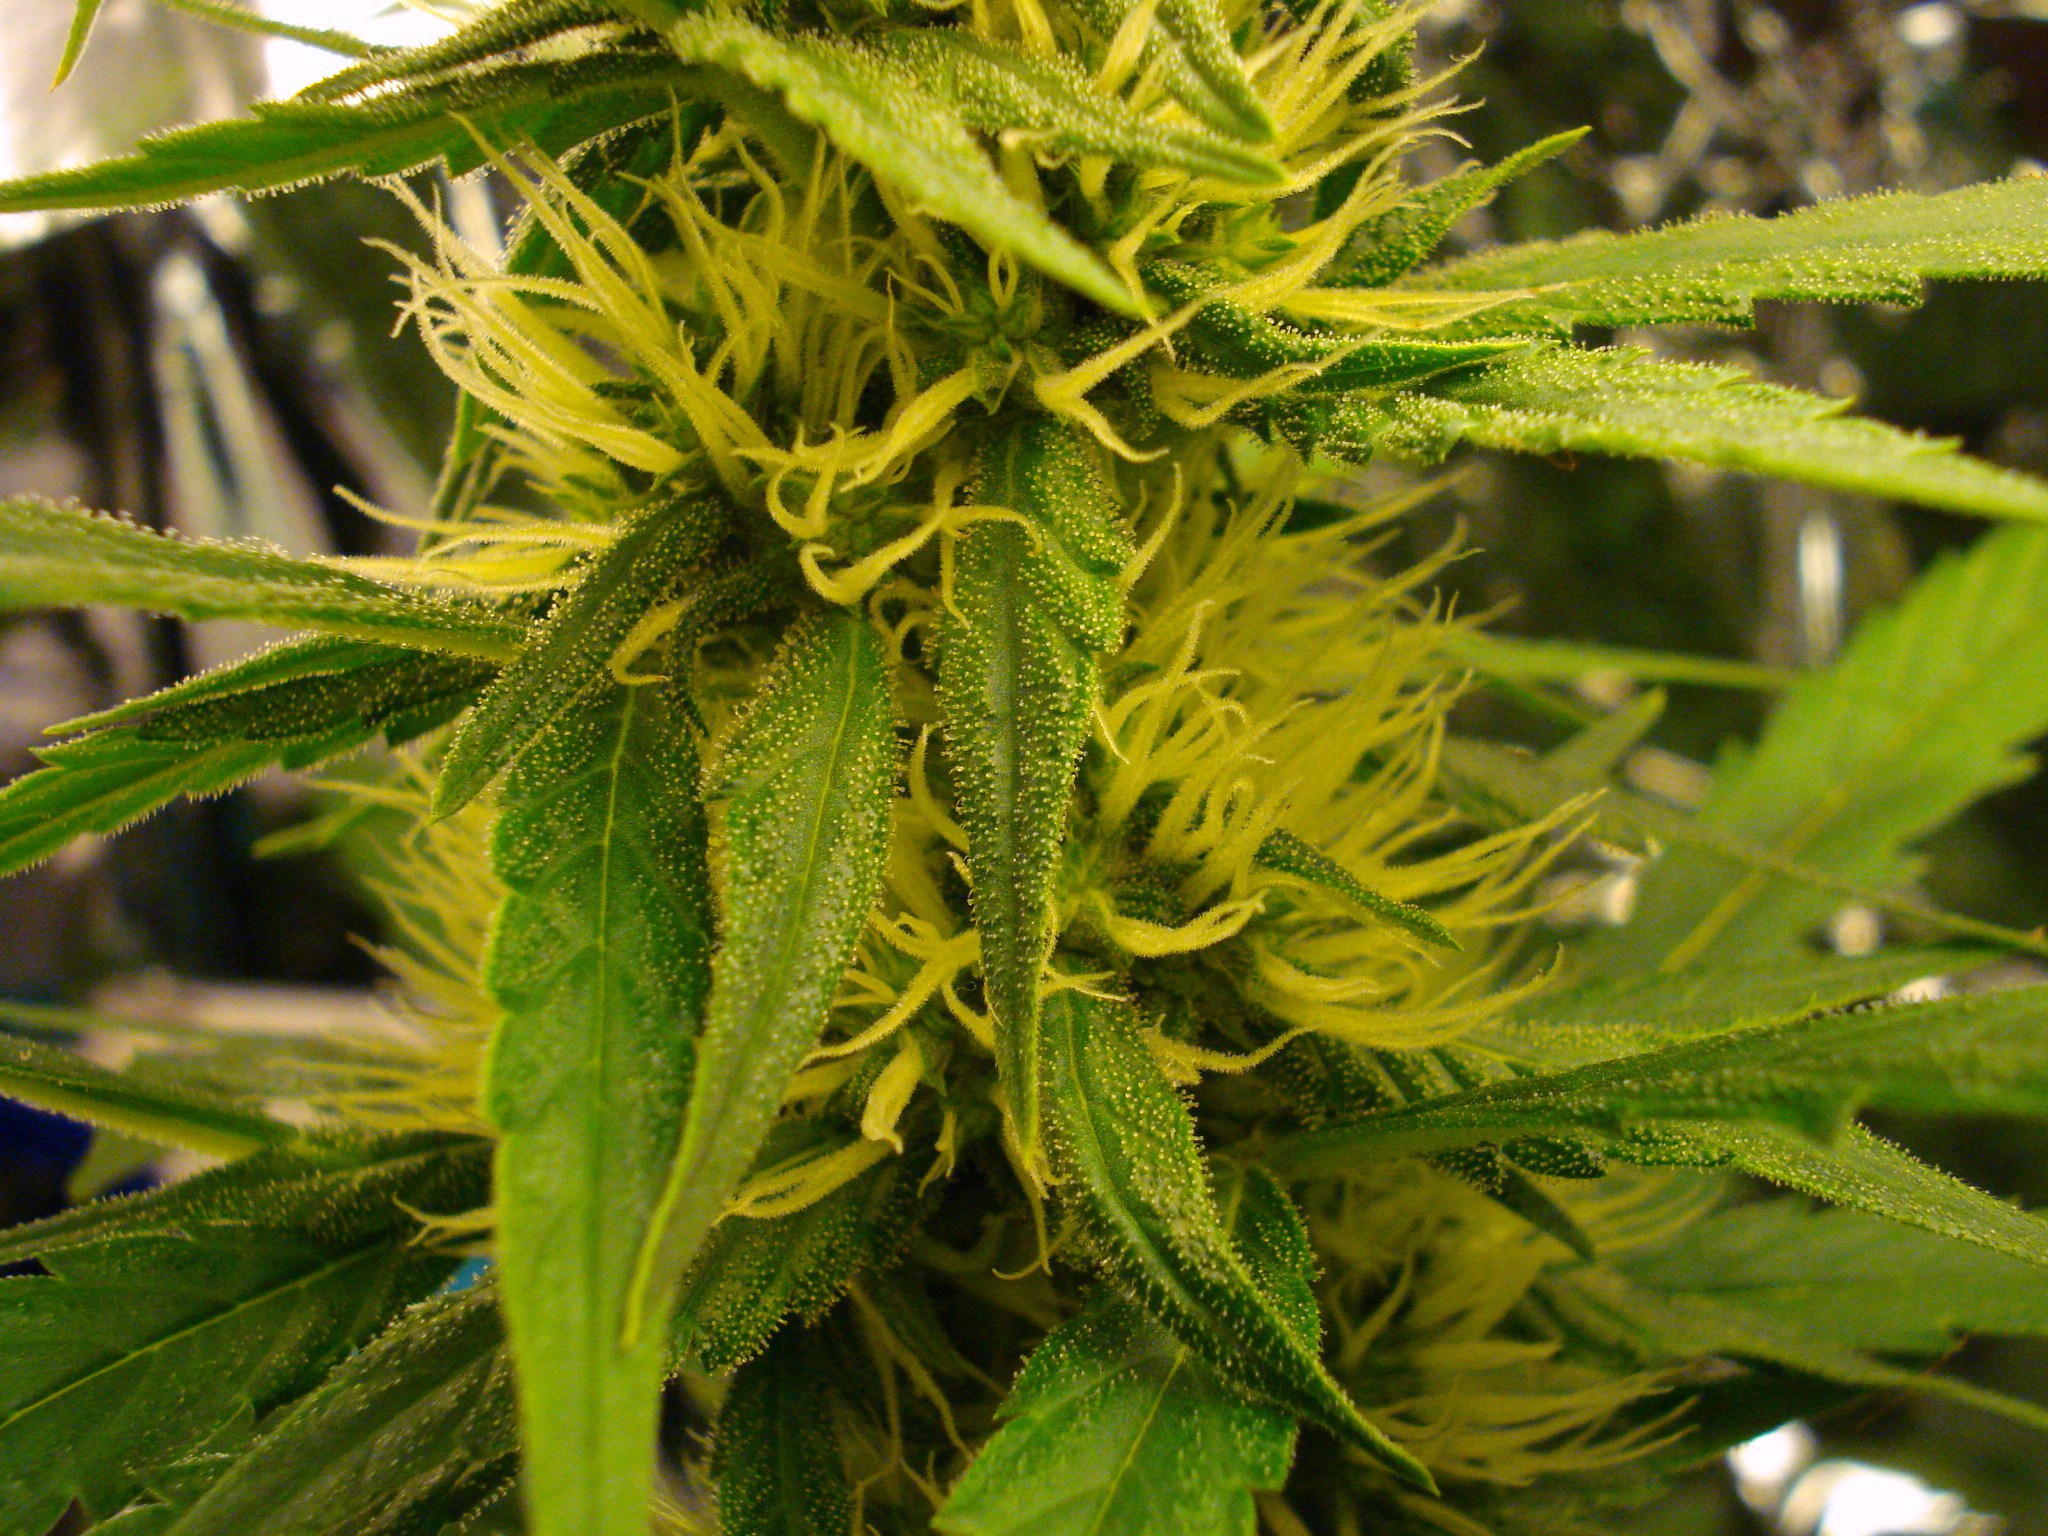
^Photo 5: Finally seeing some obvious trichome "crystal" formation. I hope it gets real frosty later: Looks tasty already...
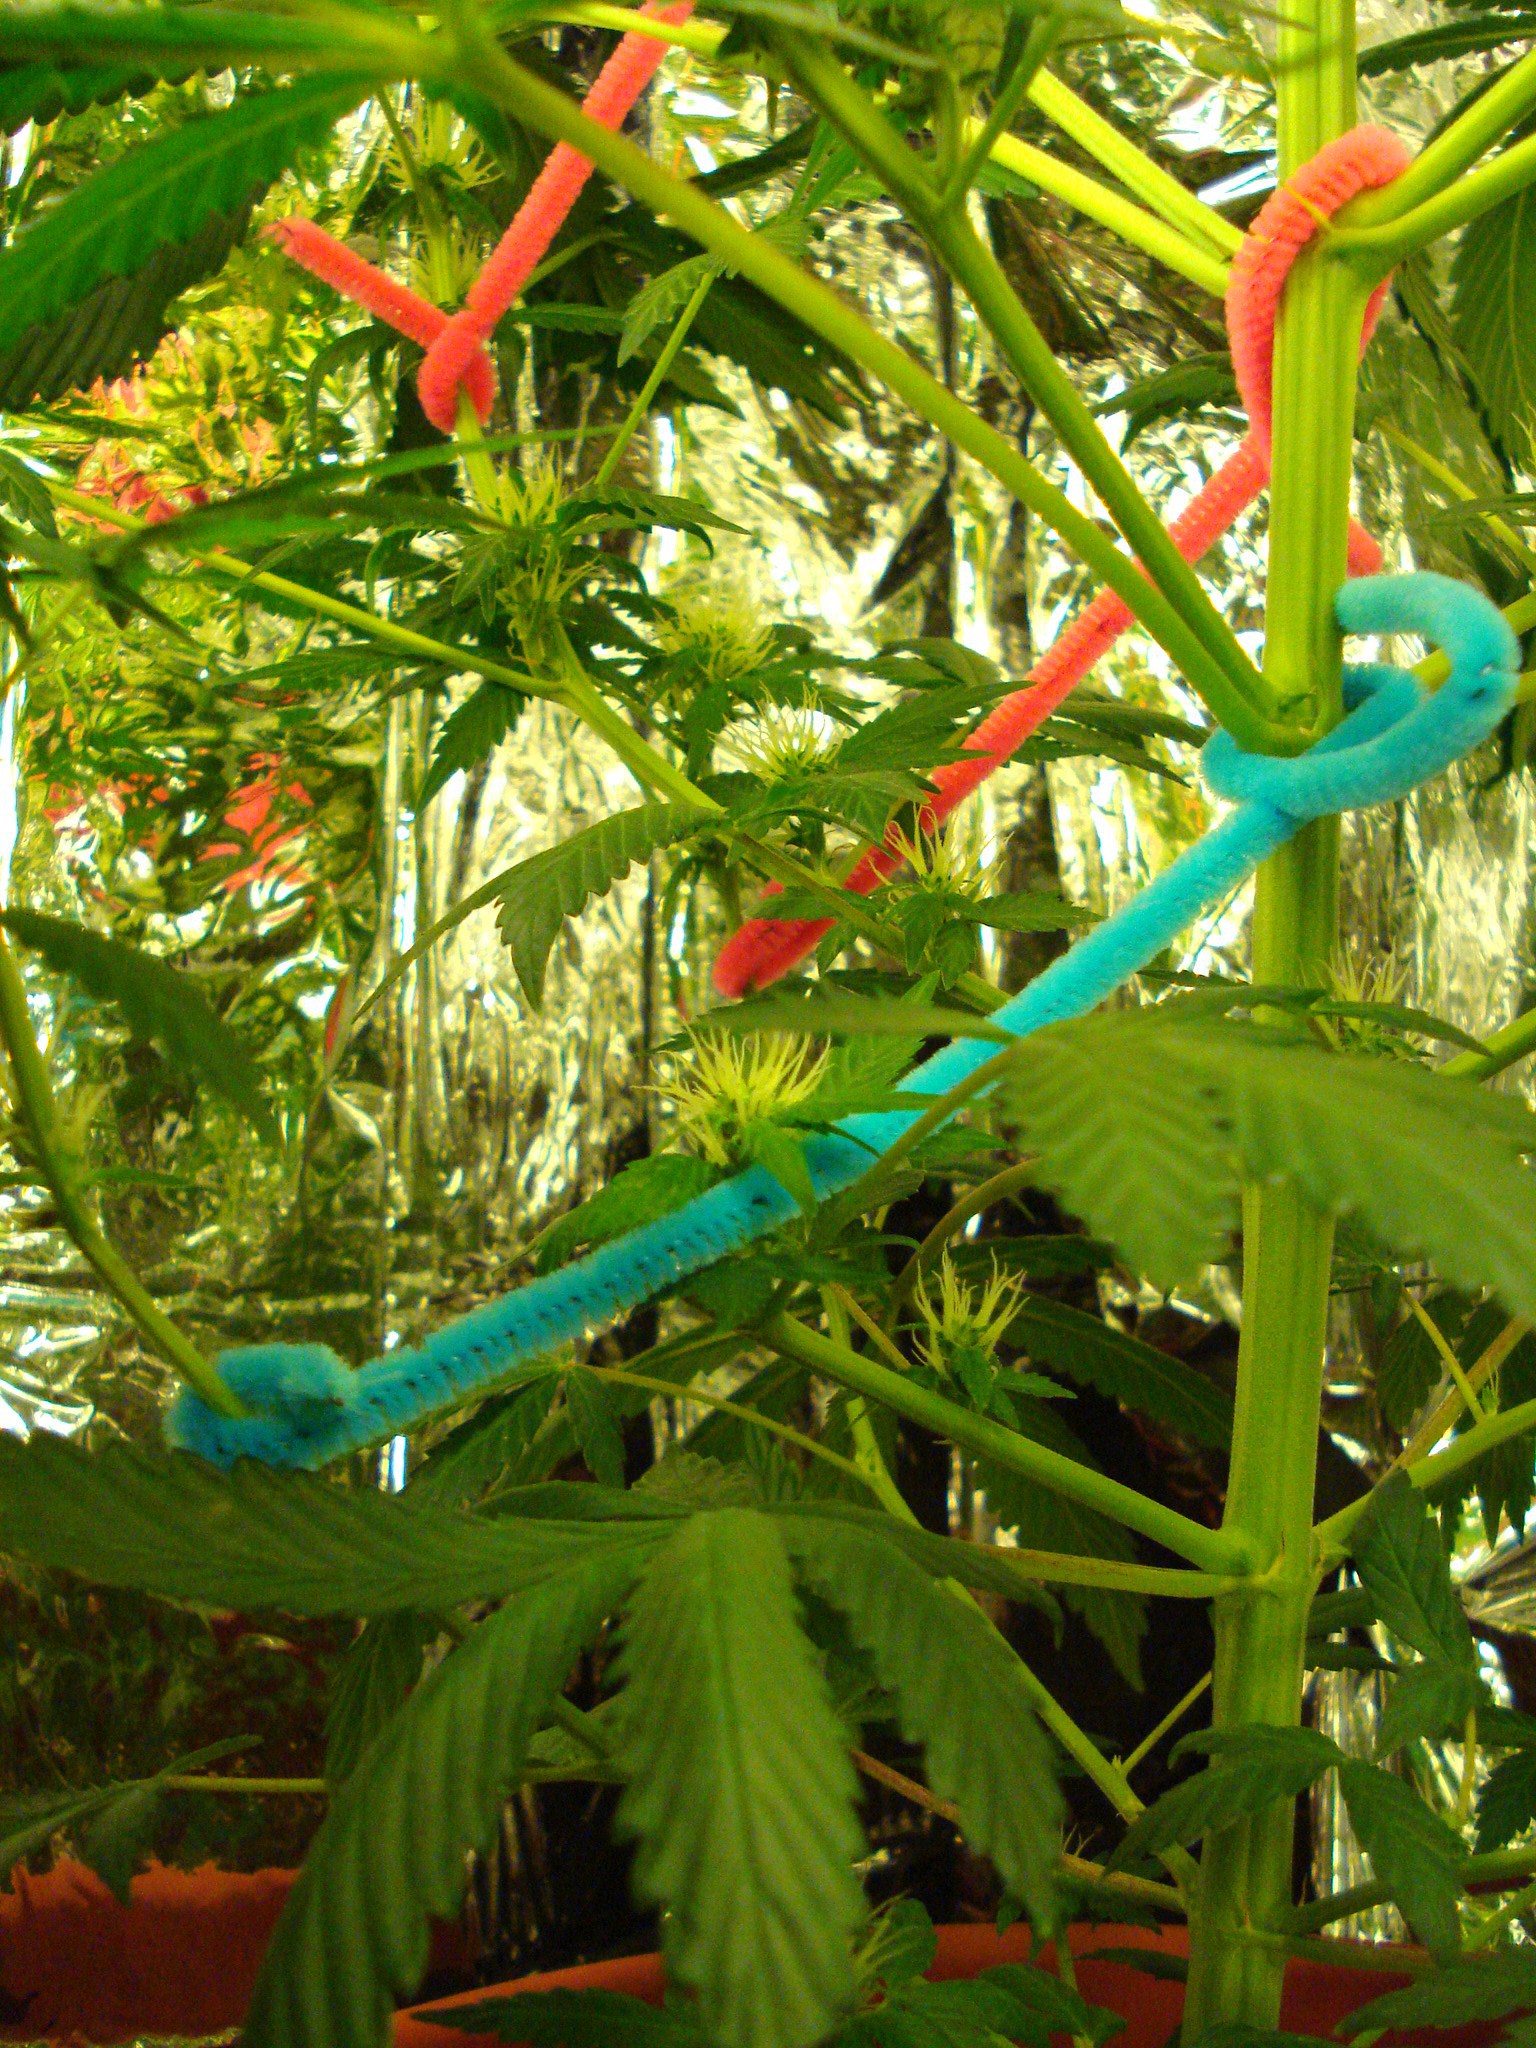
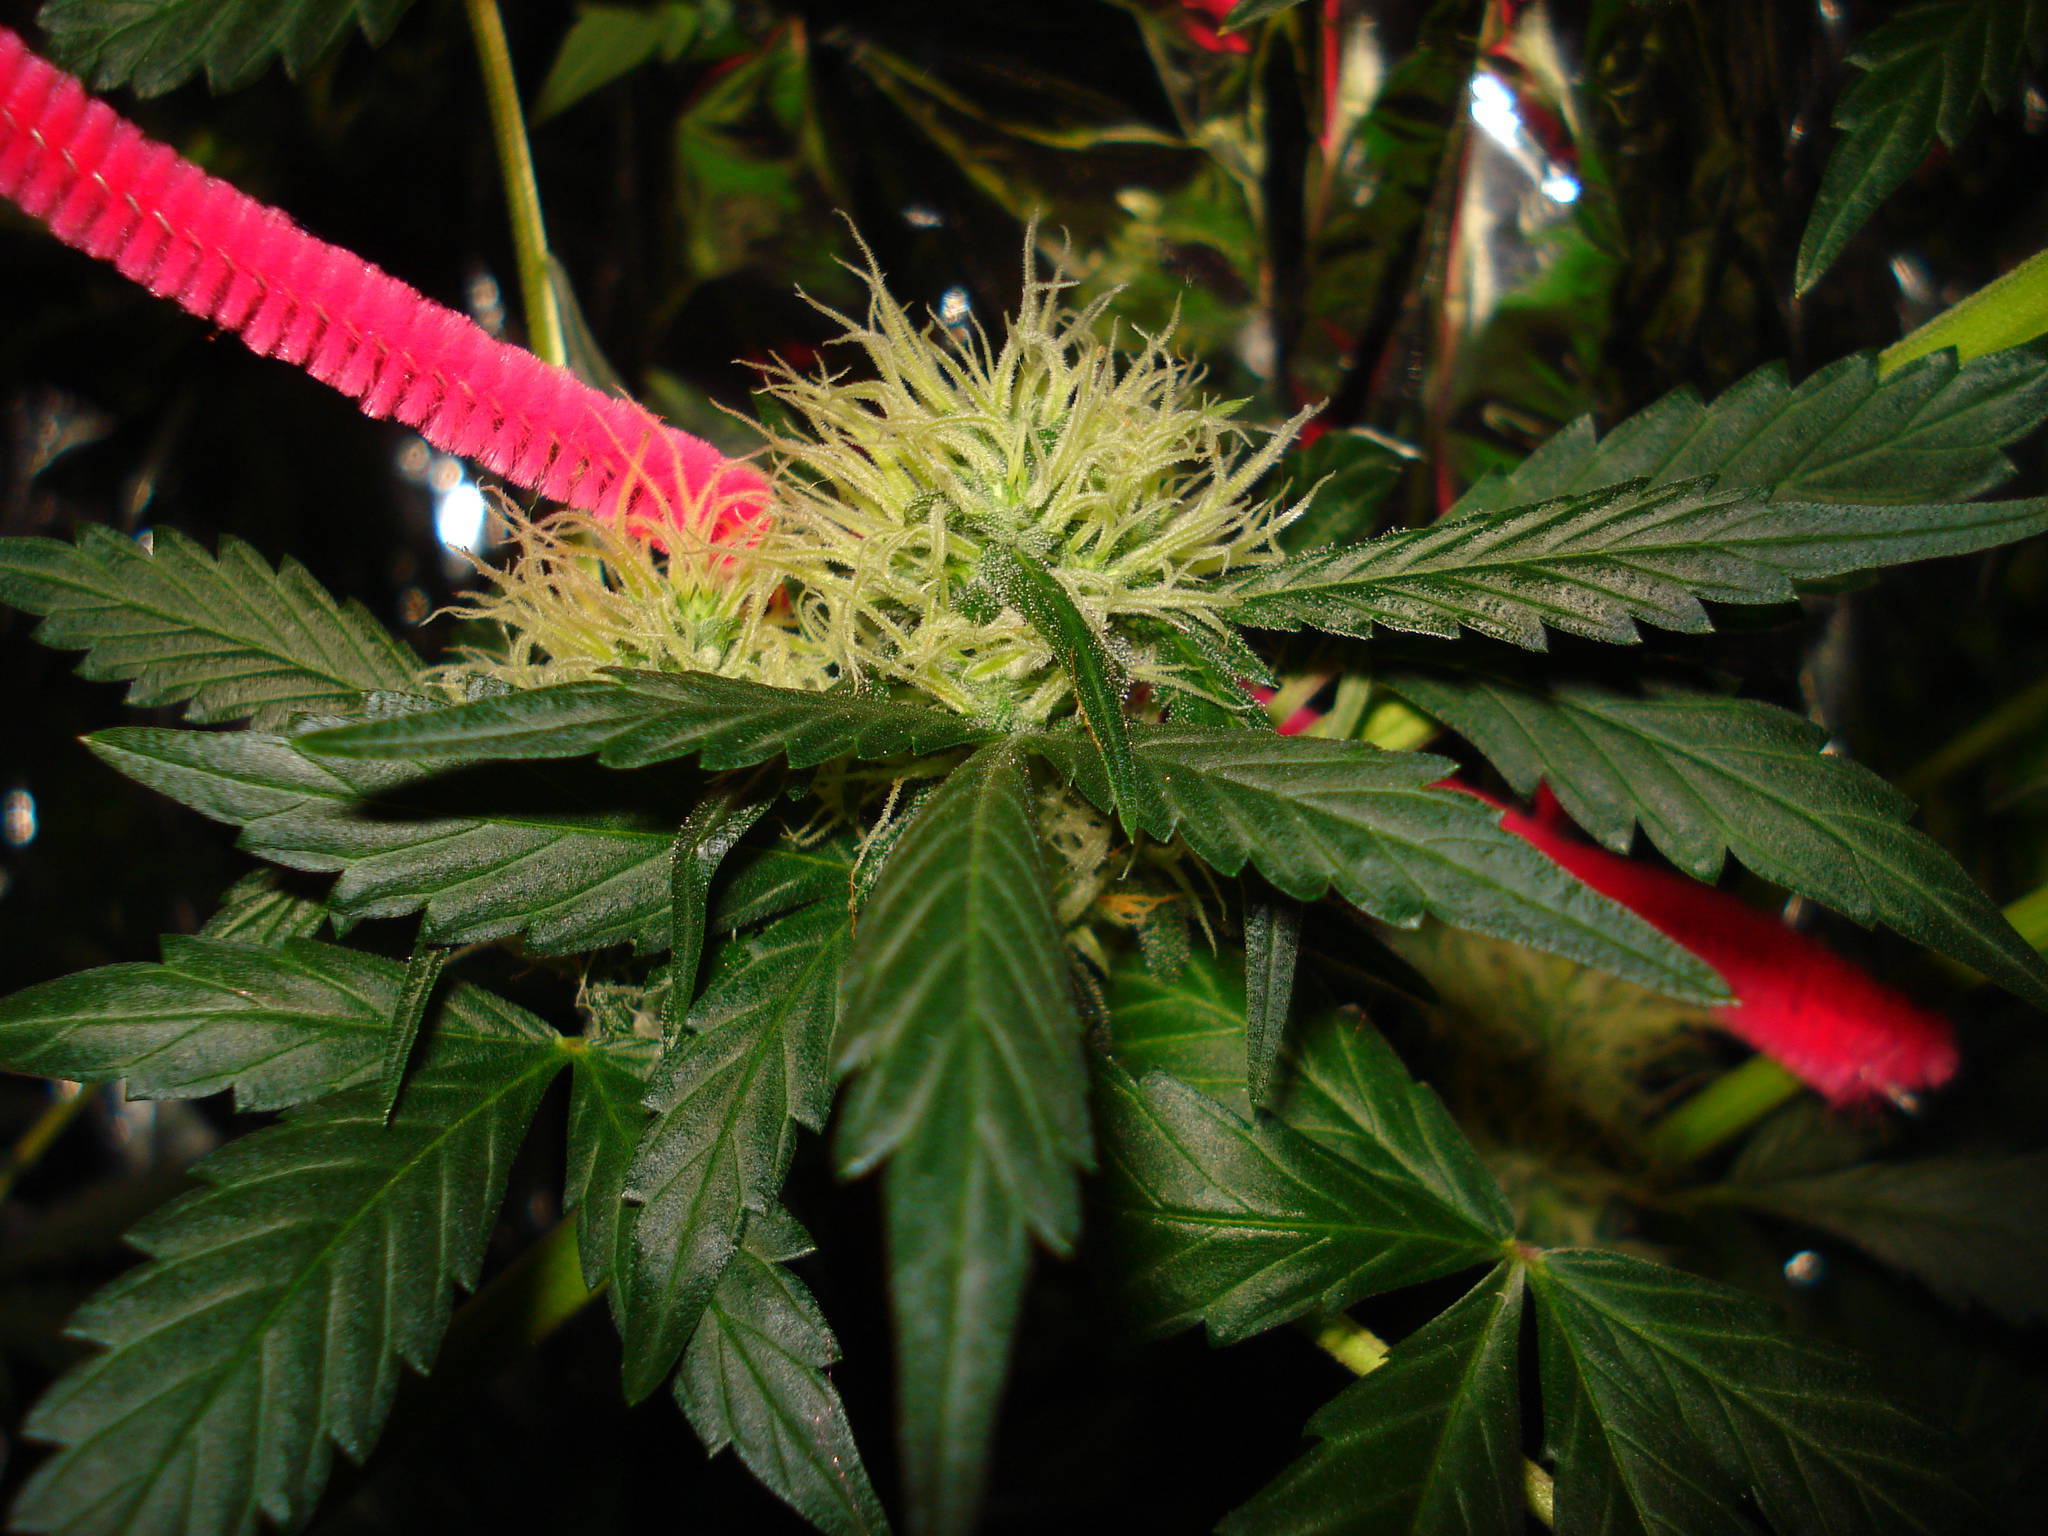
^Photo 6: I've also been doing some minor Low-Stress Training to just the lower budz (for 4-20 holiday), using some colorful pipe cleaners. They were going outside the lamp range, so I adjusted them closer to the lights. Its pretty fun, I have to say. I might add some more later....
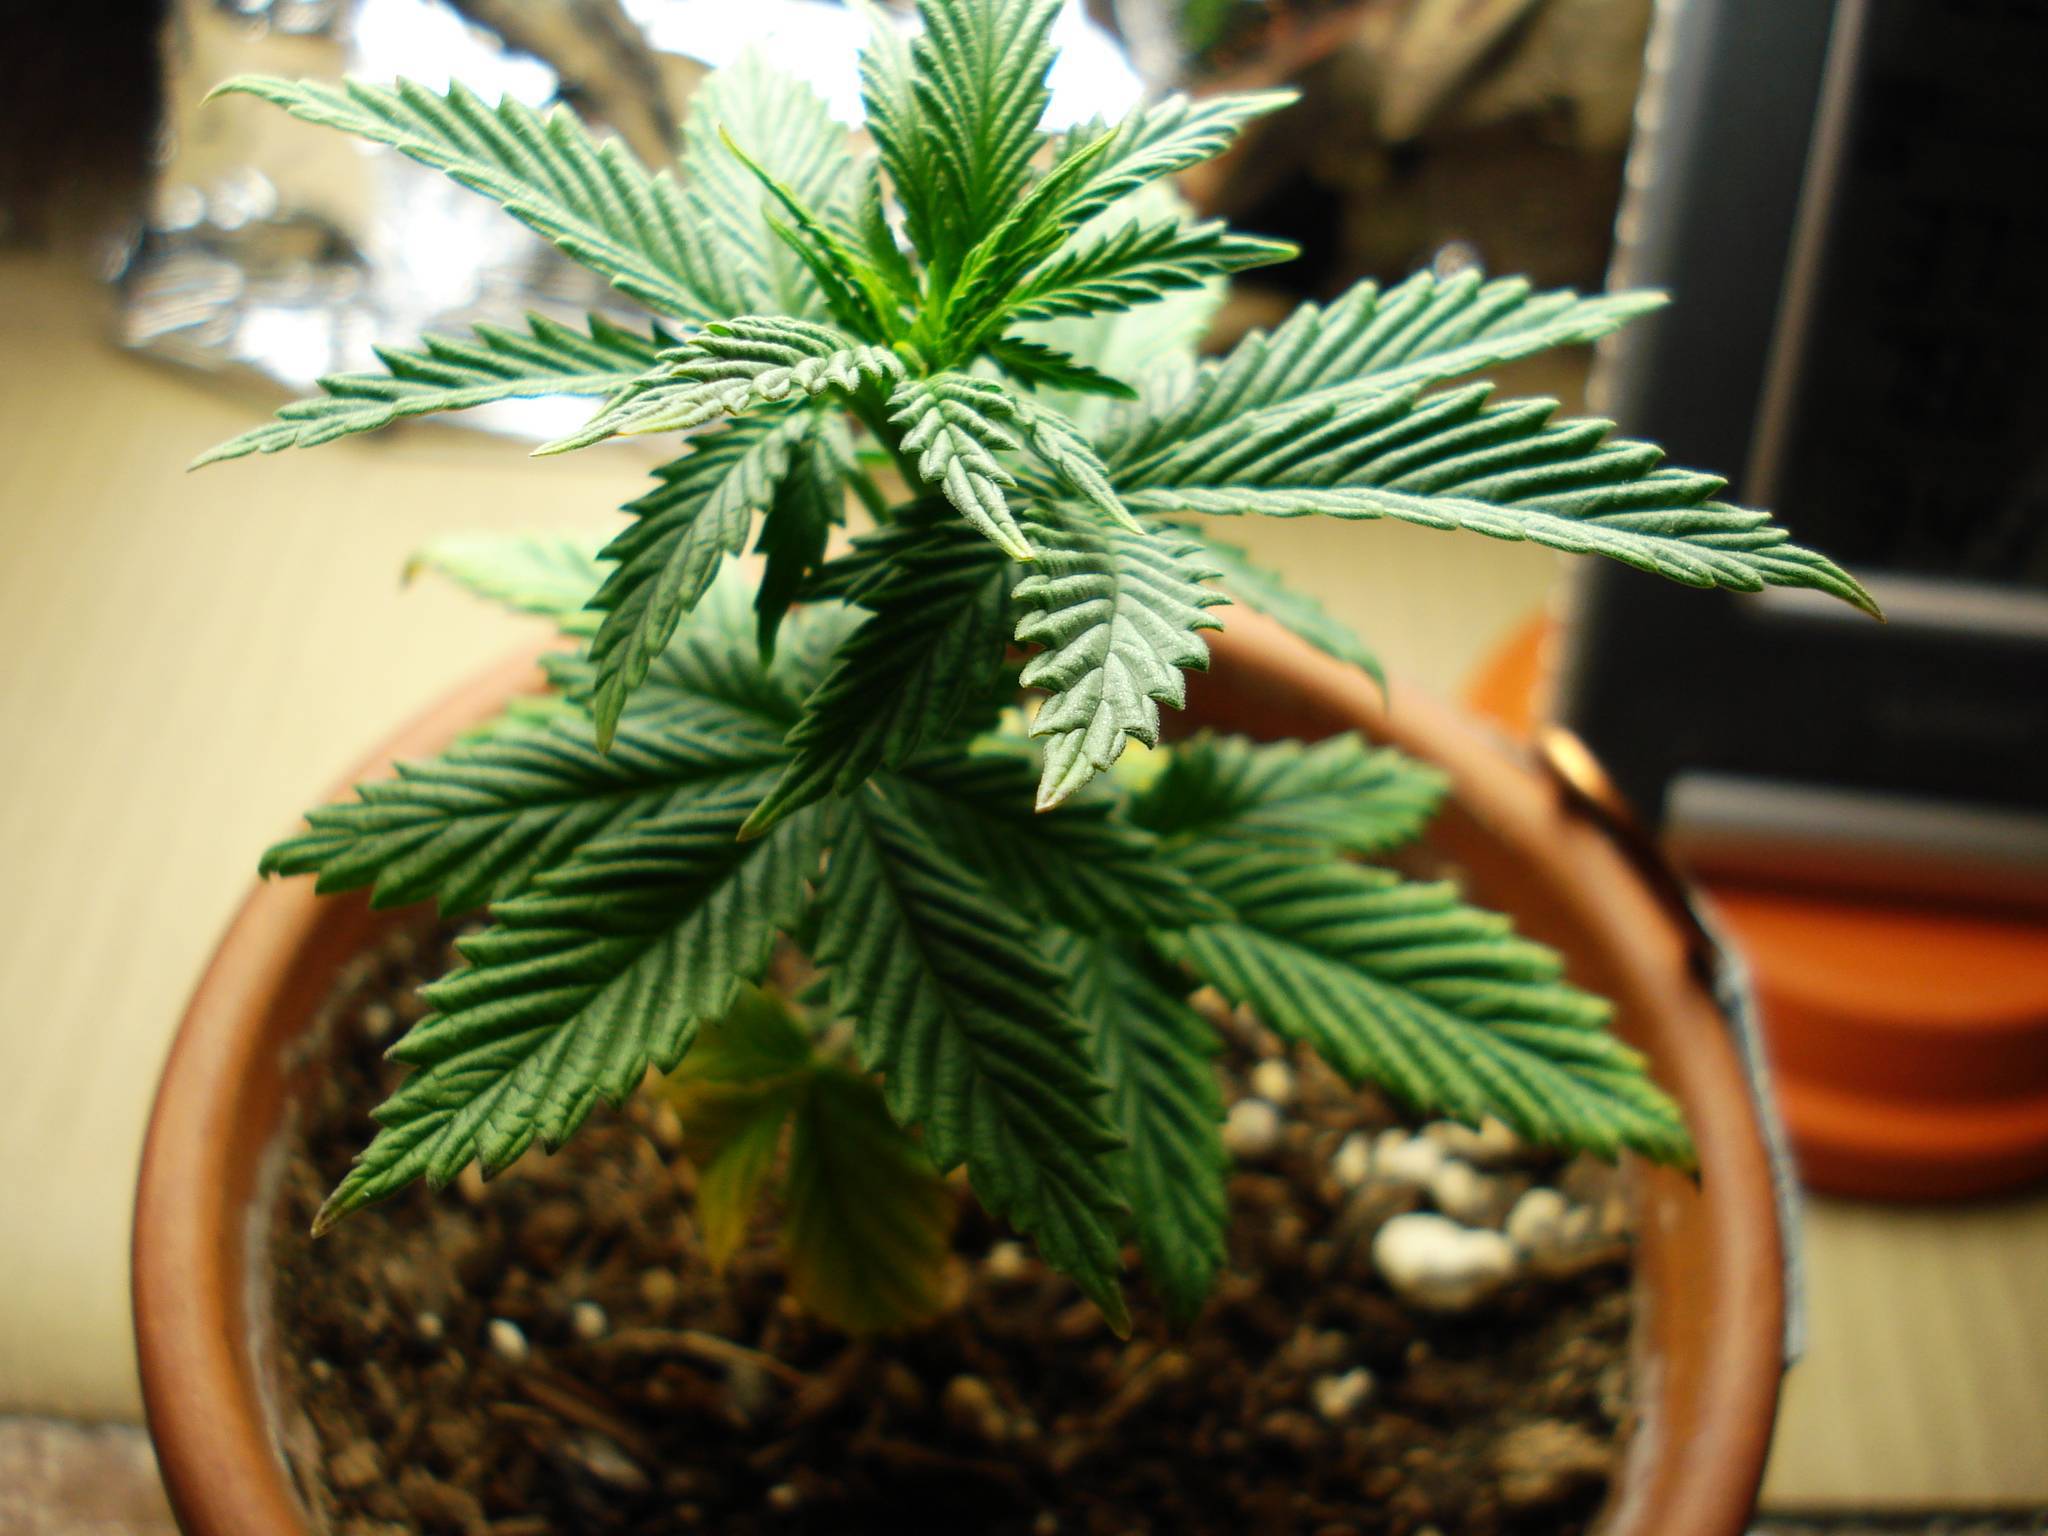
Day 81 (Day 36 of Flower): April 26, 2010
         
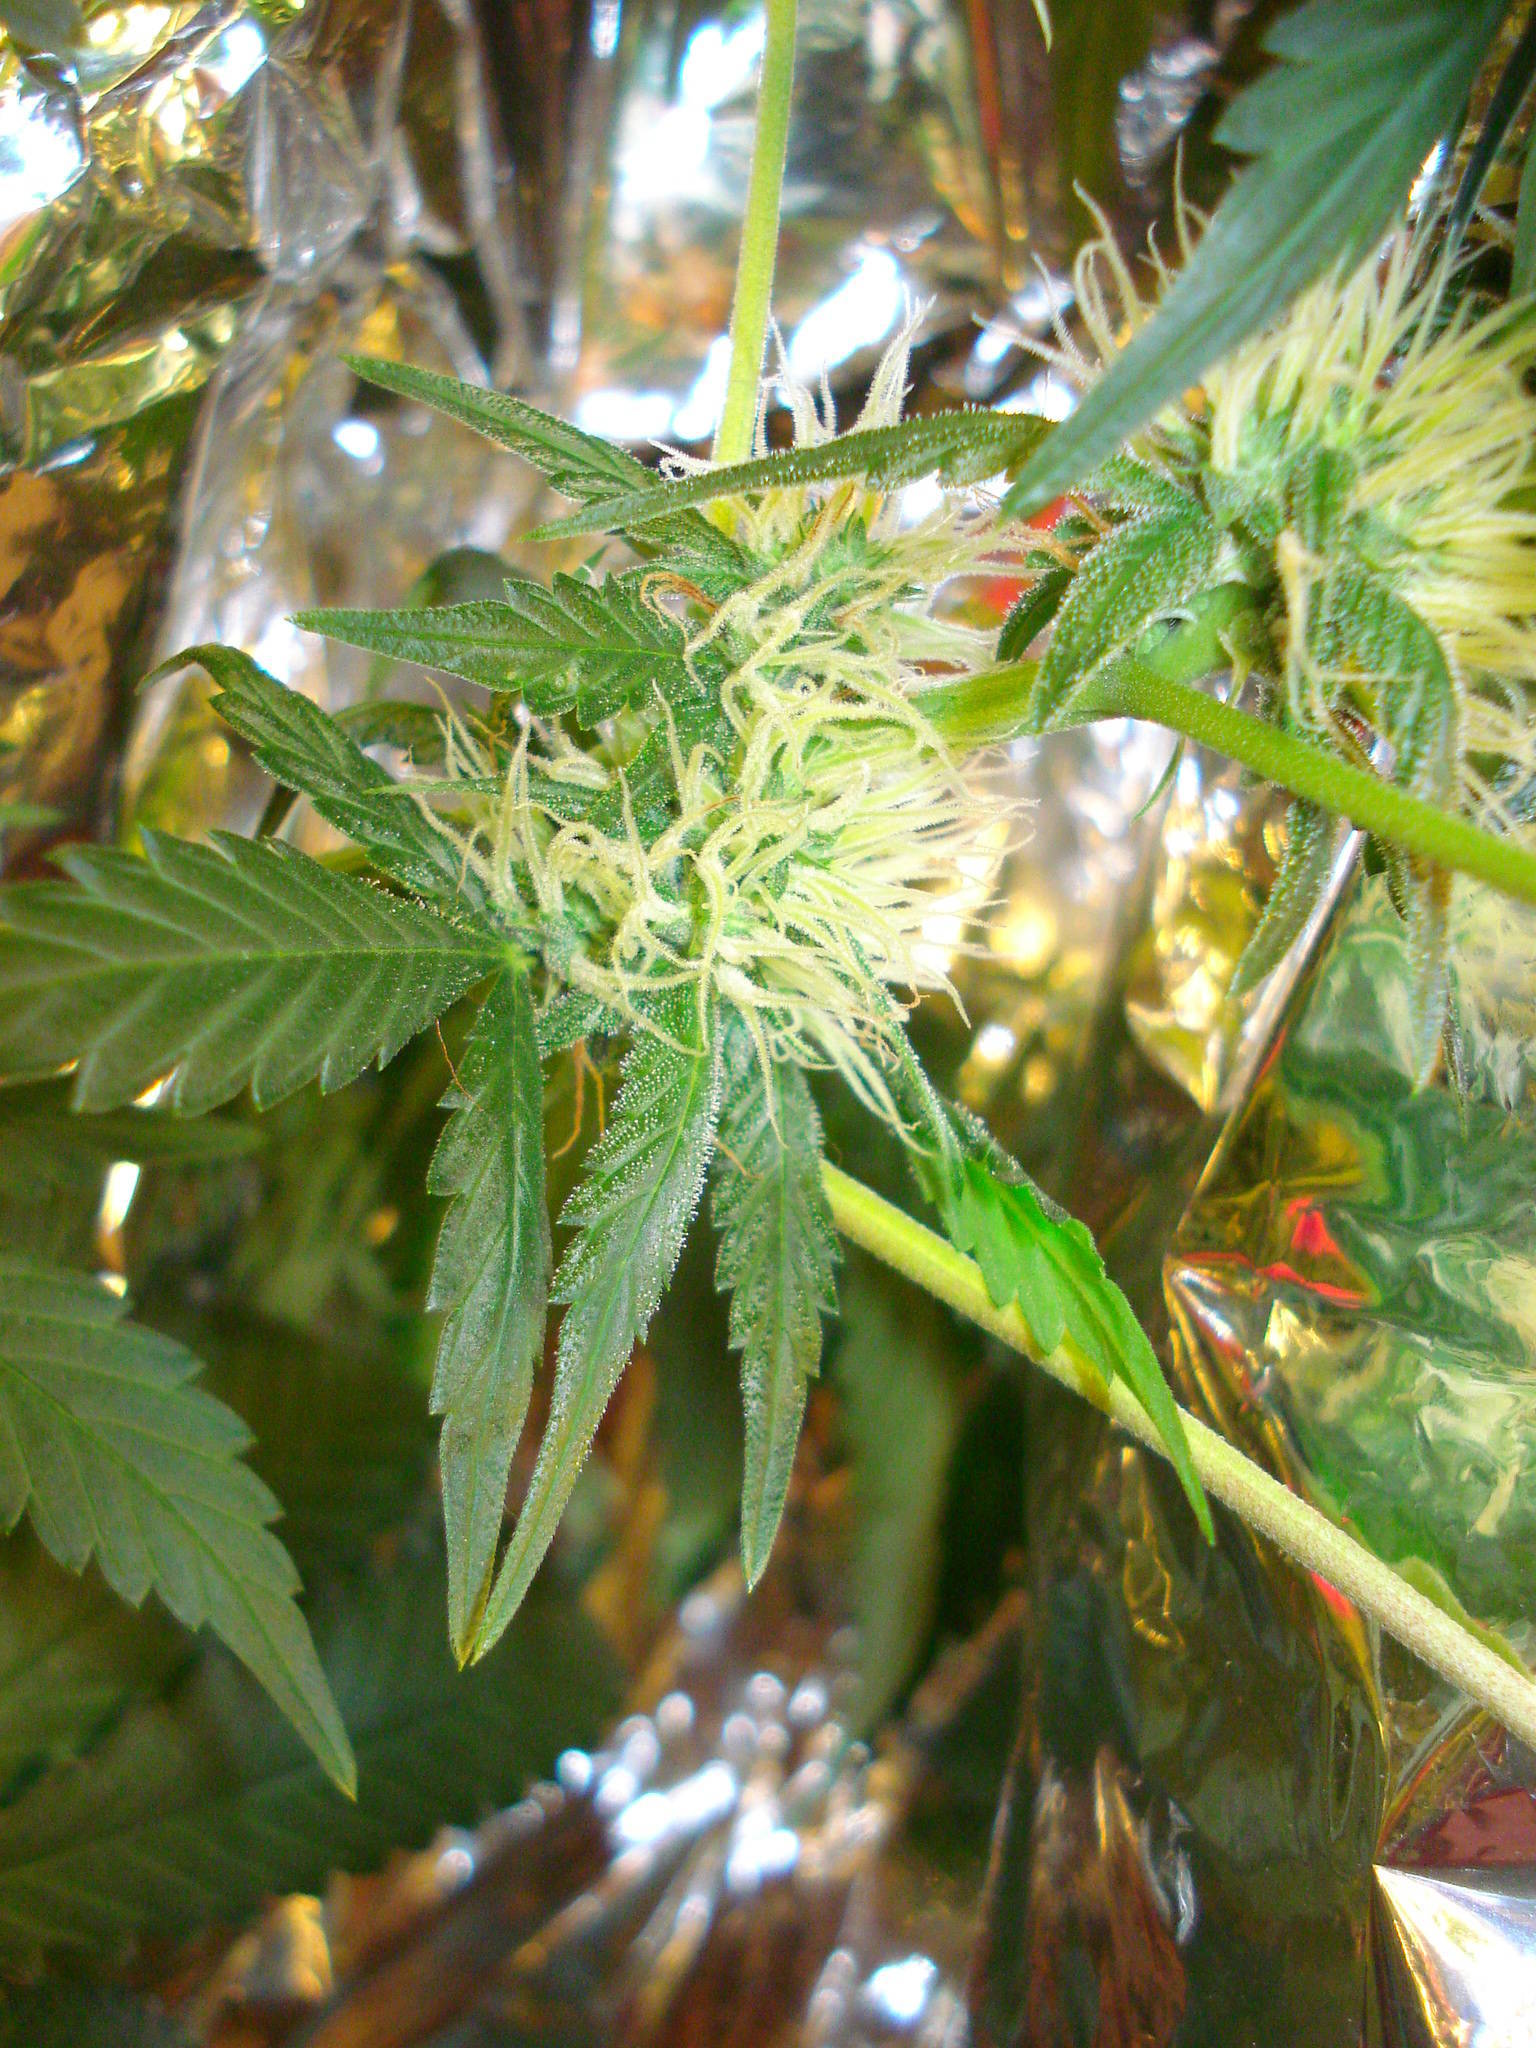
^What I've noticed with the frosting-effect on the budz is that its directly proportional to the amount of local light there is. So, the top budz are the dankinest now, and the bottom ones are barely showing any frost....
The scent: I've noticed up-close I can smell her really easily. It has a peppery, sweet and sour smell. Nothing like the guava smell I inhaled back in the vegging days...
Day: Unmentionable
And then the worst that could happen happens...In the Beginning of May, I accidentally kill my plant from a very stupid mistake...
And that was the end of her, killed prematurely due to today's so-called "free-country". It won't be free until the Mary Jane is let free....
Worst possible ending for a first-time grower...
But I have learned the Truth.......
~_~_~_~_~__~_~_~_~_~_~__~_~_~_~__~_~_~__~_~_~_~__~_~_~_~_~_~_~__~_~_~_~_~__~_~_~_~_~_~_~__~_~_~_~_~_~__~~_~_~__~____~_~_~_~__~_~_~_~
(Whew! That was a lot! For now. This is really time-consuming! How do other growers do this so easily? Well, now the original, old, super-messy post....)
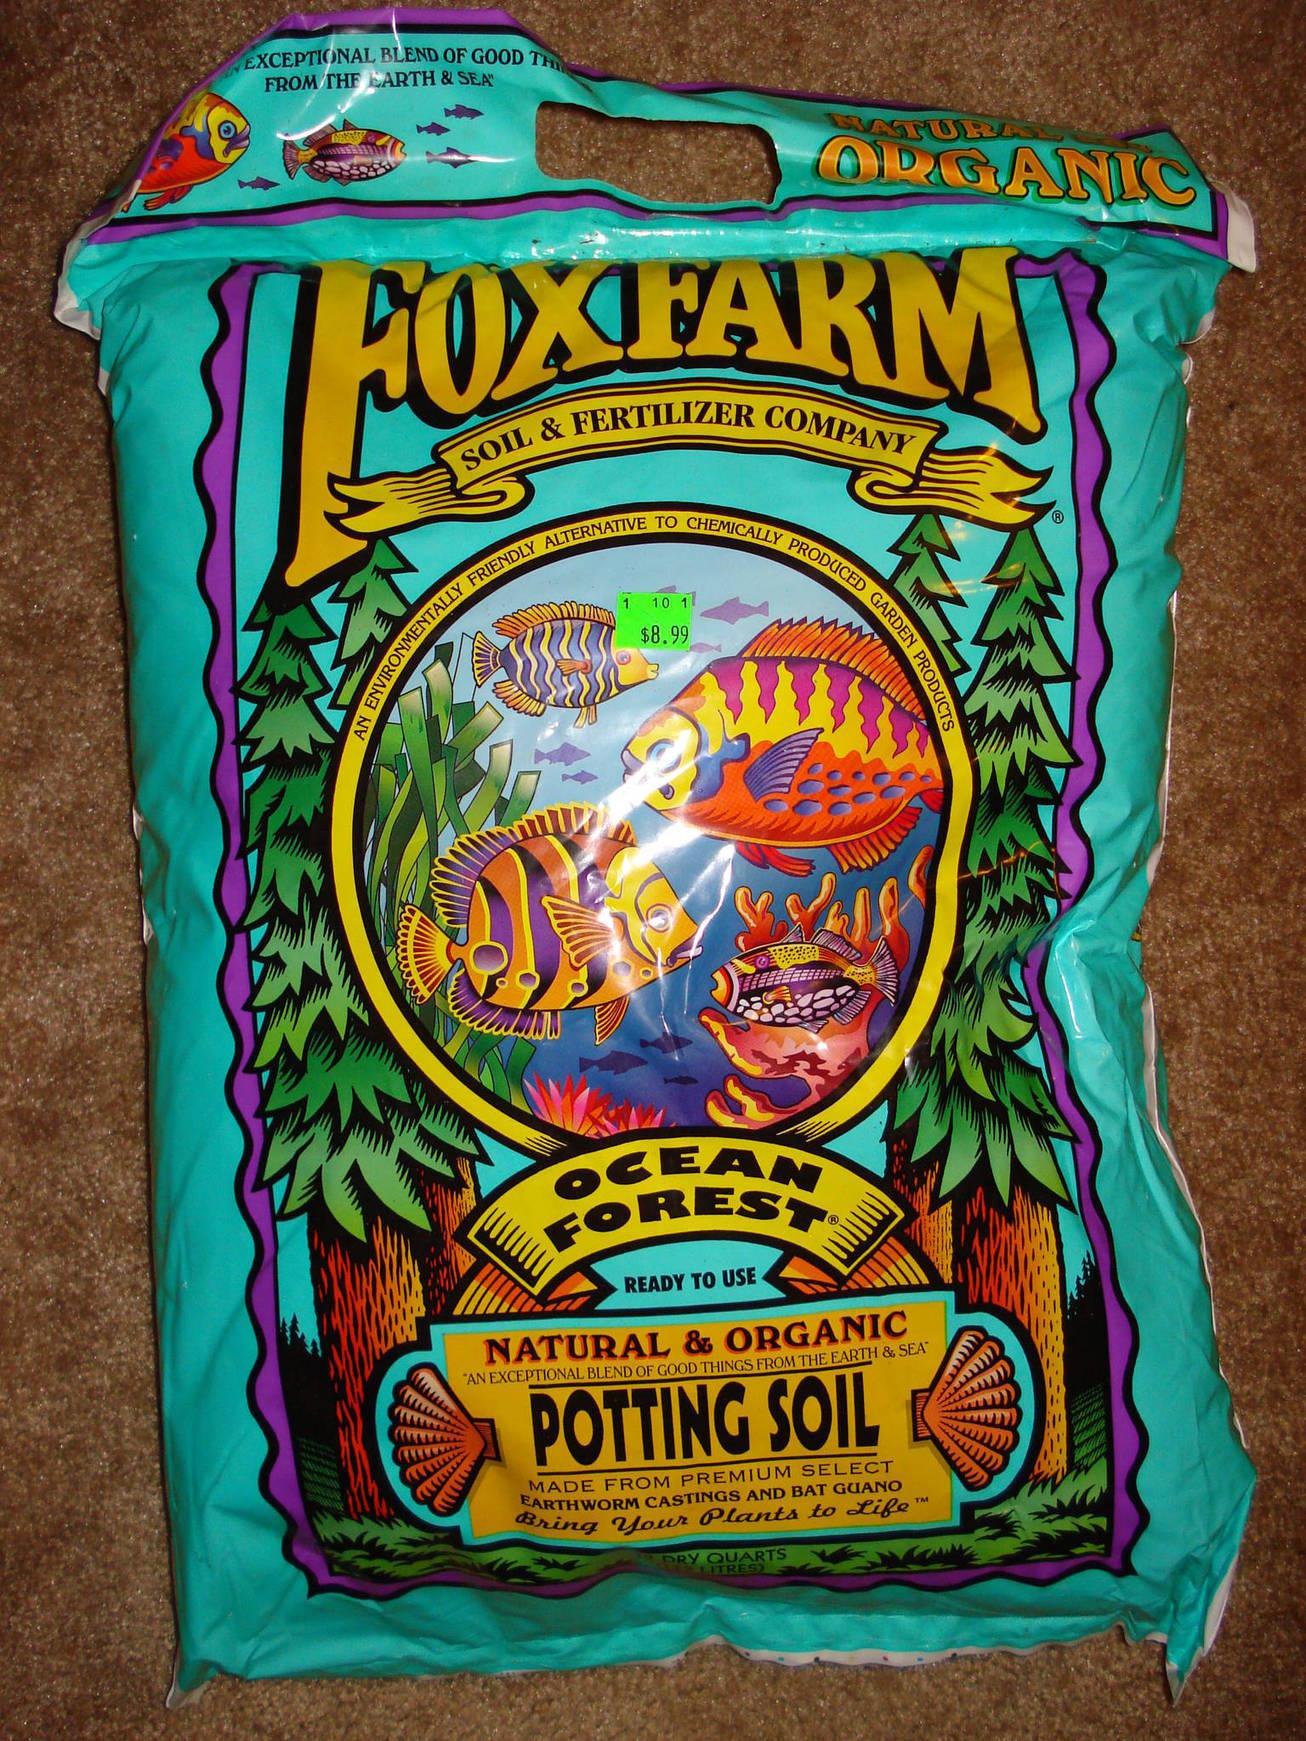
>>>> I just received my 2 CH8 "Flower" seeds in the mail on Wednesday, Febuary 4, 2010 and I just planted them directly in Fox Farm Ocean Forest soil on Thursday, Febuary 5, 2010 at *exactly* the most sacred time of the day 4:20 PM, Pacific Coast Time. The next journal entry will be discussing what I did to prepare for this wondrous day.... <<<<<<
This will be my first grow (when it starts), and I've always wanted to grow my own all on my own, and this is my attempt.
My Dream Goal for my my first grow
My dream goal for my first grow project is to time it so that when its time to harvest, it will be *right before* be the best International holiday, 4-20 Day, aka April 20 and have a nice abundance of fresh budz that I grew myself. Unfortunately, I've starting this project a little too late (should of germinated in January 1) because budding usually takes a minimum of 2 months (depending on strain), plus a minimum of 1 month Vegetation, so I won't make my Dream Goal on time. Plus, drying out the flowers takes time, so I could be way off.to make it weeks before 4-20, so I can dry out my budz. I should of starting germination back in January. Because of this tight time-scale, I will be searching for a strain with the shortest flowering (with agreement with my budget, of course).
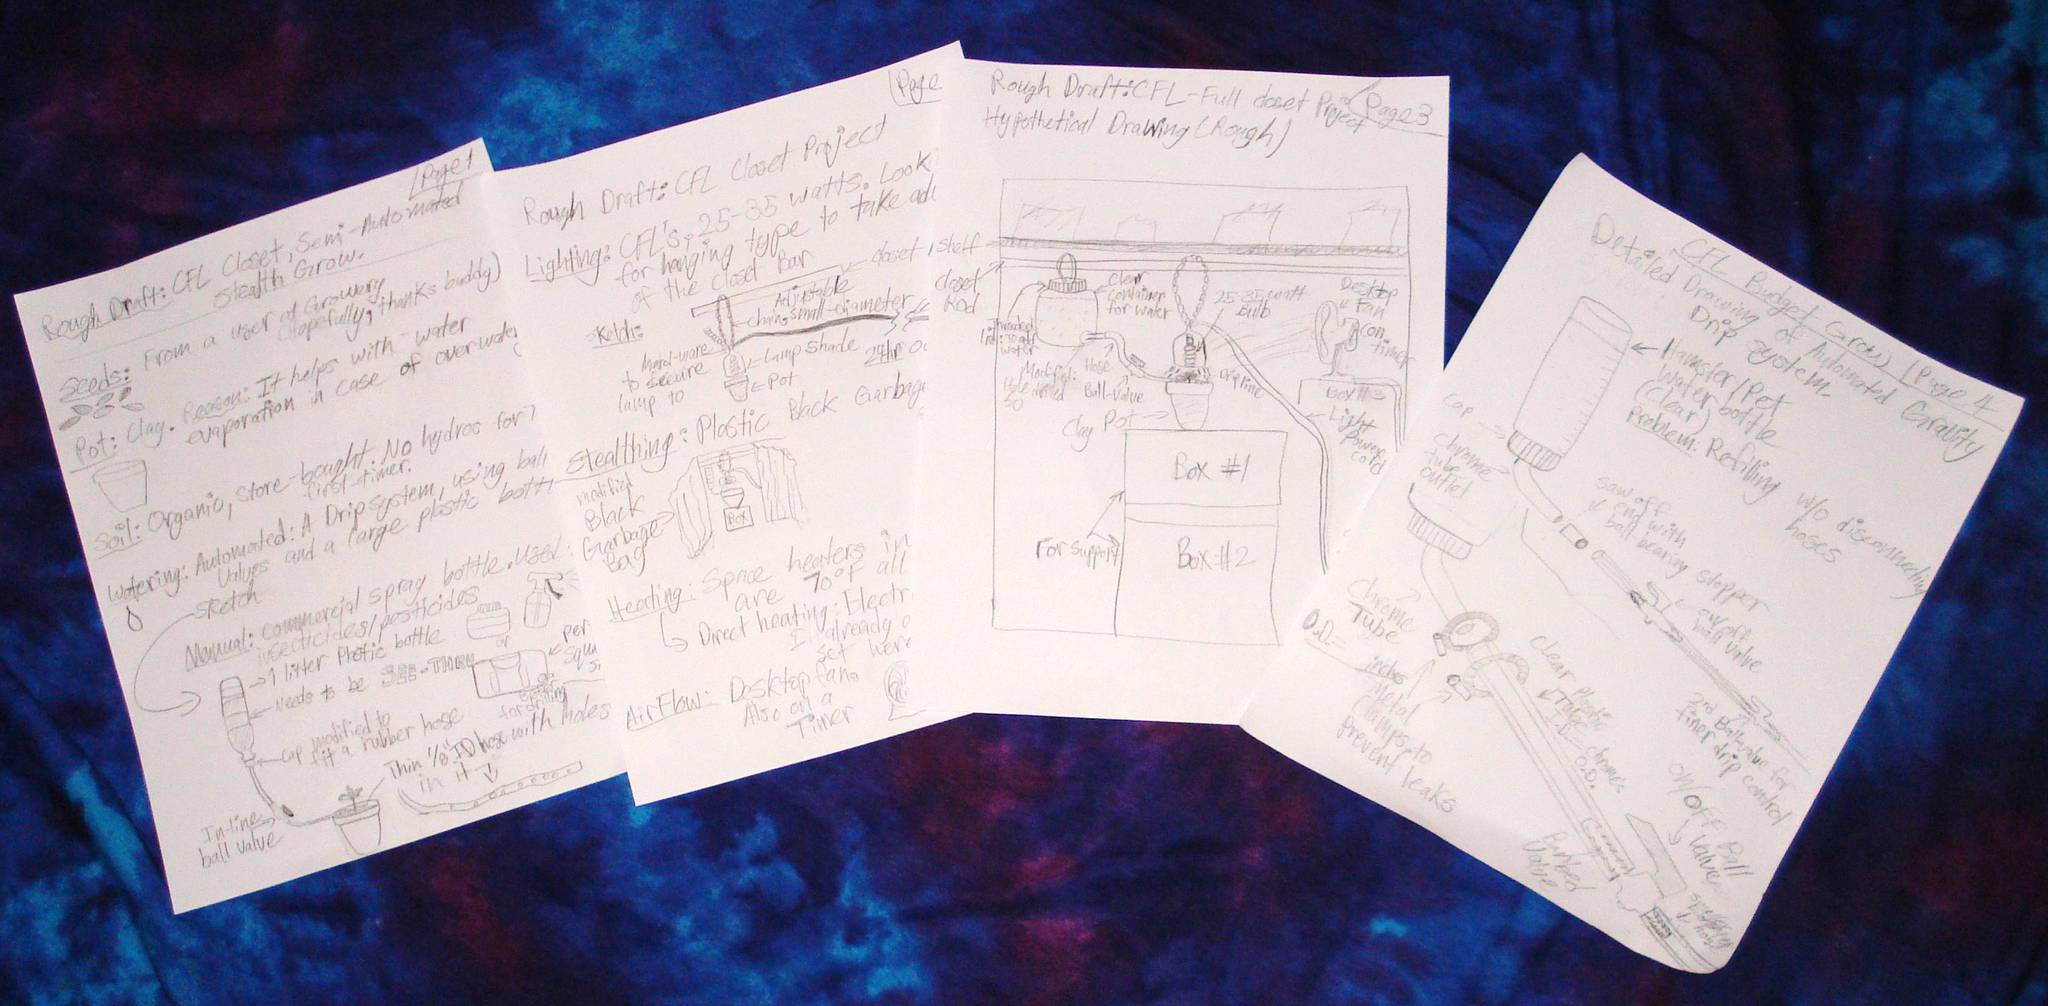
Here's the planning that I have been writing and drawing down...

   
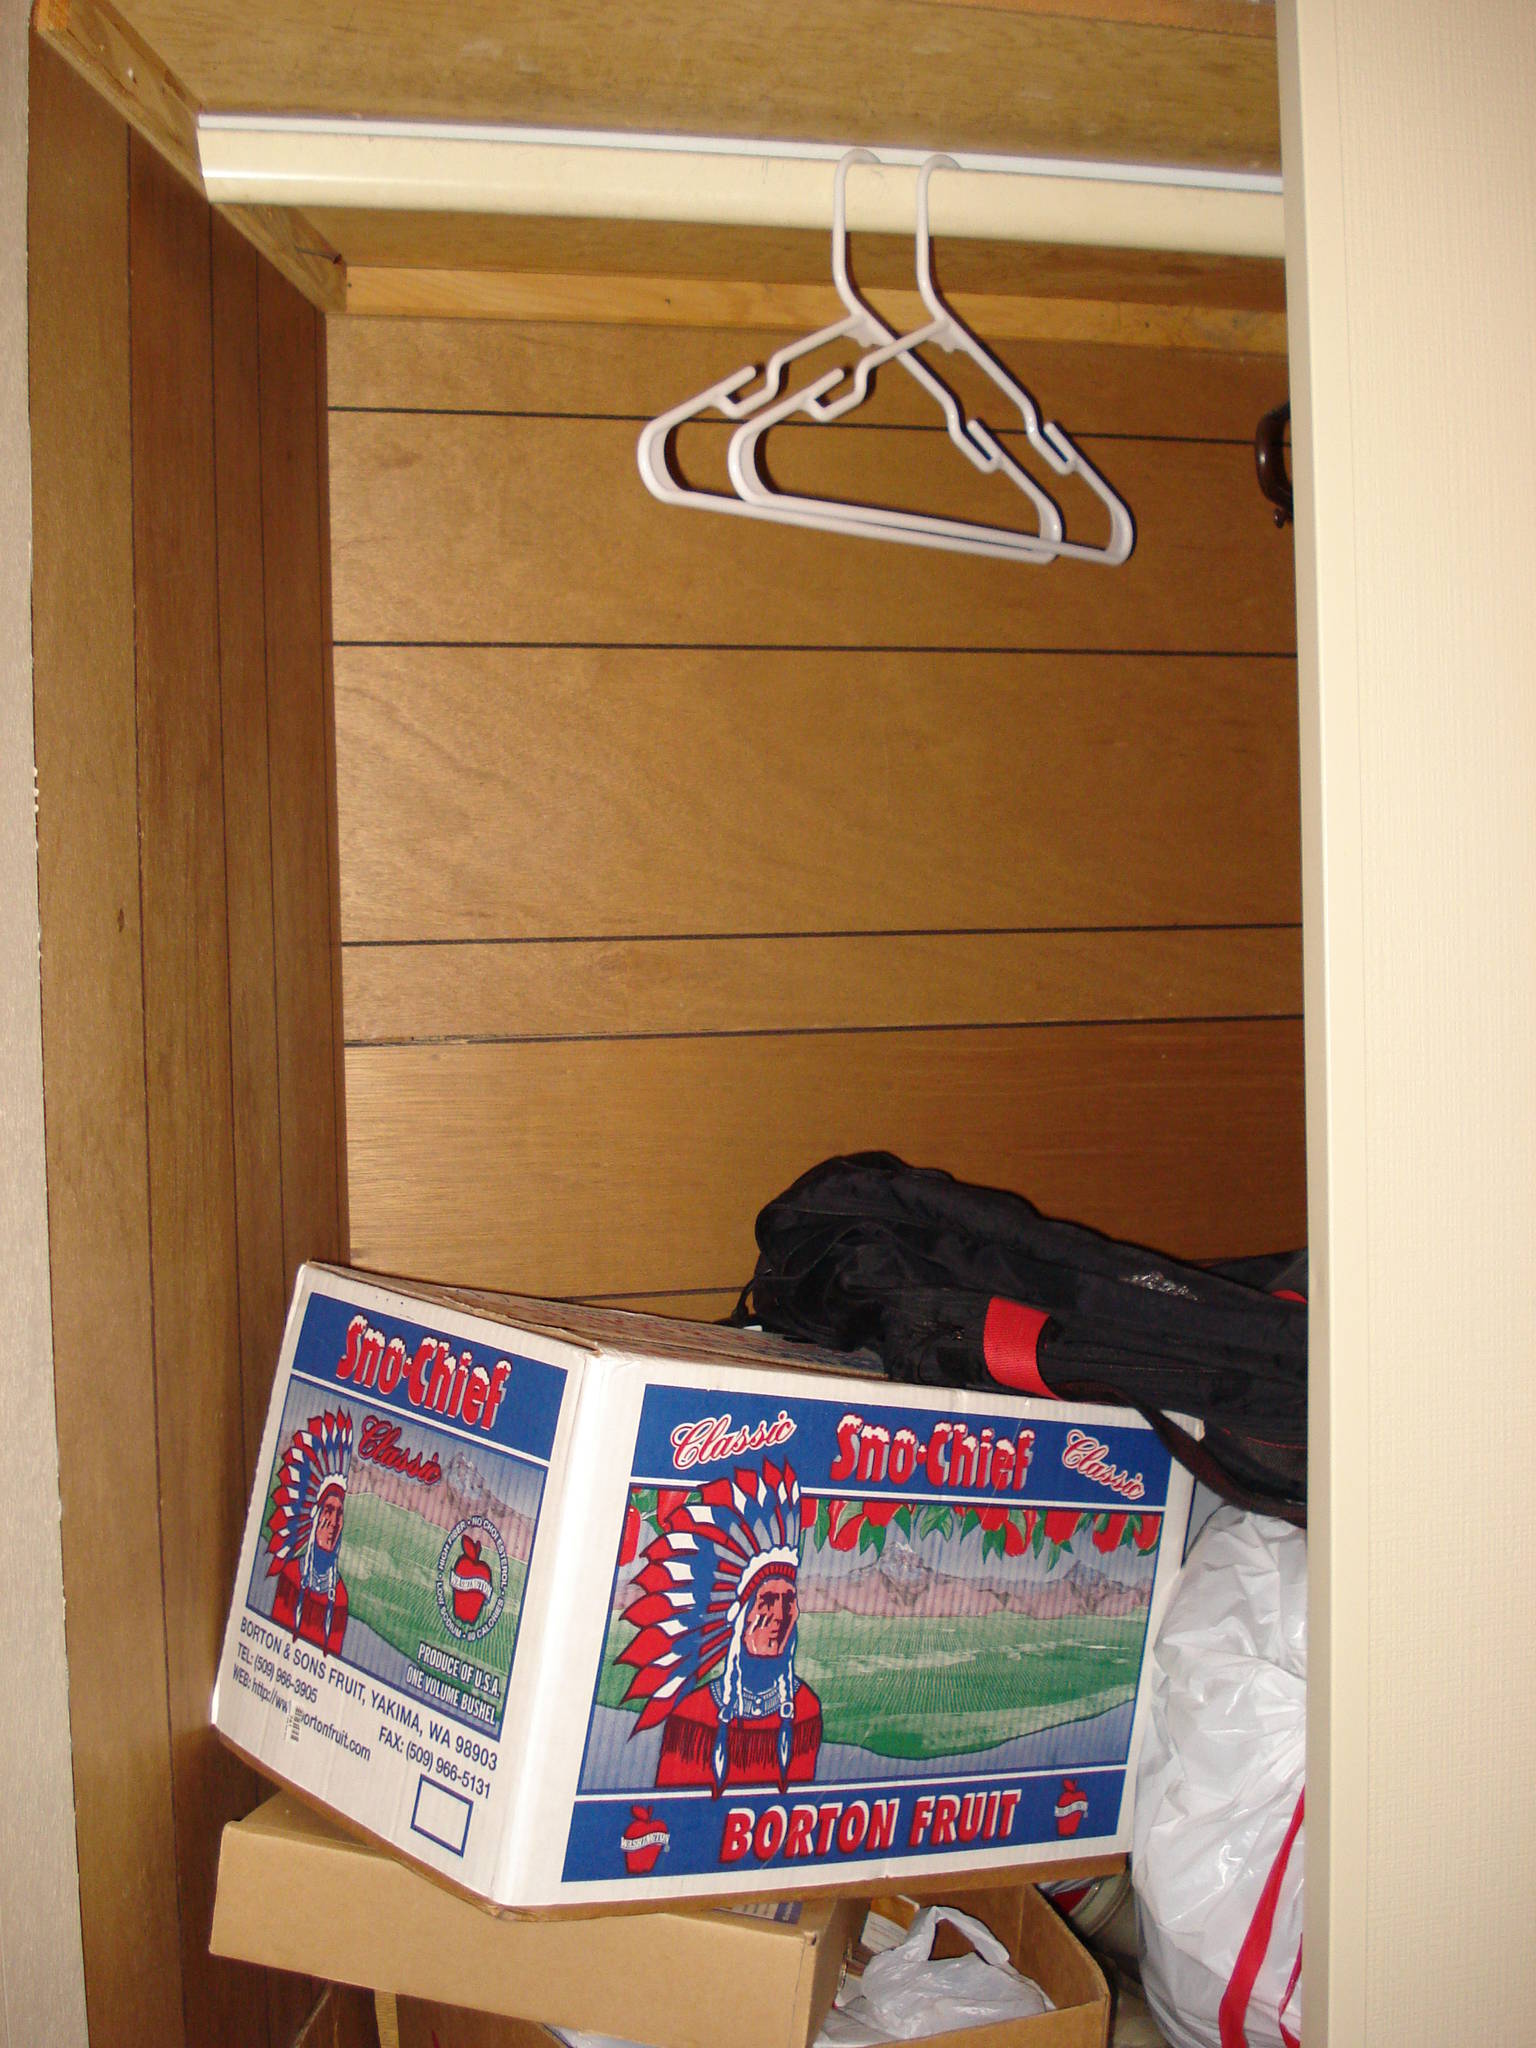
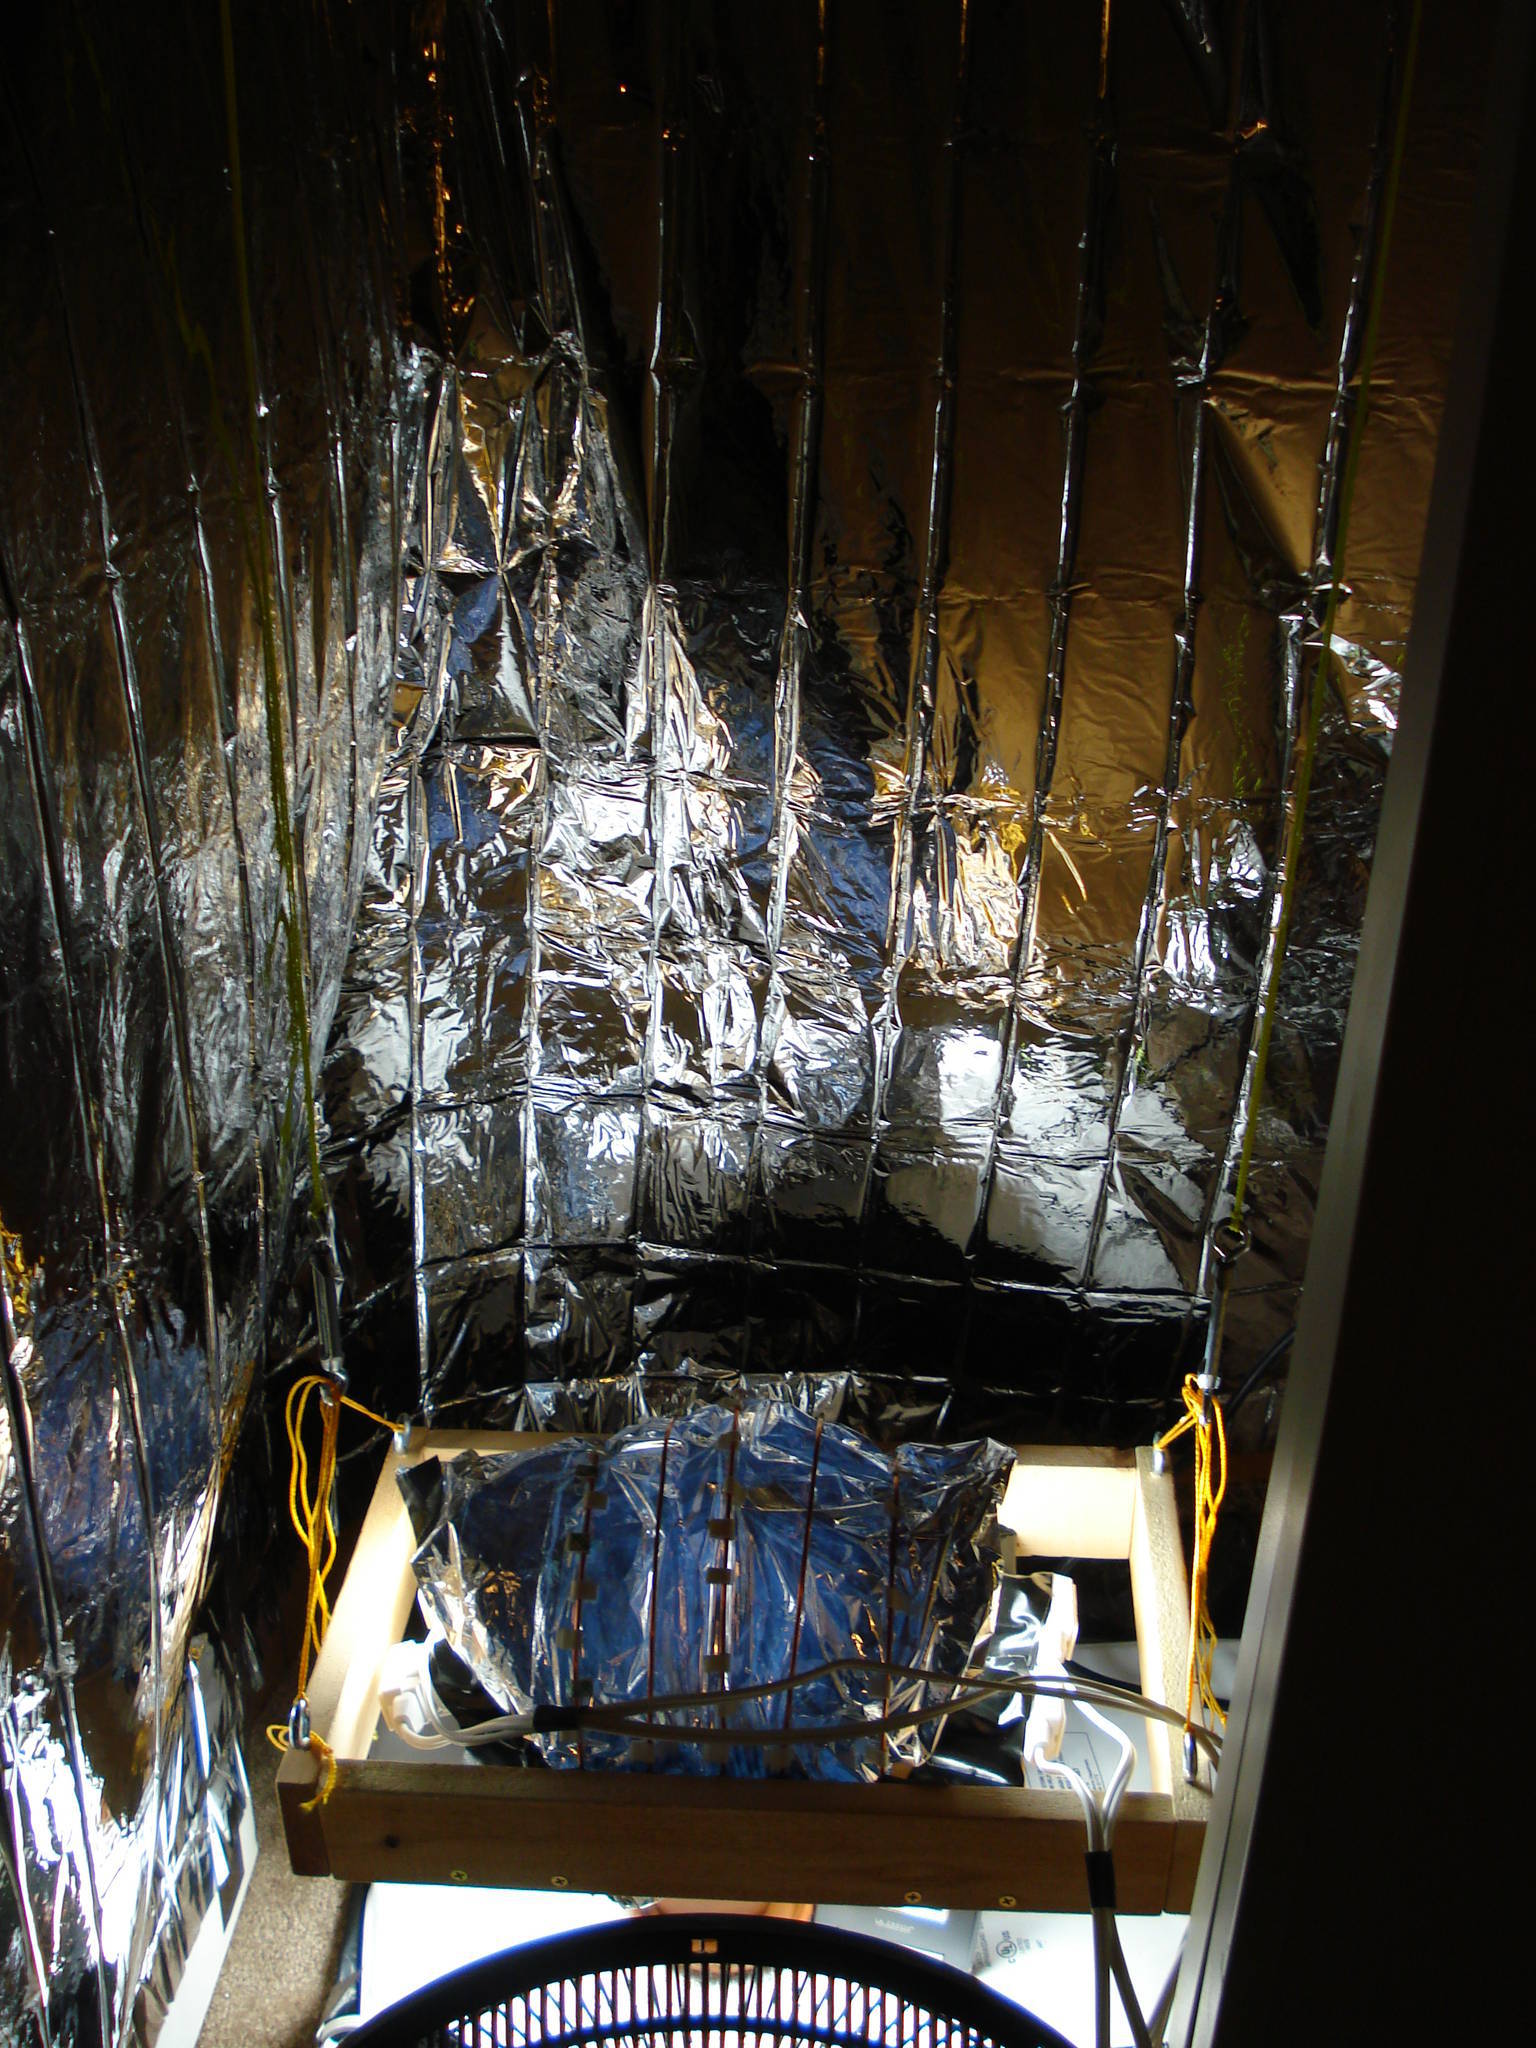
Here's the closet I plan to use for the project (its needs some organizing: its a little messy right now).
That hanger "bar" was tricky to figure out since its not a typical round bar, but more of a metal rail. To hang stuff, I'll need some strong "S" hooks.
--------------------------------------------------------------------------------------------------------------------------------------------
Before

2nd Version: January 20, 2010
 
The Final, Perfected Version: Febuary 16, 2010
 
-------------------------------------------------------------------------------------------------------------------------------------------
And from those plans and my closet arrangement, here's the material list I made...
***March 16, 2010 Edit: Here's my actual list I'm using right now ***
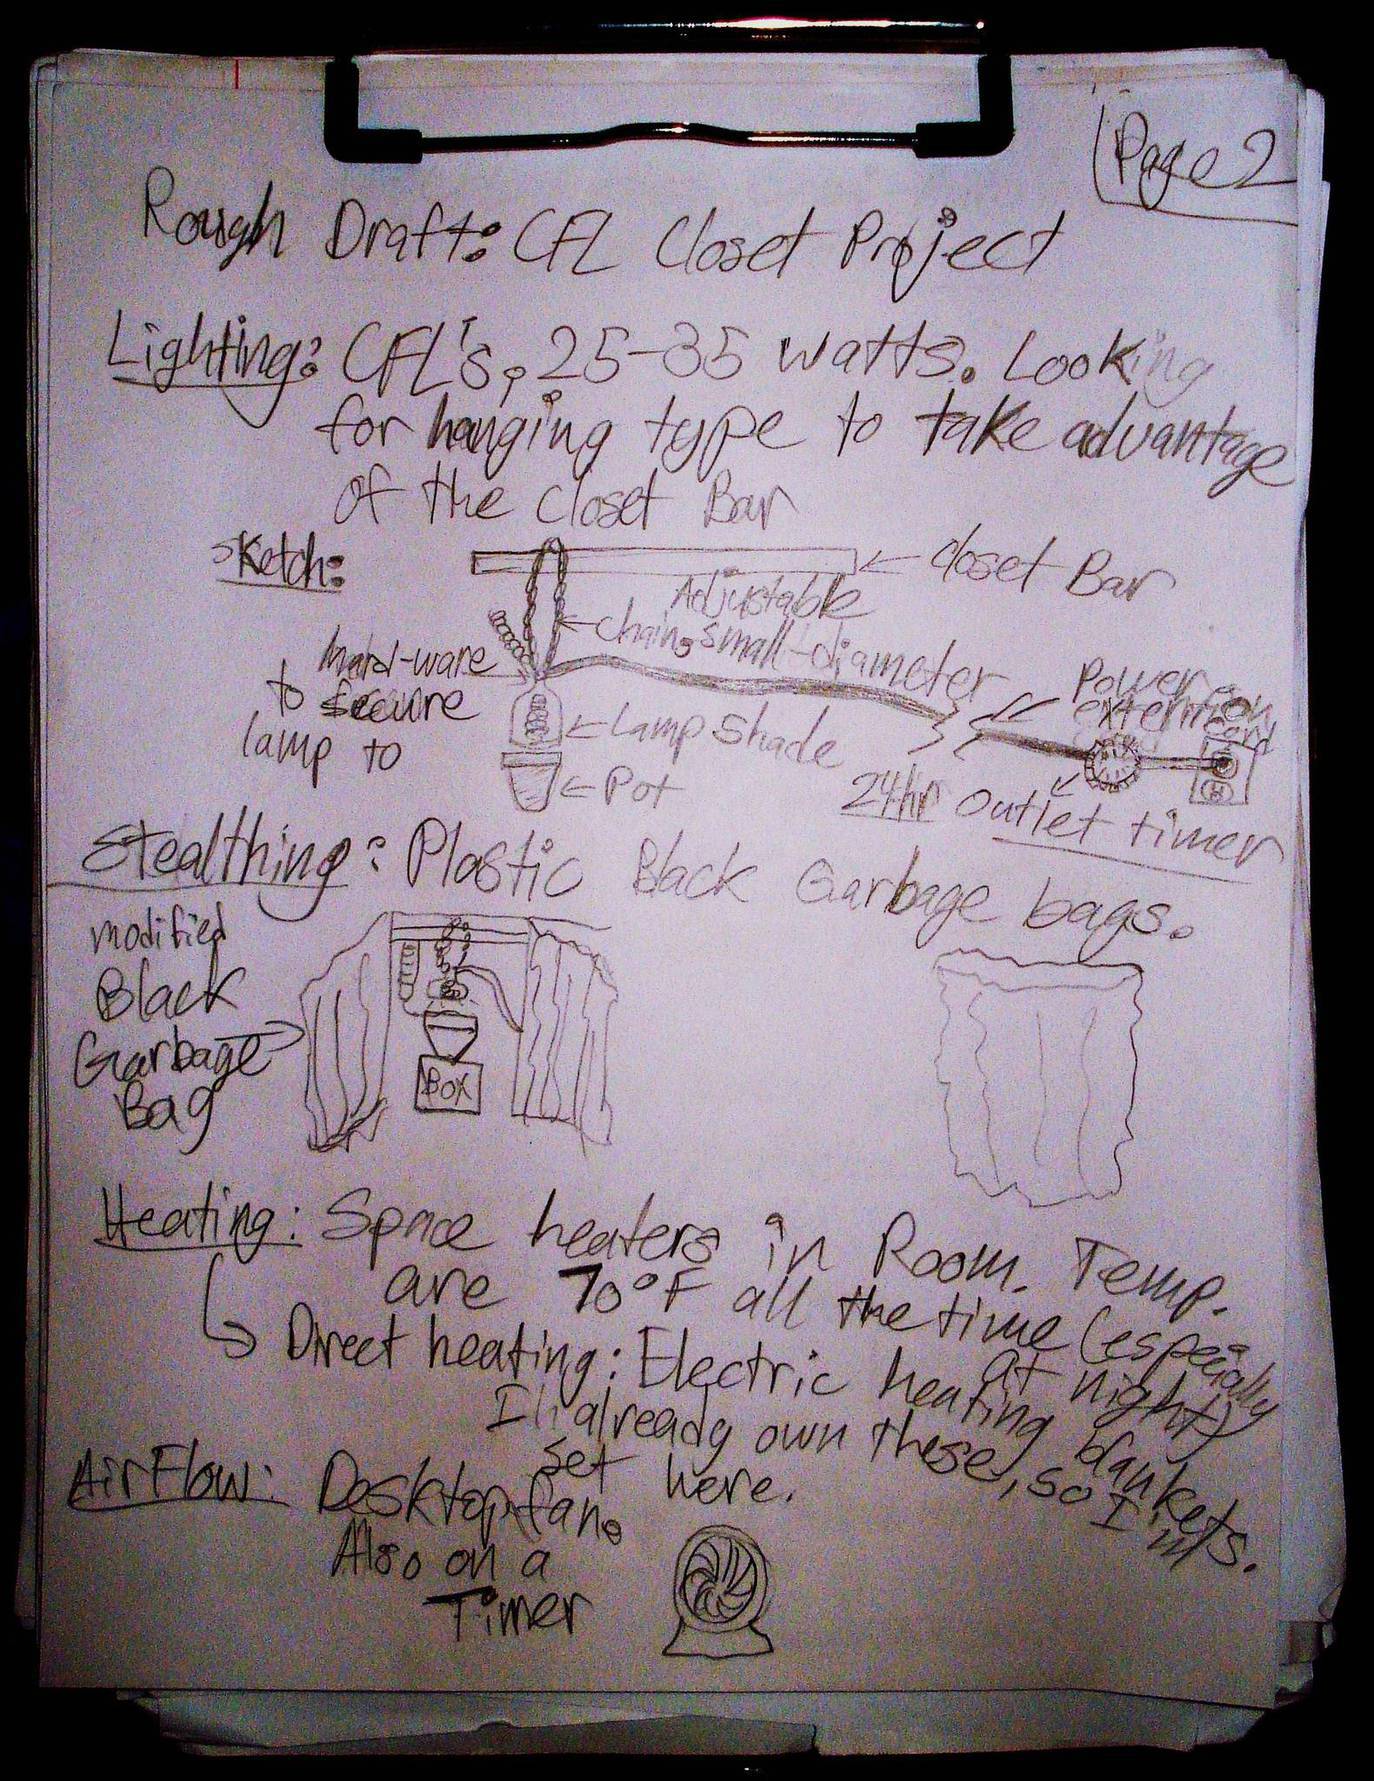
 For Lighting System For Lighting System
For Vegging: Two 26 watt 5,000K color CFL bulbs and two 27 watt 6,500K bulbs (socket adapters to plug into 2-prong plugs). Total: 106 watts
For Flowering (Updated April 16):
Overhead: 1 x 68 watt HUGE CFL 2,700K bulb & 1 x 42 watt 2,700K Overhead total: 110 watts //
Side-Lighting Lamps, Front 2 x 42 watt 2,700K color CFL bulbs & 2 x 23 watt 2,700K color. Back 1 x 23 watt 2,700K CFL. Side-Lighting Total: 152 watts. Total: 263 watts
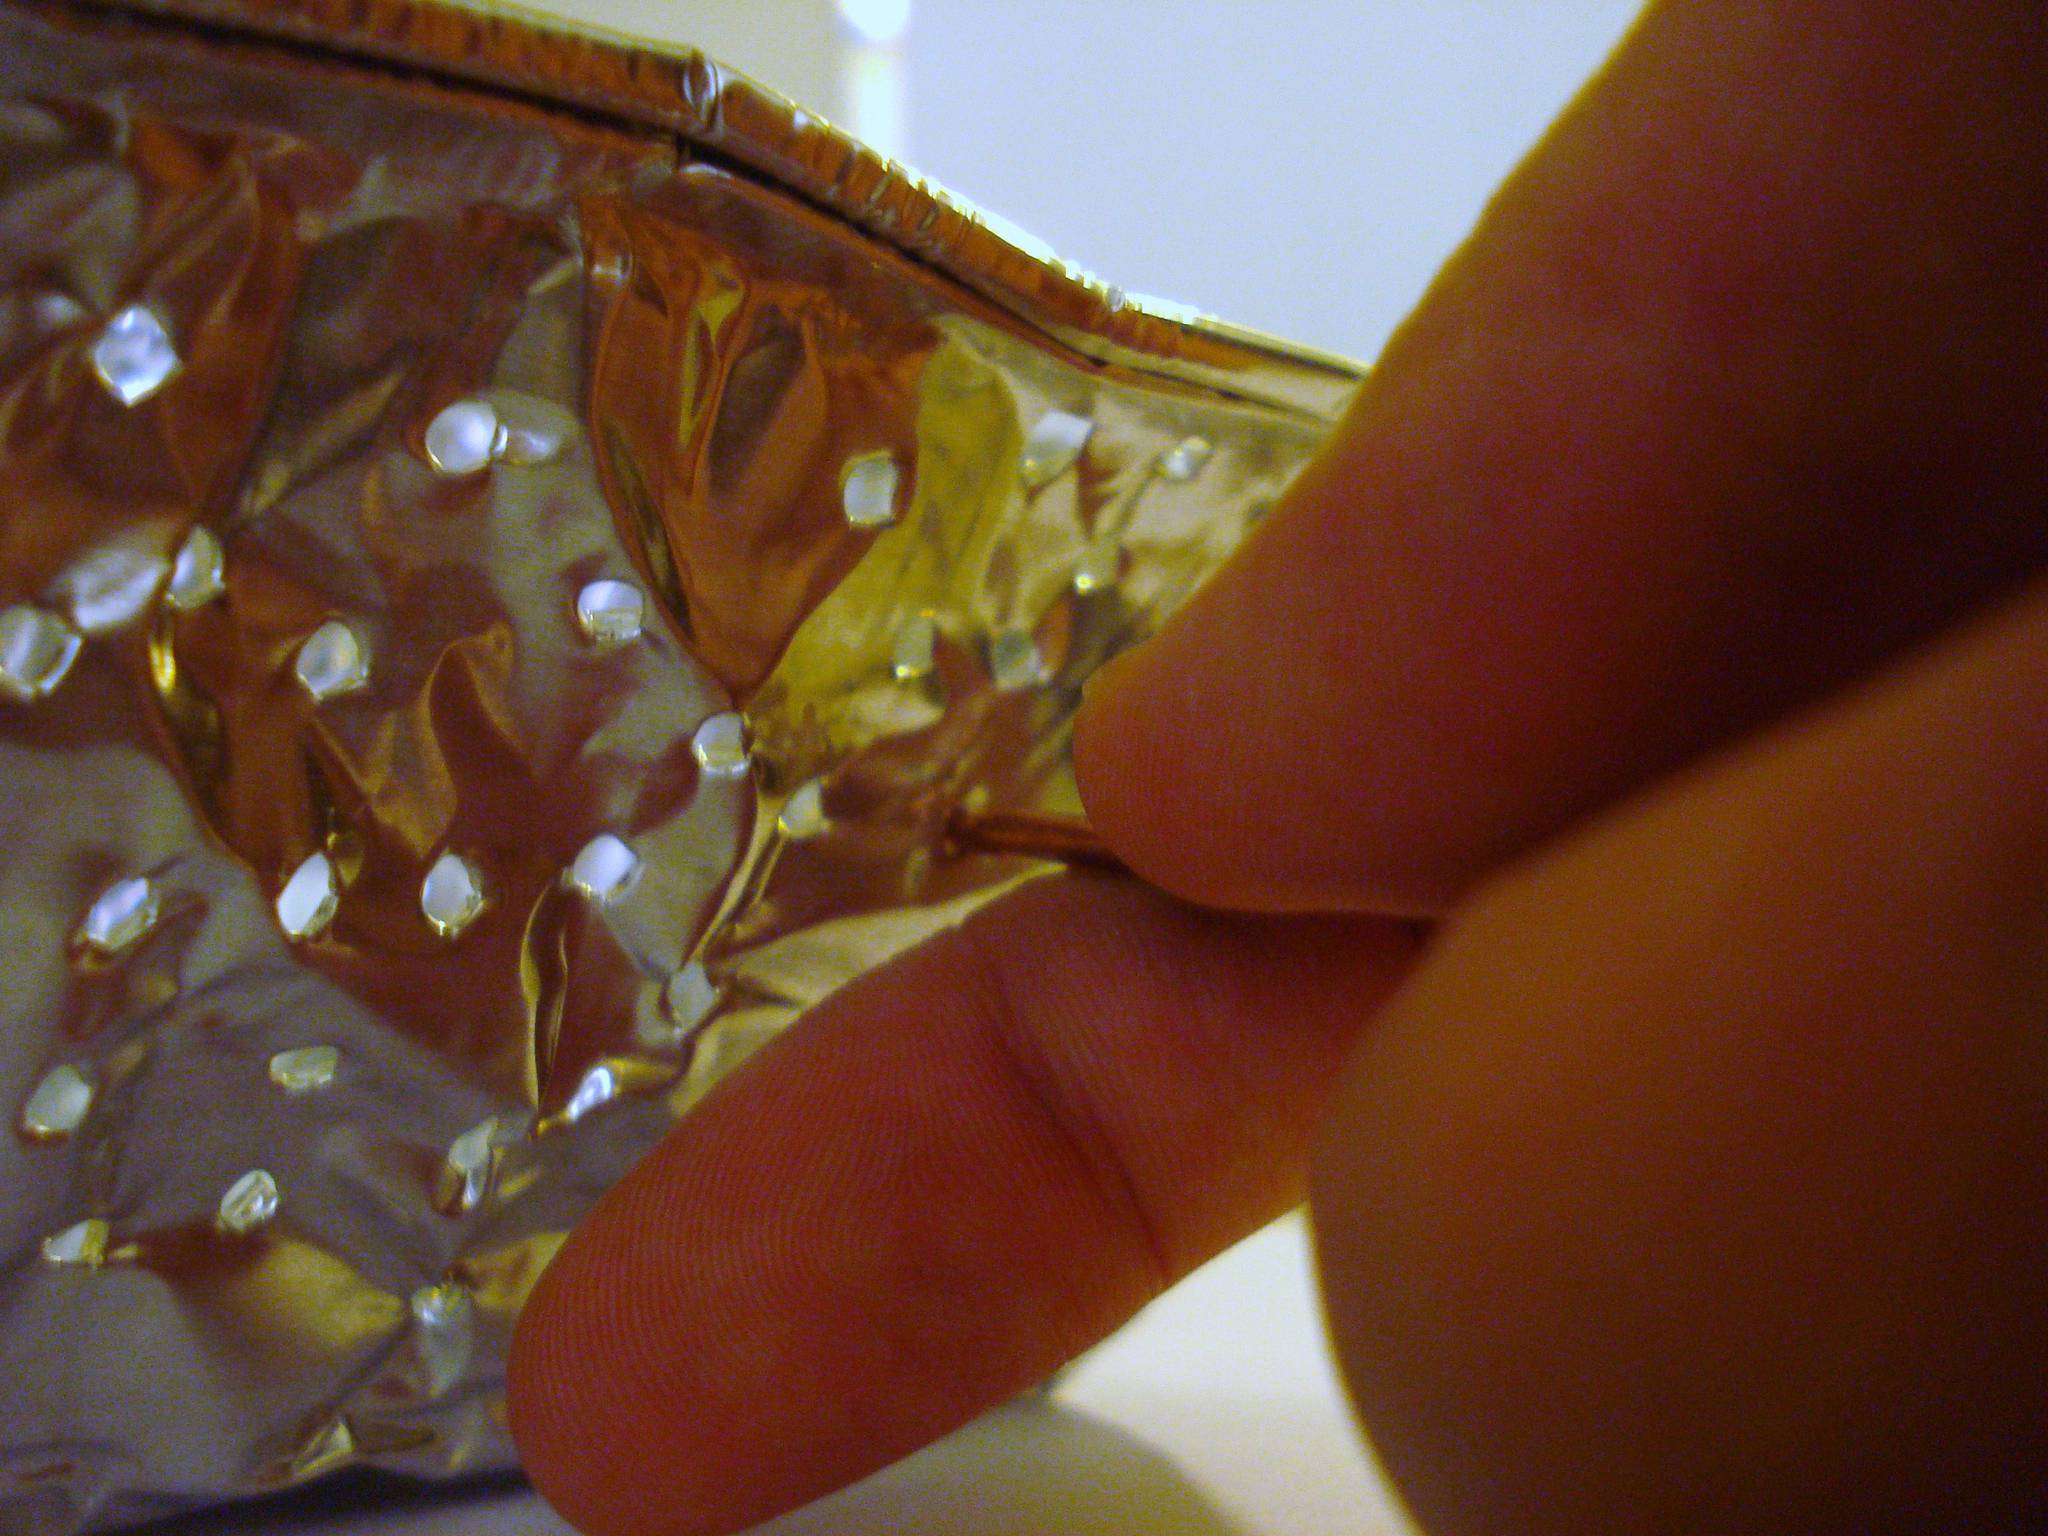
For Reflecting Light: 3 sheets of Emergency Mylar blankets (in the Camping Section of K-Hole Mart)
4 x 6 ft Extension cords for each bulb independently.
24-hour On/Off Timer (set "on" for 18 hours during vegging, and 12 hours "on" for flowering)
6-outlet power strip.
For Gravity Drip-Watering System
Clear soda bottle
Clear vinyl tubing of 3 different diameters
6 - metal clamps of various diameters (to stop leaks at connections)
1 barbed brass On/Off ball valve (to control drip rate, and to fit inside tubing).
Various lengths of string to hold up the hoses and bottle.
Pot and Substrate
1 - small clay pot
Bag of FoxFarms(R) Ocean Forest Soil.

Perlite (from cubenis growing)
3 large manual spray bottle (for spraying soil and wetting perlite for increased humidity)
Stealthing
Black trash bags (which I own)
lots of duck tape (to make one big sheet)
Maybe a simple carbon-filter system for the smell (far future)
Cooling & Fresh Air Exchange:
For Plant: 1 x 80mm PC fan set on a 12volt, 1 amp adapter. This small fan is also used for strengthen the stem. 1 x 12" oscillating fan that runs during the light cycle only.
For Lighting: 1 x 80mm PC fan set on a 1.5 amp adapter positioned right near the bulbs.
------------------------------------------------------------------------
Old materials (not in use)
Here's the Materials (Top-left: no longer using white "pet" water bottle)

>>>For Lighting System<<<

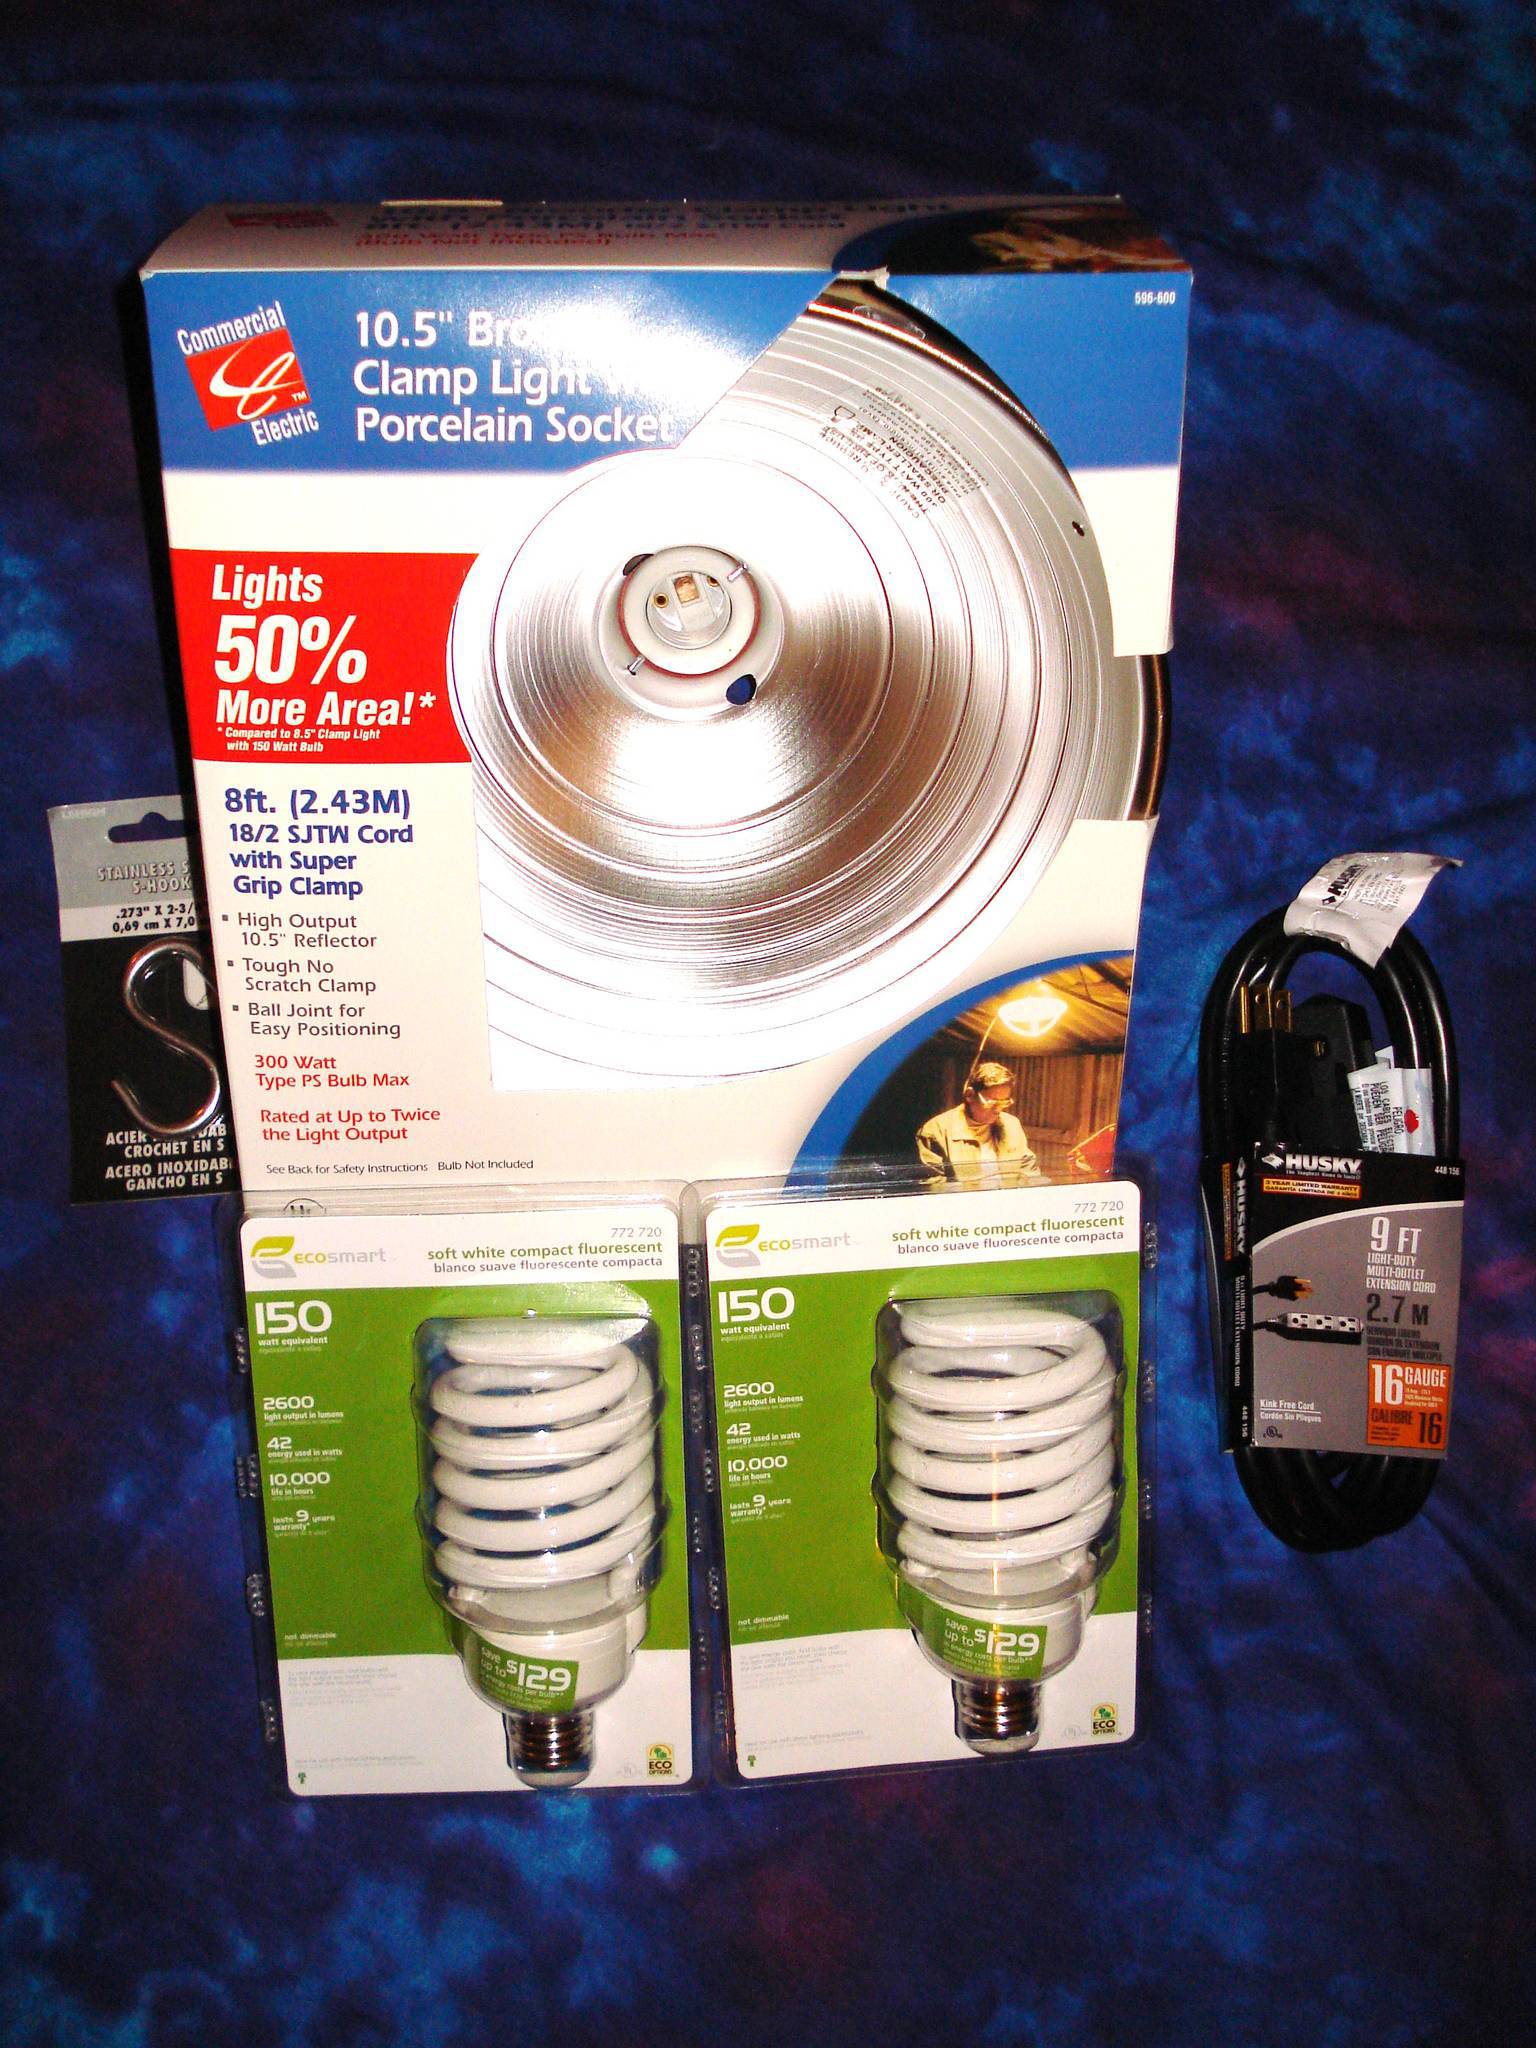
2 - 42 watt CFL bulbs (one is for back-up, or if I need more light)
10.5" clamp lamp reflector with Porcelain socket (for CFL)
8ft indoor Extension cord
1 - Stainless steal S-Hook (for hanging light off the closet rail)
~~~~~~~~~~~~~~~~~~~~~~~~~~~~~~~~~~~~~~~~~~~~~~~~~~~~~~~~~~~~~~~~~~
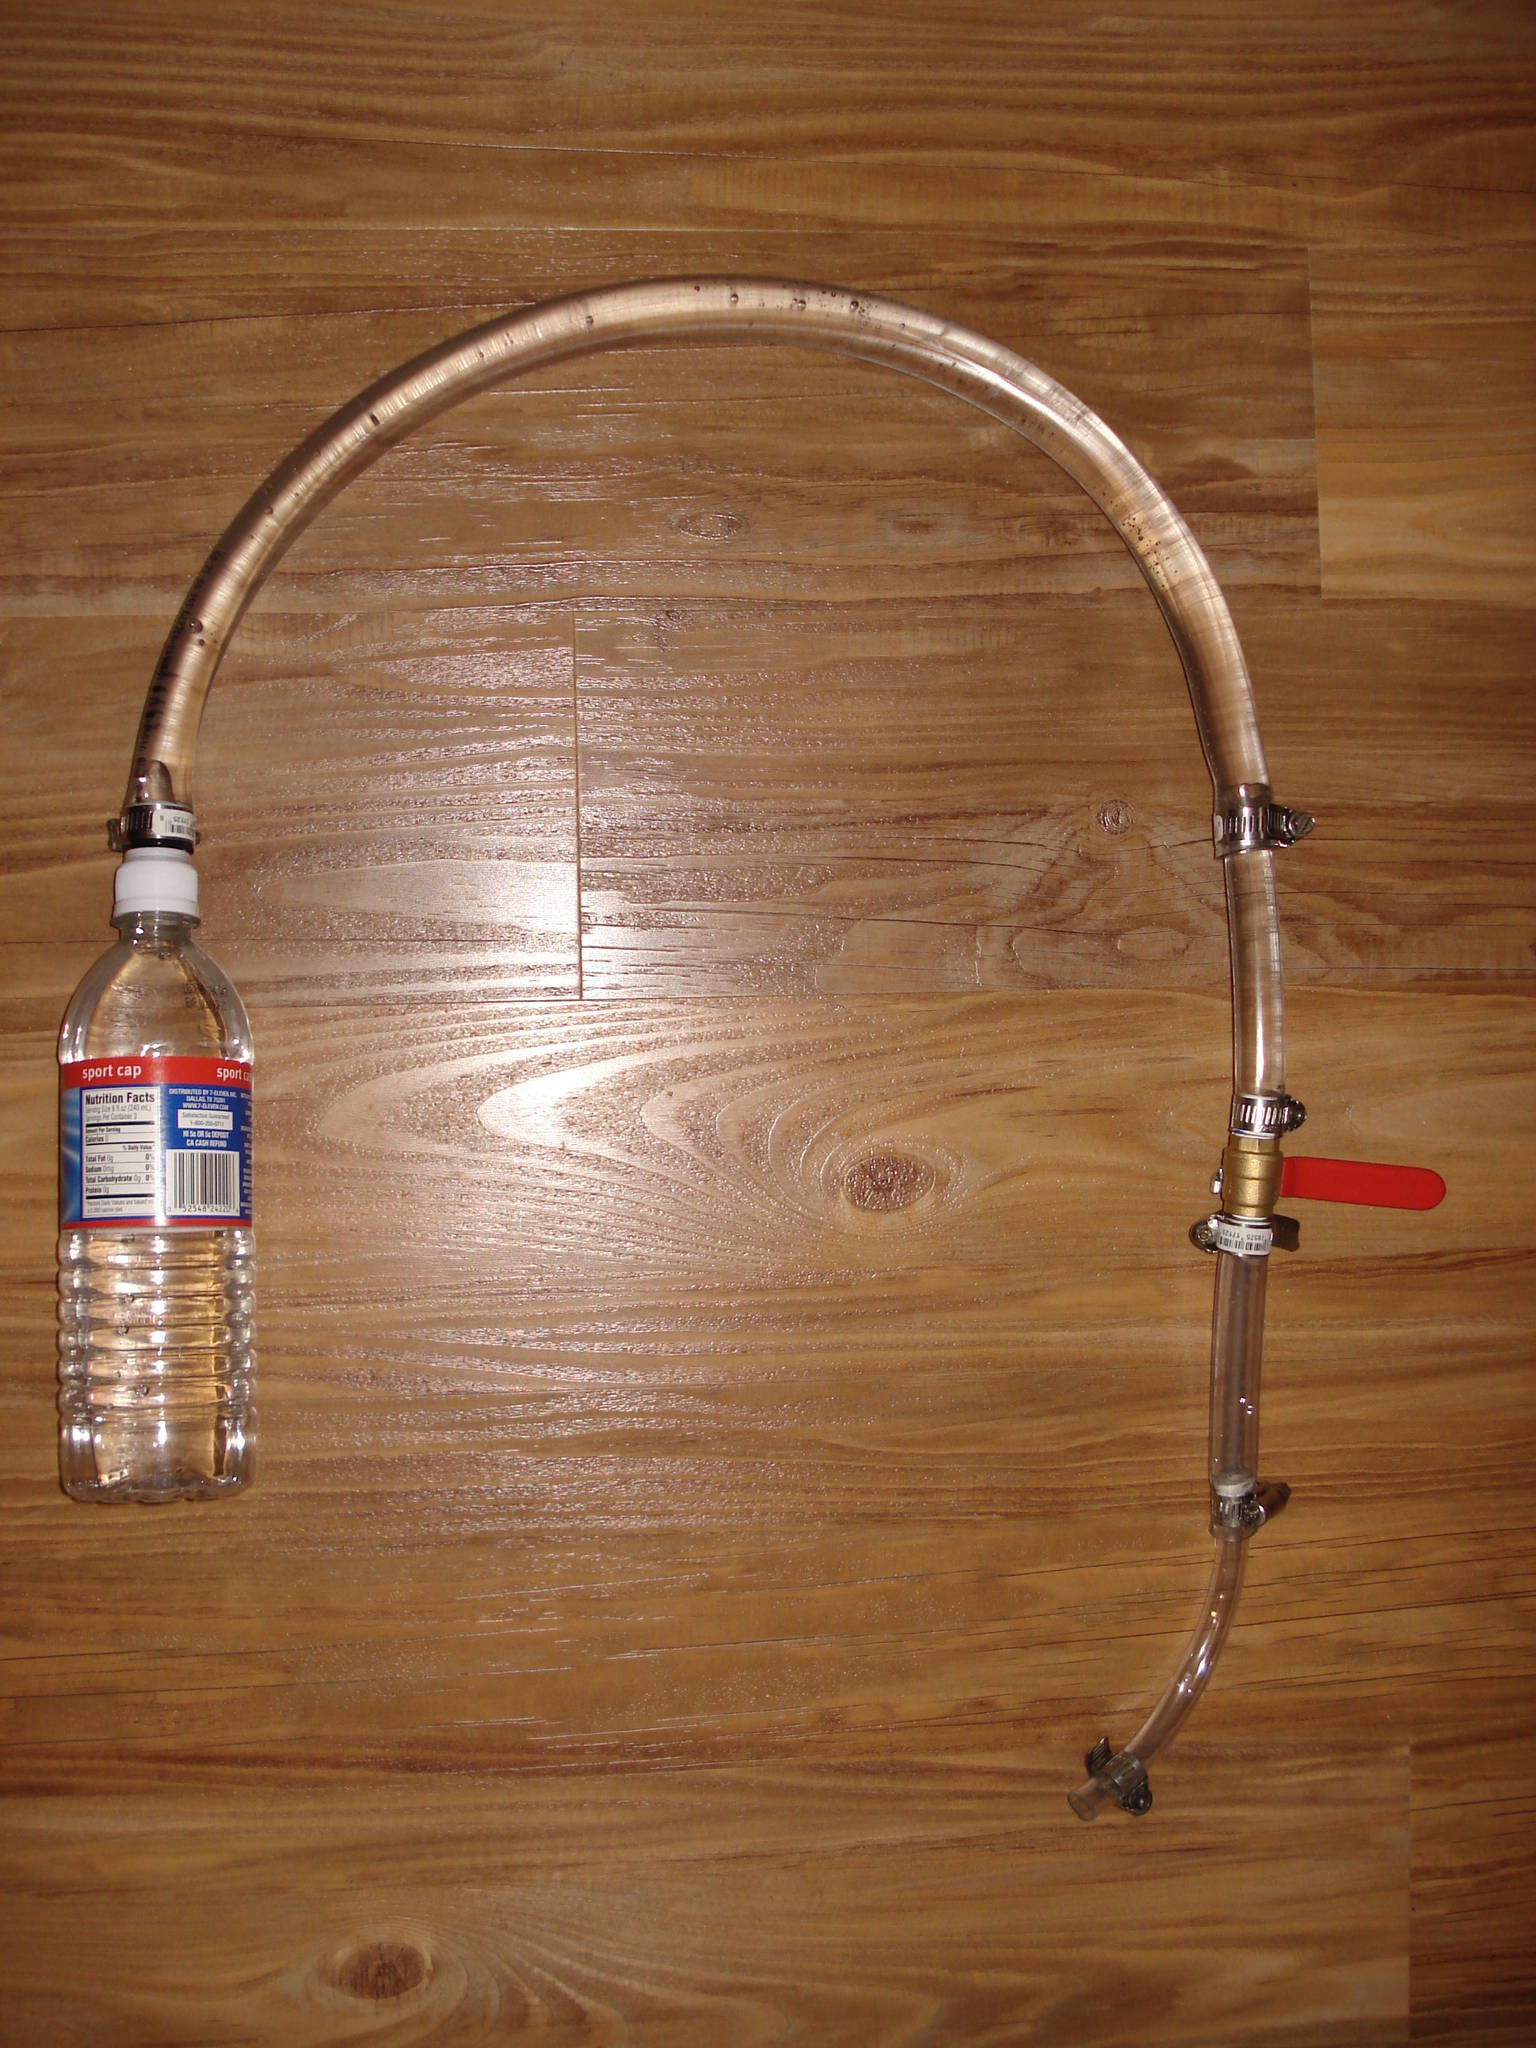
>>>WORKING Gravity Drip-Watering System<<<

List of objects
1 x 2 litter clear soda bottle (pictured right)
1 "sport" water bottle push/pull valve (white colored one)
2 ft of 3/4" ID x 1" OD vinyl tubing
5 ft of 1/2" O.D. (3/4" I.D.) Clear plastic tubing (to fit over the chrome stem of the "Pet watering bottle")
1 box of 3/4" OD x 9/16" ID x 3/32" (thick) rubber O-Rings
4 x 1.25" metal clamps (to stop leaks at tubing connections)
1 x 1/2" O.D. barbed brass ball On/Off valve (1/4 turn)
2 x Stainless steal S-hooks (for hanging bottle on closet rail)
~~~~~~~~~~~~~~~~~~~~~~~~~~~~~~~~~~~~~~~~~~~~~~~~~~~~~~~~~~~~~~~~~~~~~~~~~~~~~~~~~~~~
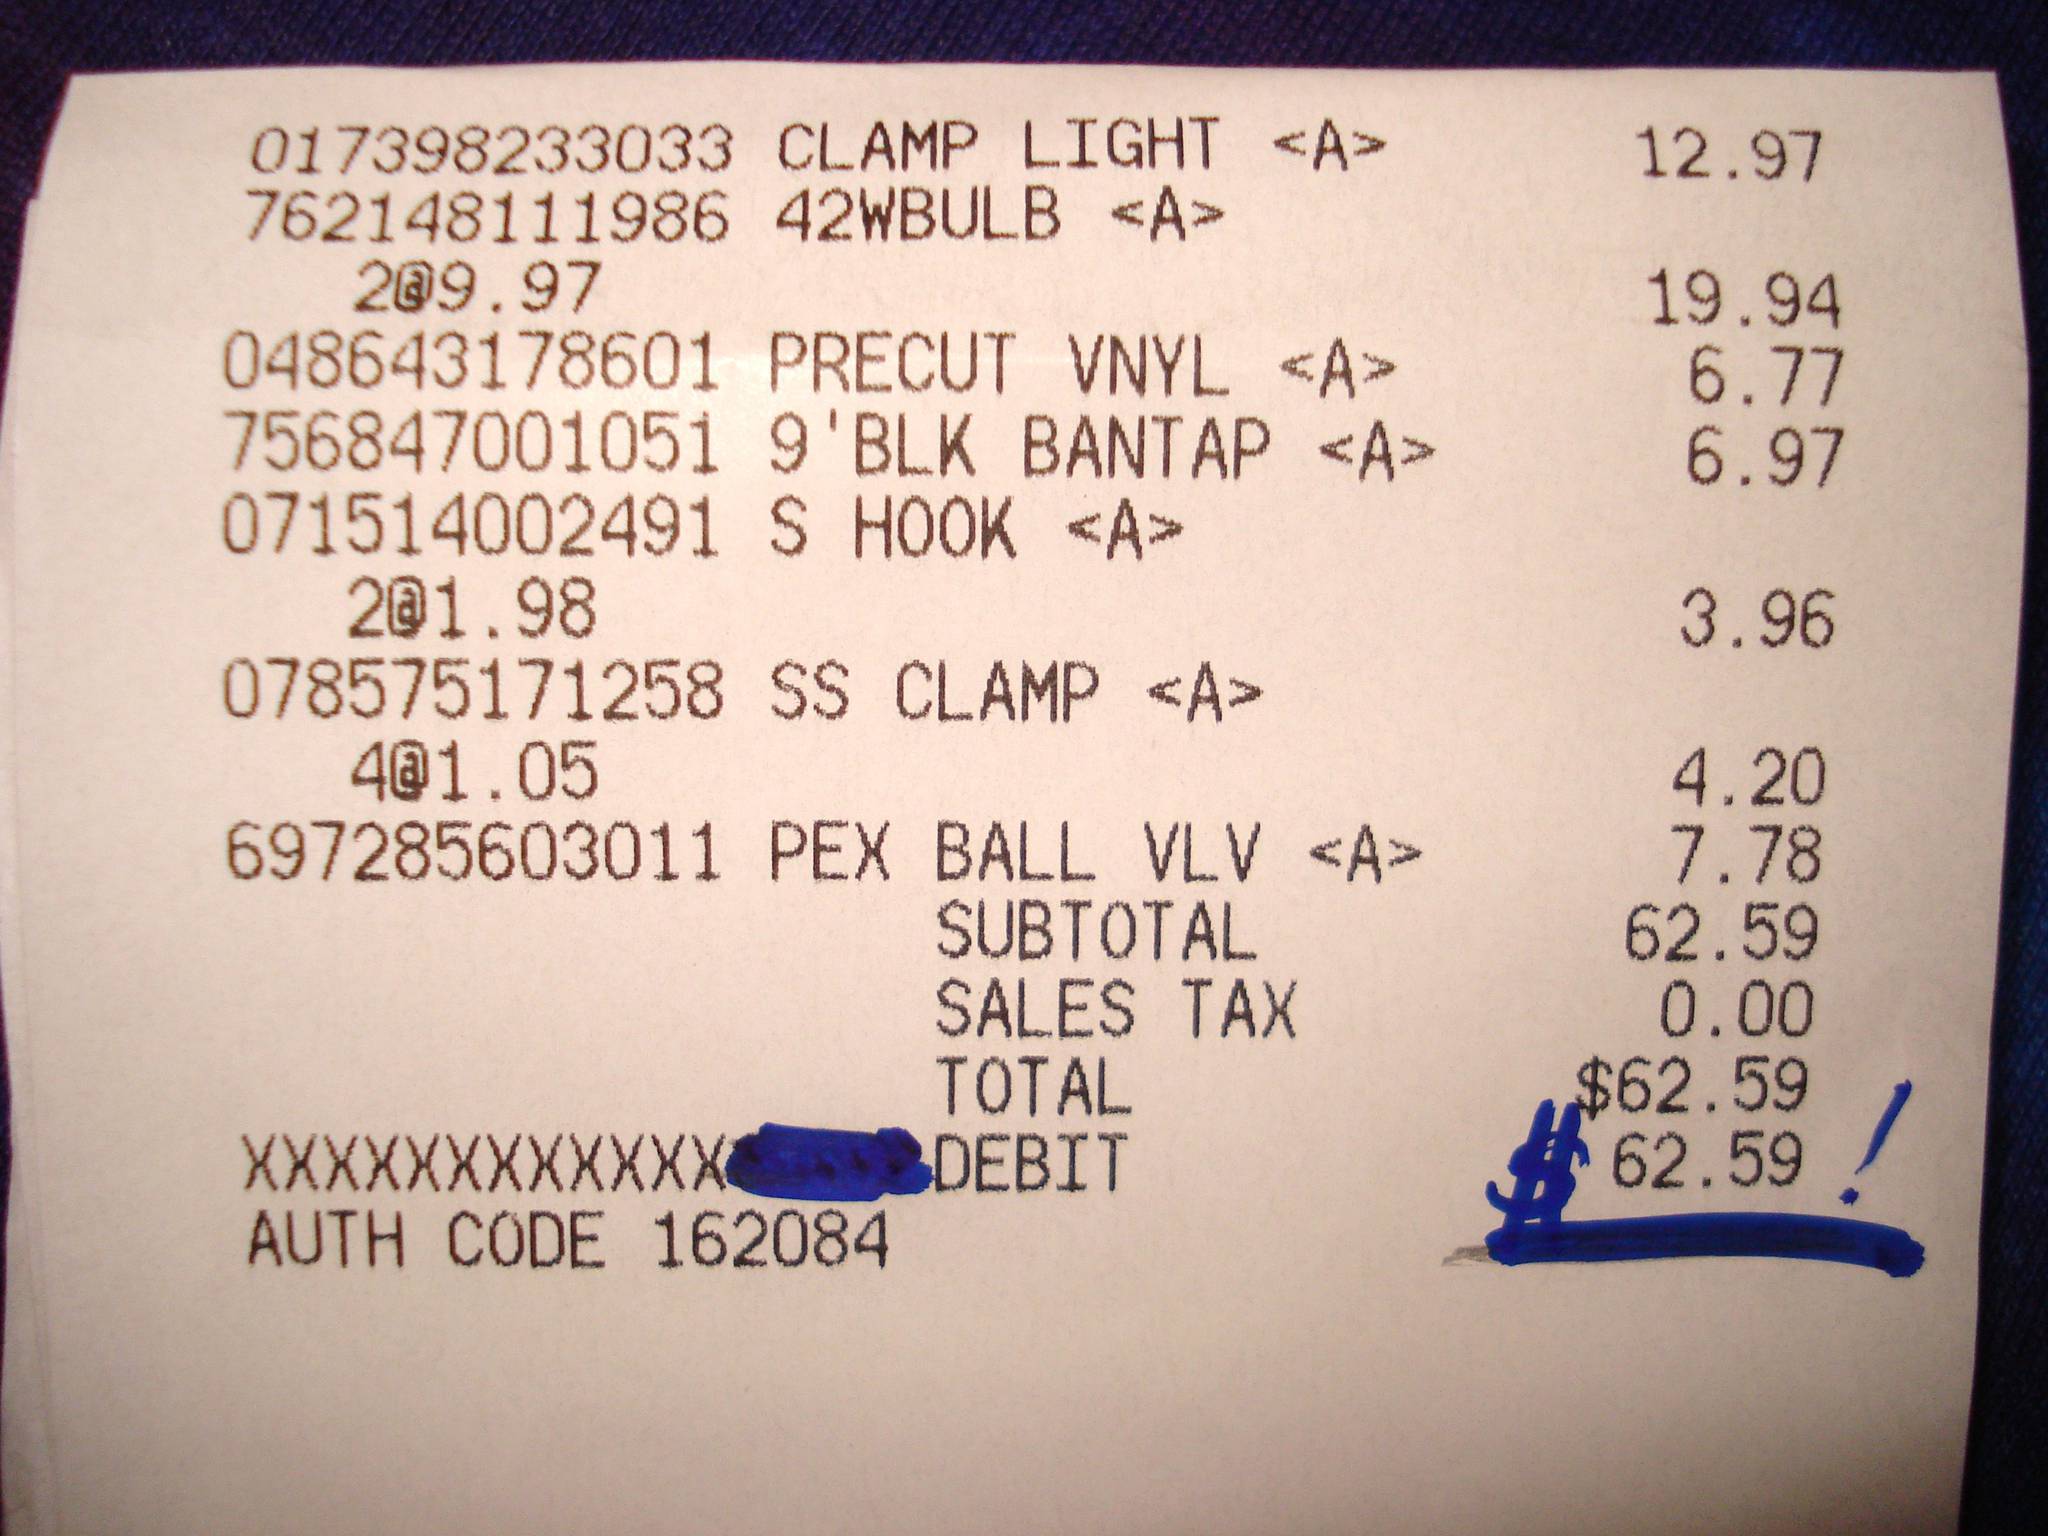
Here's the Total US dollar amount for everything I bought so far...
From Homey D.

^ Everything pictured/listed above expect the pet watering bottle (see below)
Grand TOTAL thus far (rounded up): ~$65
That's much more than my "hopeful" $40 (not including seeds). The good thing is I already have some 24-hour timers, I own a desktop fan, I already own black trash bags for stealthing, I can use string to hang the light/water systems, and clays pots and soil is pretty cheap.
So, I would say, I basically have everything.
...What do you guys think? Is this a pretty good budget grow or does it need much improvement?
*** I finally got my "Flower" seeds *** 
Constructive Feedback always accepted!
Thanks to all the growers (especially you Inverted and Harry!) who've help me thus far: your advice is *priceless* (and certainty not worthless!)
First Grow, Here we Go!
~ TrueHerbCrystal ~ 
Edited by TrueHerbCrystal (02/18/11 11:11 PM)
|
FurrowedBrow
Free yourself from yourself

Registered: 04/20/08
Posts: 12,045
Loc: Carpal Tunnel

|
Re: All CFL Semi-Automated Closet Project (FirstGrow)(Pre-Seeds) [Re: TrueHerbCrystal]
#350468 - 01/19/10 09:43 PM (15 years, 2 months ago) |
|
|
This should be interesting. Best of luck!
|
TrueHerbCrystal
Uncertified Oregrowian
Registered: 02/07/09
Posts: 1,352
Loc: Emerald City
Last seen: 6 years, 6 months
|
Re: All CFL Semi-Automated Closet Project (FirstGrow)(Pre-Seeds) [Re: FurrowedBrow]
#350632 - 01/20/10 03:01 AM (15 years, 2 months ago) |
|
|
I hope its interesting Mr. Brow, but in a "Wow, that was interesting!" and not "Wow, he really failed, big time!" interesting kind-of-way.
And thanks for the Good Luck! I'm gunna need it, for sure!
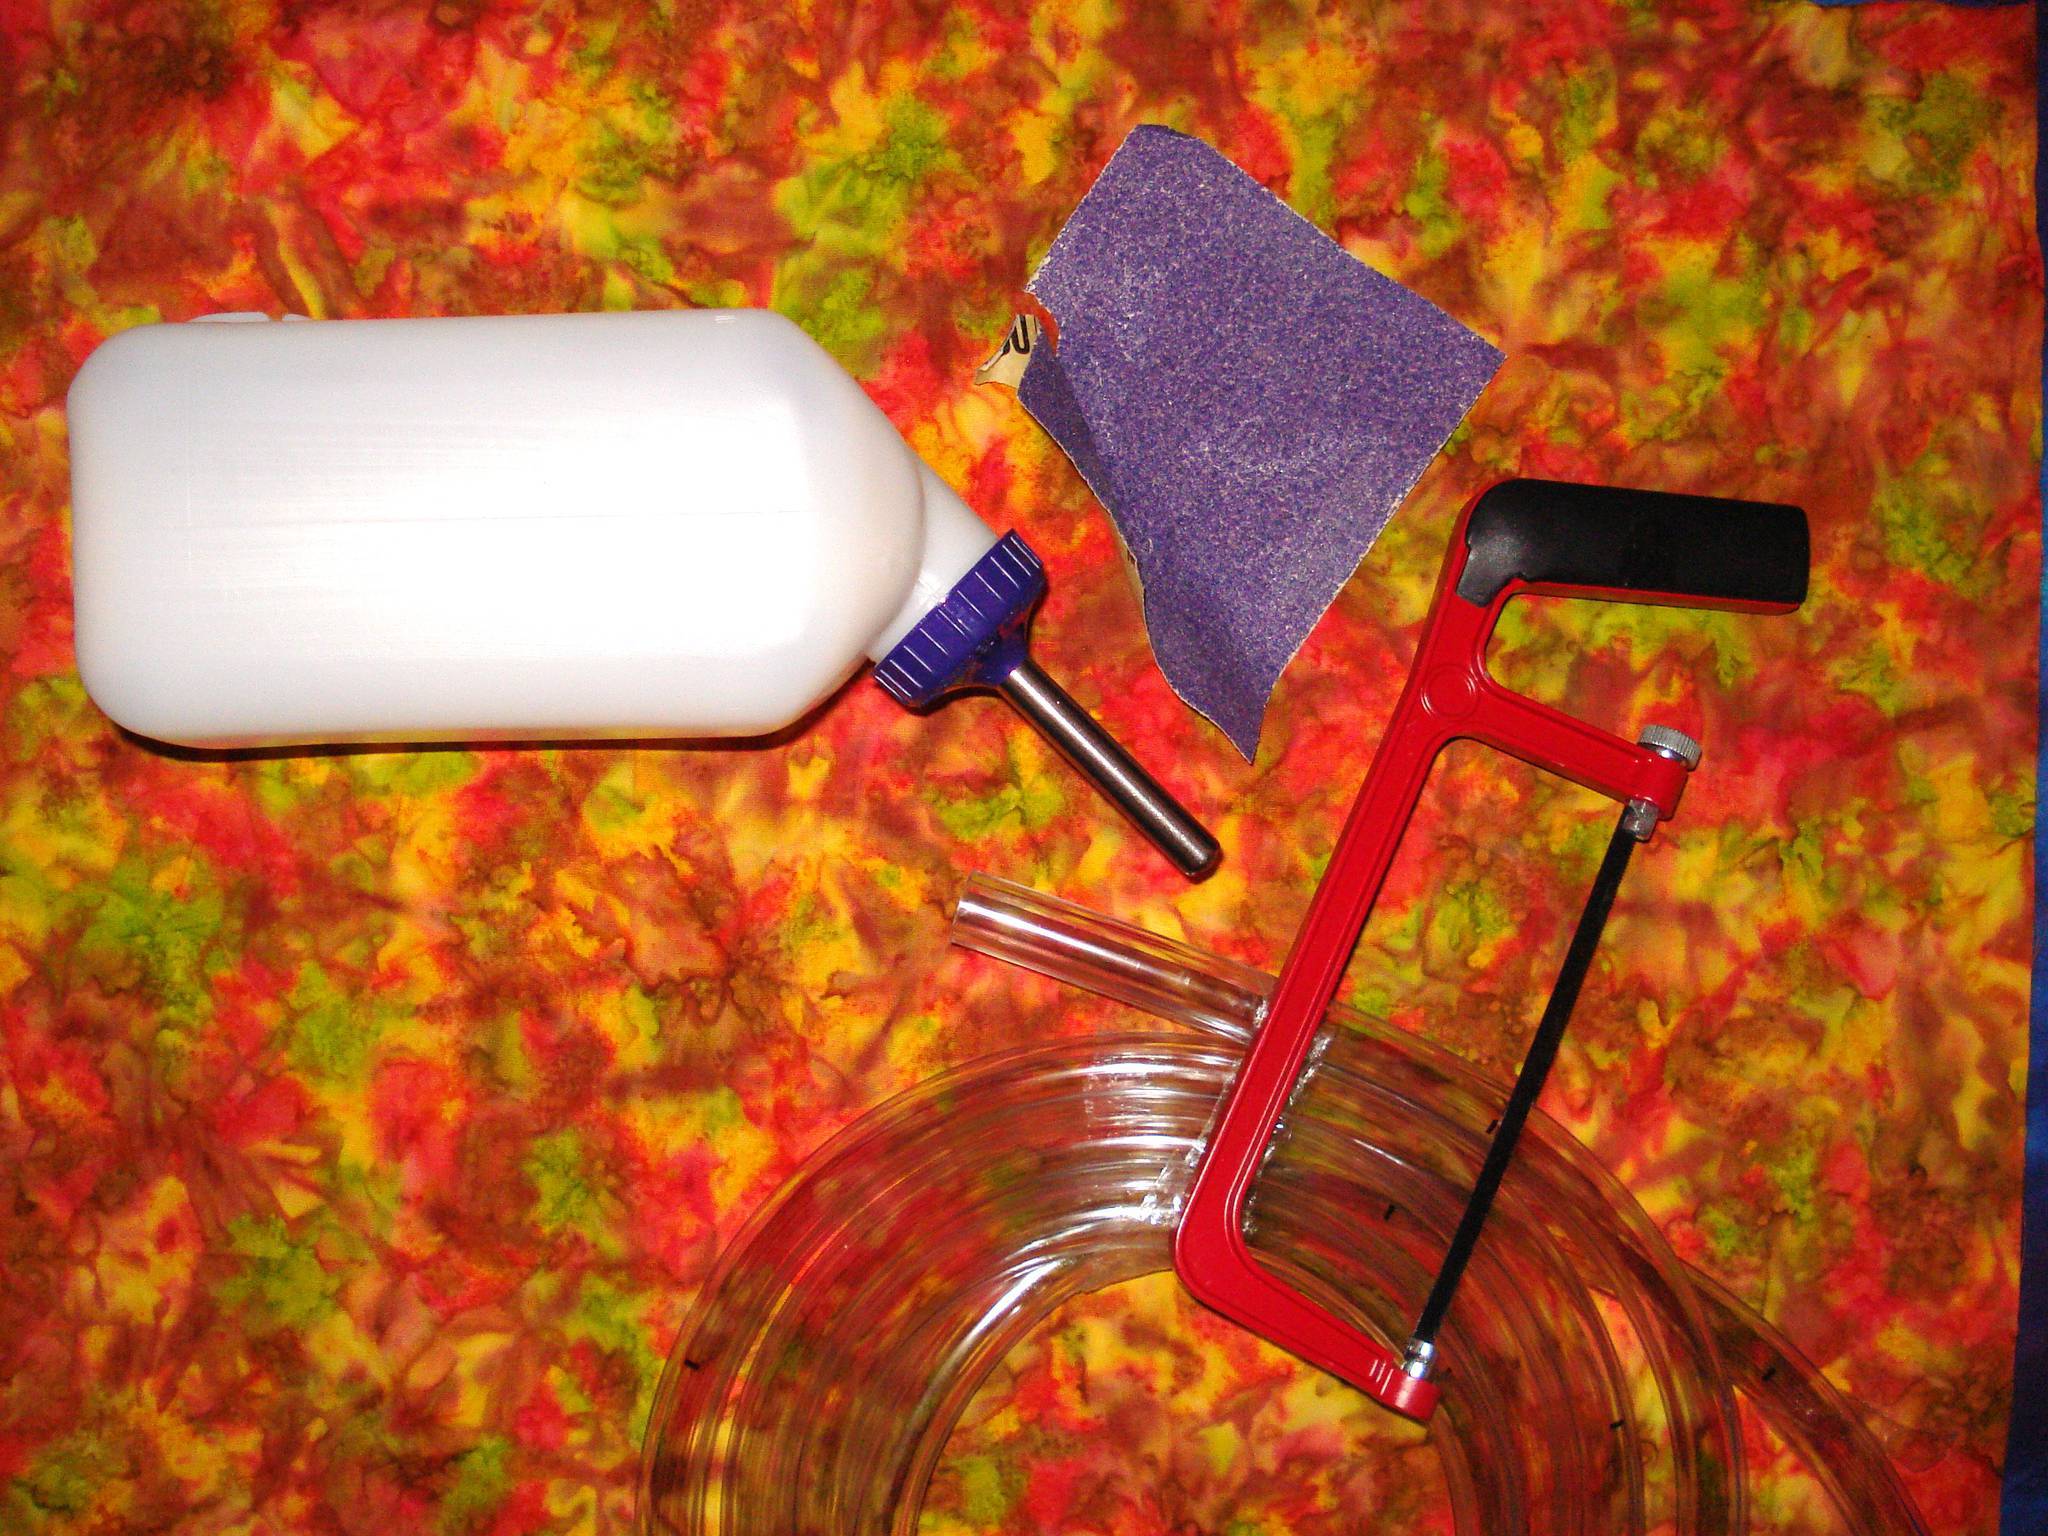
Well, I've been working on my drip-system, and I found some interesting problems with even more interesting (and better) solutions.
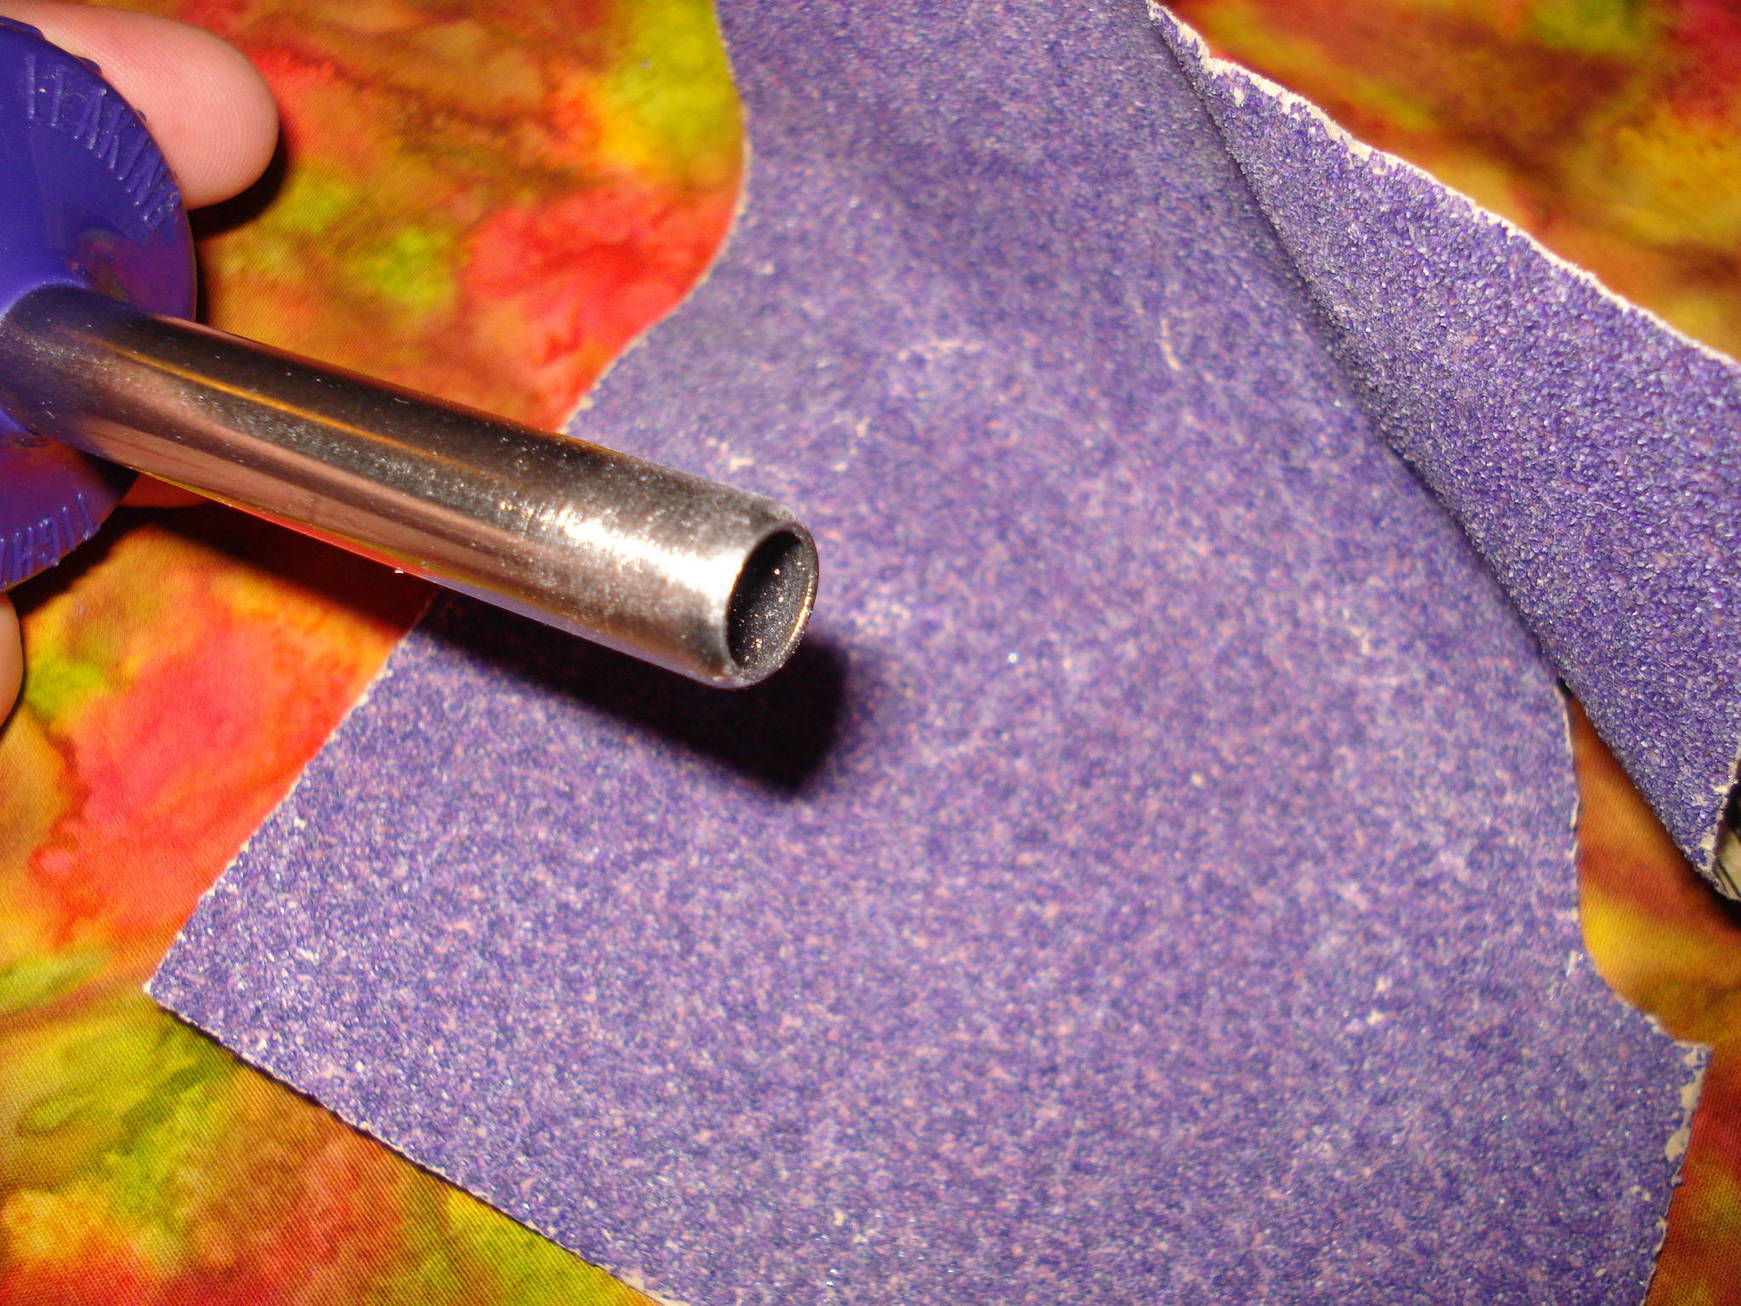
To get the water to flow correctly, I had to first modify the end of the pet water bottle to remove that little ball-bearing.
Here's what I used: Sand-paper (to make it easiler to cut) and a small hand saw...

 -> Sanded chrome stem in hopes it would be easier to "grab" with the saw teeth. I was wrong.... -> Sanded chrome stem in hopes it would be easier to "grab" with the saw teeth. I was wrong....
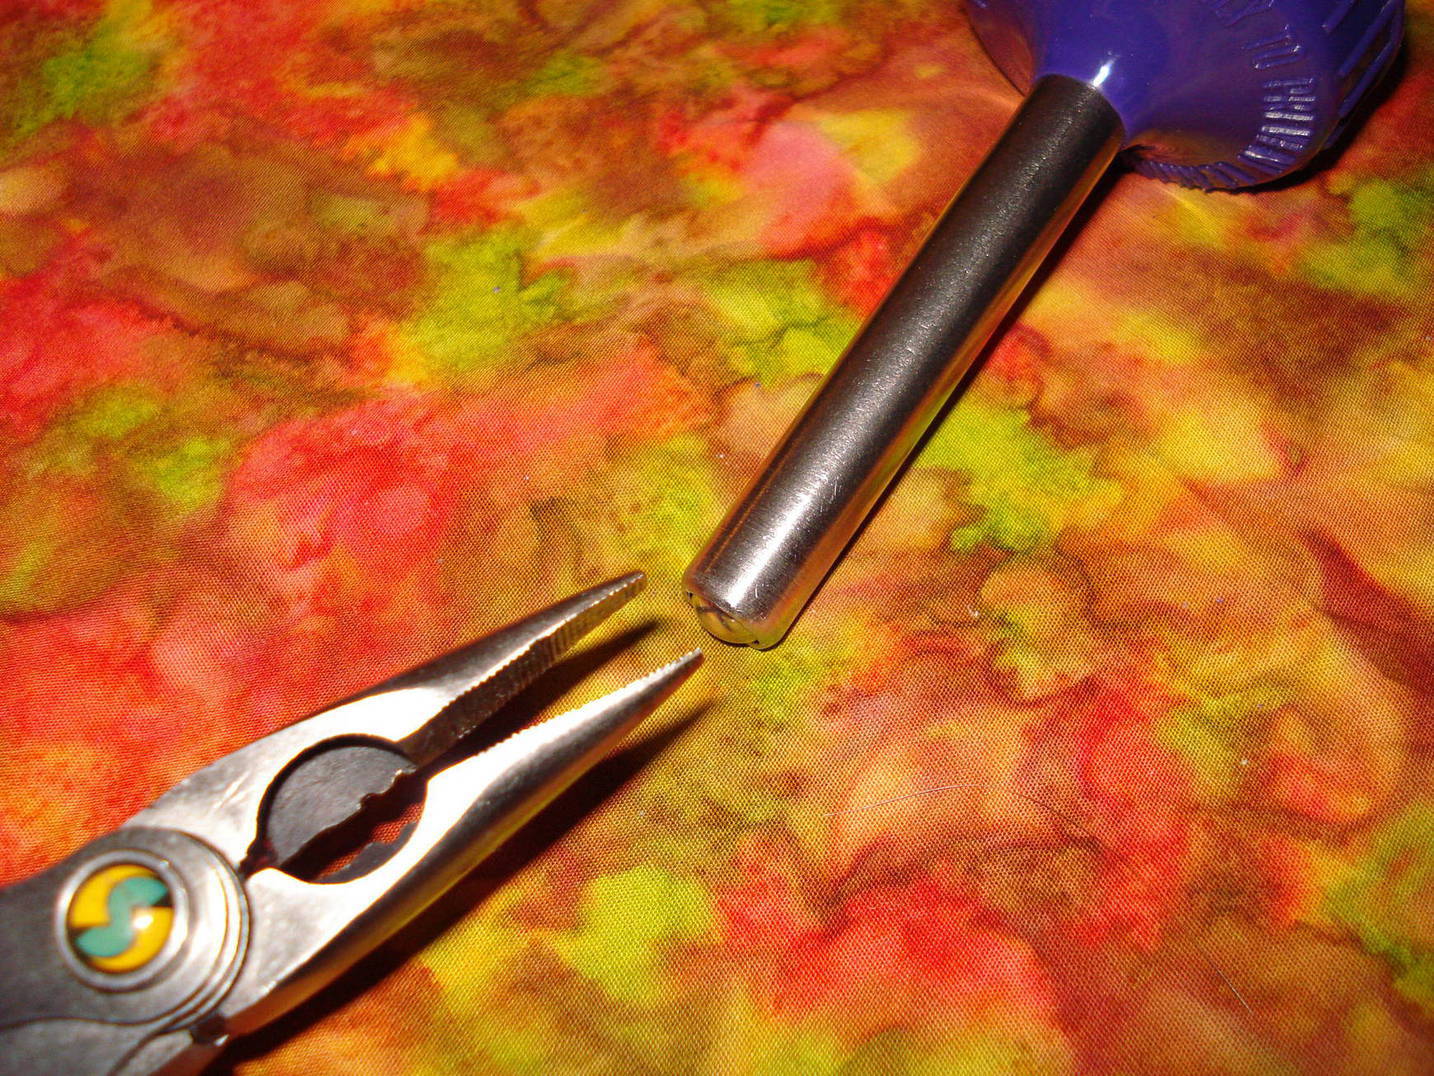
 -> Now I had to get the ball-bearing out. Time for the hand saw. -> Now I had to get the ball-bearing out. Time for the hand saw.
 -> The sanding didn't help at all with the sawing of the stem, so I skipped it and tried Plan B: fold back the "lip" on the end of the tube with a pair of pilers. This didn't work either, but any measures. The steel is too thick, I give up. -> The sanding didn't help at all with the sawing of the stem, so I skipped it and tried Plan B: fold back the "lip" on the end of the tube with a pair of pilers. This didn't work either, but any measures. The steel is too thick, I give up.
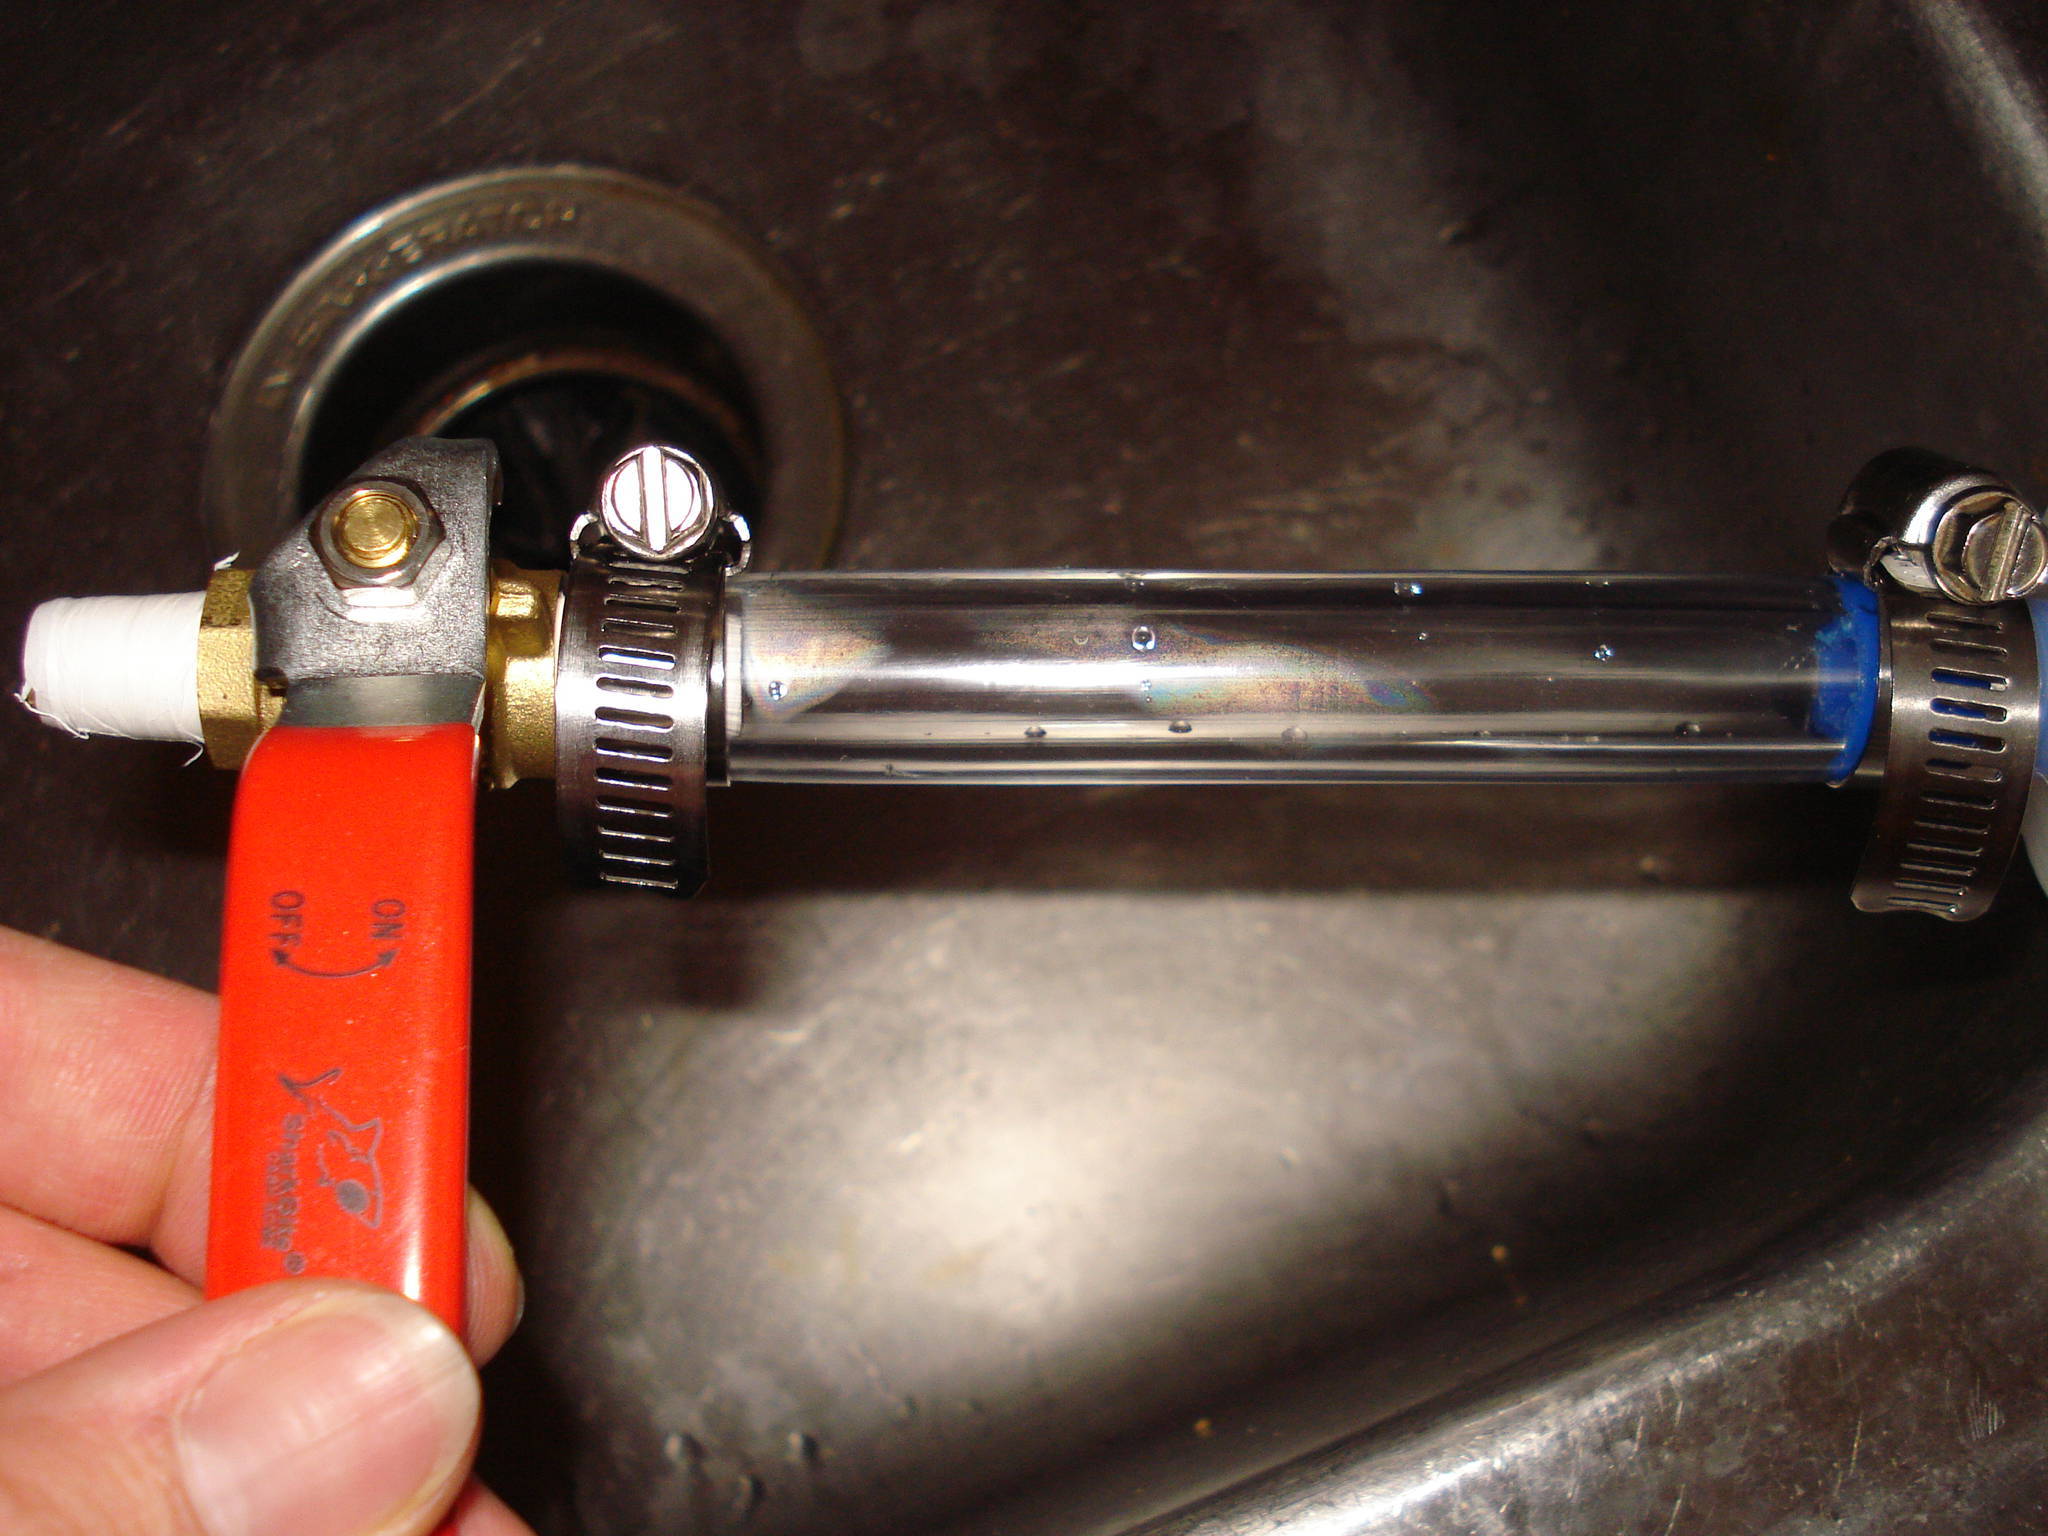
So, I realized that I didn't have the right tools to cut that metal. Also, I found out that the Outside Diameter of the tube is much *smaller* than I expected. I tried the tube on there with clamps on full-tension: it leaked. I'm giving up on the Pet Bottle.
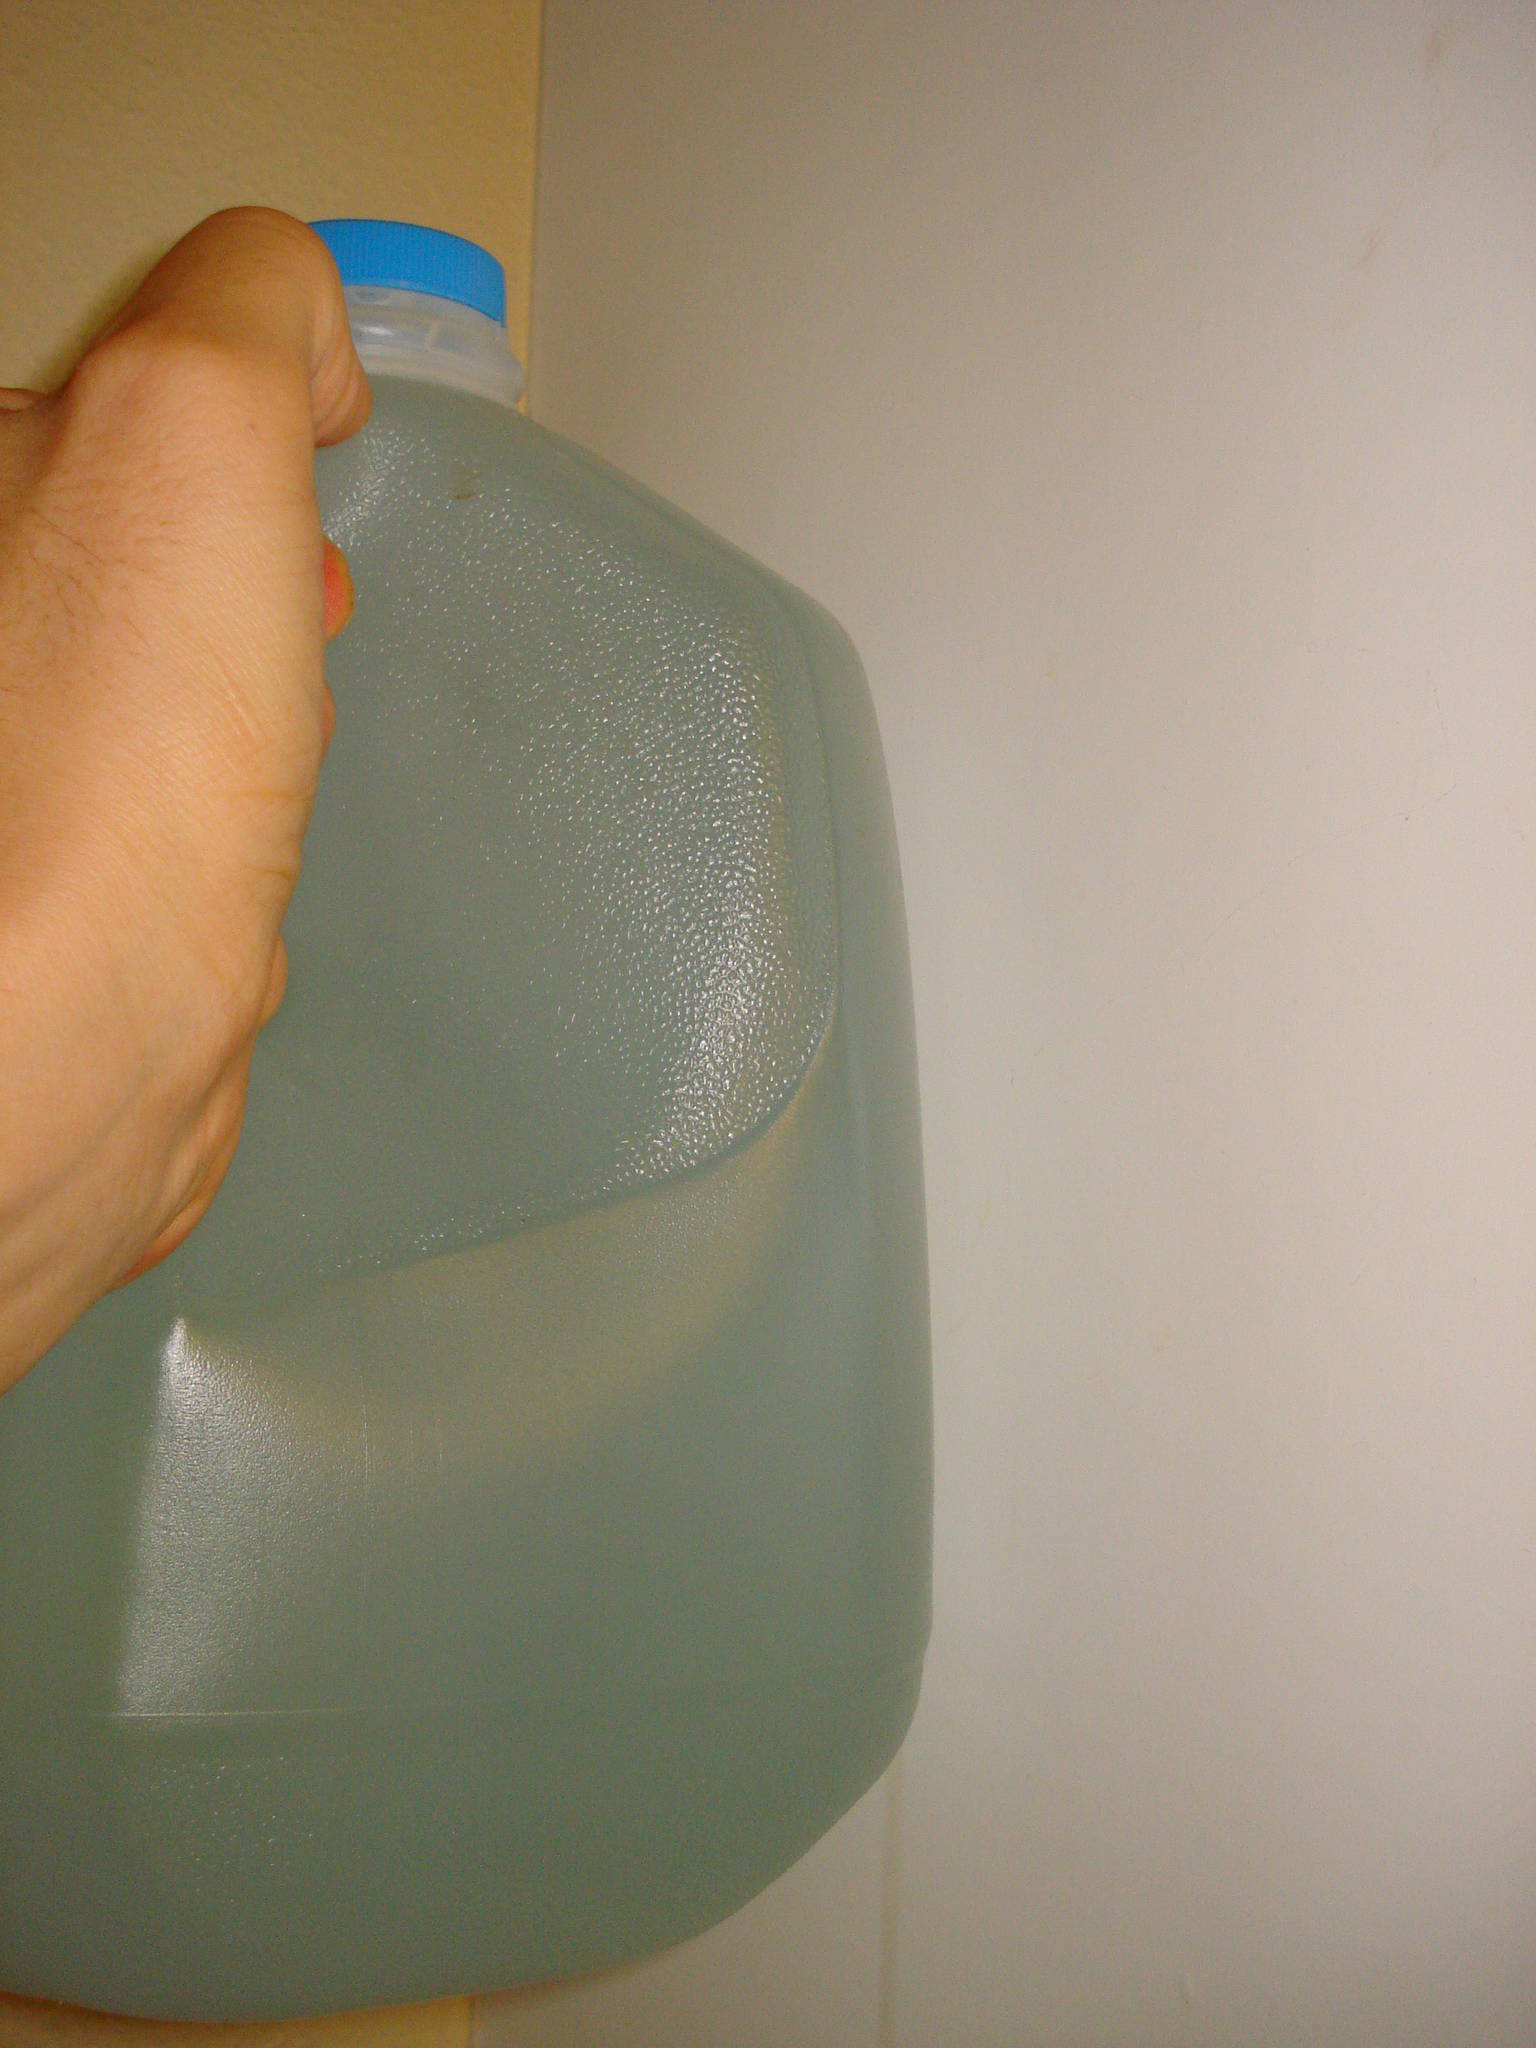
Then I remember the other container I was going to use: those 2.5 gallon drinking water "tubs" with the plastic water "valve" on the bottom. I used to buy these all the time, but sadly I recycle them, so I didn't have any, or so I thought...
After careful searching, I found an old one with the top cut out. I had turn this specific tub into a ghetto cooler, and believe me, it works great! Its got a handle, its cheap, durable, and there's a valve to drain out the melted ice.
---------------------------------------------------------------------------------------------
Anyway, here it is, ready for modification...

(Note: I took like 15 photos showing how I made this, but since it takes so long to upload, I'm just gunna post 5. So if it looks like magic, its not, its just a jump in time)
 -> Then I cut the tube so its only 5 inches, then I put A LOT of Telfon(r) tape over the barbs because it fit *very* loose inside the tube, even thou its supposed to fit tight in there like a shinny glove). Then, I tightened those metal straps, and then tested it by filling the tub with water. It held the gravity pressure very well! -> Then I cut the tube so its only 5 inches, then I put A LOT of Telfon(r) tape over the barbs because it fit *very* loose inside the tube, even thou its supposed to fit tight in there like a shinny glove). Then, I tightened those metal straps, and then tested it by filling the tub with water. It held the gravity pressure very well!
 -> Here's the final product. Here I tested it to see if I could precisly get a small drip by playing with the 1/4 valve. -> Here's the final product. Here I tested it to see if I could precisly get a small drip by playing with the 1/4 valve.
I did ( ), but it was tricky. Here's my evidence that it works, but it takes some time to get it right.... ), but it was tricky. Here's my evidence that it works, but it takes some time to get it right....
Conclusion:
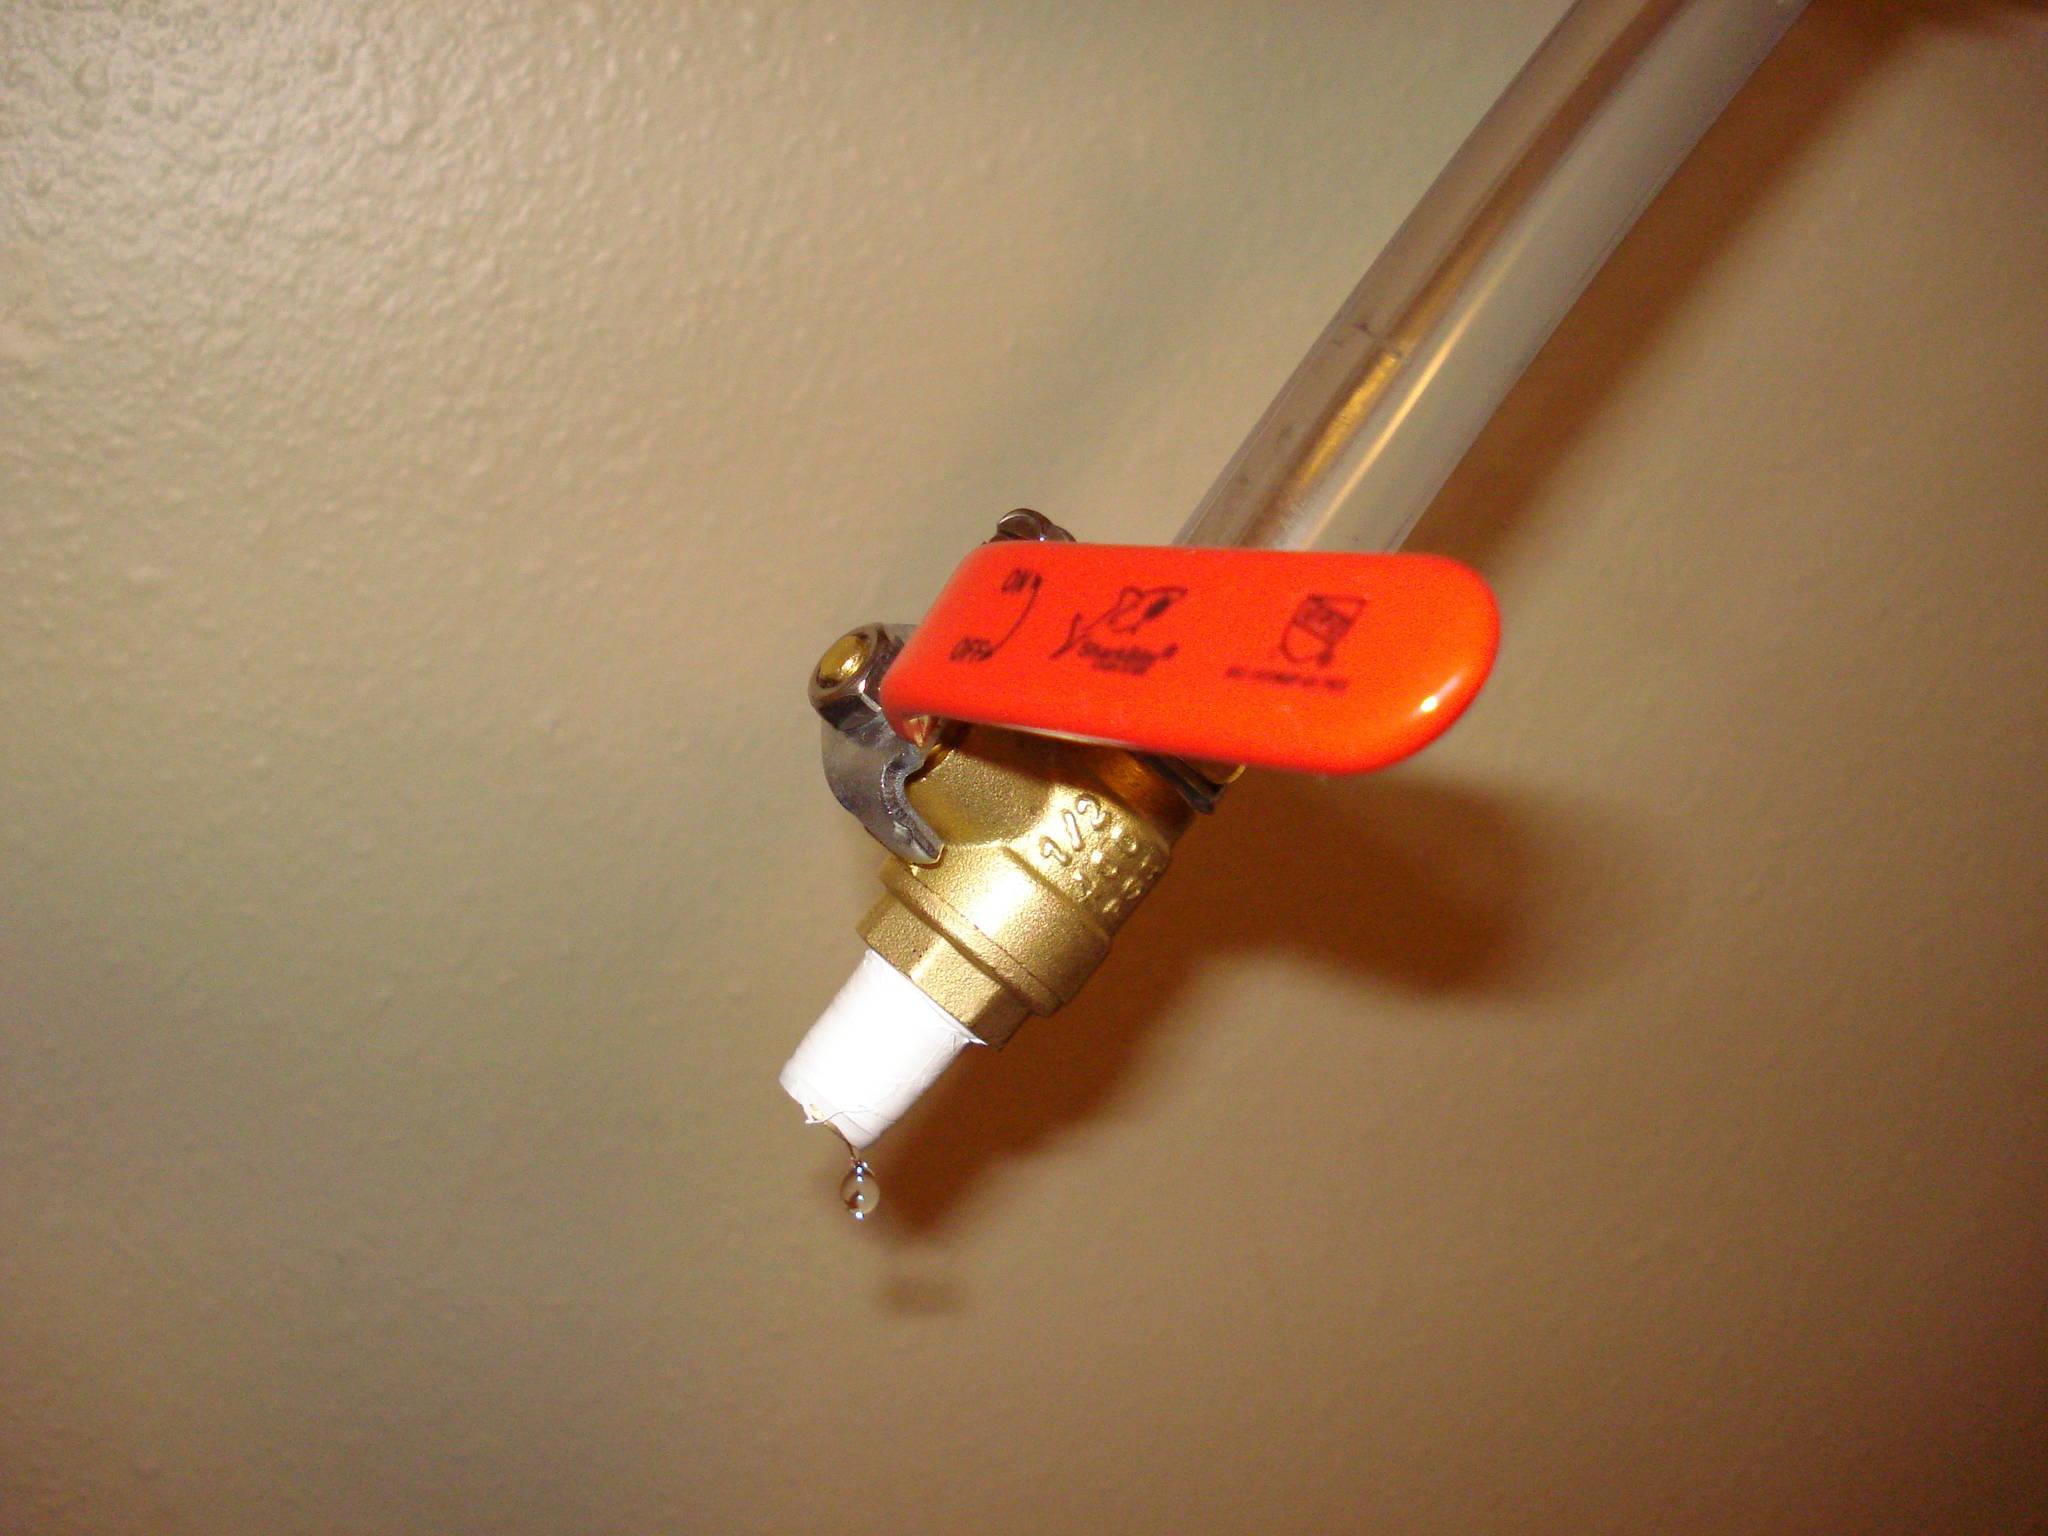
The Drinking Water jug is *way* better than the pet water bottle. I'm returning the silly Pet water bottle on Wednesday. Here's my reasons why:
Pros
1) The best thing, the stem is almost exactly 1/2 in diameter. But, I recomend puting some Teflon(r) tape to waterproof it *completely*.
1.5) Its a lot cheaper at about $3 a jug. (the pet thing was $14)
2) It holds A LOT more water than the pet thingy. A whopping 2.5 gallons
3) Its much easier to modify because the stem is plastic (and not chrome metal like the Pet thingy).
4) The handle is useful for hanging on a closet bar/rail
5) They are easy to find in a supermarket. The Pet thingy is only at pet stores
Cons
1) No easy way to refill it (I might have to cut a hole in the top)
2) Stem is plastic
3) Stem is NOT fixed (it moves back and forth) unlike the stem on the pet bottle which was fixed in place. This makes it hard to install the tubing, because it moves inward while I tried to put the tubing on. Involving a flathead Screwdriver on the inside of the tube to keep it still while you force the tube on the stem.
4) Stem is a little short (which makes it difficult to attach the tubing)
5) Because of the large size of the jug, if it leaks or spills, there will be a lot of water spillage on the carpet, which would be disaster.
So, mostly the stem is not as good as the other pet one, but at least its the right Outside diameter at 1/2" wide. The 1/2" diameter is a common size for tubing and valves, which makes it nice to find parts for. 
Overall, I like th jug. A much better alternative.
On Wednesday, I'll set-up the closet (gotta clean too) with all the life-support systems along with a random tropical plant to make sure my set-up can support life.
Just the Beginning...
~ TrueHerbCrystaL ~
Edited by TrueHerbCrystal (04/04/10 06:22 AM)
|
TrueHerbCrystal
Uncertified Oregrowian
Registered: 02/07/09
Posts: 1,352
Loc: Emerald City
Last seen: 6 years, 6 months
|
Re: All CFL Semi-Automated Closet Project (FirstGrow)(Pre-Seeds) [Re: TrueHerbCrystal]
#351153 - 01/21/10 03:49 AM (15 years, 2 months ago) |
|
|
***Construction Update***
Date: January 21, 2010. 1:56am
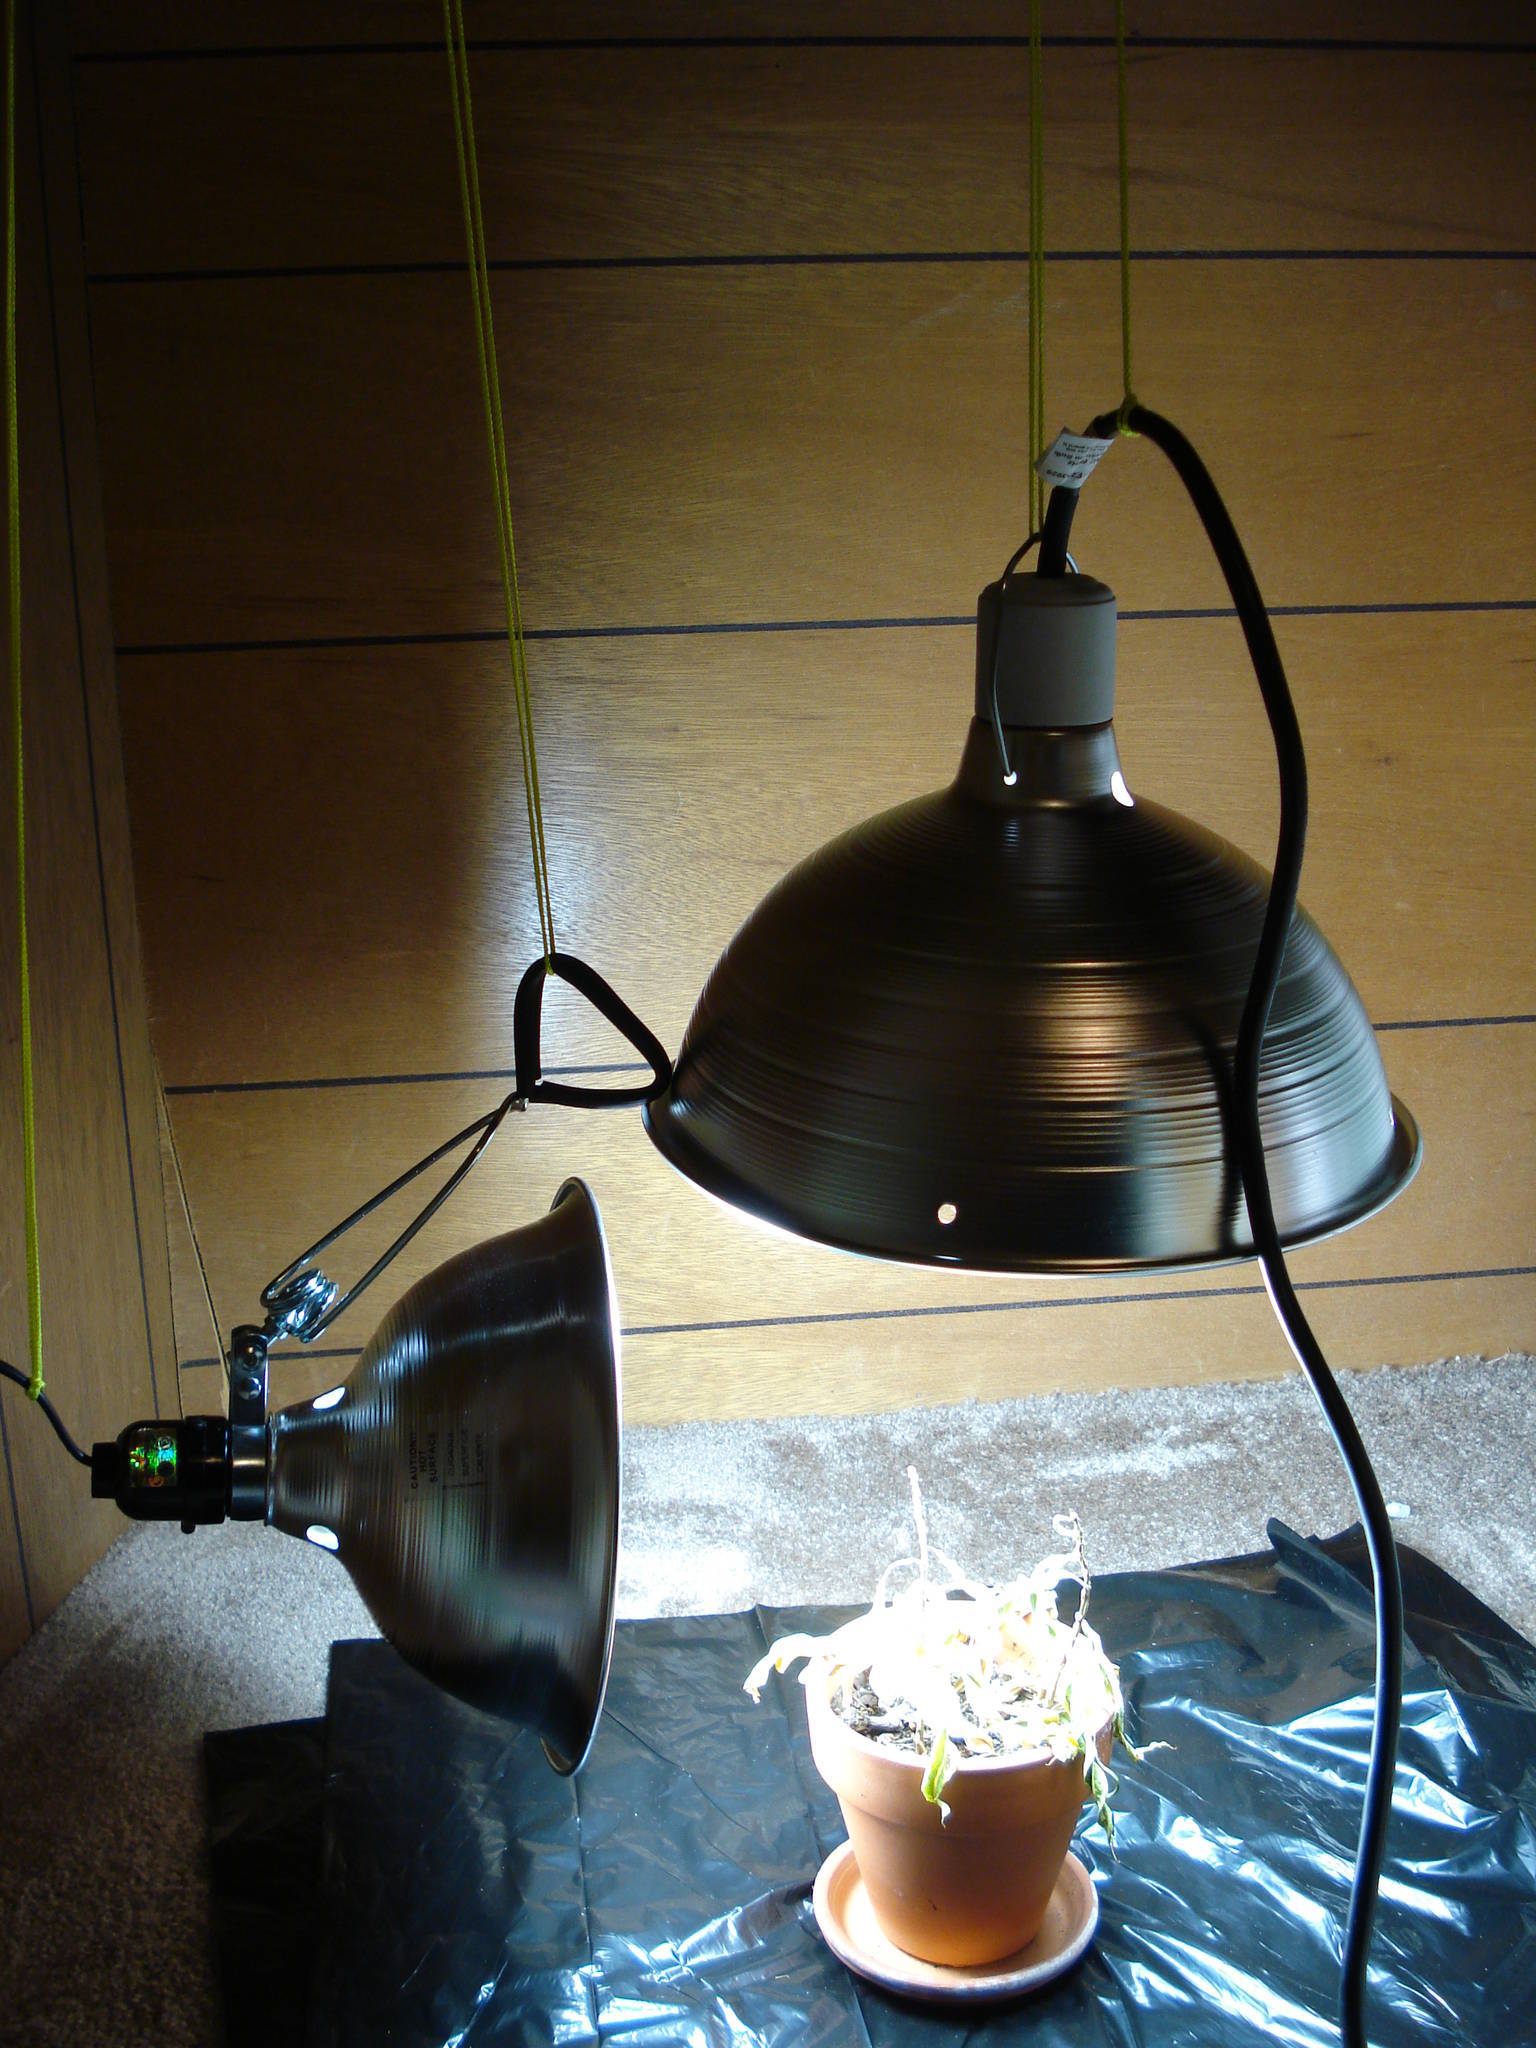
Status Report: Light, fan, and stealth system installed and functional. Gravity drip system yet to be set-up.
Wide-view of Closet set-up (thus far):
I hung one of my light fixtures on Tuesday. Today, I bought another, smaller reflector because after reading this quote from thread "number of CFL's", quoted from a post from Sirius...
Quote:
Sirius said:
"I think you're going to want at least 100 watts for one plant (the CFL wattage, not the incandescent equivalent).
More the better, definitely"
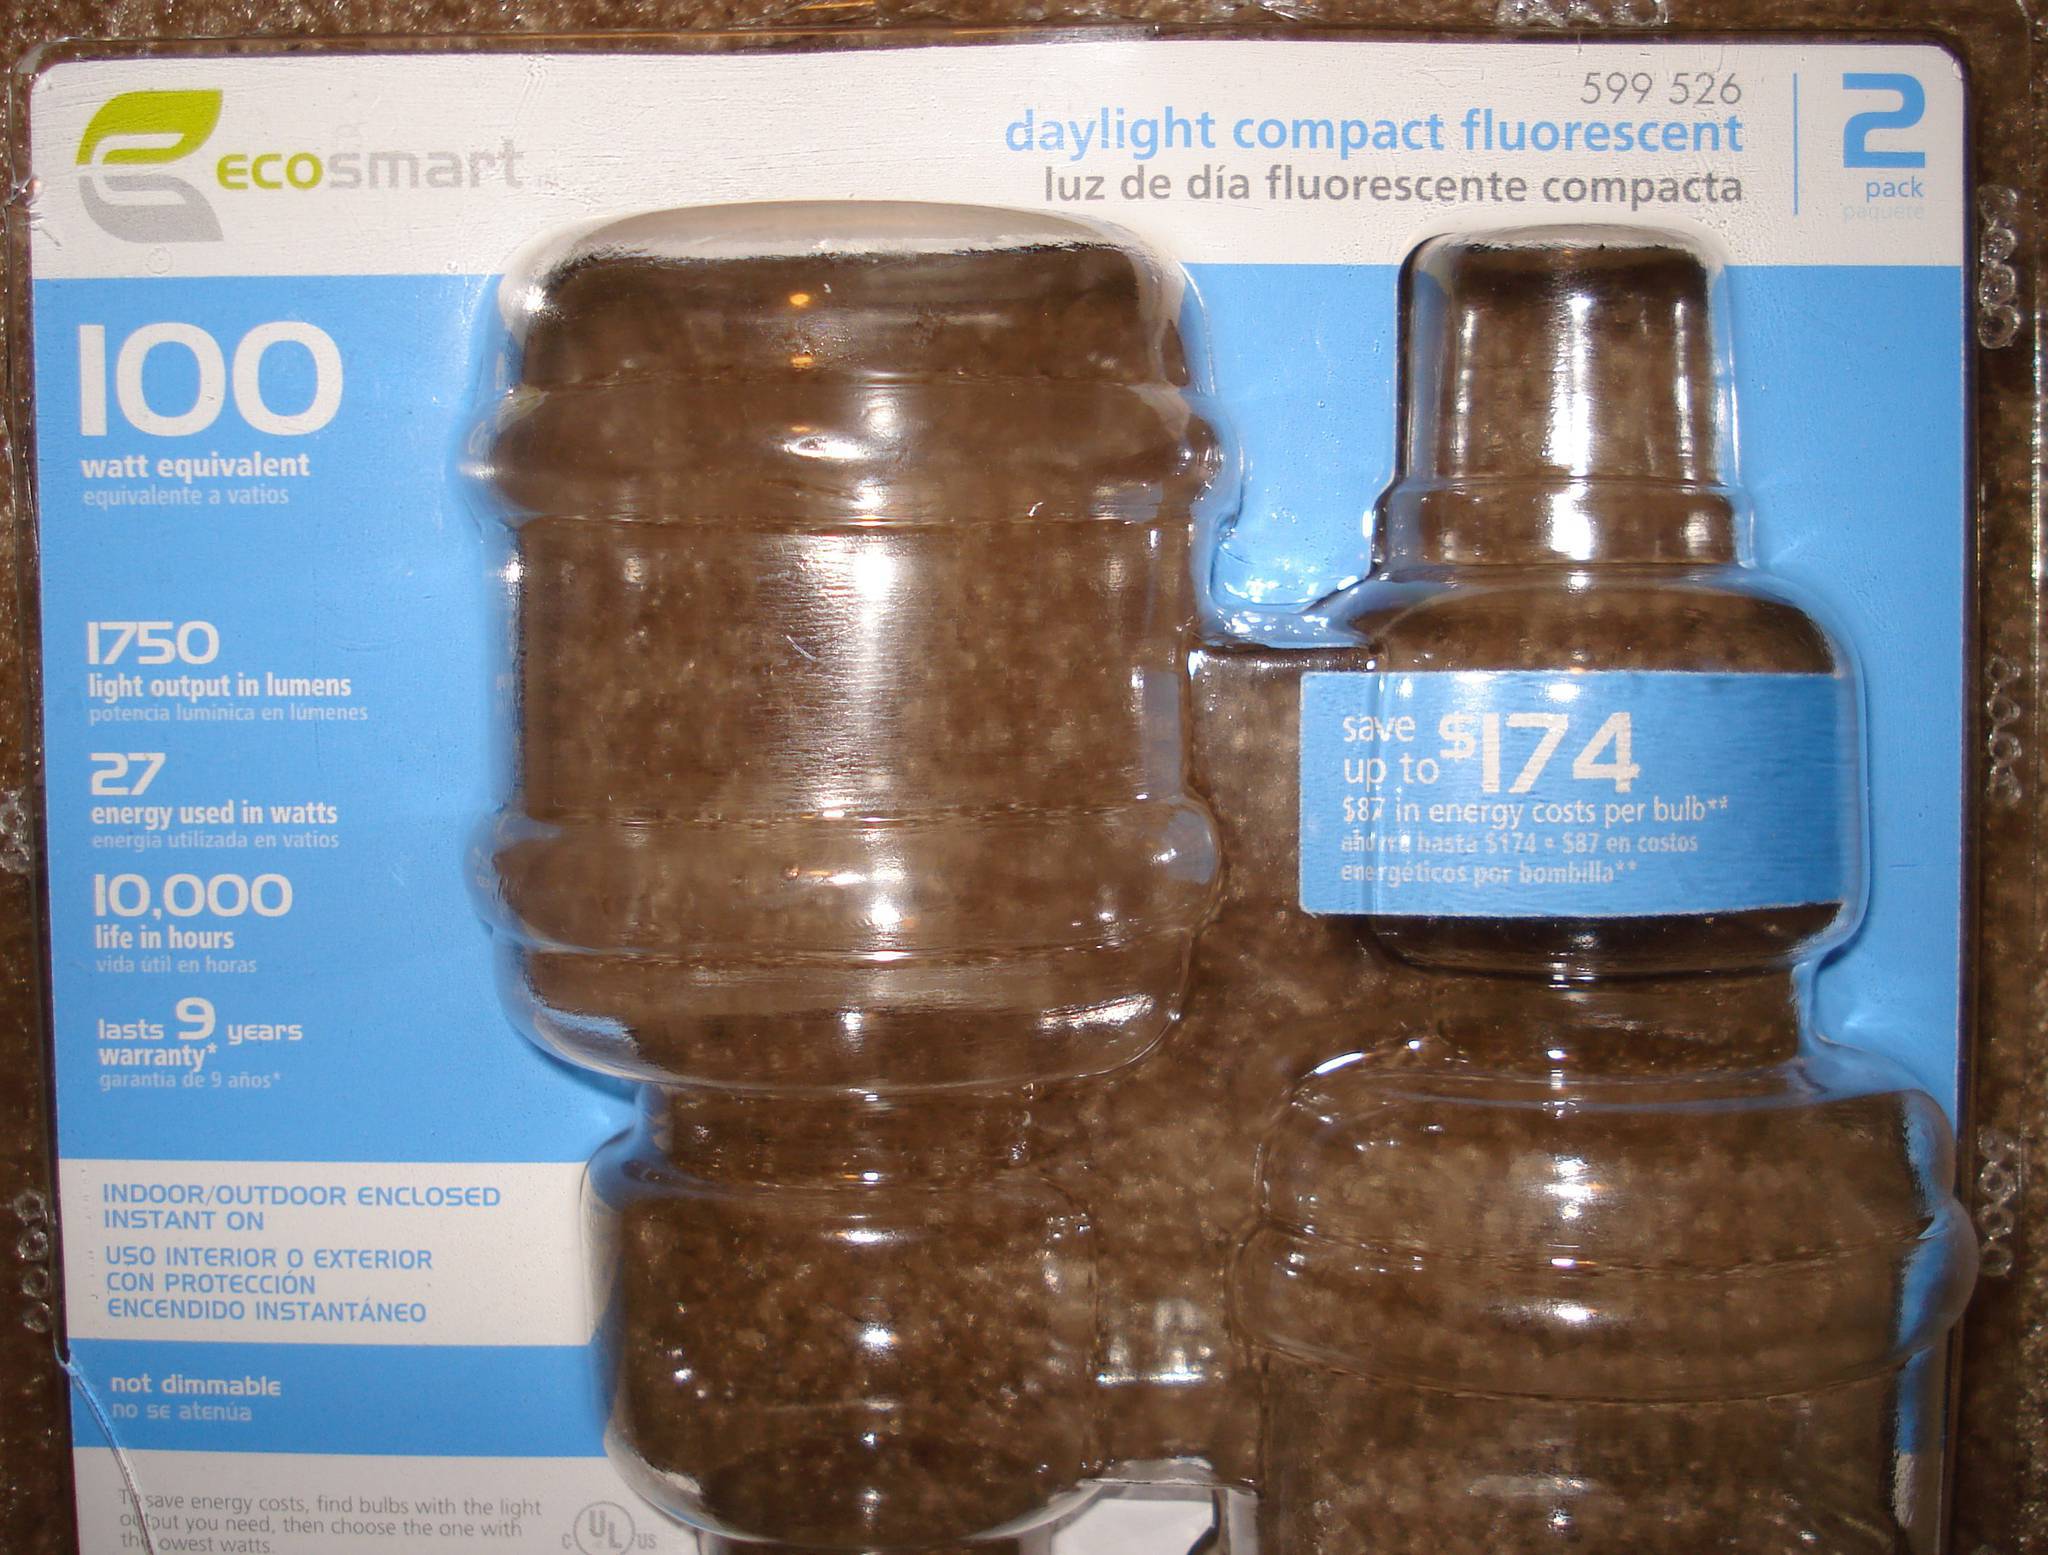
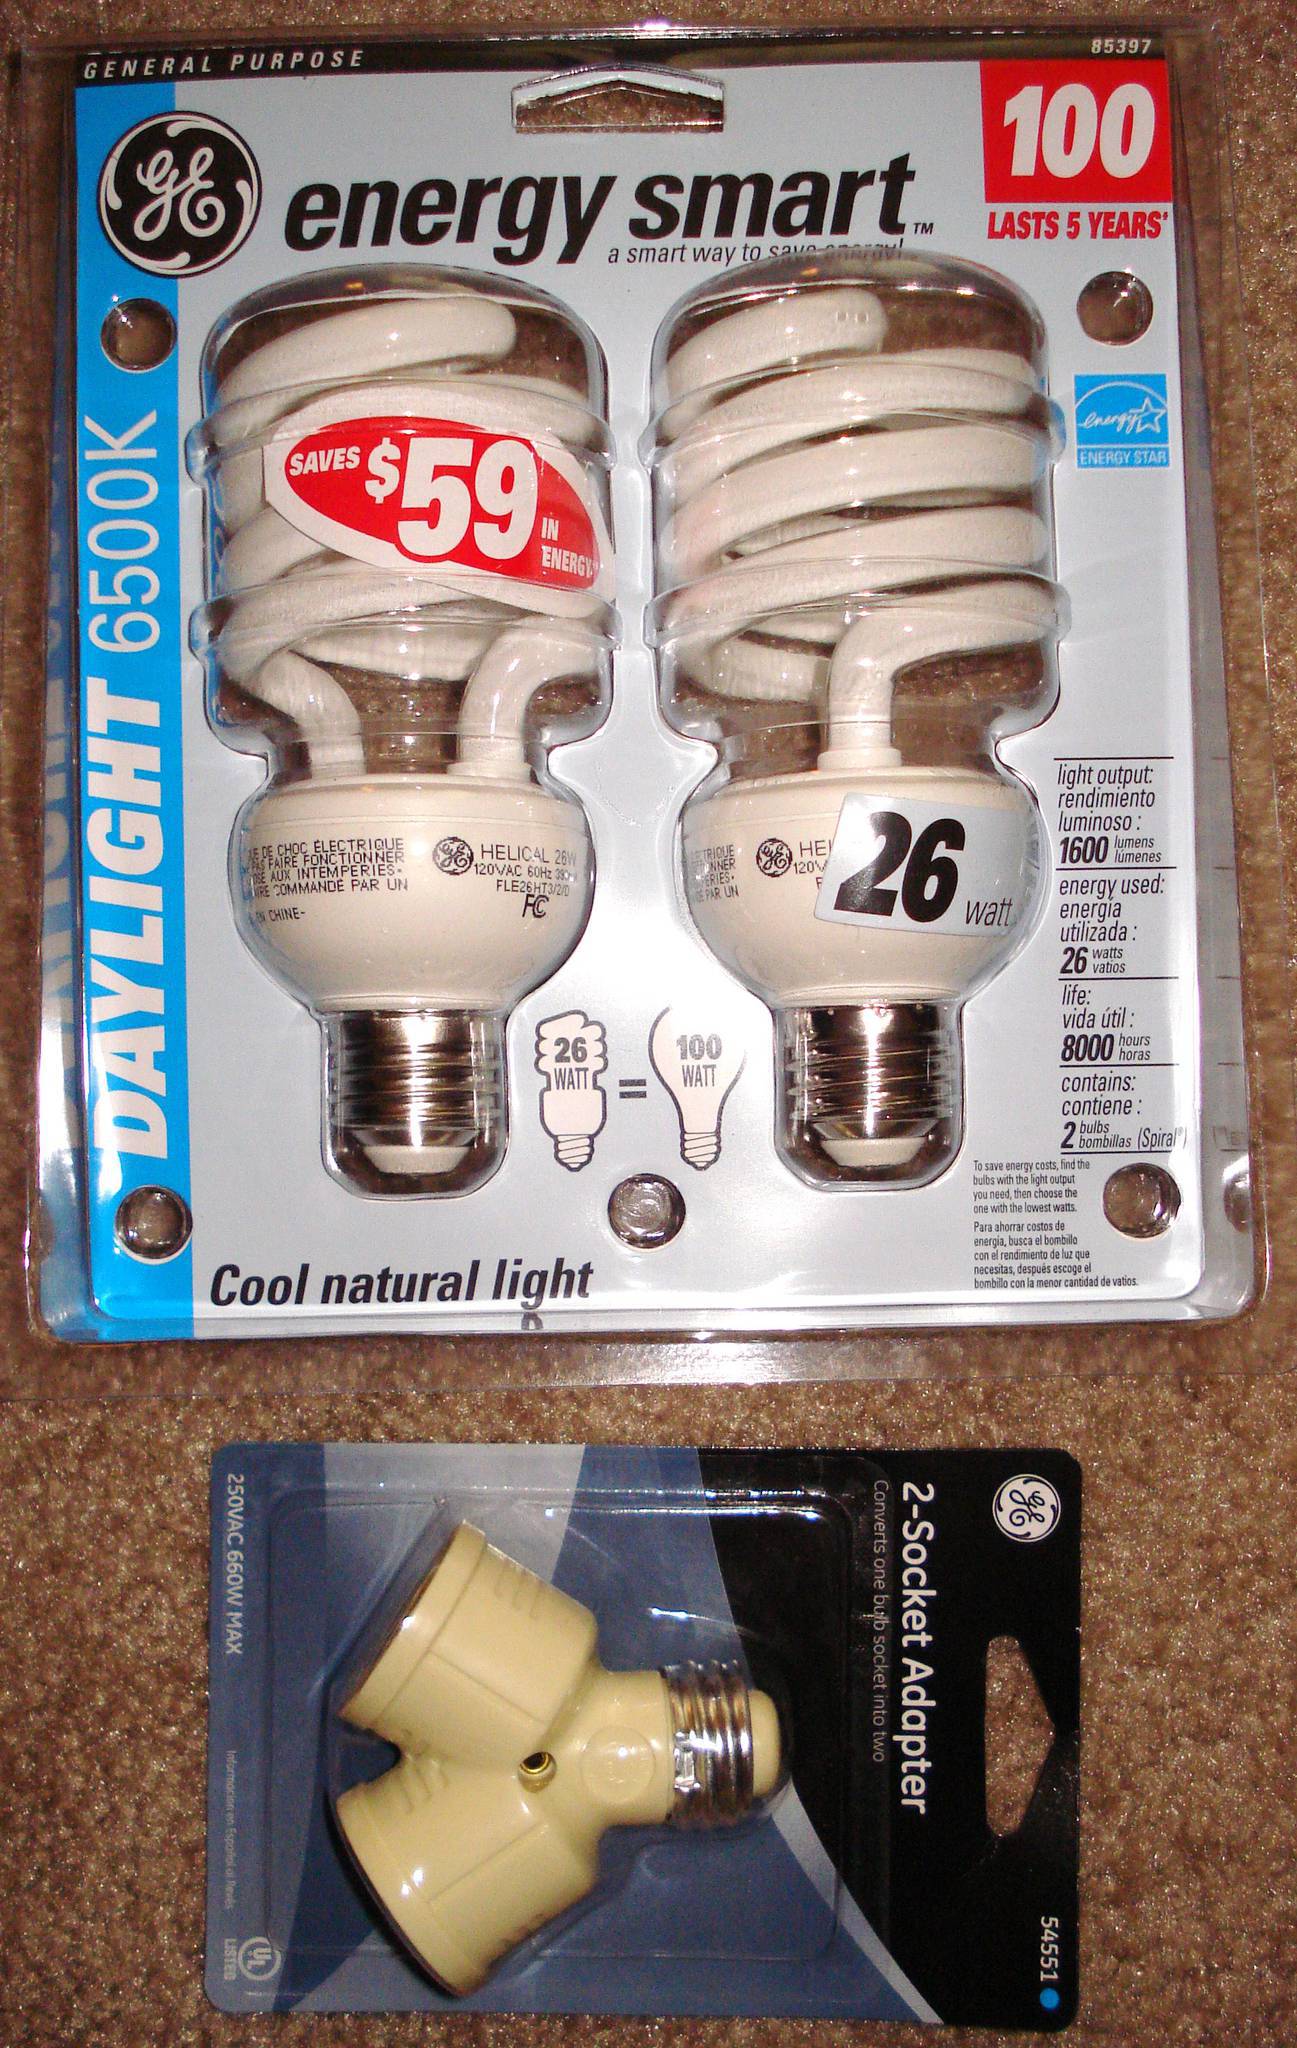
....I knew my 1 - 42 watt CFL wouldn't be enough after reading this quote by the planet man. Also, I noticed that the color temp. on this 42 watt was 2,700K called "Cool White", which is good for budding but not vegi-growth. So, I went to Homey-D and looked for a 42 watt in "Daylight" color temp., which is typically 5,000K+.
The problem is that I could only find a 27 watt model in the "Daylight" color type, but they were *really* cheap at $1.50 a 2 pack, which as nothing short of awesome!
Here's the deatils on the actual package:

^ Color temp. info is in the top-left corner, wattage on the right (the large "100" is the equivalent, NOT the actual wattage).
I also bought another reflecting dish, but this one is smaller at 8.5" diameter. I got the smaller one because these "Daylight" bulbs are smaller than the larger 42 watt CFL's I bought. I installed both 27watt "Daylight" CFL bulbs in the the lamp clamps, then hung them up using construction string.
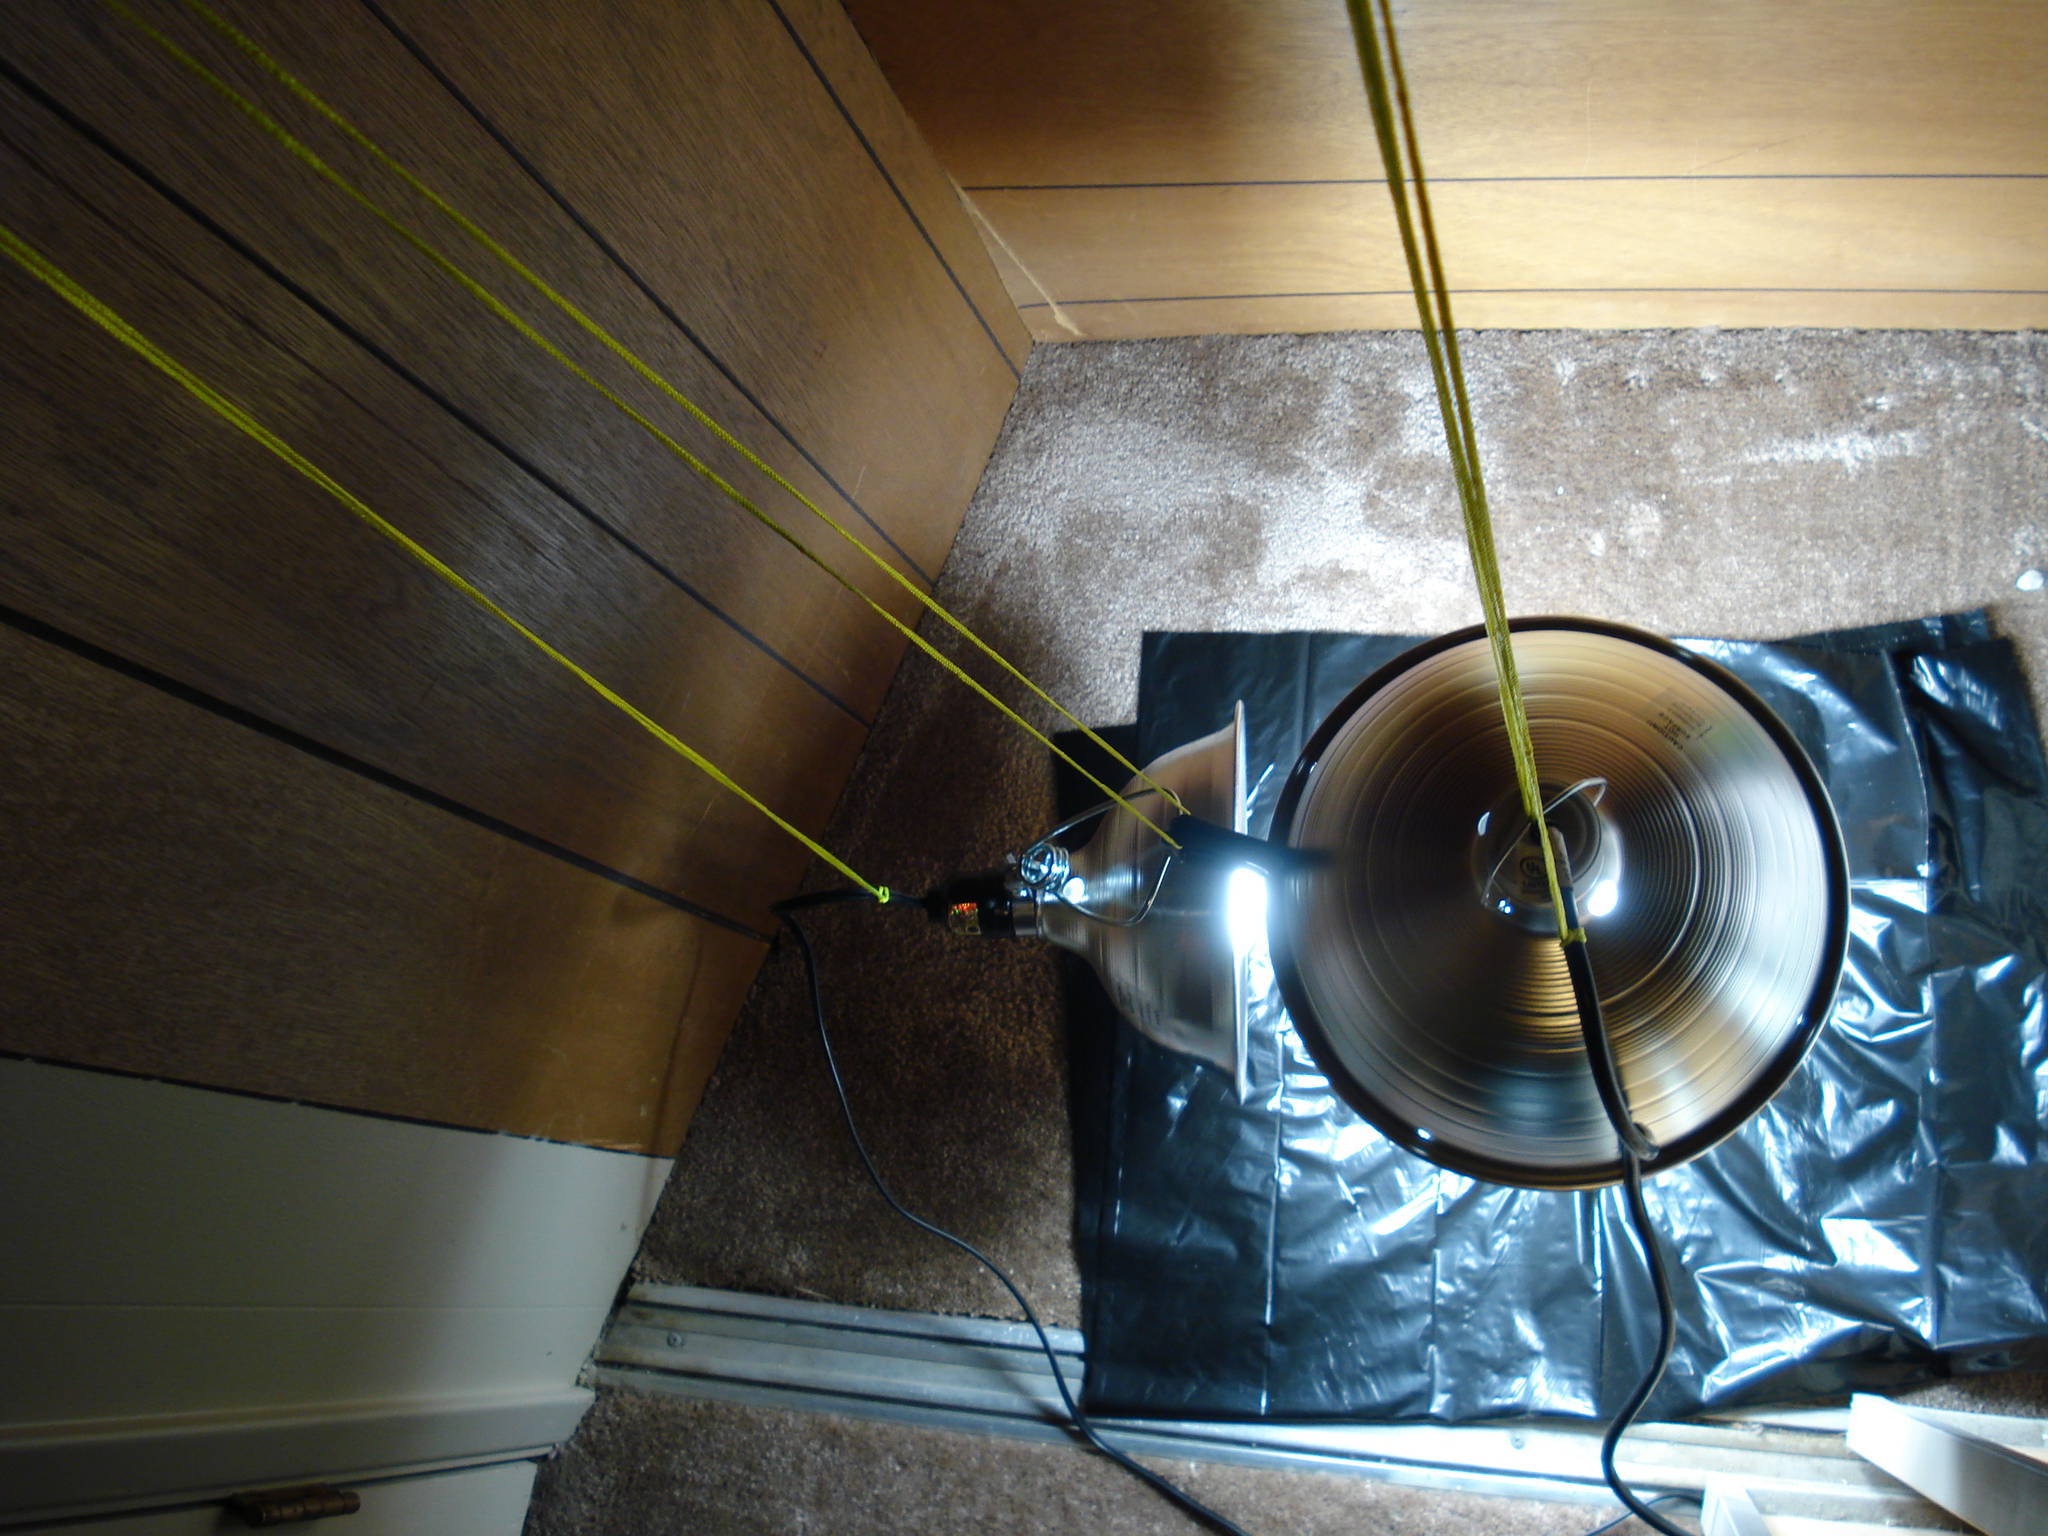
After about 0.5 an hour of running green string and power cords, I created my lighting system thus far:
^As a stand-in, I'm using a dead tropical plant I had living but died when I went on vacation. I'm hoping this plant I'm using for demostration doesn't become a metaphor to what happens to my *actual* M.J. plant that I attempt to grow.
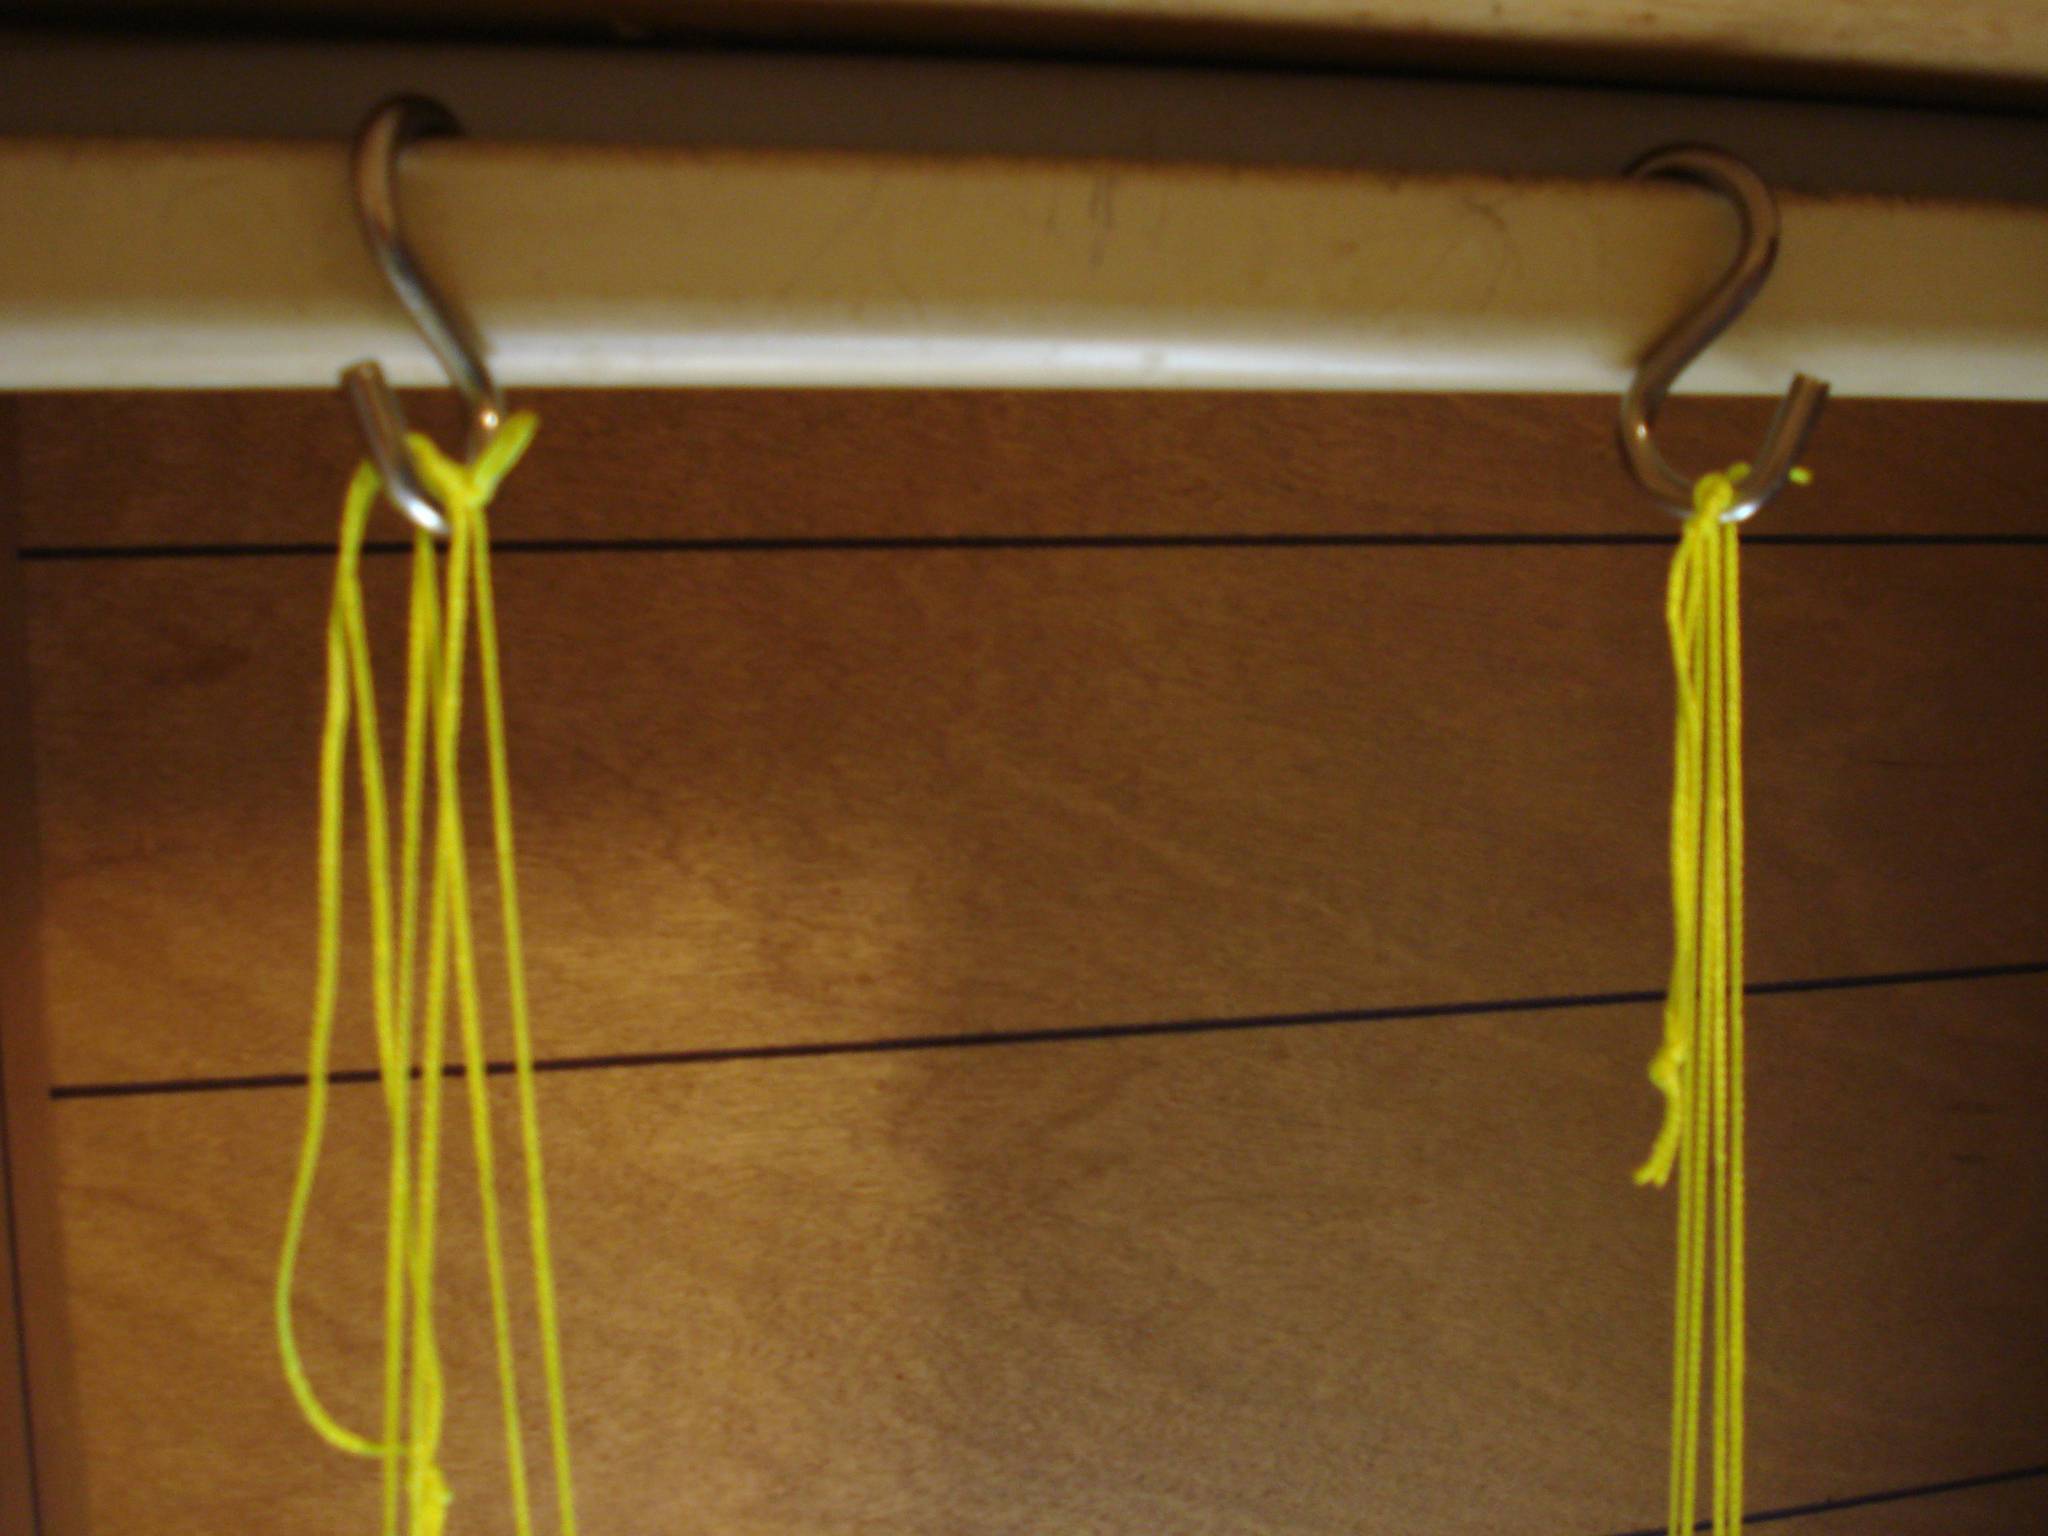
I used metal hooks to interface with the weird rail bar in the closet for hanging my support strings:

Here's a cool top-view of the strings and lights:

Since the lights were in place and functional, I could now work on stealthing it.
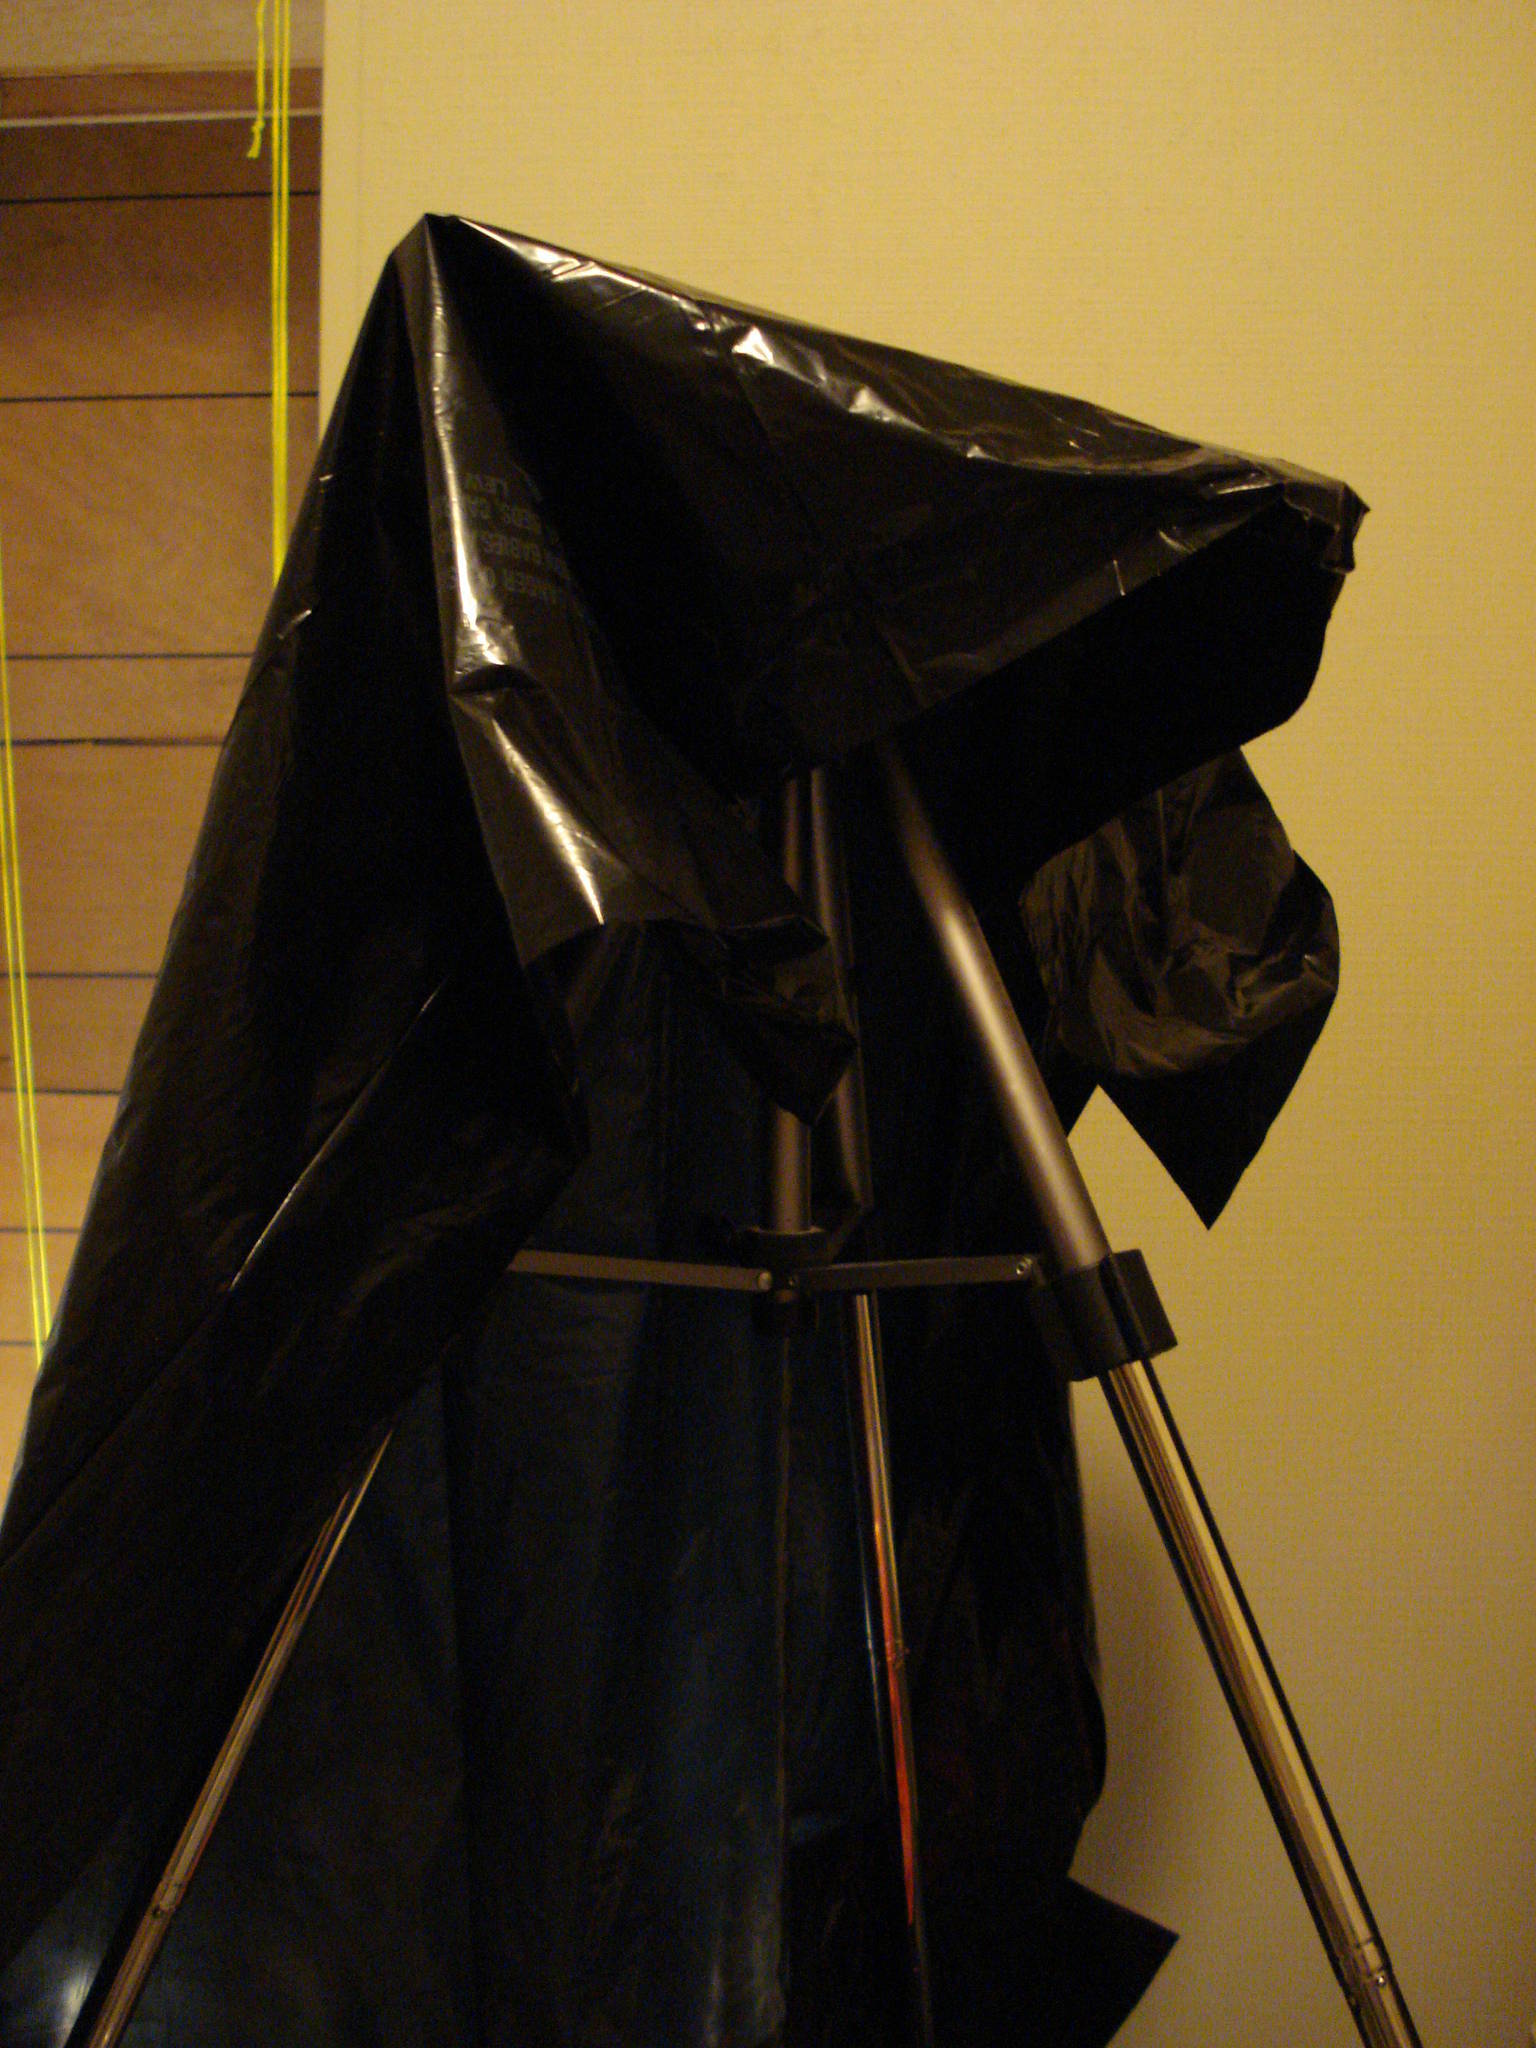
I used 2 large black garbage bags, a tri-pod and some duct-tape to cover some of the light hitting the window in the room.
This is what is looks like from the back:

It works pretty well, even thou its really simple and doesn't cover much.
Here's the effect it has on the stray light coming from the closet:

^ As you can see from the photo, the light is *not* on the window, but around it. This small light-blocker works perfectly! I'm glad it was easy to set-up and didn't cost anything (since I already had the materials for it). I'm happy with it so far. 
-> My seed search.
I've found a website and company close to the Pacific Northwest that I have been searching for hours looking for the right seed (they have A LOT of seeds). I will not speak of the website name (in case that's againist the law), so the company shall remain nameless.
However, I will discuss some of the statistics they provide for the seeds I'm interested in getting.
Here's my critieria for my first plant:
- Short vegi-time. (1 month prefered. 2 months max)
- Shortest flowering time possible (about 6-7 weeks, because I'm moving out of here in about 5 months or the end of June)
- Has to be feminized (because its sexy...no because I don't wanna waste time messing with dude plants)
- near 100% Indica (because Indica's have the shortest flowering period. If I had more time, I would go 100% Sativa)
- Cheap. $10 a seed or less.
- Compact Size (because this is a small closet grow)
- Semi-good looking budz (no standard, looks-totally-generic-budz. Wouldn't be as fun or interesting.)
- Easy to grow Indoors (can't be touchy with nutrients and lighting. has to be for beginners (because I don't know what I'm doing))
- Can't stink too much (that means No AK-47, Skunk #1, or any other potent-smelling strains)
(^this list makes me sound kinda like a lazy, way-too-picky grower who doesn't have the patience for good budz...oh well.)
>>> My Top 3 Choices for my First Grow <<<
1) "Flower"
"Flowering time: 7 weeks/49 Days – 8 weeks
Indoor yield: Up to 100 gr indoor with 35-45 days of veg."
Cost: $7.25 per Feminized seed
2) "California"
"Indoor yield: Up to 80 gr indoor with 35-45 days of veg
[iFlowering time: 6.5 weeks (45 days).
Cost: $7.25 per Feminized seed"
3) "Speed Devil Automatic"
Type: Automatic Flowering
THC: 15%, CBD: 1,2%, CBN: 0,5%
Yeld: indoor 300-450 gr/m2, outdoor 15-50 gr/plant
Flowering period: 5 week
Harvest time outdoor: 60 days
Price: $15.03 CAD per Feminized seed
^ I like this one a lot, but the seeds are a little pricey. But, because Its got a lot of good qualities, I may reconsider, especially with that *very short* 5 week budding period and the fact its an auto-flowerer. I wonder how they make it auto-flower, that almost seems like genetic-splicing or a madd-scientist made it. How do you breed for that trait?
Thats all for now. its 2:45am, and I need to go to sleep now.
Thrusday I will buy a small tropical plant (that I forgot to buy on Wednesday) and install the gravity drip system so I can see if my system can support plant life.
To be continued...
~ TrueHerbCrystaL ~
Edited by TrueHerbCrystal (01/21/10 03:52 AM)
|
Inbred_gimp
Herb Connesuir

Registered: 10/07/09
Posts: 1,115
Loc: Beyond the wall of sleep
Last seen: 6 years, 8 months
|
Re: All CFL Semi-Automated Closet Project (FirstGrow)(Pre-Seeds) [Re: TrueHerbCrystal]
#351784 - 01/22/10 07:19 AM (15 years, 2 months ago) |
|
|
just a thought: why not just put a measuring jug under the drip system for a day to see how much it drips out? then see if thats enough for a marijuana plant each day, The other plant you were going to use might not have the same watering needs as a Cannabis plant. I will be following this grow looks very interesting, Keep up the regular updates and thorough posts i like growlogs which have alot of detail  , plus at the end you will have a great journal to look back on , plus at the end you will have a great journal to look back on
best of luck to you 
--------------------

|
Harry_Ba11sach
cannoisseur

Registered: 04/20/08
Posts: 11,753
Loc: Nepal
|
Re: All CFL Semi-Automated Closet Project (FirstGrow)(Pre-Seeds) [Re: TrueHerbCrystal]
#351788 - 01/22/10 07:43 AM (15 years, 2 months ago) |
|
|
it's funny that Furrowed called this project interesting, because that was the first thing that came to my mind too! you are a very interesting person Mr. Crystal, but you're also very thorough which is doubtlessly the most important thing for finding success in this hobby
I think you might want to consider a different arrangement for your lights. this arrangement is good for seedlings, but in a week or so you're going to want to at least triple the amount of bulbs you have on that plant. Something like this is very easy and cheap to make, but allows you to get a ton of light onto the plant. I've built several of these so if you need help finding any parts just let me know.

--------------------

|
Inbred_gimp
Herb Connesuir
Registered: 10/07/09
Posts: 1,115
Loc: Beyond the wall of sleep
Last seen: 6 years, 8 months
|
Re: All CFL Semi-Automated Closet Project (FirstGrow)(Pre-Seeds) [Re: Harry_Ba11sach]
#351791 - 01/22/10 08:26 AM (15 years, 2 months ago) |
|
|
Hey harry do you think you could write up a list of the parts needed to make a simple cfl setup like that i am interested in making one of my own for growing some clones in the off season
--------------------
|
TrueHerbCrystal
Uncertified Oregrowian
Registered: 02/07/09
Posts: 1,352
Loc: Emerald City
Last seen: 6 years, 6 months
|
 Re: All CFL Semi-Automated Closet Project (FirstGrow)(Pre-Seeds) [Re: Harry_Ba11sach] Re: All CFL Semi-Automated Closet Project (FirstGrow)(Pre-Seeds) [Re: Harry_Ba11sach]
#351957 - 01/22/10 03:30 PM (15 years, 2 months ago) |
|
|
Thank for the kind remarks Harry_Ba11z and you too Inbred_Gimp.
I was touched (but not in a gay way, in a MANLY way) when I read your quote: "a very interesting person Mr. Crystal, but you're also very thorough which is doubtlessly the most important thing for finding success in this hobby. " I tend to be pretty detailed with everything I do, and this new hobby is no different. Also, by being thorough with my project step-by-step, I hope to inspire or encourage someone who wants to do something similar. Not that my method is revolutionary or unique, but I hope it gives some ideas and insight for anyone doing a semi low-budget project from my success/failures.
Its funny you recommended that 2-way spliter, because just today I thought "Those reflector fixtures are expensive, and I need more bulbs for my plant since 50 real watts of CFL is not enough. What If I bought one of those spilters I saw in another grow journal at the Growery. That will really make use of those reflector dishes!"
And that's what I did. And there so cheap too, it would be silly not to do it. Also, since it puts the bulbs at 90 degree angles, it gives the plant more even lighting instead of just straight top-down lighting like I have right now. There was only one in stock, so I got it. I'll get another one later when I actually have seeds.
Here's the splitter and *right* CFL bulbs. The splitter is a cheap version of the one you pictured, but it should work OK.

^As pictured above, I also found some excellent 26watt 6500K color temp CFL at the store today. I've been reading that during the Vegetation stage, plants like about 6000K color range or above, so I'm going to use a combo of a 27Watt 5000K and now one 26watt 6500K on a 2-way spliter socket connected to one reflector lamp. I hope that makes sense, bascially 2 different bulbs hooked up to one lamp clamp.
To Inbred_Gimp,
Quote:
You said:
Why not just put a measuring jug under the drip system for a day to see how much it drips out? Then you can see if that's enough for a marijuana plant each day.
Actually, that was going to be the next part of my Gravity Drip project, but since I've (ironically) been having problems with leaks at the water-jug to vinyl hose connection interface, I can't test the drip rate until I find a better alternative. Once I find a leak-free connection, I will be fine-tuning the valve to get the best drip rate, and I will be using time and a measuring cup to see how much water comes out over a period of time. I will also measure the amount of time the container (which ever I use) it takes to drip thru the whole container, to see how long I can be gone from my future plant without having to manually water it. Thats important because I don't want to overestimate and return to a dying or worst dead plant.
But I have found a better alternative, which I will discuss and build (while taking photos) in my next journal entry.
Drip Project has been Re-thought
~ TrueHerbCrystaL ~
Edited by TrueHerbCrystal (07/27/12 09:04 PM)
|
Sgt. Smoke
File up and smoke down!

Registered: 09/06/09
Posts: 43
Loc: Classified
Last seen: 14 years, 10 months
|
Re: All CFL Semi-Automated Closet Project (FirstGrow)(Pre-Seeds) [Re: TrueHerbCrystal]
#352001 - 01/22/10 05:08 PM (15 years, 2 months ago) |
|
|
You're attention to detail is phenomenal. I have no doubt you will love your new hobby and do a very good job:)
Rock on.
SGT.
--------------------
L.O.B.
LEGION OF BUD
|
TrueHerbCrystal
Uncertified Oregrowian
Registered: 02/07/09
Posts: 1,352
Loc: Emerald City
Last seen: 6 years, 6 months
|
 Re: All CFL Semi-Automated Closet Project (FirstGrow)(Pre-Seeds) [Re: Sgt. Smoke] Re: All CFL Semi-Automated Closet Project (FirstGrow)(Pre-Seeds) [Re: Sgt. Smoke]
#352726 - 01/24/10 04:47 PM (15 years, 2 months ago) |
|
|
***Current Seed Status***
Date of Entry: January 24, 2010
Thanks to a new friend here at the Growery, I will getting some free seeds for my first grow. I'm gunna have to give this nice person something special in return for their very generous offer to a total stranger....
Because I don't the strain, flowering time, feminized/regular, Brand-name/bagseed, etc. of the seeds, I don't know if I will hit my 4-20 goal close enough to sacrifice almost-matured budz. Because of this unknown, I've descided to buy a couple Brand seeds in which I know a little about.
Date of Purchase: January 23
The Seeds I picked are from the "Top 3" list I made in the second post. I choose Flower, a very apporiate name for a cultivated plant...
Here's some details the breeder listed on the website I bought from about...
"Flower"
The prices were all in British Pounds, but the 2 seeds I bought were about 9 BP total. There was 3 choices for the shipping, which caused me to a make a hard choice:
The cheapest one was 5 BP ($8 US) but it had a note by the choice that said "(Not Guaranteed)". The second choice said "Guaranteed - Signiture Required" for 12 BP (~$19.40 US). This choice was a little to sketchy for me considering I had to sign it personally. That seemed like evidence the cops could use againist me in court. And then there was the thrid choice: "Guaranteed - No Signature", which to me sounds kinda like a oxymoron. This was my choice, but at a price tag of 15 BP (~$24.20), it was a hard price to pay. And if it got taken by Customs, I would loose all that money I spent on that shipping. But, they said "guaranteed" so hopefully they pack it well, or whatever that money is going into for the shipping.
Its from a UK website, which means its gunna likely take a long time to travel overseas and make it here. I hope it doesn't get confiscated by US Customs.
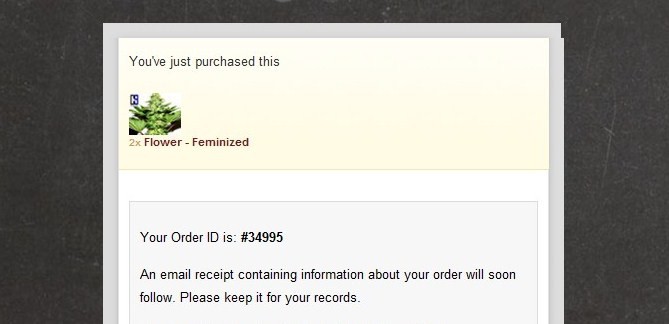
Here's the actual "Order Confirm"

Total price (with shipping): 24 BP (~$35 US)
Hopefully, the shipping doesn't take longer than 2 weeks considering that its coming all the way from the UK. Only time will tell...
In the meantime, I will be working on perfecting the drip system, looking for quality soil AND most importantly, research the best way to germinate seeds.
"I'm on my way..."
~ TrueHerbCrystaL ~
Edited by TrueHerbCrystal (01/24/10 04:57 PM)
|
Triptonic
Registered: 06/13/08
Posts: 15,581
Loc:
|
Re: All CFL Semi-Automated Closet Project (FirstGrow)(Pre-Seeds) [Re: TrueHerbCrystal]
#353400 - 01/26/10 01:40 AM (15 years, 2 months ago) |
|
|
| |
|
|